Those who like to relax in the country have probably wondered whether to buy themselves a hammock. But if you wish, you can make it yourself, and it will not require much effort. A hammock woven from rope using the macrame technique is easy to make, comfortable and reliable. In addition, it is lightweight and compact. All you need is a little time, effort and money for materials, after which a pleasant rest in the shade of country trees is guaranteed.
General description of the design
A hammock chair is a movable element that is suspended from the ceiling or any support. Its design is quite simple and consists of:
- textile base (its quality is durable and wear-resistant fabric);
- crossbars that distribute the load;
- sling _ They are made using strong rope or braided cord;
- suspension _ It can be either rings with a spring or ceiling mounts.
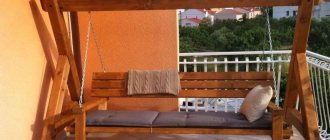
Important : macrame swings are often installed on balconies, loggias, and verandas.
As can be seen from all of the above, a macrame swing is a comfortable and soft hanging structure. It's nice to swing from side to side with them in the garden at the dacha or on the veranda on summer evenings.
Advantages and disadvantages of a hammock chair
The main advantages of a macrame swing hammock include:
- no sharp corners. This allows even small children to use the swing without fear of injury;
- removable soft seat that can be easily washed in a machine - automatic;
- relaxation while swinging. With such designs, stress and fatigue are relieved after a hard day at work;
- large selection of models. Macrame swings can either be purchased ready-made or made independently, using your imagination and personal preferences;
- ease of operation and maintenance;
- safety and naturalness (durable and hypoallergenic fabrics are used when sewing them);
- Possibility of use at any time of the year. In summer, macrame garden swings are hung in the garden under spreading trees, and in winter they can be hung in a house, apartment or on the balcony.
As for the shortcomings, they include only:
- the impossibility of attaching to the ceiling in old houses, since unreliable ceilings may simply not cope with the load;
- problematic when mounted in a room with suspended or suspended ceilings. In this case, part of the ceiling will have to be dismantled in order to hang the swing. Therefore, having decided to install a homemade macrame swing in a house with suspended ceilings, you need to think about their installation at the renovation stage.
Attention: when deciding to purchase a macrame swing for a home where it is not possible to make a high-quality ceiling mount, you should choose models with a support. Their advantages include: mobility, compactness and the ability to be moved to any convenient place.
Varieties of design
There are many types of macrame swings. The most popular include:
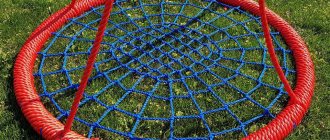
- Swing "Nest" . They differ from each other in size and load capacity. But they all have the same type of design. The base of the product is a metal hoop wrapped in a thick rope. Inside the circle there is a net made of rope. Such a product is suspended on ropes from a support. Thanks to this, you can swing on a swing in a circle on one support point or on two axes. The “Nest” swing will appeal to small children, teenagers and even adults. They are installed in the garden or on the veranda, and are used not only as a swing, but also as a comfortable bed. For weaving the seat, the following are used: rope, rattan, wooden rods, decorative cords. When choosing the macrame technique, the pattern on the product turns out graceful and elegant, formed from dense rope knots. If you wish, you can make a macrame garden swing with your own hands from two hoops. One hoop will act as a seat, the second as a backrest. This option will please you with its convenience and ease of use.
- Chair "Cocoon" . The design features include the fact that its seat and back have the same height, and the streamlined shape of the structure is connected at the top. Such models are available both closed and open. You can completely immerse your feet in them, hiding completely from the outside world. Various materials are used to make your own cocoon. They are most often woven from ropes, rattan, and willow vines. The wicker body of the product using the macrame technique gives them lightness, airiness and elegance.
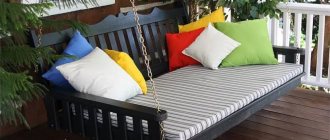
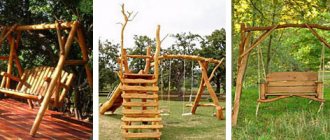
- Hanging chairs - swings . Their shape is formed using the chosen weaving technique. For these purposes, it is best to choose durable rope or rattan (as these materials hold their shape well and for a long time). Swing chairs can have their own support or be suspended from the ceiling or tree on brackets.
Attention : the wicker garden swing “Cocoon” does not cause discomfort due to the open space. They are well blown with fresh air from all sides, and they can clearly see what is happening around them.
How to weave a hanging chair with your own hands?
The work is divided into several stages. The amount of time you have to spend depends on your experience. A beginner may need approximately three hours, while an experienced carpenter can complete it in an hour. However, no one should rush.
Shortening cuttings
It is necessary to measure 80 cm with a tape measure on thick cuttings and mark the end of the segment with a pencil. They do the same with small ones, but the length should be 90 cm. We attach the cuttings one by one to the table with a clamp and saw off the excess area with a grinder (you can use a jigsaw or a hand tool).
Preparation
You need to make holes in two thick cuttings. To do this, use a ruler to measure and mark points at a distance of 5 cm and 10 cm from each end. On the last cutting, only points at a distance of 10 cm from the edges are marked at both ends.
Now the cuttings need to be drilled one by one at these points, using a 16-mm drill, after having secured them with a clamp, or better yet, with clamps to the table. All that remains is to sand the treated areas with files.
Attention! You should be careful with the hole to remove burrs, but not to increase the diameter.
Frame assembly
It's time to make the base of the hammock. Thin cuttings of 1.6 cm are inserted into similar holes along the edges of one of two identical thick cuttings about 2.5 cm. It is better to do this in a circular motion, without haste.
Now on the thick cutting we mark the points directly above the places where the thin ones enter it. Holes are made one by one with a 4 mm drill to a depth of 2.5 cm. Then screws are screwed in there. On the other hand, we thread the thin cuttings into the thick ones and fix them in exactly the same way.
Rope weaving macrame
You will need to cut 16 pieces of 8 m each from a coil of rope. It is better to hang the hammock blank on some kind of crossbar, for example, on a horizontal bar. To do this, take 2 additional pieces of rope, insert each into the free holes on one side of the frame and tie knots large enough for the rope to hold the hammock. We tie the other ends around the same horizontal bar. Now it will be convenient to weave macrame.
We take one piece of rope, bend it in half, and wrap the bend around the top handle in the frame. This is done from the left edge, more precisely, starting from the fastening rope. We thread both ends into the “eye” and the loop is tightened. We do this with all 16 segments. As a result, they should be evenly spaced from one fastening rope to another.
How to knit knots yourself: diagram and step-by-step instructions
Next comes the most intricate part - weaving. The two leftmost loops move towards each other. Now you need to tie a knot of four ropes at a distance of 8 cm from the top of the hammock. This is done as follows:
- The left rope crosses the middle pair on the braider's side.
- Then, the right rope is bent around the left, also from the front.
- The right rope bends around behind the two middle ones and extends in front of the left one.
- There are two ends that need to be pulled, thereby tying the knot tightly.
The next knot with the same four ropes is:
1. The right rope bends in front around the two middle ones. 2. The left one is pulled back and pulled out through the hole between the right and middle ropes. 3. The knot is tightened.
Now you can proceed to the next two loops and do a similar manipulation with them. After all pairs of loops have also been tied, the third and fourth ropes from the first four on the left, and the first and second from the second four, are woven. Do this in the same way, getting two nodes.
Well, then the two extreme ropes on the left and right will be used again. According to the principle of this alternation, all macrame is woven. There should be an equal distance of 8 cm between the nodes. Macrame is woven all the way to the bottom handle of the frame and beyond. You should stop after the length of all this splendor is 115 cm. There should still be long, unbraided ends left.
The four leftmost ropes are thrown over the lower handle from above, in front and tightened with an ordinary knot, which is then reinforced with an ordinary knot on top. The last knot differs from the first only in that it is not made around the handle, but simply in the air.
Advice! To tighten it as close as possible to the first knot, you need to pull two ropes in different directions with each hand.
All other ends of the ropes are also tied to the handle.
The remaining ropes are braided according to the same principle as the main part of the macrame. The only difference is that the first two ropes on the left and right are not used either in the first knot or in the subsequent ones, because a triangular pattern is braided. The remaining ends of the ropes are cut with scissors so that they form a neat shape that fully corresponds to the braided triangle.
Final stage
You need to cut 3.2 m from a thicker rope. The piece is folded in half and a regular knot is tied in this place. The ends of the rope are threaded into the holes of the handle that has not yet been used. This should leave a fairly large triangle of rope. The ends are tied with ordinary knots at the handle.
The braided structure is removed from the horizontal bar and placed on the table, and the fastening ropes are removed. We thread the ends of the second element of the chair into the vacated holes. The ropes are again secured with ordinary knots. They are stretched along the entire hammock and threaded through the holes of the trailing handle and tied as before.
In the additional cutting we drill two more holes, which are located at a distance of 4 cm from the existing pair, closer to the center. The thick rope comes back, re-stretching along the pattern. Its ends are threaded into the holes just made and then secured with a knot. The macrame chair is ready!
Mounting methods
As for the methods of attaching a hammock chair in a country house or indoors, it can be:
- ceiling _ For these purposes, a durable ceiling hook is used, onto which a chain holding the product is attached. With this design it is easy and pleasant to swing from side to side;
- axial _ This option is attached to the ceiling or a strong branch, but there are slings on its sides. On such a product it will not be possible to swing from side to side, but it is easy to rotate around an axis;
- with double suspension in the form of a platform . This option is a strong and stable base, equipped with additional sidewalls. You can easily install a double swing chair on such a mount;
- rod _ Involves the use of a curved stand with a ring stop at the bottom. On top of the rod there is a suspension made of a spring, onto which the swing is attached.
What you need
- two metal hoops of different diameters (for the seat - 70 cm, for the back - 110 cm);
- durable cord of medium thickness - 900 meters;
- slings - 12 meters;
- thick cord - 2 pieces;
- wooden rods - 2 pieces;
- a hook to hang the finished product;
- centimeter;
- scissors;
- gloves.
Joom company