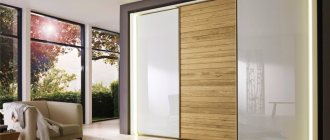
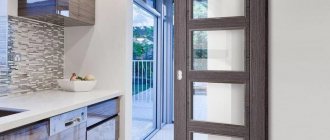
The popularity of sliding wardrobes with sliding doors is due not only to the fashion for minimalism, but also to the development of the production of furniture of this type using various design solutions and materials. Sliding doors can not only be disguised in a high-tech interior that does not allow everyday excesses, but also turned into an elegant piece of furniture, decorated in any of the design styles.
Various door designs allow you to build such cabinets into niches and corners and use almost any finishing materials.
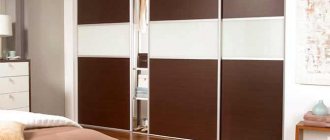
The doors for sliding wardrobes made of chipboard shown in the photo show only part of the wide selection of colors and textures.
Hanging doors
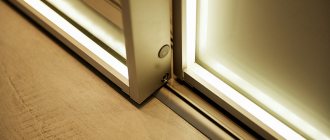
The modern hanging mechanism installed at the top of the door expands the design possibilities. The doors are located in front of the cabinet without a frame, completely covering the frame, which significantly increases the usable space and facilitates decoration.
In addition, restrictions on the width of sliding doors are removed. The latest developments make it possible to use a suspended version for sheets weighed down with mirrors; they can also be equipped with an electric drive for automatic door movement and a remote control system.
The hanging option has a number of advantages, but its use is not always justified. There are a number of parameters for the weight and dimensions of the door that make it difficult to use only the hanging option.
In some cases, it is impossible to do without guides installed at the bottom. The seemingly simple design of sliding doors requires a professional approach to design, assembly and installation, as well as adequately selected service fittings for the doors.
Photo report on the assembly
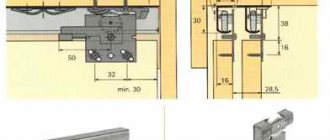
First, all profiles are cut exactly to the calculated dimensions. The accuracy must be perfect. The cut is strictly perpendicular, at 90°. Holes are drilled in the handle profiles for installing rollers and fasteners.
The holes are made through two diameters. The exact size depends on the dimensions of the purchased fastener, but basically there are two sizes: 4 mm and 6 mm, as well as 6 mm and 10 mm.
How to drill holes
One such hole is made at the top, the center of which is located at a distance of 7 mm from the edge of the profile, at the bottom there are two holes - the first at a distance of 7 mm from the edge, the second at a distance of 42 mm from the profile cut.
Holes at the bottom of the side profiles
During assembly, all parts of the filling are assembled first. First, if there is glass or a mirror, sealing rubber is installed around the perimeter. It is simply put on the end of the part by pressing a finger. The seal is cut off along the edges and placed end to end, but without overlapping on the next side.
Seal on the mirror
A protective film is glued to the back of the mirrors. You can use regular self-adhesive. This film will prevent fragments from scattering if the mirror breaks.
If the sash is composite, we assemble it using connecting profiles. The filling parts are simply inserted with force into the profile. Sometimes considerable effort may be required. You can tap the end with the back of your hand or use a rubber mallet for this.
Simply insert the filling parts into the grooves of the profile and tap on the end
When the sash is assembled, the corresponding profiles are installed at the top and bottom using the same principle.
Top profile installed
Then it’s time to install the side handle profiles. Everything is the same: push the filling into the groove, make sure that it fits all the way along the entire length without distortion. When the frame is assembled, it is necessary to tighten it with fasteners. Let's start from the top. Take the fasteners and insert them into the previously drilled hole. If the distance was measured accurately, the screw fits into the groove of the upper cross member.
If drilled correctly
Tighten the connection using a hex wrench. Slightly not tightening it all the way, insert the upper rollers between the screw head and the profile jumper, then tighten the screw.
Insert the upper rollers
We repeat the same operation on the other side. Then we move down. Here the fasteners are installed in the upper hole. Just tighten it all the way. We repeat similarly on the other side.
Install the fasteners from below
Next, install the lower rollers. We insert the thrust plate into the groove and press it.
Installing the lower roller - insert the plate into the profile
We press the spring, tucking the roller body inside. We insert a screw into the hole, trying to get into the socket, and tighten it with a hexagon. You may need it in a different size - slightly smaller than the others - since this screw is usually thinner and longer.
Press the roller, insert the screw
There is no need to tighten it all the way. So that it goes into the plate half a centimeter or so. Then, when installing the door and adjusting its travel, this screw adjusts the position of the sash - the angle is raised or lowered.
Tighten the screw that fixes the roller
If you press the roller wheel, it will go into the housing, then return due to the elasticity of the spring. This simple mechanism ensures smooth movement of the sliding wardrobe door.
Having assembled all the sashes, we proceed to installing the guides. They must be located strictly one below the other, even without deviations of a millimeter. Use a plumb line or a laser level (read how to use a laser level here).
First screw on the top guide. It is attached either to the ceiling or to the top of the cabinet. The distance from the shelves is at least 100 mm, otherwise the doors will touch shelves, things, and hangers.
Screw on the top guide
We insert bumper springs into the grooves in the lower guide from the sides. They will limit the movement of the door. The number of springs is equal to the number of leaves; they are installed at both ends.
Door stoppers Insert travel limiter springs
If you don’t have a laser level, so you don’t have to worry about plumb lines, you can start by simply laying the bottom guide without fixing it yet. Then install one blade, placing its upper rollers at the top and installing the lower ones in the desired groove. This way the doors will connect the upper and lower guides.
Having aligned the sash vertically, automatically align the bottom guide
By aligning the canvas strictly vertically, you will automatically align the lower guide. All that remains is to screw it on. Just be careful that the doors do not move.
The last thing left to do is to glue the Schlegel on the sides. This is a fleecy self-adhesive strip that softens the impact of the sash on the walls of the cabinet (or simply on the walls, if the cabinet is frameless).
The final touch is the Schlegel sticker
Here the wardrobe doors are installed and ready to go. You can watch the process again in the video.
Radius doors
The curved, concave or wavy surface of the wardrobe is not only a tribute to the original design. The absence of sharp corners and the unique ability to close niches and corners are practical benefits when choosing such doors. Placing them in children's rooms will protect the kids, while at the same time opening up new opportunities for thematic design of the room.
Radius doors are more expensive than regular doors, they are most often made to order, and it would be wise to turn to experienced and well-known manufacturers who can also provide replacement parts for a complex sliding mechanism.
How to choose cabinet colors (pro tips)
An important factor when choosing a design is the correct choice of color. The design shade will depend not only on personal preferences, but also on the size of the room, its purpose and style.
In a small room, a product in pastel colors is ideal. Light facades give the room lightness and spaciousness.
Sliding wardrobes in black and graphite colors also look very impressive. However, such colors are often chosen for spacious rooms: even with a glossy finish, dark shades make the room seem smaller.
For those who want to create a bright and extravagant interior image, a model in rich green, red, blue and other contrasting colors is suitable.
Natural wood palettes can be classified as a separate category. Dark or light brown facades add respectability and a touch of luxury. They look great both in modern styles, such as loft or minimalism, and in rustic ones, such as country or Provence.
Folding doors
This is another design that allows you to expand the scope of the sliding wardrobe. Double-leaf doors with a book design and four-leaf doors with an accordion design, similar in design, operate using a hanging mechanism.
Their main advantage is the opening of the entire facade; they are widely used in the design of wardrobes.
Create a drawing
The production of sliding doors for furniture begins with the selection of their sizes. At this stage, you can use ready-made sketches (provided that the dimensions of the room and the design of the cabinet completely match), the calculation results of online calculators, or make the drawings yourself. The initial data are the dimensions of the doorway, the number and method of arrangement of the leaves, the type of the selected system and the width of the guides. Detailing that takes into account the exact dimensions of the components used helps to avoid errors.
The height of the sash, as well as the length of the side profile, are calculated simply: 40–45 mm are subtracted from the height of the cabinet opening (the exact value depends on the type of profile). Several factors are taken into account when calculating width, including:
- The need for a sufficiently tight connection of the sash - when the doors are closed, only one handle should be visible, without overlapping adjacent leaves.
- Correct placement of doors - the doors should not overlap shelves and drawers. With the right approach, the width of the doors is selected taking into account the internal layout of the wardrobe.
- Compliance with the optimal width ratio ranging from ¼ to ½ of the door height. Ignoring this requirement has a negative impact on the stability and reliability of fastening the door leaf.
The optimal sash width is calculated using the formula: (cabinet opening width + number of overlaps × handle profile width): number of doors.
At least 100 mm is allocated for the placement of the sliding system in the depth of the cabinet; the exact value of this parameter depends on the type of guides, the number of sashes and their layout. Special attention is paid to the method of installing the bottom guide; in mortise-type systems, the height of the door leaf is calculated differently; simply subtracting the height of the guides is no longer enough. The same applies to prefabricated structures; the height of their individual elements is calculated minus the dimensions of the connecting profile.
Parameters to measure
size table
Possible options for placing sliding doors
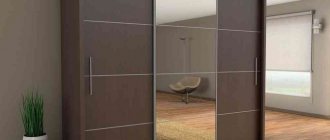
Mirror sliding doors
Traditionally, wardrobes with mirrored doors are used in bedrooms and hallways; they are also becoming part of modern sets for living rooms and offices. Modern technologies make it possible to ensure ease and safety of operation.
A special film is attached to the back of the mirrors to retain fragments in the event of mechanical damage to the doors. Additional parts of sliding mechanisms ensure smooth sliding and locking of doors in the desired position.
Depending on their purpose, mirror doors can convey a high-quality image or serve as a basis for the use of sandblasting, fusing and other technologies, with the use of which the overall design style of the interior is maintained and unique patterns and paintings are created.
It is these new surface treatment techniques that greatly facilitate the care of furniture and expand the scope of use of mirror doors.
Materials for the manufacture of swing doors
Hinged doors are considered the classic, easiest to manufacture option. Ordinary cabinets and bedside tables, as well as some built-in wardrobes, are equipped with such doors. The main advantage of such doors is that they are functional and durable; they, unlike their sliding counterparts, do not contain elements in their design that can quickly wear out.
In most cases, hinged doors are attached to the cabinet body using piano hinges. To assemble such a door, it is enough to cut out a rectangle of the required dimensions from the material, and then sand its ends. After that, all that remains is to install the hinges and handles. Swing doors are made from solid wood, chipboard, MDF, plywood and other materials.
Natural wood
Wooden products are environmentally friendly; they do not emit harmful substances into the environment. Natural resins and essential oils come into the air from wood, which have a pleasant aroma and have a positive effect on the human body.
Wooden furniture is characterized by strength, resistance to mechanical stress and a long service life. The main advantage of wood is its pleasant and status appearance. The wood is easy to process and can be easily milled. For the manufacture of cabinet furniture, pine, spruce, fir, larch, birch, aspen, oak, acacia, linden, cedar, walnut, chestnut, poplar, rowan, maple, beech, ash, apple tree, etc. are most often used.
The main disadvantage of natural wood is its high cost. Therefore, wood is now inferior in popularity to other, more affordable materials. Another disadvantage of wood is its rather heavy weight. For this reason, wooden doors are not installed on lightweight structures (for example, on cabinets made of thin chipboard).
Chipboard, MDF
Chipboard (chipboard) is the most popular material in furniture production, as it has the optimal combination of price and quality. Products made from chipboard are practical, resistant to moisture and have a pleasant appearance.
This material imitates natural wood, giving the interior originality and sophistication. A large selection of shades makes chipboard a universal material. Wood processing and sawmill waste is used to make chipboard; formaldehyde resins are used as a binding material when pressing wood waste. The presence of formaldehyde in the composition of the boards is perhaps the only significant drawback of chipboard.
In the furniture industry, frames and milled facades are made from Medium Density Fiberboard (MDF). This material is made from dried wood fibers. The production technology is based on hot pressing followed by grinding with synthetic binders.
MDF differs from chipboard in its greater environmental friendliness, as well as higher ductility (the material bends well, which makes it possible to make semicircular and bent structures from it). MDF can be milled, so all kinds of designs can be applied to facades made of this material. The main disadvantage of MDF is its relatively high cost.
Veneer, plywood
Cabinet doors made of veneer are practically no different in appearance from wood, since veneer is a thin sheet material that is made from natural wood by planing or peeling. This material is used as a cladding for chipboard or MDF panels. The main disadvantage of veneer, which is an organic material, is the need to handle it carefully.
Plywood is one of the materials most in demand and widely used in furniture production. Plywood is wear-resistant, it does not rot or warp, and is resistant to moisture, high temperature, and sunlight. It is resistant to chemicals, detergents, and various types of contaminants. Plywood furniture is practical and easy to move due to its light weight.
Plywood owes its excellent characteristics to a special manufacturing method: a plywood sheet consists of thin layers of wood (veneers) glued together. The number of sheets is always odd, which allows you to maintain symmetry with respect to the central sheet. This symmetry ensures the strength of the product, its resistance to loads and a long period of operation. In each layer of plywood sheet, the wood fibers are directed perpendicular to the adjacent layer, which increases the material’s resistance to bending and twisting.
To make furniture that is used outdoors (for example, for a cabinet installed in a country house or an unglazed balcony), you can use moisture-resistant plywood. Layers of such material are connected to each other using moisture-resistant glue.
Photo printing on wardrobes
The smooth surface of sliding doors makes it possible to use photo printing on them using large-format printers. Another new product on the market is direct printing on chipboard.
At the same time, you can use ready-made designs from designers, photo wallpapers, or make an individual order, selecting reproductions of world masterpieces, posters, professional photographs to suit your taste. Even photographs from your personal archive can become the basis for the design of furniture with sliding doors.
Methods of decorative finishing of furniture boards
To improve the performance characteristics of the above materials, special coatings can be applied to them. The most popular method of processing furniture boards is lamination. It consists of covering the material with special films made of paper and impregnated with melamine resins under high pressure and at high temperature.
Laminate is resistant to chemicals and scratches. In addition, it is aesthetically pleasing. Now there are a large number of colors and shades of this material on the market. Another way to process furniture boards is lamination. It involves covering the material with paper-resin or polymer film, followed by applying varnish or paint. The film is applied to the slab using glue.
Built-in wardrobes
It is not always convenient to equip the facade of cabinets built into niches and corners with compartment doors.
Moreover, traditional sliding doors still have one important advantage - this mechanism ensures the longest trouble-free operation and easy replacement of parts when repairing.
The possibility of using such doors is significantly expanded due to high-quality and inexpensive custom assembly. Perforated or slatted doors will provide adequate ventilation.
Doors made of wooden slats will create coziness in eco style. Transparent glass cabinet fronts combined with wood may suit vintage lovers.
Glass also allows you to apply painting and painting with stained glass and acrylic paints. Different types of stops, fasteners and handles can ensure practicality and long-term use.
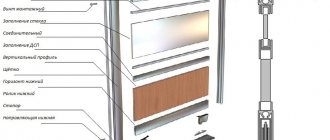
Sash design
The wardrobe door leaf consists of profiles:
- lower;
The lower profile has deeper sidewalls - upper;
Upper profile for sliding door leaf - handle profile;
The handle can stand on both sides - intermediate.
These profiles are placed between parts of the door leaf, but you can do without them - if the door is solid and not composite
All this together looks like in the photo. The door material you choose is inserted into this frame, into the grooves. It can be glass, mirror, chipboard and other materials.
Sash design without filling
Separating profiles are optional. They are needed if you assemble the sashes from different materials or you simply like them this way better. The maximum thickness of the filling material is 10 mm, the minimum is 4 mm. Thinner ones - glass, plastic, mirror - are inserted through a sealing gasket.
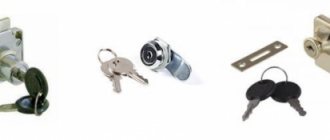
In order for the sash to be able to move, rollers are installed on it - at the top and bottom. The lower rollers bear the entire weight of the door, and the upper rollers stabilize the vertical position of the leaf, preventing it from deviating.
Rollers for wardrobe doors
The rollers are attached to the side profiles using special fasteners.