Books, in any form, will always be in fashion, as well as bookshelves for them. But homemade book stands can add variety to even the most dull interior.
A modern book holder can be of any shape.
Often it reflects the interests of the owner of the house, his passion for a certain topic or genre, and commitment to a certain style.
The main purpose of this simple device is to preserve good vision in children, since a vertically placed book does not strain the pupil, preventing changes in the structure of the eye lens. Also, modern design solutions are focused on minimalism and comfort, and a book stand in this case is indispensable, because it frees up space at the desk.
The shape of the book holder depends only on the imagination and interests of the owner.
This is not only a convenient device, but also a magnificent interior detail.
In order for an elegant accessory to decorate your home, just a few hours of free time, imagination (and the World Wide Web will help you get interesting ideas), patience and perseverance. A book stand can be made without any special material costs, because the material can be used: toothbrushes, cardboard boxes or wooden planks, children's toys, plaster or plywood and even wallpaper left over after renovation.
Even the most unnecessary things will help turn an amazing idea into reality.
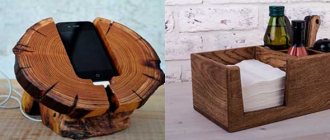
Wooden stand
The classic material for creating a stand is wood. At the same time, you can use either wooden planks, a wooden block or a log. In this case, an indispensable auxiliary tool will be sandpaper or a sanding machine, which eliminates flaws in the wood and gives it an aesthetic appearance.
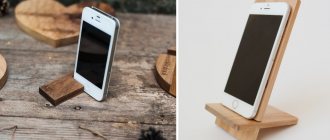
This stand can be made from boards or plywood.
You can also make a wooden book stand with your own hands, “breathing new life” into an old kitchen board. It is enough to attach a book holder to the front and a holding bar to the back. The material can be decorated with decorative paint of one or several tones (for example, like the popular ombre). The finished product must be thoroughly dried.
It is suitable for reading books, as well as for tablets and other electronic devices.
Important! There is no rush in carpentry work, so think carefully about how the finished product will look. It would be good to make a layout and take all the necessary measurements, and only then start processing the parts.
It is very convenient to use a stand in the kitchen for a recipe book.
Plywood can be an excellent substitute for wood when making book stands. To do this you need:
- cut a sheet of plywood into 5 parts: 20x1x2 cm - 2 pcs.; 18x3x2 cm – 1 piece; 20x5x2 cm – 1 piece; 34.5x20x2 cm - 1 piece;
- then cut grooves for the legs in the largest board;
- in the place of the cut grooves, glue the front parts of the workpiece in the center;
- put a press on the glued parts and dry;
- Next, you should glue the legs and also dry them under pressure.
If desired, you can decorate the stand by carving or burning wood, paint it, or varnish it.
Additional Information. Parts can be dried one at a time if there is no special vice. For this you can use any weighting material.
Methods for attaching shelves
In this case, it means fastening mainly wall shelves and some corner structures.
Most often, the fastening method is standard: metal plates with holes are installed in the back of the shelf.
Let's look at this whole process step by step. Holes are drilled in the wall according to the markings, dowels are driven in and screws are tightened. Then you just have to hang the shelves and you're done.
Floor shelves, as a rule, do not require any fastening. True, there are also suspended structures. They are attached to the ceiling or ceiling beams using ropes or metal chains. Sometimes - against the wall.
Today, when making a wall shelf with your own hands, the so-called hidden fastening method is often used.
For example, you can make a metal frame of suitable size from a profile pipe, which is then attached to the wall. After this, the shelf itself is assembled from boards, chipboard or plywood, in the form of a box.
The shelf simply “slides” onto the frame, and it won’t go anywhere. You can read more about this method of fastening in our article.
A similar method of fastening can be done without using a metal frame. In this case, a plank with wooden dowels is attached to the wall. First we make the shelf itself.
You need to drill the appropriate holes in the shelf. It is simply put on the dowels. However, this design is not designed for heavy loads.
This is important to understand. Read about this mounting method on the website
There is another option that is useful when installing a shelf in a niche. Grooves are selected on the sides of the wooden shelf to the required depth, and metal guides are attached to the walls inside the niche itself.
Then the shelf is simply “slipped” onto these guides, and thus securely fastened. This is how easy it is to make home furniture with your own hands.
If you are interested in this method of fastening, you will find all the detailed information with step-by-step stages of work, including a photo and video review, in the article.
Cardboard stand
If you are wondering how to make a paper bookend, use cardboard.
You can also make such a stand from corrugated cardboard.
- Cut out 2 identical rectangles, each 35x42 cm in size. Bend them 14 cm on the long side and glue them into one piece.
- Cut out 2 more rectangles measuring 5x14 cm and also glue them together.
- Glue the small and large triangles together as follows: glue one end to the smaller part of the folded rectangle at the edge, and the other to approximately the middle of the larger part. Carefully lubricate the joints with hot-melt adhesive.
- Cut out the piece 29.5x10 cm and fold it in half.
- Cut a rectangle 2 times smaller in width than the previous one. Glue the parts from steps 4 and 5 to form a triangular cylinder.
- Glue the cylinder to the large blank from below.
- Cover the workpiece with newspapers and napkins, paint and varnish.
Very light, compact. It can also be made from plywood.
Peculiarities
Furniture and equipment for the library have the following features:
- They must preserve books, newspapers and magazines for a long time. That is why the interior items in the library are made from modern high-quality materials. This prevents the appearance of fungi and insect pests that affect the condition of books during long-term storage;
- Systematization of books, disks, audio cassettes, video cassettes. Library furniture is quite spacious, it allows you to freely place publications. They are arranged in alphabetical order, according to thematic principle, which makes it easier to find the necessary book, thereby extending its service life. Models equipped with wheels help you quickly find the publication you need. These include rotating display cases;
- Demonstration of books, CDs, audio and video cassettes. Furniture can be open access or equipped with glass doors. This allows you to demonstrate new products and exhibition items.
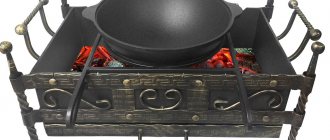
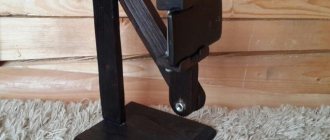
Ironwork
You can forge a real work of art from iron. But how to make a book stand out of iron if you are not a blacksmith? - using wire. The flexibility of the material can give it any desired shape. For a book accessory you will need a wire with a diameter of 4-5 mm, 4 pins with a diameter of 1.5 mm.
It’s not difficult to make an elegant interior book support; you just need to have imagination and some craft-making skills.
For such creativity, all kinds of, but at the same time, affordable household items will be useful.
Sawing parts
There are many rules for cutting, but you need to stick to the most common ones. First of all, you need to cut out the internal parts, only then according to the external pattern. There is no need to rush when cutting. The main thing is to always keep the jigsaw straight at a 90-degree angle when cutting. Cut out the parts along the lines you accurately marked. The movements of the jigsaw should always be smooth up and down. Also, do not forget to monitor your posture. Try to avoid bevels and unevenness. If you go off the line while cutting, don't worry. Such bevels and irregularities can be removed using flat files or “coarse-grained” sandpaper.
Plaster stand
No less attractive for designers are handmade book holders. To realize the most intricate ideas, you can use gypsum.
Book holders in the shape of plaster hands will fit into a variety of interiors.
Prepare a mixture of plaster and water.
Important! In this matter, you need an assistant, because it is better to hold the form horizontally rather than vertically.
Such a magnificent designer item can be made from plaster, for example, imprinting your hand, foot or any object. First of all, you need to stir the alginate to a dough-like state. As a form, you can use a regular box sealed with adhesive tape.
To find out the amount of mixture required, pour water into the glove.
Make a hole in the box for the hand and first pour out part of the alginate to the level of the hand, and after a minute the remaining mass. After about ten minutes the arm simply extends. Fill the resulting hole with plaster. Leave to dry overnight. Then cut out the alginate and take out the plaster arm. Cover with paint and glue to a wooden board. Instead of a hand, you can use any other shapes, for example, like the elephant in the photo.
Plaster book stand in the shape of an elephant.
Additional Information. The remaining small lumps and bubbles in the alginate liquid do not affect the result.
A little history
With the advent of the first books, the need arose for special devices to accommodate them. After all, the printed materials, bound in leather, were thick and heavy. It was not easy to hold such a book in your hands while reading. Music stands appeared.
In eastern countries, book holders emphasized the status of their owners. They were decorated in various ways and looked like works of art. In Europe, they treated stands much more simply. These were inclined boards or special prisms. Such differences were associated with reading methods: in the East they read while sitting on a carpet, and European residents did it while sitting or standing.
Modern stands decorate the interior and allow optimal use of the surrounding space. The design of the stationery accessory allows a person to choose a convenient angle of inclination. There are stationary bookends and folding ones. Schoolchildren and students take the latter option with them to classes. They should fit into a briefcase or backpack. Now there are even models that can be mounted on a computer monitor.
When choosing the right item, you should take into account the recommendations of doctors. Children should not sit at the table in an awkward position: poor posture can cause back pain, and problems with the spine in the cervical-collar area arise. Ophthalmologists also set their own requirements: book holders provide the correct angle of inclination and the right distance, making the eyes less tired when reading. In addition, the stand helps to optimally organize the workspace, which increases the efficiency of classes.
When writing essays, term papers and dissertations, you often have to turn to printed publications, and this requires devices for holding literature. They speed up the work and make the process easier. In some cases, coasters come in handy in the kitchen. Experienced housewives place cookbooks or their recipes written in notebooks on them.
From other materials
You can also make a book holder from stone yourself. In the simplest case, you will need two massive stones, spray paint, and cork adhesive pads so that the stones do not scratch the surface and move easily. The stones must be painted, for example, in fashionable gold or silver colors. Glue cork pads to the dried stones.
Making stone book supports is even easier: just find a suitable cobblestone on the street, cover it with paint and varnish.
A holder made in this way can take on any appearance depending on the author’s imagination.
To make a book holder out of concrete on a shelf with your own hands, first of all, you need to oil the mold. Next, knead the concrete until it forms a dough. Fill the molds with concrete and leave to dry overnight. Separate the seized parts from the molds by tapping them with a brick or hammer. Sand the bottom of the future stand. At the end of the form, paint it or leave it as is.
Once the paint has dried, the endpapers are finally ready to hold the books.
Additional information: to get rid of bubbles, you need to tap the container with concrete and shake it.
Minimalist, durable tree branch holder design. A nice addition to a row of titles on a shelf.
Antique-looking owls are massive and detailed.
If the classic options are boring, then the following will help answer the question of how to make a creative book stand with your own hands:
- Handsets of old wired telephones;
- Kids toys;
- Pillows of different shapes.
Such a soft pillow stand would be perfect for a child's room.
You can also cut a toy animal, such as a giraffe, horizontally. Glue the back part to the left holder, and the front part to the right one.
A witty holder in the shape of a dachshund is another find for extraordinary people or a gift option.
Good luck in your creative pursuits!
The animal book holders covered with sheep's wool turned out to be soft and textured.
How to make a book shelf with your own hands
Furniture manufacturers offer a fairly large assortment of bookshelves, racks and cabinets of various designs and prices. You can buy shelves for books, or you can make them yourself, which is not at all difficult. To make a bookcase, cabinet or shelf yourself, all you need to do is draw up a project, buy the material, have the necessary tools and minimal experience working with it.
The simplest shelf you can make yourself
So, in order to make a bookshelf with your own hands, you may need the following materials:
- laminated chipboard or MDF;
- wood or plywood;
- plastic;
- glass;
- metal.
Related article:
Laminated chipboard is the most common material for making bookshelves
You can use one of these materials or combine them, which will create quite original shelves for books. As for tools and components, you will definitely need:
- tape measure and ruler;
- electric drill and screwdriver;
- Screwdriver Set;
- nozzles for tightening fasteners;
- stainless steel furniture pipe with Æ16 or 32 mm;
- confirmations;
- screws 16×3.5, 20×3.5, 30×3.5 and 50×3.5 mm;
- edge;
- iron or hair dryer;
- PVA glue.
Necessary tools for making furniture
We make our own bookshelf from wood or chipboard
In order to make any furniture, you first need to create a sketch and drawing. We have already written about how to do this using the PRO100 program on the pages of our online magazine in the article “How to make a wardrobe with your own hands.” If it is not possible to use the program, then the drawing can be made on a regular notebook sheet in a box, where each cell will indicate 10 mm. We will show you how to make a designer book shelf using the PRO100 program as an example. As already mentioned, a designer item is something that is made in very limited quantities.
Photo Description of work
First, let's model our rack. This visualization will help you imagine how the finished shelf will look in the interior.
For ease of work, you can divide the sketch into separate parts. At this stage, you can already accurately determine the dimensions, which means choosing the right raw materials and accessories for assembling the shelf.
The sketch shows the basic fastening points
Connecting using cokes (cylindrical wooden pegs) is the most difficult option, since additional devices and maximum care and attention are required. In principle, the same can be said about rafixes and minifixes
Assembly diagram on minifixes
This method is difficult for a novice furniture maker, since it is necessary to make very precise markings of the joints of two parts. However, the advantages of this type of fastening are that, if necessary, the shelf can be disassembled and assembled many times, and the structure will not become loose over time. In addition, the peculiarity of this fastener allows you to make the connection point invisible from the outside, which cannot be said about confirmations.
Assembly diagram using minifix and additional reinforcement with cokes. On narrow parts, when there is only one fastener on each side, additional fastening is needed, which will be provided by wooden pegs (cokes), completely hidden.
Beginners can master this simplified version of the shelf. And if you have carpentry experience, if you have the material, tools, imagination and desire, you can make the most unusual shelves for books on the wall.
The cost of homemade structures is much cheaper than purchased ones, and you also get the pleasure of knowing that they are made by yourself and are unique.
Related article:
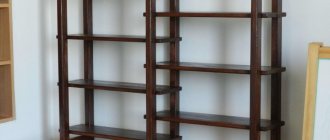
DIY book shelving
Using the same principle as described above, you can make bookshelves. The difference lies only in the dimensions of the structures. Shelving can be made in almost any size and used as partitions, as well as for zoning space in studio apartments. Such book storage systems can be made of wood, chipboard, metal, and even scrap materials (pipes, pallets or logs).
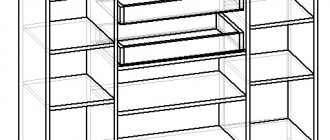
Detailing of the rackThe joints of the parts are marked in red
1 of 4
Watch this video on YouTube