The characteristics of wood allow it to be used not only during construction, but also for the manufacture of all kinds of useful little things. You can make everything from wood - from cabinet furniture to a children's toy or key ring. Among all kinds of crafts, wooden stands stand out. They are easy to make and functional. Made with high quality, they will decorate a stylish interior.
Wooden stand
A wooden stand has many advantages:
- It is durable and multifunctional.
- This home attribute will fit well into any interior.
- Wood blanks are easier to process.
- Low material cost.
Before starting work, get yourself a hand jigsaw so that delicate work looks neater.
For books
A book stand will provide you with ease of reading, provide aesthetic pleasure and help reduce eye fatigue.
So, the main task of the stand is support. Don't forget this. Let's look at the process of its manufacture (according to the diagram provided):
- Cut out the necessary parts from wood according to the diagram using a band saw.
- Sand each piece to avoid unevenness.
- Drill the required holes in the parts (where available) and connect them to each other.
- The original and unique stand is ready. Enjoy reading!
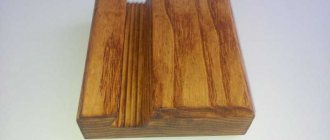
For hot drinks
A wooden hot stand is one of the simplest products that even a beginner in this business can make. You just need to take a piece of wood of the thickness and diameter you need, process it and coat it with varnish (this will give it a presentable look).
In order to make a stand of a more complex design, you just need to cut out strange figures (for example, leaves) from the sawn wood and glue them together.
Here are some photos of wooden coaster ideas for your inspiration.
Why do you need a hot pad?
When hot tea is brewed and a mug of this drink is placed on the table, many notice the traces that remain after this. They are difficult to remove, sometimes almost impossible. This problem is especially relevant when a thin oilcloth, susceptible to high temperatures, is laid on the surface. Putting a cup of hot tea on a special surface is much more practical than purchasing a new film for the table. Plywood stands in this case are the best option.
A plywood stand will protect the furniture covering from marks.
Cardboard stand
Almost every family has cardboard. This is a budget-friendly and easy-to-use material. That is why making a stand from it will not be difficult.
It is suitable as a holder for a tablet, phone or even a photo.
Manufacturing process:
- Fold the cardboard into two parts and cut out a strip of 10 by 10 cm.
- Also cut out a 15 x 15 cm square.
- Fold the strip in half and glue it into a triangle onto the square.
- The stand is ready!
This product can be taken with you to school or work as a book holder.
You can also look at the photos below and take them as an idea.
What you need for work
An alternative to purchasing a special stand for a gadget is to make it yourself. Before starting work, you need to find out what type of stand will be made. The list of materials needed for the work depends on this.
| Type of material | Description, features |
| Cardboard | You can use cardboard to make a mobile, portable stand that can be placed on a table or other hard surface. In addition, using a cardboard sheet, you can construct a roller device that is easy to use when working on the road |
| Tree | Stands-tables or trays are made from wooden boards, which are installed next to the bed or sofa, and are also used as portable devices for installation on the table |
Wood and cardboard are traditional materials used to construct the stand. In addition to them, you can use plastic and other suitable materials that hold their shape well.
When designing a stand as an overlay for a table, it is possible to create a hollow space between the flat surface and the table top of the stand. This space is suitable for storing flash cards, mice, stationery, and smartphones.
To work, you will need auxiliary tools, with the help of which the structures are given shape and improve the declared functionality:
- sharp stationery knife;
- scissors;
- insulating tape, construction tape;
- construction tools: screwdrivers, construction stapler, jigsaw, drill, soldering iron and others;
- fastening devices: brackets, screws.
If we are talking about constructing a full-fledged stand with a fan, then to create it you will need a mini-computer fan, a plug, a cable, and batteries. As an adapter, it is recommended to use switches from lamps that have a simple design. As a device for receiving electric current, the best option is to use a power supply from an old phone or router.
The design with a fan is preferable to the usual device, which is made to create an angle of inclination that allows cooling the processor. The fan is able to quickly cool an overheated device when turned on in a directed manner. When the fan is constantly running, the lower part of the case does not have time to heat up.
Reference! It is recommended to sew the fan into the tabletop or place it on the left side of the laptop.
Photo stand
Tired of framed photos? Do you want to diversify your interior? Then make a photo stand using our step-by-step instructions.
Manufacturing process:
You will need:
- Hot glue gun
- Wooden clothespins (preferably small)
- Wooden blocks (15 by 15 cm)
- Wood varnish
Preparation method:
- Sand the wooden blocks and coat them with varnish.
- Glue clothespins to the back of the block. They will be a photo holder.
- The product is ready!
If desired, you can paint the bars with paint.
Support for flowers
To add beauty to the design of a country mansion or cottage, you will need to know how to make a flower stand with your own hands. In large rooms, a volumetric structure decorated with floral plants will look great.
Manufacturing process:
You will need:
- Saw
- Drill
- Wooden plank
- Varnish
- Decor
- Roulette
- Pencil
Preparation method:
- Saw off the necessary parts.
- Drill holes and connect the parts together.
- Apply varnish.
- Decorate the stand with decor.
- The product is ready.
Knife stand manufacturing technology
Manufacturing technology will depend on the chosen model. Three types of models are most popular.
The best thing is that you can easily make a knife stand with your own hands.
- Container with filler. The knife is inserted into the material, which securely fixes it in an upright position. Such filler can be cereals, legumes, bamboo sticks, or plastic bristles. For the container, you can take any container that fits in size.
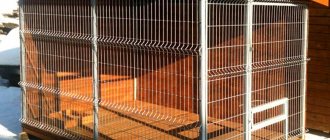
- Wooden support with slots for knives. The design has special rectangular slots for the size of each knife. There are several options for this design: one is hanging on the wall, and the second is on legs or a base that is placed on the work surface.
- Magnetic surface. A wooden or plastic panel with a built-in magnet is attached to the wall.
The knife is magnetic to the panel and fits tightly to it.
Notebook Stand
Manufacturing process:
You will need:
- Three tablets
- Drill
- Pencil
Preparation method:
- Saw two planks. They will go on the legs of the stand. Don't forget about wood processing.
- Punch square vent holes in the wider board.
- Drill similar holes in other boards as well.
- Fasten the parts to each other.
- The product is ready!
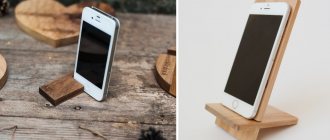
What you need to make a wooden phone holder
The main element is the basis of the future stand. Any board or piece of wood of suitable thickness will do. A long structure will take up too much space, but it should be enough to give the model stability.
The lack of length is compensated by the thickness of the base - this will make the stand more stable
You need to select a workpiece based on your phone model. The groove for long smartphones will have to be made deep, with a slope. Before starting work, you should make a small cutout and install the device into it, expanding it to the required size. A right angle is also acceptable, but working with the device will be less convenient.
The minimum kit for preparing to create a stand includes:
- The basis. Wide beam of required thickness. There is no particular difference in the choice of wood, but some varieties are more difficult to process.
- Tool. A wood hacksaw, ideally a router, to create a recess. Sandpaper and files will help give the stand a nice appearance.
- Marking supplies - pencil, marker, ruler.
- Additional materials for creating complex and unusual models. Varnishes, paints, glue, decorative elements.
A simple design can be created using ready-made diagrams.
Hanging stands
Hanging stand manufacturing process:
You will need:
- Drill
- Shelves
- Rope
Preparation method:
- Treat the shelves if necessary. Drill two holes in them on all sides.
- Pass the rope through the holes and secure with knots.
- Hang it on a nail.
- The product is ready.
Consider the diameter of the rope and holes.
Manufacturing process of hanging knife stand:
You will need:
- Lining
- Saw
- Plane
- Emery
- PVA
- Water based varnish
Preparation method:
- We unravel one of the two boards lengthwise - we get 2 narrow ones. We choose the one with a nicer wood pattern - it will be the face. In another, we make grooves on the router - nests for knives. We select according to the width of the blade.
- Glue the parts together.
- Once dry, sand the stand.
- Cover with varnish, you can cut out a design on the product.
- Hang it on the wall.
- The product is ready.
A stand is a necessary item in every home. It is used for storing jewelry, placing flowers in summer cottages or country mansions, and much more.
Depending on preferences and requirements, everyone chooses for themselves what shape the stand will be. Therefore, it is important to know how to make a stand with your own hands.
We hope that you have created unique coasters thanks to our instructions and photo ideas. Happy work!
The basis
In order to make beautiful coasters for dishes, you need to choose a relatively flat log (bends can complicate the work). Saw off several cross sections so that it is as straight as possible.
Cartoon about Hansel and Gretel from Wizart Animation studio is released
The most budget-friendly travel destinations in Russia in April have become known
Russian tourists spent 1 billion rubles on cashback tours in just 4 days
If you have special tools for sawing, this will be just great (for example, a circular saw). If you don't have power tools, you can use a regular saw. This will be especially convenient if you plan to make stands of small diameter (large circles will be difficult to saw off). When the blanks are ready, you need to sand them thoroughly using sandpaper. The surface must be level, otherwise your dishes will not hold steady. The bark on the outer circle shouldn't bother you either. It needs to be carefully cleaned and made as attractive as possible (beautiful and durable). To prevent it from crumbling during use, remove the loose fibers that adhere to it.