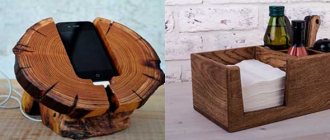
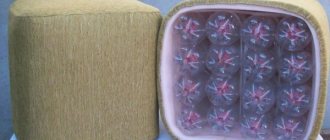
How to make an ottoman from chipboard with a lid?
A cube-shaped pouf with your own hands can be placed in the living room or nursery.
The photo shows a bright opening ottoman made of chipboard, which acts as a seat and storage place for various small items.
Materials and tools
To work we need:
- Chipboard sheet.
- Wooden blocks (4 pieces) 4x4x37 cm.
- Piano loop.
- Furniture swivel casters.
- Thick foam rubber 40x40x10 cm.
- Sintepon 45x160 cm.
- Strong fabric material for upholstering the base 55x165 cm.
- Cover material 65x65 cm.
- Electric jigsaw.
- Screwdriver.
- Furniture stapler.
- Self-tapping screws.
- Universal and wood glue.
Instructions
Let's get started:
- We cut out the blanks according to the following dimensions: the front and back walls are 40x37 cm, two side walls are 37x37 cm, the bottom of the base is 40x40 cm. We assemble the cube using 4x4 cm bars using glue.
- When the glue dries, we additionally reinforce the bars with self-tapping screws. This will make the foundation stronger. Use the same method to fix the lower part.
- We wrap the side walls with padding polyester, securing them with a stapler. At one of the corners we attach the upholstery fabric with an overlap, tucking the cut inward and leaving an allowance of about 2 cm. We bend the allowances inside and to the bottom of the pouffe using a stapler.
- We glue the square of foam rubber onto the lid blank using glue.
- We wrap the lid with fabric, folding the edges and securing it with a stapler from below.
- Using self-tapping screws, we fix the lid to the wall with a hinge. We attach wheels to the bottom of the finished product. Your DIY ottoman is ready!
You can watch a detailed video about making a rectangular ottoman yourself here:
Traditional and unusual types of poufs
After updating the stylistic solution in the interior, one is often surprised by how the ottoman is made with one’s own hands. Today, the trend is squares and ovals of large crochet and knitting, rugs and blankets made of mega-yarn on thick knitting needles. This is an easy way to update your interior and give it a modern feel.
Ottomans are not just light, movable seats. Although mobility is the main advantage of small-form furniture, what is more important is how they are used.
A pouf-banquette usually has a large seat width with a round or oval shape. Sometimes they have small legs on casters - this is very convenient for moving. These products have dual functionality.
By placing a glass or acrylic tabletop on top, you can get a comfortable coffee table.
Practical options for using poufs:
- Mini-chair with a small back;
- Module for the hallway with a folding “seat” for storing shoes;
- Closed shoe shelf with soft seat;
- “Pill-pillow” for a children’s room;
- “Transformer-upside-down”, combining a coffee table and an additional seat;
- A banquette in the bedroom, where it is convenient to leave a bathrobe before going to bed;
- A rest for tired feet near a sofa or chair;
- A mobile “safe” or ottoman with a lid on rollers with a thermal bag inside where chilled beer is stored (for fans of sports channels);
- Folding “cube” of 6 guest stools on metal legs, as in the photo.
Classification according to the method of manufacturing the upholstery - textile (with or without filling) or knitted poufs.
Frame-type furniture can be made of wood materials (plywood, chipboard, bars and boards) or metal.
The shape also varies, but the main difference between homemade frame ottomans remains the presence of a folding seat. In shape it is most often a “blind” cube (without a lid), a parallelogram (less often) or a low cylinder.
There are also frameless poufs:
- With inflatable base;
- Hollow inside (on an elastic basis, from “bald” rubber and empty plastic buckets);
- Frameless bean bags (loose filling).
The aesthetics of a pouf depends mainly on the upholstery. There is a variety with an open frame - this is a budget option. Such poufs have visible parts from old benches or stools.
I also divide homemade ottomans into mobile and stationary types. The low weight of knitted items allows even aunts to carry them to any place. But it is more convenient to equip seats on a wooden frame with casters, which are sold in any construction supermarket.
Among the inexpensive varieties, we can separately designate an improvised seat made from a cable spool, to which a soft “seat” is attached. The base can be hidden under a cover or the stand and support can be left open. They are less stable, but this is the most affordable do-it-yourself ottoman.
Cardboard pouf
An unusual, but stylish and budget-friendly ottoman made from recycled materials is suitable for a summer house, as well as for an informal interior, such as a loft.
The photo shows an ottoman, which can be easily made without drawings from ordinary cardboard packaging.
Materials and tools
To create a pouf with your own hands you will need:
- Carton boxes.
- Flat pillow.
- 6 m of strong braid, about 40 cm wide.
- 6 connecting rings.
- Roulette.
- Cutter.
- Scissors.
- Threads with a needle.
Instructions
Let's start making:
- Based on the area of the pillow, we determine the dimensions of the base (for example, 40x40 cm).
- Stack all the boxes until you get a base of the desired height. You can help yourself with a cutter, pressing the cardboard along the fold line, but without cutting.
- Cut the braid into 3 equal parts. We take one strip, thread 2 rings, sew up the edge.
- We do the same with the other two strips.
- Under the cardboards stacked on top of each other we thread 2 belts parallel to each other. We tighten the structure with straps and secure it to the side. We also fix the third belt on the narrow side. We put a pillow on top. The eco-friendly pouf is ready!
Manufacturing instructions
The main thing is to immediately decide on the frame and choose the fabric for the pouf. Its wear resistance and durability depend on these materials. Additionally, you need to prepare scissors, glue and other tools. For a frameless pouf you will need a sewing machine.
From polyethylene bottles
An ottoman made from scrap materials can be of any height.
You can leave them on the balcony or in the refrigerator overnight, and then place them near a hot radiator. The air inside will expand, and the bottles will become perfectly smooth and strong. The procedure for making a pouf is as follows.
- Prepare 14 bottles of the same size in advance. Wrap them tightly with tape or twine to form a cylinder.
- Trace the bottom part of the workpiece and make a pattern, cut two circles of the required size from plywood. Glue the fabric onto one, this will be the bottom of the product.
- Secure the plywood to the bottles with double-sided tape. Make notches on the disks for twine and additionally wrap the structure with it.
- Cut a rectangle out of thin foam rubber to wrap around a cylinder of bottles.
- Sew foam rubber onto the blank. You can use strong threads and an awl.
- Cut a round blank for the seat from thicker foam rubber. The size must match the top of the product.
- Make a fabric cover for the pouf and put it on the product.
Frameless with balls
In a simple version, you can use a large pillowcase as a cover.
There should be two types of fabric, for the inner cover and the outer one. The procedure is as follows.
- Make a pattern on paper. Three elements can be made: sides and bottom. Another option is petals and the lower part.
- Cut out the required elements from two types of fabric.
- Sew all the fragments of the inner cover, insert the snake. Do the same with the decorative part.
- Insert one bag into the other so that the zippers match.
- Pour the required amount of filler inside.
- Fasten the covers and give the pouf the desired shape.
From a plastic bucket
This choice of material for the base greatly simplifies the task of making a frame pouffe. You should prepare a bucket without a handle, padding polyester, rope, glue, buttons, lace and fabric in advance. Let's give the procedure.
- Divide the rope into 2 parts. Twist the first one into a spiral and paint it white. For this purpose, it is better to use a can of paint that dries quickly.
- Wrap unpainted rope around the entire bucket. The base must be lubricated with glue.
- Wind the white cord approximately in the middle of the bucket to create a prominent stripe.
- Cut a circle from the fabric to the size of the bottom of the frame and a rectangle of a suitable size. Sew the bag and put it in a bucket.
- Hide the edges of the bag under the lace.
- Cut out a lid for the pouf from cardboard. Place the padding polyester on top and cover with a cloth so that it protrudes by 7-10 cm.
- Fold the edges and glue them to the inside of the pouf lid.
- Sew a button on the front side of the fabric for additional fixation.
- Glue the soft part onto the lid.
- The edging can be decorated using rope.
How to make a pouf with your own hands, see below.
How to sew a soft round pouf?
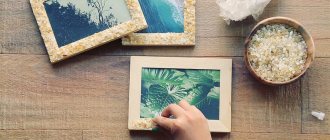
An original patchwork ottoman will add even more warmth and comfort to your home. It is made from leftover fabric that everyone has.
The photo shows a DIY patchwork style ottoman.
Consumables
To sew such a pouf, you will need:
- Scraps of multi-colored fabrics.
- Fabric for the back of the ottoman.
- Rope.
- Filler.
- Button.
- Pins
- Scissors
- Ruler and pencil.
- Sewing machine.
Step by step guide
Let's get started:
- Cut out identical rectangles measuring 5x30 cm.
- Divide the rectangles into triangles: draw a line diagonally from one corner to the other and cut.
- We lay out the resulting triangles, alternating them by color and pattern. We sew on a machine until we get a circle of scraps.
- We cut out a circle of the same size from a single piece of fabric - this will be the back of the pouf. We hide the rope inside the pillowcase, secure it with pins and machine connect the fabric as close to the rope as possible.
- Leave a small hole to turn the workpiece inside out.
- We sew the edges of the rope and hide them with a hidden seam.
- We stuff the ottoman tightly with filling and fix the decorative button in the middle, stitching it right through.
- The pouf is ready with your own hands:
Style and design
To give the room an original and exclusive appearance, the pouf should be made bright and colorful. For children's rooms, rich colors of blue, pink, and turquoise are chosen.
Of course, it must be in harmony with the overall interior. You can also decorate a piece of furniture with beads, rhinestones or embroidery.
For classical motifs such as baroque or rococo, it is recommended to attach curved or carved legs to the product . Their upholstery is made of velvet, velor or leather in subdued neutral tones.
For the high-tech style, a metal frame is taken as the basis, the seat is made of artificial leather. Their legs are shaped like arcs and painted chrome.
The minimalism direction requires a minimum of decor and ornaments.
Important: light-colored products visually increase the space. But for hallways this option is not entirely appropriate. Because if they come into contact with dirty shoes and clothes, they will get dirty.
Making an ottoman from a bucket
If a plastic bucket has become unusable, you can turn it into a cute ottoman:
The photo shows a do-it-yourself ottoman that fits perfectly into country or eco-style.
What do you need?
To work you need the following tools:
- Plastic bucket.
- Jute rope.
- Textile.
- Filler.
- Decorative button.
- Scissors.
- Hot glue gun.
- Furniture stapler.
- .Velcro tape.
Manufacturing instructions
Let's start creating an ottoman with our own hands according to the following scheme:
- Remove the handle from the bucket.
- We cover the surface of the bucket with jute rope, fixing it with hot glue.
- We cut out two parts along the circumference of the bottom: one from thick cardboard, and the other from fabric, but 10 cm larger.
- We connect the circles with a button, stuff them with soft filling and fix the fabric sheet on the cardboard base using a stapler.
- We secure the seat to the bottom of the bucket with Velcro tape.
Learn more about transforming an old bucket into a vintage ottoman with your own hands in this video:
What fabric to choose for frameless furniture
The bean bag chair consists of two covers. The inner one should be formed from breathable, durable materials. For the exterior, you need to choose an attractive, yet highly durable, easy to clean, abrasion-resistant fabric. The optimal choice is Oxford material, which is used to make tents. It has a special impregnation that makes it waterproof. Thanks to this, poufs made from this fabric can be used outdoors. The canvas is presented in a wide range of colors, so you can choose the appropriate option for any interior.
Another material option for the outer cover is eco-leather. It is also waterproof and equally easy to care for.
If the ottoman will be used only at home, you can use other dense fabrics - corduroy or tapestry. However, such a cover will need to be removed for washing, so you will need to install a zipper.
Making a homemade ottoman is not at all difficult. Choose the model you like and realize your idea.
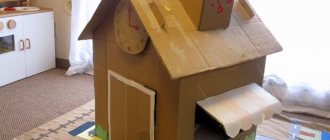
Children's ottoman for toys
A very stable and practical ottoman for storing cars and dolls is made from two wooden boxes.
The photo shows a comfortable and eco-friendly pouf with a hinged lid.
What do you need?
Necessary materials:
- Two wooden boxes.
- Chipboard sheet for the lid.
- Jigsaw.
- Foam as a filler.
- Fasteners, screws, screwdriver.
- Burlap or any other dense fabric of bright colors.
- Glue.
- Stapler.
Manufacturing stages
Let's start assembling the ottoman with our own hands:
- We fix two drawers along the long sides with self-tapping screws.
- Using a jigsaw or hacksaw, we cut out the lid to the size of the two connected boxes.
- At the next stage, glue foam or foam rubber onto it.
- We sew a cover for the lid from thick fabric material.
- You can take a simpler route: stretch the fabric and secure it with a stapler.
- Using self-tapping screws, attach the lid to the piano hinge.
- If desired, the finished pouf can be painted, and to make it mobile, furniture legs can be screwed on.
Basic requirements for ottomans
There are no requirements as such when choosing an ottoman for the hallway, but there are certain recommendations that need to be followed so that the product does not disappoint the owner.
- The ottoman should match the style and shape of the interior.
- It should be mobile and lightweight if you plan to move it frequently.
- It is better to choose environmentally friendly materials so that there is no risk of getting an allergic reaction or any disease. This primarily applies to people who have weak immunity or are allergic to anything.
- It is important to consider the size of the free space in the room. The ottoman should complement the hallway, and not occupy the last free corner and disturb everyone.
- As for the type of pouf, it is important to take into account the free space, the wishes of the owner of the hallway and other factors.
- You should not make an ottoman with sharp corners, especially if children live in the apartment. In any case, sharp corners increase the risk of injury to both children and adults.
Ottoman in the hallway - photo
Stylish pouf made from old jeans
Sometimes original furniture can be made “out of nothing” and turn several unnecessary things into one useful one.
The photo shows a strong pouf made from old jeans, which can serve as a seat, table or footstool.
Consumables
To work you will need:
- 25 identical plastic bottles.
- Double sided tape.
- Remains of plywood or thick cardboard.
- Foam rubber.
- Old jeans.
- Thread and needle.
- Sewing machine.
Step by step guide
Let's get started:
- We wrap the central bottle with tape and attach 5 more containers to it. Wrap it with tape again. Using this template we build up the frame of the ottoman.
- From cardboard or plywood we cut out two identical circles along the diameter of the connected bottles.
- We level the structure and secure the circles tightly to the base with tape.
- We wrap the frame with foam rubber: first the side, then the lid. We sew the foam rubber with threads.
- We sew a cover. To do this, carefully take measurements from the resulting ottoman and transfer it to paper. Using the pattern, we cut out the details from denim fabric, leaving 2.5 cm for allowances. We sew them together.
- A round seat can be made using the patchwork technique, so the pouf will look even more interesting. There are two ways to secure the material at the bottom: sew on an elastic band or secure with a stapler. The decor of the ottoman depends only on your imagination. You can see how to make an ottoman out of bottles with your own hands in this video:
Pouf with interior
Mess, trash, renovations - if there are a lot of things in the house that have nowhere to put, then a chipboard ottoman with an interior will be a real salvation. The design does not have a frame, because the bottom, walls and lid themselves serve as a supporting base. They are assembled as follows:
- Four squares are cut from plywood to fit the walls (sizes are selected depending on the age and height of the future user);
- It is also necessary to make the bottom and lid from chipboard;
- The walls and the lid are attached to each other using four sidewalls, which are sawn from a 40x40 mm bar;
- Sides made of 30x30 mm bars are attached to the edges of the lid (the sides should protrude outward, covering the walls when the lid closes the container);
- The bottom is attached to the walls;
- The sides are finished with padding polyester, and the lid (seat) is finished with foam rubber;
- Each part is upholstered with decorative fabric.
The fastening system is made using screws. When the ottoman with the lid is ready, it remains to be checked for stability. If desired, you can arrange the legs below the structure.
Moreover, it is better to attach the latter to the bottom even before it is attached to the walls. And although the feet leave dents in the carpet and flooring, they can be wrapped in special liners or wrapped with insulating tape.
Square ottoman
This neat homemade ottoman doubles as an ottoman or pillow and is very easy to make.
The photo shows a frameless square ottoman, made by yourself.
Materials and tools
To make it you will need:
- Thick fabric.
- Sackcloth.
- Pillow filled with polyfoam styrene.
- Pins, scissors, sewing machine and thread.
The photo shows a kit for making an ottoman.
Master class on making
Let's get started:
- The size of the ottoman depends on the pillow. We cut out the necessary elements from thick fabric: one square (this will be the top) and four rectangular (for the sides).
- We cut out another piece from burlap and connect all the elements with pins.
- We sew together all the parts except one and turn them inside out.
- We place the pillow inside and manually sew the product. A comfortable frameless pouf, made by yourself, is ready.
Materials and tools
To sew a bean bag chair yourself, you need to decide on the choice of materials and filling. In addition, you will have to choose strong threads, and also decide which fastener is suitable for easy removal of the cover.
| External cladding material | Material for inner cover | Filler | Clasp |
| natural, synthetic, fur, leatherette. | cotton, synthetic. | expanded polystyrene, foam rubber or synthetic winterizer, legumes or buckwheat, old things. | zipper, buttons, rivets, Velcro. |
It is better to sew an outer cover for a bean bag chair with your own hands from a practical material. After all, it will be subject to regular pressure from body weight and will often come into contact with clothing. This is why it is necessary to make two covers. The top one must be wear-resistant so that it can be washed and cleaned without damaging the internal filling. In addition, the material should not fade, stretch, fade or shrink when washed. You can determine how much fabric you need from the drawing after choosing the configuration. The inner cover is usually made of cotton or cheaper but durable synthetics, since its function is to reliably hold its shape. The ideal option would be polyester with water-repellent impregnation.
The most common filler is polystyrene foam (foam balls), which is incredibly lightweight, which makes it possible to sew a lightweight ottoman for a small child. The child will be able to rearrange such furniture independently. A more budget-friendly option would be foam rubber or old things that can be cut into shreds. The cleanest option, from an environmental point of view, is to fill it with legumes (peas, beans) or buckwheat. Small round seeds adapt perfectly to the shape of the body, but such furniture will be much heavier and stiffer.
When filling a chair with polystyrene foam balls, it is worth considering that over time this filler will wrinkle, so it will need to be added periodically. The service life of expanded polystyrene depends on its density.
Artificial and natural leather
Faux or natural fur Synthetic materials
Cotton Sintepon
Foam rubber Polystyrene foam balls
Zipper, buttons, fasteners
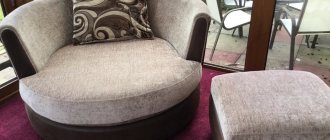
Ottoman from a stool
If an old stool has become unusable, do not throw it away - it will become an excellent basis for a unique ottoman.
The photo shows an elegant pouf made from an antique round stool.
What is needed for production?
Materials and tools:
- Old stool.
- Sandpaper.
- Primer, paint for furniture.
- Foam rubber.
- Elastic fabric material for upholstery.
- Construction stapler.
Management
Let's get started:
- We sand the old stool with sandpaper to remove the varnish. We prime and paint.
- After drying, cut out the foam and secure it with a stapler.
- Using the same method, we fix any suitable fabric.
Another way to turn old furniture into an ottoman is in this video:
A do-it-yourself ottoman made from scrap materials is not only a multifunctional interior decoration, but also a great way to save your family budget.
Decor ideas
Here are some ideas for decorating your homemade pouf.
- When making an interior item from plywood, the side walls (or part of them) can be made from laminated chipboard. This way it will look much more interesting. The texture of the product will resemble the texture of natural wood.
- You can apply a self-crocheted mesh over the upholstery. This will give the product a more interesting and elegant look.
- If the pouf is made from an old tire, then the side walls do not need to be lined with textiles. This way the finished item will look much more interesting. The side walls can be painted in a color that will fit well into the interior.
- A pouf can be made not only from an old stool, but also from a wooden box. The side walls are not sheathed, but simply varnished. The appearance of this product is very unusual and will decorate almost any interior.
- Instead of leatherette, you can use natural leather. It looks much more beautiful than leatherette. However, the price of genuine leather is quite high. This should be kept in mind when calculating the cost of materials.
- When making a pouf from plywood, it is better to decorate the internal storage compartment as well. It can be upholstered with the same material as the outer part. You can also simply paint it. True, in this case the edges of the upholstery may be visible, and this is not very beautiful.
- Small textile pockets can be sewn on the sides of the upholstery. This will allow you to store things not only in the internal compartment of the piece of furniture, but also outside. In addition, the pockets perfectly complement the overall decor of the product.
- A children's pouf can be made in the shape of an animal (for example, a hippopotamus).
Variety of shapes and sizes: ideas for ottomans
The design of home furniture must meet the requirements of practicality, functionality and aesthetics in a combination of all these parameters. For your own home, you can make frameless and frame models, and choose any shapes that will match the interior design.
The production of any model takes place in stages and during preparation it is important to carefully think through the solution and draw up a sketch. This makes it possible to select materials and calculate their required quantity, and after that select the necessary tools and begin to implement the idea.
When choosing materials, you can be guided by practical goals; improvised materials are excellent for reducing the cost of a product. But for the coating, high-quality and wear-resistant materials are selected, which are characterized by ease of maintenance and long service life.
Features of poufs and their use in the interior
The simple design of the pouf is a defined container of a round or cuboid shape with a soft finish. Such compact and practical furniture can be used in different ways and not only for decorating the interior composition, so when choosing a sketch, this point is also taken into account:
- footrest;
- seating area;
- small table;
- storage system.
Poufs-pillows have recently become very popular; they are made from durable materials and soft or hard filling. Other types of small furniture forms will require a rigid base or frame and upholstery fabric, which can be of different colors and textures.
Decorating the finished product
DIY ottoman from an old tire step by step
The ottoman can be decorated with jute rope by wrapping it around the side walls of the object.
A tire ottoman can be covered with rope using hot glue
Also, buttons are often used for decoration, which are punched to the base using a special gun, creating interesting tubercles. This option is very popular, not only among ottomans, but also other pieces of furniture.
Decorative nails are used to create a pattern on the fabric, creating an interesting pattern and additionally securing the upholstery.
In a similar way, anyone can create an ottoman of different shapes and sizes with their own hands. The product will fit perfectly into the hallway of any layout. It can perform 3 functions at once: serve as a soft, comfortable place for changing shoes, a necessary storage system for important items and small items, and an elegant element of the interior, suitable for many hallway design styles.
Beautiful blue ottomans in the hallway interior
Functional pouf or simple seat?
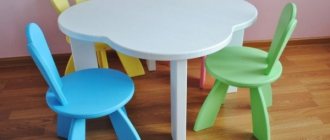
Creating small pieces of furniture is a fun creative process. A model that will subsequently decorate the room must have a certain functional load.
A homemade ottoman for a children's room is a small seat with a closed body. It can be on a rigid frame or in the form of a frameless product. This stylish pattern can be sewn or knitted in the round.
If children often play on the floor, it is important to consider that a low seat on the mat is not very comfortable; the intensity of blood circulation decreases due to bent knees.
They need comfortable low seats with little weight to carry it to any corner of the room. Two or three products of a similar design can be easily made with your own hands.
For those who don’t know how to knit, a voluminous seating block can be sewn from leather or denim from old trousers. You can make some kind of vegetable or fruit by stuffing an “apple” or “pumpkin” with padding polyester.
The design and functionality of ottomans varies:
- a seat with a folding top for storing indoor slippers or a closed shoe shelf with a soft “seat” - for the hallway;
- covers for storing winter blankets in the form of soft cylinders - seats for a balcony or loggia;
- an inverted table with soft and hard sides of the “cube” will be an excellent addition to the guest area;
- a soft footrest on casters is an excellent solution to complement a soft corner in the living room;
- flat knitted “donuts” and blocks for storing toys with a folding seat are an original addition to a child’s room.
There is nothing wrong with wanting to give a “second life” to old things. Not everyone knows about our creative abilities; they can be used in the manufacture of budget interior items.
Poufs, chaise longues, shelves for shoes or banquettes in a hallway with a soft top can become a bright design accent.