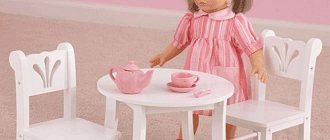
how to make a table for dolls
When little girls get together, it always involves dolls and accessories. Luckily, you can easily make your own doll furniture and save money, which is sure to put a smile on you and your little girl's face! Here you can see how to make a doll table with your own hands , a must-have for playing with dolls. There are several options: from ice cream sticks, from PVC pipes and a plastic photo frame, a doll table made of cardboard and an almost real wooden table for dolls - a copy of a country picnic table. All these crafts are easy to make…. Ideal for children of any age.
Additional furniture and decor
If desired, you can make an ottoman for a doll's house.
This will take very little time. Let's prepare the following:
- small plastic jar;
- PVA glue;
- twine or yarn;
- scissors.
Remove the lid, apply a thick layer of PVA glue and screw it on. This is necessary for greater fixation.
Apply a little glue to the lid and put some yarn or twine.
Gradually add glue and wrap the yarn until the end of the lid.
We repeat the same until the base of the ottoman.
Turn the workpiece over and glue the thread to the bottom. Leave until completely dry, then place the ottoman in the doll's house.
You can also make a small sun lounger for the house. All you need is clothespins and glue.
We break the clothespins, leaving only the wooden parts. Glue them together as shown in the photo. These will be blanks for the seat and back.
Glue the legs and armrests on each side.
The chaise longue for your favorite doll is ready! Similar pieces of furniture can look completely different. The photo shows several interesting ideas.
A decorative suitcase is not at all the most necessary item. But if you have a desire, we suggest making such a cute, original item with your own hands.
We will need:
- small box;
- stickers – 2 pcs.;
- glue;
- openwork braid;
- textile;
- scissors;
- black braid;
- beads – 4 pcs.;
- paper knife.
Glue all the parts of the box together. Using a special paper knife, cut it lengthwise, as in the photo.
We attach a sticker to each part.
Glue the fabric to the inside.
We connect the two halves together with openwork braid.
We glue black braid to the suitcase, as well as beads that will act as wheels. The original decorative suitcase for the doll is ready! Creating beautiful furniture for dolls is not at all difficult. Moreover, if you show your imagination and get inspired by interesting ideas, the result will be truly worthwhile. Tags:
Shoes
Original shoes for a doll can be cut from an ordinary bottle cap. To do this, you will need a pencil with a soft lead and a stationery knife, a cocktail tube, and a piece of paper with glitter.
We divide the cork into two equal parts, from each we cut out a blank for shoes, placing Barbie’s foot on it. For a rag doll, the size is not important, since the shoe will need to be glued to the leg, otherwise it will fall off. For a clay figurine, it is very important to accurately follow the curve of the foot.
We cut out the insoles of the shoes from paper with glitter and attach them to the sole. We make the top of the sandals from a piece of tube, you can make two jumpers, a heel, and then you will get full-fledged shoes. We attach the plastic to the base with glue and decorate it with rhinestones or ready-made miniature flowers. You can cut out a “stiletto heel” from the sole or leave it as is – in the form of a “wedge heel”.
Both the Barbie doll and the wardrobe for it are ready. There is nothing complicated, the main thing is to get carried away and go through the most difficult stage (creating a figurine). Any girl will be happy with such a gift, and if she took part in the work, then she will be even more happy when she sees the result.
Method 1. Matchboxes
First of all, let's give a fairly simple example of a craft.
The important thing is that even a child can figure out how to make a sofa for a doll using this method. So, you will need matchboxes (the quantity depends on the size, but for a small sofa 6 empty boxes are enough), fabric and glue
First you need to make the base. You need to lay two boxes flat - this will be a place for the doll to sit. At the back, as a backrest, you need to place, again, two boxes one after another on a wide edge, and a couple more empty boxes will be needed to make handles on which the doll will lean. All boxes need to be properly glued and the product should be allowed to stand for about ten minutes so that the glue dries thoroughly. Next, all that remains is to cover the sofa with fabric. This can be done in scraps, gluing them onto boxes. A more difficult way is to sew a cover exactly to the size of the product. You can also decorate this furniture with multi-colored pillows, throw on a beautiful blanket with which the doll can cover her feet while watching TV.
DIY furniture for dolls
Every little girl, having started playing with dolls, already dreams of a dollhouse. Parents soon buy it or make it themselves. But not everyone knows that this is just the beginning!
Each dollhouse will have to be furnished with furniture, and it would be good if it was included with the house. But even in this case, the child will want to “a little” complement the decor in each of the rooms.
Do not deny the young designer a creative impulse and make furniture for dolls with your own hands. You will find ideas and master classes in this article.
The lucky ones will be those parents who build huge multi-story cottages with at least ten rooms. They are now provided with a week of active needlework. At the same time, it is desirable that the furniture be in harmony with the color of the wallpaper in the rooms, be durable enough (otherwise the evenings of needlework will be repeated regularly) and correspond to the dimensions of the dolls.
Use all your design skills and your doll furniture will turn out very beautiful!
How to decide on the dimensions of a toy interior
It is important to remember that doll furniture made by yourself must correspond in scale to both the dollhouse and the dolls themselves. Otherwise, the child will feel the discrepancy and try to change the dimensions of the furniture
After a couple of such upgrades, it will safely go into the trash.
The most reliable way to make doll furniture with your own hands in the correct scale is to measure the real furniture, correlate it with the height of your family members, and then transfer the proportions.
Doll houses come in very “modest” sizes.
A universal solution is a children's chest of drawers combined with a doll's house.
For example, the height of our doll is 15 cm. We get: 170 cm / 15 cm = 11.3. We divide all the parameters of real furniture by this number. By the way, 14-15 cm is the most popular size among the entire doll assortment. That’s why the lion’s share of doll furniture sold in children’s stores has a scale of 1:12.
Approximate dimensions of furniture for dolls
Here are the most common doll sizes:
- male doll - 15cm;
- female doll - 14 cm;
- toy child - 7.5-10 cm;
- toy baby - 6.5-7.5 cm.
A striking example of doll furniture in retro style.
It turns out that furniture for dolls, made by yourself, will have the following dimensions:
- double bed - 16*13 cm;
- single bed - 16*7.5 cm;
- chair - height with backrest 7.5 cm, seat height - 4 cm;
- cabinet, height not lower than 16.5 cm;
- sofa, armchair - seat height 4 cm, backrests and armrests can have different sizes;
- work or dining table - 6.5 cm high, other dimensions are at the choice of the master.
Doll furniture from Soviet times.
What can you make doll furniture from?
If dad or grandpa gets involved, doll furniture can be made from plywood - durable and beautiful. However, this requires tools, woodworking skills and material costs.
Below we offer you inexpensive, and sometimes even free, ways to create furniture for a toy house that a mother and daughter can easily cope with.
DIY furniture for Barbie from matchboxes
The simplest doll furniture is made from ordinary matchboxes and cardboard. They are glued together using PVA glue or any other cardboard glue, including liquid nails, it all depends on the expected load.
The structure created in this way is pasted over with paper (often colored) or fabric, or self-adhesive film. Wooden beads are ideal for legs.
Handles for cabinets and sideboards can be made from small buttons on legs or from oblong beads.
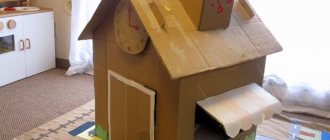
Furniture for a dollhouse made of cardboard
Probably each of us has an old unnecessary cardboard box at home. Even if you don’t have it, ask at your nearest store. Most likely they will give it to you, and absolutely free!
And now that we have the main material on hand, let’s start creating realistic furniture for the toy house. You can take cardboard interior ideas from the master classes below or come up with them yourself.
Please note that cardboard doll furniture does not look very good without finishing. So don’t be lazy and make your toy furniture comfortable and beautiful! After all, in fact, you are making it not for dolls, but for your child.
A cardboard bed for a doll is the fastest and most budget-friendly solution!
This cardboard bed is suitable for a large doll, up to 50 cm tall. If the doll is shorter, then all the dimensions shown in the diagram can be reduced, the main thing is to maintain the proportions.
Detailed diagram of a doll's crib, the parts are fixed thanks to grooves cut in cardboard. The width of the groove is equal to the thickness of the cardboard (or plywood), the depth of the slots and the dimensions of the workpieces are indicated in the diagram.
More complex products
A more difficult model to manufacture is transformable furniture, that is, a sofa bed for dolls. The operating instructions are more complex and a completely different material is used. This is necessary so that the product simply does not tear during the transformation process.
A folding sofa for dolls is best made from plywood. You will also need a furniture stapler, furniture nails, small sheds, and a jigsaw. Only one parent can do this job:
1. The details of the future product are cut out with a jigsaw: the back, side handles and three bases, one of them under the seat, and the rest will be movable. It is better if the mechanism is an “accordion” or a book.
2. The moving parts are connected with small canopies. The rest of the structure can be tied together like a puzzle or knocked together with nails.
3. When the body is ready, you can begin finishing the wood with fabric. It is better to put foam rubber under it. This will make the product safer and more realistic for the child.
Make a sofa from plywood
This sofa will become a real work of art. An analogue can be made from a dishwashing sponge. Mom will do it herself. The main thing is to think about the path of transformation. This can be seen on real sofa models.
Other furniture can be made to complement the sofa: poufs, armchairs. The principle of assembly and operation is the same as that of the main product. You can organize a whole room for your doll.
Corner sofa for dolls (2 videos)
Dimensions
Furniture dimensions are determined in two ways. If you plan to furnish a house for a standard Barbie, you should use the proportions of 1:6 (reduce the parameters of ordinary cabinets, chests of drawers, beds and other products by 6 times). You can go a more complex and precise way:
- Measure the height of the doll and yours.
- Find out the similarity coefficient - the relationship between the obtained indicators.
- Measure the dimensions of the furniture in the house.
- Calculate them for the dollhouse by multiplying the similarity coefficient by the parameters from the previous paragraph.
Requirements for children's upholstered furniture, its typical dimensions Based on the proportions of 1:6, the standard height of furniture is:
- Table - from 13 cm (the dining table will be the same height, but may have a round shape).
- Chair - from 8 cm.
- Wardrobe - from 33 cm.
- Chest of drawers - from 11 cm.
Bed width - from 15 cm, length - from 32 cm. In addition to Barbie girls, dolls can be men, children or babies. Their traditional height:
- men - 15 cm;
- children - 7.5–10 cm;
- infants - 6.5–7.5 cm
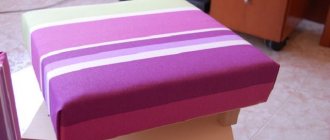
How to sew a soft doll sofa with your own hands from scrap materials: templates, stencils, photos
To begin with, we will show you how to “sew” a sofa from eco-leather and pressed cardboard. First, we make the base of the sofa: we glue together several layers of cardboard (our cardboard is thick, so three layers are enough), and we also attach the back and sides to it with glue.
We glue a thin layer of foam rubber along the entire inner side as in the photo and move on to covering the sofa.
We calculate the height of the piece of material: the height of the sofa plus the back of the sofa and leave a tolerance of 1 cm on each side. Now the length of the segment: the perimeter from the joint of the back with the sides of the sofa in a circle to the second joint. Now we mark the middle on the material and on the back of the sofa, apply glue all over the material, connect the two centers and pull it first to one side of the sofa, then to the other. We connect as in the photo.
We also glue a strip at the bottom of our sofa so that the foam rubber and cardboard are not visible.
How to sew a soft doll sofa with your own hands from scrap materials
Now we need to make 6 identical pillows for the inside of the sofa. To do this, we need to measure the inside of the sofa and divide it by three. The height of the pillows is equal to the depth of the sofa. We take one layer of cardboard, if it is thick, or several layers; if it is thin, we cut out the necessary squares, lay a layer of thin foam rubber on one side for visual “softness” and cover it with eco-leather as in the photo. Secure the ends with hot glue or torque.
We glue the cushions to the sofa; for beauty, you can additionally make several small sofa cushions. Our sofa is ready!
And another option for a sofa for your favorite doll’s country house. To work, we will need improvised materials that any needlewoman can find! We cut out a back template from thick cardboard (3 mm or wider) or thin plywood.
How to sew a soft doll sofa with your own hands from scrap materials: step 1
We duplicate the same template on foam rubber. We connect it to a rigid base using hot glue.
How to sew a soft doll sofa with your own hands from scrap materials: step 2
We cover it with fabric, secure it with thread and additionally hot glue.
How to sew a soft doll sofa with your own hands from scrap materials: step 3
We take nine identical small buttons, tighten them, mark them on a dream basis for a tie (as in the photo) and sew them under tension so that a beautiful relief is formed on the front side.
How to sew a soft doll sofa with your own hands from scrap materials: step 4
How to sew a soft doll sofa with your own hands from scrap materials: step 5
How to sew a soft doll sofa with your own hands from scrap materials: step 6
Now we need a frame made of beams or plywood, which we have at home. We assemble an even rectangle and cover the front side with fabric as in the photo. Fix with hot glue.
How to sew a soft doll sofa with your own hands from scrap materials: step 7
We put a sheet of plywood or thick cardboard on top and glue two layers of foam rubber to make the sofa seem soft and cozy.
How to sew a soft doll sofa with your own hands from scrap materials: step 8
How to sew a soft doll sofa with your own hands from scrap materials: step 9
Now we make the armrests as in the photo. If you have thick cardboard, then you can glue it layer by layer and get armrests of the same strength.
How to sew a soft doll sofa with your own hands from scrap materials: step 10
We cover it with foam rubber as in the photo. We cover the top with fabric. We connect all parts of the sofa using hot glue; if necessary, we additionally fix the back of the sofa with screws to the base.
How to sew a soft doll sofa with your own hands from scrap materials: step 11
How to sew a soft doll sofa with your own hands from scrap materials: step 12
How to sew a soft doll sofa with your own hands from scrap materials: step 13
How to sew a soft doll sofa with your own hands from scrap materials: step 14
How to sew a soft doll sofa with your own hands from scrap materials: step 15
How to sew a soft doll sofa with your own hands from scrap materials: step 16
We decorate the top with decorative cord and decor to taste. The sofa is ready!
How to sew a soft doll sofa with your own hands from scrap materials: ready
Sewing tools
- First of all, you need to prepare the necessary fabric. To do this, you need to decide what kind of dress for the doll will be - elegant or casual.
- You need needles and pins.
- Threads that match the color of the fabric.
- Scissors.
- If necessary, lace, ribbon, beads, laces and other decor are used.
Making furniture from sponges and washcloths
Let's look at the option of how to make a sofa for dolls with your own hands. A master class with ordinary sponges will help you easily make your choice of sofa or sofa. In a similar way, you can also make stools, chairs, and a table. Kitchen sponges and foam sponges are excellent materials for creating children's furniture.
Making a sofa for dolls from kitchen sponges is very simple. It is most suitable for Barbie doll. The advantages of this method are:
- strength;
- suitable shape and thickness;
- simplicity;
- ease of manufacture.
First of all, you need to choose cellulose sponges or foam sponges of suitable thickness and the correct rectangular shape. If these are not available, you can cut those that are available, giving them the required dimensions. The sponges must be new and dry.
The simplest version of a sofa is three rectangular sponges glued together, they can be used as a seat for the sofa, and three more of the same sponges are needed for the back. To connect the sponges together, you can use glue, adhesive tape, tape, or a needle and thread. It all depends on the sponges, the shape of the sofa, and the skills of the performer.
The picture shows how to make a sofa for a doll with your own hands from foam sponges using adhesive tape. In addition to the seat and back, you can additionally glue armrests.
The next step is making the upholstery. For upholstery materials, you can use microfiber cleaning cloths, pieces of thick fabric, old jeans or other available materials. Crocheted upholstery looks beautiful. For this purpose, you need to knit rectangles of the required sizes, secure them with pins in the right places and carefully sew them together.
This DIY sofa for Barbie will turn out to be very beautiful, comfortable and original. In addition, its manufacture does not require a lot of effort, materials and time. This is the easiest and most reliable way to make a sofa for dolls.
You can decorate the sofa with a couple of pillows knitted to match. If desired, you can glue the legs. For doll furniture, you can use beads made of wood or a thin block of the required size. Finished wooden parts are easy to attach with glue.
You can also make a couple more soft doll chairs this way.
Why do you need a changing table?
Despite the short period of operation, this is a very necessary item. A woman experiences a lot of stress during motherhood, and standing in an awkward position in front of a bed or chair while swaddling is very uncomfortable and, moreover, harmful to already tired back muscles.
A changing table is quite a convenient thing, but many young parents can do without it.
Now views on the need for swaddling are divided. Many modern mothers believe that these are relics of the past and refuse this procedure from the very moment of birth. However, the majority are still of the opinion that this procedure allows the baby to get used to the new environment, since being in a tight, but warm and cozy diaper, he feels like he was once in his tummy.
Having studied all the positive qualities of this piece of furniture, you can be sure that it is necessary for the early development of the baby.
Each mother decides for herself how to care for her child, but please note that in addition to swaddling, on this table you can change diapers, change clothes, treat with powder or cream, clean the baby’s nose, as well as give the baby massage and therapeutic exercises.
Experts say that the changing table is intended for children up to one year old.
Some models are made in such a way that you can store various children's accessories and clothes in them, becoming a replacement, for example, for a chest of drawers.
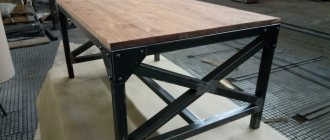
Sofa made of plywood or wood
Original doll furniture can be made from plywood blanks or carved from wood. For a doll sofa you will need bars made of poplar, maple or birch, a plywood sheet, paint and varnish for wood, glue, as well as special tools (file, jigsaw, wire cutters, drill, nails, dowels, soldering iron).
First, templates of the sofa parts are cut out on cardboard, then they are transferred to wood or plywood, cut out and fastened. Armrests can be made from wooden tubes. A wooden sofa needs to be coated with paint and varnish. To make the sofa soft, the back and seat need to be covered with padding polyester and covered with fabric.
It’s easy to make a doll’s table and stools from wood, which will perfectly match the sofa.
Furniture material
Toy items can be created from absolutely any material. Here there is complete freedom for imagination and the hands of a master. It all depends on financial capabilities and the availability of available materials. Examples of finished products in pictures are available on the Internet.
- Matchboxes. This is the easiest way to create doll furniture. The boxes are connected to each other with ordinary PVA glue. From such blocks you can create absolutely any objects: a chest of drawers, an armchair, a bed, a cabinet, a table. Handles can be buttons or beads. If the blocks are covered with foam rubber and fabric, you can make a soft sofa and decorate the living room with it in a dollhouse.
- Cardboard. This is a fairly inexpensive option for creating furniture for dolls. There are a lot of templates and diagrams on the Internet that show what and how to do. Furniture for dolls made from cardboard turns out to be quite interesting, since you can cut out any shape of the future piece of furniture. The parts are fastened using PVA glue, a glue gun or any other glue. Such furniture must be decorated, because cardboard itself does not look very beautiful. The disadvantage of this material is that it is not durable.
- Plywood. This is the most durable and durable option. Plywood can be glued together with a hot gun, PVA glue or other wood glue. This material makes very beautiful beds, tables and cabinets. From plywood you can make an entire doll house with many rooms.
- Newspaper tubes. This is a new way to create any interior item. Craftswomen who weave from newspaper tubes can easily make a bed or sofa out of them. The finished product can be painted or covered with decorative paper.
- Popsicle sticks. From this scrap material you can glue together beautiful furniture for dolls. For gluing you will need a hot gun. The sticks have a smooth surface, so they are easy to decorate.
What you need
The sofa can be made from available materials; you don’t have to buy almost anything.
The main materials will be:
- tall boxes of chocolates;
- plywood;
- pressed cardboard;
- padding polyester;
- matchboxes
A good clear glue (glue gun) is required to assemble all the parts.
You will also need the following tools:
- rule;
- a simple pencil;
- clothespins;
- scissors;
- stationery knife;
- puzzle.
To decorate the craft you will need colored paper and scraps of fabric. Acrylic paints, wallpaper scraps, beads and braid will come in handy.
Making a chair from cardboard for the kitchen
We continue the topic of how to make furniture from cardboard for dolls, and further furnish the dollhouse. In order to make a chair, you will need thick A4 cardboard.
First, prepare a diagram and transfer it to cardboard. Mark the folds. Proceed to pasting the chair blank with material or leather and remember that on the back the seams are hidden on the front side, and on the seat - on the back. The doll's chair is folded along the dotted lines; these places can be slightly bent before pasting. We attach the seat with strong adhesive. If desired, decorate with ribbons or additional decorative materials.
Step-by-step instructions for making a changing chest
If you decide that you need a changing table to care for your child, but buying it is expensive and unprofitable, and you don’t know how to make a changing table yourself, then the instructions and features of assembling a changing table with your own hands, which we will discuss below, will help you easily make exactly the model you need.
When choosing a material for making a table, parents should be based on its safety.
Additional furniture and decor
If desired, you can make an ottoman for a doll's house. This will take very little time.
Let's prepare the following:
- small plastic jar;
- PVA glue;
- twine or yarn;
- scissors.
Remove the lid, apply a thick layer of PVA glue and screw it on. This is necessary for greater fixation.
Apply a little glue to the lid and put some yarn or twine.
Gradually add glue and wrap the yarn until the end of the lid.
We repeat the same until the base of the ottoman.
Turn the workpiece over and glue the thread to the bottom. Leave until completely dry, then place the ottoman in the doll's house.
You can also make a small sun lounger for the house. All you need is clothespins and glue.
We break the clothespins, leaving only the wooden parts. Glue them together as shown in the photo. These will be blanks for the seat and back.
Glue the legs and armrests on each side.
The chaise longue for your favorite doll is ready! Similar pieces of furniture can look completely different. The photo shows several interesting ideas.
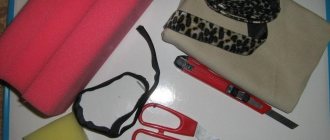
A decorative suitcase is not at all the most necessary item. But if you have a desire, we suggest making such a cute, original item with your own hands.
We will need:
- small box;
- stickers – 2 pcs.;
- glue;
- openwork braid;
- textile;
- scissors;
- black braid;
- beads – 4 pcs.;
- paper knife.
Glue all the parts of the box together. Using a special paper knife, cut it lengthwise, as in the photo.
We attach a sticker to each part.
Glue the fabric to the inside.
We connect the two halves together with openwork braid.
We glue black braid to the suitcase, as well as beads that will act as wheels. The original decorative suitcase for the doll is ready! Creating beautiful furniture for dolls is not at all difficult. Moreover, if you show your imagination and get inspired by interesting ideas, the result will be truly worthwhile.
Tags:
(1
ratings, average:
4.00
out of 5)
Probably every girl has a dream - to create a real house for her doll with doll furniture, dishes and other little things. In children's stores you can find many options for ready-made doll furniture. But not all parents can afford to buy such nice little things for their child. But it’s fashionable to make a sofa, and other interior items for a dollhouse with your own hands. This process will be especially exciting for a child.
Doll wardrobe
You will need: plywood 4 mm thick, white wood paint, cabinetry veneer, carbon paper, sheets of paper, pencil, ruler, jigsaw, jigsaw blade for straight and radial cuts, glue, sandpaper, brushes and sponges for painting, scissors, screwdriver, construction knife, 2 wooden sticks, furniture fittings (hanger hooks, 3 handles, self-tapping screws, 4 hinges).
Master Class
- Draw a sketch of the cabinet.
- Draw each detail on paper.
- Cabinet parts: 2 side walls and 2 rectangular parts for them, roof, bottom, back wall, partition, 2 shelves, drawer module, 2 doors and 2 patterned parts for them, 4 figured legs, upper horizon (shaped part), drawer (bottom, back, 2 sides, front panel and a rectangular part for it).
- Cabinet size: height 34 cm, width 22 cm, depth 9 cm.
- Transfer the cabinet parts onto the plywood using carbon paper.
- Use a jigsaw to cut out every detail of the future cabinet.
- Sand each piece of the cabinet with sandpaper.
- Glue the redwood veneer to the cabinet sides, drawer fronts and cabinet doors, then leave to dry.
- Paint the patterned pieces for the cabinet doors, the rectangle for the drawer and 2 rectangles for the side walls with white paint, then wait until dry and glue them on as decoration.
- Paint the 4 curly legs with white paint and leave to dry.
- Glue the 2 sides, the back wall of the cabinet and the legs as shown in the photo and leave to dry.
- Glue the box parts together.
- Glue the roof and the upper figured horizon.
- Glue the partition inside the cabinet, visually dividing it in half.
- Glue 2 shelves as shown in the image.
- Glue a wooden stick as a pipe for things.
- Make hangers from pieces of wood and hooks.
- Paint the inside of the cabinet, hangers, top horizon and inside of the drawer with white paint, then leave to dry.
- Attach handles to drawer and cabinet doors.
- Screw the hinges to the cabinet and attach the cabinet doors.
The plywood doll closet is ready!
How to make a sofa for Monster High dolls?
Graceful Monster High dolls will be able to sit comfortably on a soft sofa made of foam sponges. This material holds its shape well, and the hard side serves as a comfortable base for the piece of furniture.
Materials:
- foam sponges of different sizes;
- thick and thin needles for sewing;
- threads;
- thick fabric (satin or corduroy);
- scissors.
Instructions:
- We lay out the sofa of the desired shape from sponges, rounding some parts with scissors.
- Using a thick needle and thread, we intercept the frame in several places and secure the threads.
- We cut out the armrests separately.
- We cut out a rectangle from the fabric and place it on the base of the sofa and the back. We stretch the fabric, carefully grab it in several places and carefully sew it to the bottom of the base.
- We cut out the upholstery of the side parts and also tie it with threads.
- Using a thin needle we sew the armrests to the frame.
- We make decorative pillows from fabric and pieces of sponges. The sofa is ready.
Another suitable model for cute monsters is a sofa made from an oatmeal box.
Materials:
- cereal box;
- 2 viscose napkins (multi-colored);
- PVA glue;
- silicone glue;
- stationery knife;
- pencil;
- ruler;
- rhinestones.
Instructions:
- We cut the box lengthwise, based on the height of the future seat (about 3 cm).
- From the cut off part we form the armrests and backrest.
- We combine the parts and glue them.
- From a napkin we cut out rectangles equal to the width of the seat and backrest, and glue the parts.
- We cover the back of the back with a napkin of a different color, the same as the armrests.
- Carefully trim off the protruding excess upholstery.
- To make the sofa look soft, you can add a couple of layers of napkins to the seat and back.
- We decorate the finished furniture with rhinestones, gluing them with silicone glue. The sofa is ready.
Sofa made of plywood or wood
Original doll furniture can be made from plywood blanks or carved from wood. For a doll sofa you will need bars made of poplar, maple or birch, a plywood sheet, paint and varnish for wood, glue, as well as special tools (file, jigsaw, wire cutters, drill, nails, dowels, soldering iron).
First, templates of the sofa parts are cut out on cardboard, then they are transferred to wood or plywood, cut out and fastened. Armrests can be made from wooden tubes. A wooden sofa needs to be coated with paint and varnish. To make the sofa soft, the back and seat need to be covered with padding polyester and covered with fabric.
It’s easy to make a doll’s table and stools from wood, which will perfectly match the sofa.