Recently, the loft style has been in great demand in modest-sized apartments. Why is he so interesting? It turns out that it is attractive because it allows you to use very simple things, which, moreover, look very organic.
And it’s easy to make loft-style furniture with your own hands, and this again means saving money on your home budget. Let's find out what you can do for an interior in this style yourself in a matter of hours, what pieces of furniture can be made even by a novice craftsman?
DIY loft style furniture
A few words about the loft style
Before we present detailed instructions for making homemade loft furniture, we should introduce readers a little directly to the style itself. Why is it so interesting and why, despite the fact that it appeared back in the 40s of the twentieth century, does it still remain popular?
History of the loft style
Loft style furniture
The birthplace of the loft style is the USA . It was in the land of the Statue of Liberty that this simple, but nevertheless attractive style appeared. It originated in New York, in its industrial areas. During that time period, land prices were rising rapidly, and many property owners sold or completely abandoned their industrial premises just because of this. And these same premises gradually began to be used by other people to create residential buildings. Moreover, such housing was inexpensive, and, as a rule, furnished “cheap and cheerful.” But, oddly enough, it turned out tastefully. This is how the loft style was born, which remains popular to this day. Gradually the style reached Russia.
Decoupage furniture in loft style
Moreover, both a living room and an office can be furnished in this style. Nowadays even restaurants or hotels are decorated in this way, and many modern hotels prefer to furnish guest rooms in a loft style.
Loft style interior
In order to embody the loft style in the interior, you do not need to spend money on expensive souvenirs, luxurious armchairs or antique cabinets. It is enough to use what in most cases was previously thrown away.
Loft style does not require large financial expenditures
On a note! Of course, in order to furnish a room in a loft style, it is not necessary to collect “garbage” and do something with your own hands. You can just go to the store and buy everything you need. However, things in the loft style are not cheap.
Beautiful coffee table
Decoupage technique
So, decoupage is an interesting way of transferring an image onto a wooden object using napkins and glue. This technique has some features. For example, the surface on which the drawing will be applied must be absolutely flat, smooth and dry, perfectly polished, and free of paint and varnish.
To work you will need:
- Prepared wooden surface;
- Drawing from a napkin or special paper;
- Brushes;
- Glue;
- Varnish or paint depending on the desired effect.
The process of creating a surface with a pattern using decoupage is simple, but painstaking:
For additional “age,” the wooden surface is coated with white paint in 3 layers, and after thorough drying, it is sanded, rubbed with sandpaper or a brush to the desired areas; Additionally, you can create the appearance of a wood surface eaten by beetles using a brush attachment on a drill; The necessary pieces with patterns are torn off from the napkin, and only 1 layer of paper with the image is required, so you should try and separate it from the rest of the paper; The drawings are laid out on the surface in the required order and carefully covered with a layer of glue using a brush; When the glue is completely dry, the surface is covered with the necessary varnish, for example, with a craquelure effect.
The production of the vintage surface is complete! When creating a vintage interior, do not overload the space of the room. It should not just be forced, but carry a certain meaning, telling about a bygone era. It’s not for nothing that this direction is called not only very sophisticated, but also intellectual.
Thin the paint
Apply the first layer
Apply a second coat of paint Apply glue Sand the corners Finished work
The main features of the loft style
It is easy to determine that a person is looking at a room decorated in this style. It is enough to pay attention to some signs.
- The room should have a lot of free space, and there are usually a minimum of partitions in it . In general, only the toilet and bathroom can be separated in the apartment. That is why the loft style is often used in studio apartments, where even the sleeping area is located in a common area. About the characteristic features of the style
- The windows should be large and preferably from floor to ceiling . This is the main source of light in the room. Moreover, curtains are used extremely rarely.
- The presence of various beams in the ceiling area is welcome , the ventilation does not need to be closed, and iron fittings add charm, but do not in any way spoil the appearance of the room.
- You usually cannot see wallpaper or other decorative material on the walls of a loft-style room.. Brickwork or concrete is often imitated or left completely as is. Also, plywood, metal, etc. can be used for finishing. It’s funny, but to achieve the desired effect, sometimes you sometimes have to purchase quite expensive materials.
Typical loft style interior - Option for the floor - concrete, board or marble . No complex designs or anything pretentious or extravagant.
And the main highlight of the loft is the furniture. It may be somewhat unsightly in appearance, made of simple materials, and does not have any decorations or monograms. Its charm lies in its simplicity and functionality. At the time when the loft was born, everyone had no time for luxury.
Loft bedroom
To make loft furniture, you can use simple boards, iron pipes and some modern materials. It is best if they have a somewhat aged look.
On a note! Those elements that are considered defects in most other styles are welcome in the loft. These could be rust stains, some roughness of the wood, or simplicity of design.
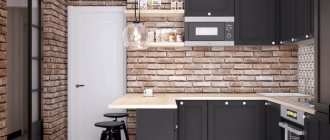
Kitchen in the loft style
Although, despite the apparent simplicity, to decorate a room in the loft style you need to have a certain taste. In general, with a successful combination of circumstances, a loft can harmoniously combine the incongruous. For example, a brightly colored modern sofa and an antique chest of drawers. So this style can be very, very different.
There are several loft style trends
Table. Loft style directions.
| Direction | Characteristic |
| Bohemian | This option is chosen by artists and poets, in a word, creators of beauty. Moreover, they can use the style not only at home, but also when organizing their own personal exhibition or show. Here the walls and ceilings are left almost without decoration, but other interior items or decorations are selected with a special sense of beauty. The walls may be decorated with paintings, there may be musical instruments, some sculptures, etc. in the room. |
| Glamor | This is a rather delicate loft, in which the same iron beams and beautiful chandeliers or sofas in the Baroque style can be perfectly combined. Here, much attention will be paid to lighting and directly to chandeliers and shades. The colors used for decoration will be gentle and pleasant (for example, it could be lilac). |
| Industrial | This is the most popular loft option, as it is the simplest and does not require anything special from the designer. It is enough to create the appearance of a moderately lived-in space. Furniture made by yourself is ideal for this type of loft. Even if it is a little unsuccessful, it will look no worse in almost industrial conditions than furniture from a store. Here any decorations are unnecessary. |
Bedroom in loft style
Tired of trading, I wanted to rest
Greetings to the readers of the magazine. My name is Max. I am an entrepreneur and resell car parts. But today we will not talk about my main business, but about my new hobby, which unexpectedly began to generate income for me.
To be honest, there is nothing difficult about reselling spare parts. I bought them in one place and sold them in my store. To do this, you need to be able to communicate with clients, have some money, some computer skills and documents for the right to conduct business.
I have a product that I buy from wholesalers, and a small room of 25 square meters in which this product is displayed. In addition to selling spare parts and consumables, I also supply body parts to order. These are mainly fenders, hoods, doors and bumpers. This type of activity brings in from 100 to 170 thousand rubles per month.
Until mid-2022, I managed my business alone, and then I decided to hire an employee. This decision was influenced by accumulated fatigue. This freed me up to four days a week. After five years of hard work, I decided to take some time off and find some new direction in business.
I don't crave huge amounts of money, and what I have suits me quite well. I organized a business not to conquer the world, but so that I would have money, a little more than a good average salary, and time that I could spend with my family. I achieved this and am very pleased with it.
The boards suggested their use
The fact is that most body parts are delivered to me by a transport company. The sender of fragile or deformable cargo orders rigid packaging for it or, as it is also called, lathing. This packaging is made mainly from untreated pine or birch boards. If the arrived cargo is packed in such a crate, then it is delivered to my store along with the goods. I collect a lot of such boards in a month; if I say offhand, I always get 0.7-1.2 cubes. In the winter season, when more cars get hit than in the summer, I accumulate twice as much wood.
I used to go through these boards: I kept the good ones for myself, and gave away what was cracked or crooked to everyone who wanted it. Local residents took away unwanted boards from me. I always thought about a useful use for this board, but nothing came to mind. As a building material, this board can only be used for the rough lining of the attic, and there is nowhere else to use it. Over time, I had a barn full of such boards.
This is how parts are delivered to me.
Idea
One day, while at work, I was looking through local advertisements on Avito. I came across a dressing room mirror made in the so-called “off” style. The mirror measured 125 by 90 centimeters and was illuminated around the perimeter. Regular sockets with LED bulbs screwed into them were attached to the mirror frame. This design cost 8,500 rubles. I was interested in this household item, and I decided to study this style and these products in more detail. They really reminded me of the boards from my barn, but only varnished and neatly nailed together.
To study this material in depth, I decided to watch videos on YouTube. It didn’t take long to watch, and after watching literally half of the video, I realized where to use all those boards that had accumulated in the barn over four years. The decision was made instantly - I decided to turn all these boards into mirrors or other devices in the loft style.
What do I think about this style and this furniture?
Before starting to design mirrors and other interior items in the loft style, I decided to study the market for these products.
When I talk about warmth, I mean some strange pleasant feeling when you look at these objects. I looked at several of these mirrors and realized that they were somehow fascinating. And if it worked on me, it will certainly work on buyers. I decided to make mirrors, but at the same time choose my own, special style.
Also, I definitely decided that I would make shelves. Shelves are a part of the interior that will fit anywhere: from a home kitchen to an expensive cafe setting. But I decided not to even try to start making cabinets, beds, bedside tables, coffee tables, since making furniture requires skills and knowledge. Such furniture carries a load and should be useful, not decorative.
Also, when studying the style, I discovered one pattern: the more modern the processing of the material, the cheaper the item made from it looks. For example, if you use a sanding machine to polish furniture, the board will take on the appearance of plastic, but if you do this with a brush and sandpaper, the wood will open up and acquire its charm.
Loft style furniture caught my attention
What materials are suitable?
Loft style furniture is very easy to make, since you don’t even have to worry about selecting materials. This style is ready to “tolerate” plastic, metal, wood, leather, and all kinds of fabrics. If you think through the design wisely, you can use anything. The main thing is that everything fits together in the end.
On a note! It would be great if the room had wide beams and the furniture was equipped with wheels. This will only emphasize the presence of a loft style in the apartment. Moreover, wheels can be on tables and chairs, or on shelves or anything else. Their presence can significantly increase the functionality of most furniture, and this is precisely the quality that is valued in the loft style.
Loft style and its features
When making furniture, you don’t have to focus too much on neatness. Of course, you shouldn’t do everything completely carelessly, but you also don’t need to cling to the slightest drawback. Let this flaw become the highlight of a homemade piece of furniture.
Shelves and tables made using metal pipes or metal profiles look great in this style. The wood may be a little old and the fabric may be worn. Barrels, cable reels, pallets, old window glass - something that can be safely used in creating loft furniture. You just need to put in a little effort and these items can turn into real works of art. You can also use new materials, but it is recommended to artificially age them, giving a slightly careless look. The main thing is that everything must be done carefully and tastefully.
Furniture design in loft style
DIY loft hanger
A simple hanger in the hallway will not fit into a classic interior, but for a loft style it is perfect.
For those who prefer elegance in everything, it is better to order a beautiful slab and purchase decorative hooks.
Bed made from pallets
Let's look at how you can make a simple bed from pallets that are used for transporting goods. It will cost mere pennies, or even almost free, which will save a lot of money. Moreover, such a bed will look very harmonious. The biggest expense for creating such a bed will most likely be a mattress, which, like it or not, you will have to buy.
Types of pallets
Step 1. The first thing you need to do is purchase the pallets themselves. You can buy them new, paying only 150-200 rubles per unit, or you can even find them for free by asking around in warehouses or trading companies. Often used pallets can be picked up "for pickup".
Finding pallets is not a problem
Step 2. Old pallets usually require drying. If possible, it is better to leave them outside in the sun for a few days so that they dry out a little.
It is advisable to dry the pallets
Step 3. After drying, the pallets need to be sanded and painted or varnished. Sanding can be done with regular sandpaper, but the work will be faster and easier if you use a special machine. You may also need a timber that will be used as a base; it also needs sanding and painting. However, you can simply put one row of pallets on top of another and thus make the bed higher.
Wood preparation
Step 4. Having chosen the place where the bed will stand, you need to lay either the first row of pallets on the floor, or a beam around the perimeter of the bed, creating a base.
Laying the base of the structure
Step 5. Next, you need to lay a row of pallets on top and secure them to the base using self-tapping screws. It is better to use them, since nails will not make it possible to create a monolithic structure - the joints may become loose.
Pallet stacking
Step 6. The next stage is sheathing. Usually only the top side of the pallets is sheathed with some kind of material. You can attach it to the tree using a construction stapler.
Sheathing material is secured with a stapler
Step 7. Then you need to put a mattress on top of the pallets sheathed with material.
The mattress is being laid
Step 8. The final stage is the selection of bed linen and bedspreads. The bed is ready.
Ready-made pallet bed
DIY loft coffee table
Anyone will like a stump table. The rhizome of the tree must be dry. Clean it, treat it with an antiseptic, dry it and coat it with varnish/special oil.
Impact-resistant glass can be purchased from a specialized company and you can immediately order edge processing (bevelling), as well as cutouts in the tabletop.
Here's another interesting idea. As you can see from the photo, the table base is made from the legs of old chairs.
Making a loft chair from a metal profile
Using a square profile and a couple of boards, you can make a very simple and interesting chair that will fit perfectly into a loft style interior. However, this will require a little more effort than when creating a bed, and will also require some welding work.
Step 1. The first step is to draw a diagram of the chair and mark all its dimensions on it.
Scheme of the future chair
Step 2. Then, in accordance with the diagram, you need to apply markings to the profile along which the pipes will be cut.
Markings are applied to the profile
Step 3. Next, you need to cut the part from the square section metal profile to the required length. It is important to understand that not all parts will have straight cuts - they may also be beveled. This is necessary to make it easier to join them when assembling the chair frame.
Metal profile cutting
Step 4. Each section must be processed to remove burrs and other defects.
Sections are carefully processed
Step 5. Next you need to carry out welding work and connect the elements of the chair frame into a single structure.
Carrying out welding work The parts are connected into a single structure
Step 6. Now the welding areas need to be processed so that they are even and do not stick out. A simple grinding with a grinding wheel is sufficient.
Processing of weld seams A grinding wheel is used
Step 7. After this, you need to assemble the back and seat of the chair from two boards of the same size. They can be immediately connected to each other. Or you can attach it to a chair separately.
You will need 2 boards of the same size
Chair back and seat
Step 8. In the metal frame and in the wooden blanks for the back and seat, you need to drill holes of the same diameter, which must coincide with each other when fitting the same seat to the frame.
Drilling holes in wooden pieces
Drilling metal elements
Step 9. Now you need to sand the wooden elements and varnish them, and the metal frame of the chair needs to be painted. Work cannot be continued until the paint and varnish materials have dried.
Painting the metal frame
Sanding wooden elements
Step 10. All that remains is to assemble the elements together, that is, screw the back and seat to the frame. And the chair is ready, you can use it.
Screwing the backrest of the finished chair in the loft style
Video - Simple pipe shelving
Loft shelving
Loft rack, characteristics:
- Overall dimensions: 1840x1000x440 mm
- Square pipe 40x40 mm
- Shelf: 1000x360x40 mm
Drawing - assembly of loft shelving
Loft shelving detail drawing
Download loft shelving drawing
The drawing can be downloaded HERE or by clicking on the button below:
Making a table from pallets
From the pallets from which we made the bed above, you can make other furniture. These can be large and small tables, sofas, armchairs and much more. Now we’ll look at the option of creating a simple table with metal legs that will look very organic in a loft-style apartment.
Step 1. First you need to prepare. To create such a table, it will be enough to take one pallet, and you will also need to make or buy 4 metal legs of the same height. You will also need a saw, screws, a screwdriver, a brush and varnish. Sandpaper for sanding or a sanding machine will also come in handy.
Preparing everything you need
Step 2. The pallet needs to be partially disassembled. It is very large, and we are making a small table. Therefore, the excess pallet needs to be sawed off, and several boards need to be detached from the remaining piece of the pallet - they will be needed to create supports for the legs.
The pallet is disassembled
All excess is cut off
Step 3. It is recommended to sand all workpieces with sandpaper so that they are not prickly and dangerous. Next, you need to screw along the right and left ends along the board from those pallets disconnected from the rest. You should get flat platforms to which the legs themselves will be attached.
There should be flat areas
Step 4. To attach the legs to the corners, you need to screw metal corners at a short distance from the edge.
Screwed metal corners
Step 5. The free spaces between the boards on the “front” side of the table need to be filled with other boards from the rest of the pallet. They can be nailed, or they can be screwed onto self-tapping screws. There should be a solid surface.
All voids are covered with boards
Step 6. Next you need to fix the legs on the back of the table.
Metal legs installed
Attention! Don’t forget to varnish the sanded table. Otherwise it won't last long.
The table is varnished
Step 7. When the varnish is dry, the table can be used for its intended purpose. Namely, use it as a coffee table, a small dining room table, or put some things in unique shelves.
Ready-made table in loft style Advantages of furniture made from pallets
Video – Loft style table
Furniture made from boxes
Wooden boxes can be containers for storing fruit, but they are also an excellent building material.
You can make excellent multifunctional furniture from them: ottomans, shelving, wall-mounted walls, bedside tables, a storage chest and an exclusive coffee table.
To make loft furniture from boxes you will need a screwdriver, self-tapping screws, sandpaper, primer, paint or varnish, and brushes.
How to make a floor hanger from wood
Let's consider another budget option for a homemade floor hanger. This time - made of wood
. This design is durable and reliable, and looks very beautiful in any interior.
Design of floor hangers
made of wood can be very different, which is why wooden structures are more popular. Are they warmer than metal - they warm the soul...
Okay, let’s not beat around the bush (the advantages and disadvantages of natural wood are already well known), and let’s finally start making a wooden hanger
.
The first step is to cut the wooden slats to size (size 40x20 mm). A total of eight blanks will be required.
Four slats will be used to make the vertical stands of the hanger (their edges will need to be rounded), and four more blanks will be needed to assemble the shoe rack.
Let's start making the first pair of racks.
To do this, we place one rail on top of another, and move the lower parts apart to the required distance (usually 50-60 cm is enough).
In the upper part, where the slats intersect, you will need to drill a hole for the crossbar using a wood spade drill. We make the second pair of racks in the same way.
From the remaining four slats we assemble a rectangular frame that will serve as the frame of the shelf.
In general, you can just screw on a piece of board and not worry about it. But if you want to create something original, then make the base of the shelf from thick rope. A very interesting design trick!
We screw the finished shelf to the racks at a height of 30-40 cm from the bottom.
Wooden slats need to be varnished in 2 layers or simply soaked in mineral oil. Then we install the crossbar. The ends of the crossbar can be wrapped with thick rope.
Details on how to make a wooden floor hanger with your own hands
, watch the author's video below. The idea belongs to the author of the YouTube channel Living to DIY with Rachel Metz.
DIY Wooden Clothing Rack + Woven Shelf with LONE FOX!
Massive mirrors
Mirrors in a loft play an important role: they create an optical illusion, visually expanding the space, and make the room brighter. Rectangular mirrors in massive wooden or metal frames, placed on the floor near a free wall, will fit ideally into a loft. And if there is no possibility or desire to place such a mirror in the interior, you can choose a wall mirror - preferably with the correct geometry.
decoist.com
1/3
froy.com
2/3
froy.com
3/3
Metal clothes hanger
A type of hanger-rack is a “U”-shaped hanger. This detail would be right in the dressing room, in a minimalist Scandinavian interior or loft style. To create a floor hanger with your own hands, you will need copper pipes: this environmentally friendly and durable material has long been used in the interior and does not lose its relevance.
The photo shows a metal stand that perfectly complements the interior, where natural materials are used as finishing.
Tools and consumables
To create a floor hanger you will need:
- Epoxy glue.
- Pipes 150 cm (2 pcs).
- Pipes 60 cm (4 pcs).
- Pipe 90 cm.
- Copper tees (2 pcs).
- Copper corners (2 pcs).
Step-by-step instruction
How to make a hanger with your own hands:
- We fasten the two bases on which the product will stand. We take two 60 cm pipes and fix them with glue and a tee. Using the same method, we create a second support.
- Let's make a crossbar. We connect two corner elements with a pipe 90 cm long.
- Before assembling the structure, you need to make sure that the glue has completely dried and held the parts together. We connect one and a half meter pipes by inserting them into tees.
- Attach the top crossbar to the vertical supports.
- The floor hanger is ready. It is so thin and light that, if necessary, it can fit into a closet or dressing room.