wine cabinet for home
In this article you will find useful information on how to make a wine cabinet with your own hands . 20 examples of functional and stylish designs with step-by-step photographs, drawings and a link to the source with detailed instructions, a list of materials and dimensions of parts. This will allow you to make a great looking wine cabinet for much less than it would cost to buy it at the store.
There are also several examples of how to make your own wine racks in different styles and sizes. For the kitchen and living room, vertical and horizontal, wall-mounted and counter-mounted - just choose what suits your style and interior. Making a wine rack is a simple project that can be completed in most cases in a day or two, depending on the complexity of the design.
Manufacturing materials
Wood is considered the best material for making wine cabinets (except for conifers with a characteristic resinous odor). A wooden cabinet is a traditional storage unit that has long earned its impeccable reputation among collectors .
Wood allows wine to breathe and maintains the desired temperature and humidity. Wood species that are distinguished by their durability and excellent aesthetic characteristics are especially valued. Wood lends itself perfectly to self-repair and restoration.
The following breeds combine all these requirements:
- Red tree;
- cherry;
- oak;
- Karelian birch;
- acacia;
- nut;
- ash;
- maple.
Metal and plastic are used to produce high-tech wine refrigerators. Such equipment regulates and maintains the required parameters regardless of the temperature and humidity of the environment. Small models fit perfectly into home kitchens, and large refrigerators are installed in restaurants and cafes.
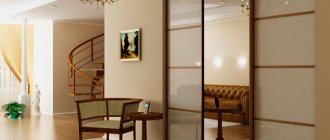
Clay is used to make drainage pipes, in which wine bottles remarkably preserve the properties of the drink. Tinted glass is often used for wine cabinet doors. Such glass prevents ultraviolet radiation from entering the cabinet, preventing oxidation of wine and sedimentation. In addition, tinted doors look impressive and decorate the wine cabinet.
Wine rack
For this you will need:
- Sanded birch plywood sheet (1.5m*1.5m);
- Propylene black rope;
- Dowels (thickness −4mm);
- Sanding paper (120cm and 220cm);
- Acrylic impregnation for wood;
- Brush;
- Old laminate (for template).
Process:
We cut the plywood lengthwise so that you get 5 vertical elements. Then we cut out a round hole with a diameter of 10-12 cm from a piece of old laminate, which we will use in the future as a template.
Using this template, we measure and draw circles on vertical sheets of plywood. Next, we make a hole inside each circle so that we can freely insert a jigsaw into it and then cut out holes for bottles with it. But it’s worth making these holes a little smaller than you originally drew.
Next, using a cutter, we bring the circles to the finished form, that is, we adjust them to your template.
The next step is to cut out the top and bottom covers of the shelf-rack and, again, using a cutter, make grooves so that their thickness is the same as the thickness of the plywood. This is necessary so that the vertical sheets fit into the grooves as tightly as possible.
After this, we make a 6mm rounding on all holes and edges of the parts using a router. At this stage, your wine rack is already starting to look like an almost finished product.
At this point in the process, you can give your imagination a reason to run wild. What can be done to prevent bottles from falling out? As an option - a mesh of rope on the holes in the outermost vertical wall.
We mark the holes, then drill holes where we will subsequently insert the rope and treat them with a sanding attachment so that the rope does not catch and does not break off pieces of the plywood sheet. We sand your almost finished product using a sanding machine.
Now you can paint the wine rack in the color you like along the grain with a regular brush.
To complete the process, we drill holes for dowels in the top and bottom covers, glue them in and in this way connect all the vertical and horizontal parts of the shelf-rack.
Let the glue dry. This will take at least a day. Then we lace up the holes in the back wall with rope, ribbon or whatever you like best. Your wine rack is ready! You can arrange the wine.
Add glass holders
1. Cut out the middle and outer holders R, S from the cherry board. Using a standard saw blade, make folds 38 mm wide and 12 mm deep in two passes (Fig. 2). Then file a 3 mm wide chamfer at an angle of 45° on the longitudinal edges of the holders. (Formation of folds and chamfering is shown in the photo on page 20.)
2. Make chamfers 3 mm wide along the front ends of the holders R, S using a file (Fig. 2).
3. Drill mounting holes in the R, S holders and countersink them from the bottom. Make the holes in the outer holders S at an angle of 8° (Fig. 2a). Sand the holders.
Pressing the middle and outer holders R, S with clamps and inserting spacers 27 mm wide, drill guide holes in shelf B and screw in the screws.
4. To install the R, S holders in place, turn the body over and place it on blocks made of blocks to make it easier to work with the clamps (photo G). From a scrap of 19mm board, cut a 27x305mm strip and saw it crosswise into 45mm lengths to use as spacers. Place the holders on the underside of the shelf B flush with its rear edge and install 27 mm wide spacers between them. Secure the holders. Drill guide holes in the shelf through the mounting holes of the holders and screw in the screws. To simplify further finishing, remove the screws and holders, marking their positions, and set them aside.
Requirements for conditions for storing wine
Not all wine varieties require careful storage and have the potential to age. For young light wines, a small rack in a cool, dark place or a built-in cabinet in a kitchen unit is sufficient. For vintage varieties that require long-term aging, special conditions must be created.
There are five most important parameters for storing wine at home:
- Protection from direct sunlight. Bright lighting contributes to the rapid aging of wine, spoiling the taste and quality. A mandatory requirement for long-term storage of wine is a dark place, protected from sunlight.
- Strict adherence to temperature conditions.
- Maintains a constant humidity level of 60−80%.
- Strong fixation of wine bottles. No movement, vibration or rolling is allowed.
- An additional requirement for bottles with traditional cork stoppers is that they should only be stored horizontally. Contact between the cork and the wine is necessary, because... In a vertical position, the cork dries out and air gets into the drink.
There are several recommendations for storing an open bottle of wine. To extend shelf life, use vacuum stoppers or add gas. A tightly closed container without air access in a cool place will preserve the drink for some time. But the best way is to use the leftover wine in French recipes.
How to choose
The choice of wine cabinet depends on personal preferences, available space and financial capabilities. A standard ready-made cabinet has a full range of necessary functions and a simple design. More expensive models are equipped with additional options and are decorated more effectively. Elite devices are made to order for expensive and rare varieties and are equipped to ensure long-term perfect preservation of the drink.
The main task of a wine cabinet is to provide all storage requirements. To ensure that the purchased unit is distinguished by its functionality, reliability and long service life, we provide several recommendations for selection.
- Vibration is not allowed. Careless handling spoils the wine, promotes sedimentation, and disrupts the ripening process. Equipping with shock absorbers and shelves made of strong wood is a must in a cabinet with a compressor. The non-compressor model eliminates the risk of vibration.
- Stable temperature and humidity. The storage regime must not be violated; constant temperature and humidity indicators must be observed.
- The collection, which includes different types of wines, is placed in a cabinet with isolated zones.
- Protection from light is required. An open closet is only permissible in rooms without windows and bright lighting. In all other cases, doors made of wood or tinted glass are hermetically sealed. Lamps without heating are used.
- Ventilation is necessary. Carbon filters do a good job of cleaning the air and removing foreign odors.
Household
A household rack is designed for storing various things, for example, garden tools, sports equipment, car tires, industrial goods, books, household appliances. Such racks are used in garages, utility rooms, offices, warehouses, and they can also serve as a display case in sales areas.
This design consists of supports and collapsible shelves: it takes up little space, but, nevertheless, allows you to store a large number of things. The shelf can support up to 120 kg of cargo; you can also change the design using additional shelves, dividers and drawers.
The household rack is made of metal, coated with a durable polymer coating and has a light gray color. Thanks to its appearance, it can fit into any interior.
Characteristics:
- structure height – 2000 mm (any size available on request);
- shelf length – up to 1800 mm;
- shelf depth – up to 600 mm;
- load on the shelf – up to 120 kg.
Pros:
- easy to assemble;
- made of high quality galvanized metal, which is resistant to damage and corrosion;
- easy to use;
- storage levels can be easily changed without disassembly thanks to the special design;
- You can use any flooring: chipboard, metal, plywood.
- beautiful appearance and high quality.
Minuses:
low capacity.
How to make a minibar with your own hands: 135 photos of ideas on how to make a minibar from scrap materials
- A line is drawn exactly in the center of the globe using a construction pencil.
- Exactly along the marked markings they are carried out with a jigsaw, forming a cut.
- The cut line is carefully sanded, and the edges can be coated with paint, a rubber gasket can be attached, or the surfaces of opposite cuts can be covered with soft textiles.
- The inner surface of the globe is cleaned of dust and debris.
- As an additional decoration, you can cover the inner sphere with satin fabric or velvet.
- Rotary fittings are attached to both halves of the globe, carefully checking the serviceability of the mechanism.
- The most crucial moment is the installation of internal racks. Due to the small size of the globe, 3-4 bottles and several miniature glasses fit inside.
Made from plywood and leather strips
Coasters with leather materials look very unusual and elegant. For this model you will need two plywood: 50 by 50 cm. One, as a base, will have the product on it, and on the second, bushings will be attached, each about 45-50 cm in length.
If desired, you can cover the product with a decorative finish: wax, stain, oil or varnish.
Leather strips 2-3 cm wide are fixed on two bushings, parallel located opposite each other at a distance of 15 cm.
This will create cells for storing wine.
Where to start?
First of all, you need to think about the purpose and location of future shelves.
For small items, it makes sense to make neat, lightweight shelves or a modular system united by one style solution.
If it is necessary to store large or weighty items, it is important to correctly calculate the overall dimensions of the shelves and their strength. Bookshelves should be strong enough and securely fastened, for example. The simple wooden structure will be a good addition to the kitchen interior and room decorated in folk style.
A simple wooden structure will be a good addition to a kitchen interior and a room decorated in a folk style.
Bright colors for a homemade shelf are permissible only if there are similar color accents in the design of the room.
A good visual effect is created by shelves whose color matches the overall tone of the walls or furniture.
The shelf is an important detail of the interior, for this reason its appearance is very important to think through in advance. In addition, you should take seriously the choice of placement of the shelf and decide on the option for its fastening. In addition, you should take seriously the choice of placement of the shelf and decide on the option for its fastening
In addition, you should take seriously the choice of placement of the shelf and decide on the option for its fastening.
Shelves are usually secured using metal furniture strips with slots.
Taking into account all the nuances, it is necessary to draw a sketch of the future shelf, take careful measurements, calculate the overall dimensions of the product and complete a competent drawing.
Drawing
No matter how simple the model of the planned shelf may seem, it is necessary to spend time on drawing work.
This work will help to correctly calculate both the dimensions of the future structure and the material consumption.
When making a drawing, you should additionally consider the functional features of the design. The shelf must be strong enough to withstand future loads.
Supporting elements are placed taking into account the characteristics of the material. In any case, the maximum step between the supports should not be more than 90 cm. The thinner and softer the material from which the shelf parts are made, the smaller the distance between the supporting elements.
Careful preparatory work will allow you to avoid annoying mistakes when making your own home shelf.
Holder made of hooks or metal plates
This design is suitable for a country style kitchen. Metal hooks are inserted into a large solid board. The board will be mounted vertically on the wall.
The hooks are fixed on both sides, at equal intervals.
Additional Information. To create a special authentic spirit, you can use cast iron bolts as hooks, like on a railway.
These bottle holders are great space savers.
Cooling technologies
Depending on the model, a wine cabinet may offer several different drink cooling technologies:
Absorption cooling
Absorption is the quietest technology that does not make any noise during operation. It is based on evaporation and heat absorption through chemical reactions. Thanks to its silent operation, the absorption cabinet can be installed in any room. But this technology is not without its drawbacks - high price, high electricity consumption and the presence of harmful substances in the system.
Compressor cooling
Compressor – cools the contents by compressing and expanding gas. When it contracts, it evaporates heat, and when it expands, it absorbs it. The main advantage of the compressor is its efficiency. It does not consume a lot of electricity, but maintains the set temperature well. It is also good that the compressor cabinet is quite narrow, which allows it to fit into any space.
Thermoelectric cooling
Thermoelectric - carries out cooling using a special plate, which, when voltage is applied, cools one side and heats the other. Thermoelectric wine coolers may produce noise, the volume of which depends on the quality of the devices themselves. An expensive model will be almost silent, while a cheap model will cause noise discomfort.
This technology is good because it is low cost and does not emit vibrations or vibrations during operation.
Completeness
When purchasing a shelf that requires self-assembly, you should make sure that all the declared elements are included in the box with the product. Searching for fasteners that match the size and color can really ruin your mood. Buying bolts and fasteners, even if they are of the right size, can result in another problem - reducing the strength of the structure. Storing glass bottles does not allow the slightest slack in fastening, otherwise extraneous vibrations (steps, door slams, etc.) will interfere with the aging of the wine.
Wall location
DIY wine racks, and even on the wall. This is an ideal option for a kitchen with a small area.
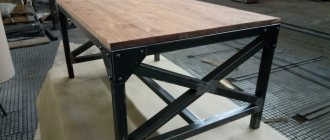
Alternatively, you can use rectangular pieces of wood. Attach short ones to the long one, like legs for a wooden bench.
Then limit the edges with long bolts or nails and paint the structure. You can also lightly sand the painted wood from the edges to give it authenticity.
A similar effect can be achieved by driving several massive nails or pegs into a wide board.
Design Features
A modern wine cabinet is the ideal storage for a noble drink. Cabinets provide the required temperature and ventilation, maintain humidity, and protect from direct light. Temperature cabinets are designed for short-term storage, while climatic structures are designed for long-term storage and create conditions similar to a wine cellar.
In addition to the aesthetic appearance, the cabinets are equipped with a climate control system. The operating principle of this system is similar to the operating principle of a refrigerator. The compressor reduces the temperature, the ventilation system ensures uniform distribution of cooled air. Carbon filters clean the air of fine dust. For illumination, lamps that do not heat the air are used.
The compressor creates a slight vibration, so the system provides structural protection - mechanical impact on the cabinet is unacceptable for storing wine. The compressor is secured so that it does not come into contact with the cabinet walls. Compressor trays are made of dense wood. Special rubber shock absorbers installed in cabinets dampen vibration.
The most modern models are created according to the Peltier principle. They use thermoelectric cooling, where thermal energy is pumped out of the chamber. The moisture partially settles on the walls, thereby achieving the desired percentage of humidity. Excess liquid is removed outside by a special drainage system. They control the equipment using the built-in panel or remote control.
Tackle the foundation
Drill overlapping holes to make sockets 32mm long by 14mm deep on two faces of each piece as indicated on the template.
1. Glue two blanks measuring 38x51x240 for the legs J. Each piece will make two legs.
2. Make two copies of the leg template. Using spray adhesive, attach them to the blanks by bending them along the fold line. Place a 6mm diameter drill bit into the drill chuck and form 32x14mm sockets in the locations indicated on the template (photo D ). Then use a sharp chisel to level the walls of the nests and trim the corners.
3. Cut out the legs along the contour lines using a band saw and sand, but do not separate them. Insert a cutter for roundings with a radius of 3 mm into the collet of the router installed in the table and process the workpieces on both sides, as indicated in the template and Fig. 1. Sand the workpieces smoothly.
4. Using a saw machine, using a crosscut (angle) stop with a wooden pad and an end stop-stop that ensures the parts are the same length, saw off two legs 114 mm long from each workpiece.
5. You are sawing the kings K. Using a groove disk, form 6x13 mm tenons at the ends of the frames, fitting tightly into the sockets of the legs (Fig. 1 and 1a). Before sawing tenons on parts, check the settings of the sawing machine on scraps of the same thickness. Having cut out the cheeks of the tenons, place each drawer on a narrow edge and reduce the width of the tenons to 32 mm.
6. Install a standard 3 mm thick blade into the saw machine. Make a couple of shallow cuts on the top side of each drawer (Fig. 1a). The cuts will serve as traps for excess glue when attaching the base to the body. Sand the sides smoothly.
7. Dry assemble the base by connecting the drawers K with the legs J , and make sure that the parts fit accurately. Then glue the base (photo E).
Glue legs J and drawers K together, aligning the pieces along the top side. Check the squareness of the base by measuring its diagonals.
Glue the J/K base to the bottom of the C/E/F body, lining up the side gaps. The legs J should be flush with the back of the cabinet.
8. Place the case on the floor with its bottom upside down. Apply glue to the upper edges of frame K between the cuts. Align the J/K with the body and secure with clamps (photo F ).
Case stand
Here you can use your imagination to the fullest. After all, this design assumes that it will be stored on a table or, in extreme cases, on the floor. In general, everything that was described above can be applied here, only in a smaller version.
DIY high chair - interesting drawings and projects on how to make a comfortable and functional high chair (120 photo ideas)
DIY built-in wardrobe: 115 photos of original ideas and video tips for building built-in wardrobe models
It is also necessary to mention that you can use similar wine racks for the refrigerator.
If you prefer branded products, then you can buy wine shelves. This is not difficult to do, but it costs money, especially if you want the original handmade work of a master.
But there are also inexpensive wine shelves aimed at mass production. Among them are the IKEA wine racks.
Source
Kinds
There are several types of wine cabinets. The main guideline when choosing a wine storage is the size of the room. Owners of spacious premises can afford a free-standing wine cabinet or even organize a special room for a private wine collection.
But there are many solutions for small spaces too. A private house with a cellar or an apartment with a regular small kitchen, there are options for all lovers of good wines. The most popular design is called a built-in wine cabinet. They are built into a wall, column or countertop. Capacity - from 20 to 200 bottles. There are several types of built-in wardrobes.
- Single zone. The cabinet maintains the same temperature in all sections.
- Dual zone. The cabinet consists of two insulated sections, each maintaining its own temperature regime.
- Multi-zone. Specialized equipment consisting of several long-term storage sections. Designed for a large number of bottles with different types of wine requiring different storage conditions.
In addition to large cabinets, wall racks are common. The good thing about the design is that it can be mounted on any free wall. Racks and racks are positioned so that wine is stored horizontally or at an angle of 15º. Tight fixation protects bottles from shaking and sedimentation. Wine shelves are an even more practical option. The shelf can be made in any design, the desired size and fit beautifully into the overall interior.
The most economical design is pipes. Cylindrical clay blocks perfectly preserve the drink and have an original design. A bottle holder (this is the name of a structure woven from metal rods) is also considered a practical option for small spaces. The standard width of the bottle holder is 10 cm. The bottles are arranged tightly, and the height of the structure does not allow them to fall.
Posting rules
There are two types of wine cabinets for the home: free-standing and built-in. A separate closet is installed so that it does not interfere with other pieces of furniture. The cooling radiator is placed on the rear wall or in the side of the structure. Built-in devices are compactly placed in furniture sets. Wall racks and shelves are the easiest and most functional option.
The ideal place to install a wine cabinet is the cellar, so it is easier for owners of private houses to decide the issue of placing a wine cabinet. In addition to the cellar, the underground and attic are excellent for wine storage. The space under the stairs, dark storage rooms - the choice of homeowners is very wide and allows you to show not only practicality, but also imagination. In the spacious cottage it is possible to allocate a separate room for storing elite varieties of collection wines.
Important! Using the refrigerated wine cabinet for purposes other than its intended purpose is unacceptable. You cannot store food together with wine - foreign odors and mold will appear.
However, lovers of good wine will be able to place the necessary equipment in the apartment. Most often, a wine cabinet is installed in the dining room or kitchen. A built-in wardrobe or wall rack is an excellent solution for an apartment. The design can be developed for any empty corner, free wall, or built into a countertop. You can also buy a modern small wine refrigerator and place it in any convenient place.
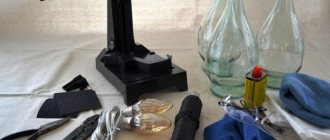
Stand for wine bottles made from tin cans
For this you will need:
- glue;
- spray paint;
- fabric (so as not to smear everything around with paint);
- canning knife;
- cardboard;
- tin cans 8-12 pieces (absolutely any cans will do: peas, corn, beans, etc.).
Process:
First of all, we clean the jars of labels: soak them in warm water, as this will help remove the paper from the surface quickly and will not allow small shreds to remain. Next, dry the clean jars.
Then you need to cut out the bottom of the can, and process the sharp edges and bend them inside the can.
Place the jar on a stand and apply paint first to the inside and outside. When the jar is dry, start applying paint to the outer edges and leave to dry again.
The number of jars used depends on how many tiers in the stand you planned to make.
After all the jars have dried, we begin to assemble the structure. We make the first row and fasten the jars together with superglue. We fix this row with clothespins, glue the subsequent rows and let it dry.
Ready!
Assembly order
To assemble a wine box with your own hands, no special skills are required. Just follow the instructions:
- Decide how many bottles the container will hold. The standard quantity is 3 pieces. Measure the diameter of a standard wine bottle at the widest part, multiply by the quantity and add a couple of centimeters to the dividers.
- Take kitchen boards and use a pen to widen the holes where they are usually hung on hooks.
- Cut the board into equal pieces equal to the length of the box. Screw the sides with self-tapping screws or nail them. Dial the bottom in the same way. The step between adjacent boards is arbitrary.
- Cut two more fragments along the width and insert them transversely inside the box. These are partitions, thanks to which the bottles will not hit each other.
- Take the rope, pass it through the holes in the “ears” and tie it in a strong knot.
- Cover the product with stain, and after drying, rub it with oil. This will give your homemade wine box an expensive look.
Having made such a device, you can test it by going to friends or outdoors.
Expert opinion
Strebizh Viktor Fedorovich, leading construction foreman
At the same time, the work can use an ordinary board, a well-preserved cut of a tree or a stump, unnecessary pallets, or an old shelf for books. If you want to clarify something, please contact me!
Another simple option for a wooden wine rack is a round shelf made of plywood sheets
For this you will need:
- Two sheets of thick plywood.
Process:
We take two sheets of plywood and make round holes in them in the same places. The diameter of these holes should be slightly larger than the diameter of the bottle itself - 10-12 cm. Then we fasten two plywoods at a distance of 15-20 cm from each other.
The holes can either be scattered across the entire area in chaos, or they can be arranged in any specific order. It's up to your discretion. Also, if desired, the shelf can be painted or some accessories can be added: additional carved elements, artificial fruits, etc.
How to make a box - 90 photos and a master class on making a box
- Woodworking Machine. Its price is high and not everyone has it, but when creating batch products it’s worth stocking up on it. Its capabilities are impressive; it is a substitute for a plane, circular saw, and several machines. It is powered from a simple network, so everyone will appreciate the ease of use.
- A drill and a screwdriver, and sometimes just one thing.
- A jigsaw (there is no need for a professional one), but if you have one, the work will go faster.
- Stapler for furniture.
Expert opinion
Strebizh Viktor Fedorovich, leading construction foreman
Approximately all processes have the same sequence; the only difference between a plywood box is the selection of material thickness. If you want to clarify something, please contact me!
Tags
equip with regular shelves Such a shelf can wine rack. give the shelf an elegant wooden shelf allows it to be a shelf like a wine rack in a wine rack than a shelf from Wine cellar design Wine cellar design expensive wine. decoration of wine cabinets for your wine collection wine rack option. built-in wine rack. hex screws. with your own hands with your own hands with your own hands with beautiful hands, a lot of masturbation and with their own hands the designers did it with their own hands
store your photo
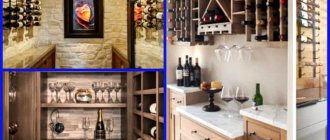
Built-in wardrobes
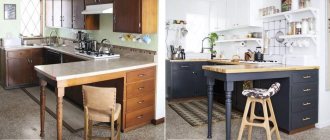
Obviously, one of the most convenient and attractive ways to store your wine collection is to integrate special shelving into the finished space. This way you don't have to look for extra space in your kitchen. The Room Interiors portal suggests equipping a regular sideboard for dishes with shelves. Thus, in one half you can store drinks, and in the other, sets of glasses and cutlery.
Another option, equipped in a kitchen unit. All you need is to equip one of the modules with special compartments and a grille, as the designers from Live Laugh Decorate did.
The following DIY project will appeal to those whose kitchen space is so limited that it seems impossible to allocate even a little free space. You can get a small vertical shelf. It is very narrow and therefore will not take up too much space, and you can vary the height yourself. If desired, you can make it from the floor to the ceiling.