Collecting scale models has become a favorite hobby
many people.
One of the directions is small copies of various cars. These can be cars, trucks, or special-purpose vehicles.
When a collection becomes large, the need to house it arises. A DIY typewriter shelf will help with this.
You can purchase a ready-made product in the store. But it’s not always possible to buy a shelf that fits the size. And realizing your fantasies, making something exclusive is much more interesting.
In addition, you can make sure that the shelf fits harmoniously into the interior of the room. The most accessible materials for its manufacture will be:
- Wood (natural or chipboard);
- Plastic;
- Metal;
- Glass;
- A combination of the listed materials.
Working with them does not require any special knowledge or skills.
The tool you will need is the simplest one. The shelf can be floor-mounted or wall-mounted.
A shelf for cars for my son or porridge from an axe. — DIY community on DRIVE2
I wish you all good health.
I’m growing up a bully who really doesn’t like to clean up his toys, especially the construction toys on the floor and small cars bring me great happiness, in short, I decided to make some kind of shelf for the cars so that my son would keep order and it would be interesting for him)) . I will say right away that I did everything from what was and what was. And it was: 1.Rack 20 by 45. 2. Carpenter's glue. 3. Milling cutter. 4.Drill. 5.Jigsaw. 6.Miter saw. In general, nothing else was needed. I looked at photos of shelves on the Internet and chose the option of a shelf in the form of a tractor, with a semi-trailer. The semi-trailer, as you guessed, has a shelf. In short, I’ll get to the point: On the board we found, mark out the outline of the truck and cut it out with a jigsaw.
Since I didn’t have enough boards to make the wheels right away, I had to tinker with them. Once upon a time we cut holes in an oak board with a crown, there were blanks left for the wheels, they were useful to me, they were not even, they were of different diameters.
To make everything even, I made the following design: I put the future wheels on the bolt, tightened it with a nut, and inserted it into the drill. I leveled it first with a chisel, then with sandpaper. Looks like I drew it on the photo, it looks bad, but it should click.
I cut out the car and the wheels are ready.
To keep everything civil, I went around everything with a radius cutter with a bearing. You can see her in the photo.
We put the tractor aside and proceed to the trailer. I sawed 4 slats at 45 degrees on the trim. The next task was to glue them together; there are no corner clamps, but I saw on the Internet that they used an elastic band. There was no rubber band either, there was a camera. I cut out a suitable strip.
When screeding, the planks were positioned at the corners, resulting in exactly 90 degrees. Now about the grooves into which the middle shelf is inserted, highlighted in circles
I thought it would be easier to cut them out, in short, I quickly assembled the carriage on my knees.
Here's the carriage. We select a cutter of the required size, set the milling depth, place the router in the carriage and go through it. If anyone can tell me how to make the grooves simpler, I would be very grateful.
Well, the best part is, we put everything together. Initially, I set myself the task of doing everything without a single screw, just glue.
I assembled everything using homemade dowels and glue.
I'll tell you how I make them. They cost pennies, I agree, but sometimes they are needed, but they are not at hand, but there are a lot of scraps that cannot be used anywhere.
Here's the device. We insert the piece of wood into the drill, then pass it through a hole in the metal, the diameter of the hole is slightly larger than the diameter of the required dowel.
The sandpaper and our type of dowel are ready.
Almost done. He indicated where he glued his dowels.
Well, all that remains is to paint it. I entrusted this matter to my wife, because it was not given to me. We used acrylic paints, firstly, they seem to be more environmentally friendly), and secondly, my wife has a lot of them in different colors))). Well, I also liked that it seemed to be painted and the wood texture was visible. Well, the finished product:
My son is happy. The paint has dried, I have a day off today. My son is in kindergarten, which means the shelf will take its place on the wall very soon, and I hope in the evening my son will carefully arrange his car park there)))
Thank you all for your attention, maybe it will be useful for someone, because buying everything now costs a pretty penny. I made it from scraps and with the cheapest tools, I think if you initially prepare the right material, all sorts of ribbons, lights, light bulbs, then you can create something more interesting, in general there is an idea in your head, but that’s a completely different story))).
Purpose
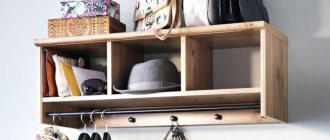
The difference between the designs may also be related to their intended purpose. It’s easy to make an attractive and comfortable shelf for shoes on the wall from plywood (in the house, in the country, even in the garage). The simplest option involves using hooks - nothing else is really needed. But for those who actively walk along the street in the off-season, a multi-level design will be more attractive. It avoids contact between dirty and clean shoes.
But for long-term storage, a shelf with closed drawers is preferable. It is usually decorated in a rustic style, although this is not necessary. For a large number of shoes, it is recommended to use a full-wall closet with shelves made of thin plywood. They are arranged in the manner of brickwork; To make the product stronger, individual shelves are fixed to a wide board made of thick wood.
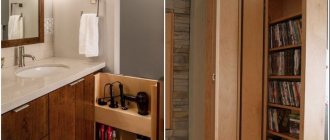
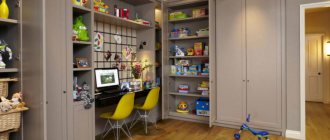
In a children's room, shelves are often used to store cars and other small toys. Sometimes they are supplemented with glazed doors into which anti-reflective glass is inserted. But such doors must be made exactly according to the allotted dimensions in order to avoid mistakes. It is useful to have an easily removable, replaceable backdrop.
If you need to make a shelf for flowers, for the kitchen or for books in small quantities, you should focus on other approaches. The front walls are definitely not needed here, and you can do without the rear ones.
Flowers can be placed on a hanging shelf. In this case, fastening is carried out using cables, brackets, chains and other methods. However, you definitely can’t count on a serious load. A standard and quite familiar solution is a wall-mounted flower shelf. It is attached using brackets and self-tapping screws (sometimes hinges are also used). But in terms of stability and safety, there is no equal to floor structures.
And also shelves for flowers can be made in:
- corner;
- direct;
- figured;
- multi-tiered;
- single and group options.
Creative shelves for storing cars
Homemade shelf for cars
Purchasing a shelf for cars is a way out of the situation when the toy car fleet has grown so much that it takes up almost all the free space. Additionally, cars scattered around the house can cause serious injury, which is why it is important to have a good storage system for them. This review contains several ideas that will inspire parents and collectors!
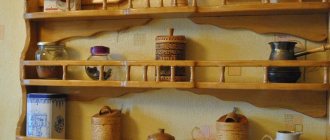
Vintage typewriter rack spotted on 4 EGT blog. It will become not only a practical storage unit, but also a beautiful showcase for displaying your collection.
This cozy “garage” is easy to sew yourself using instructions from the Homemade by Jill website. Its main advantage is portability.
The environmentally friendly truck, produced by the Czech brand Fler.cz, is a toy in itself and also serves as storage for other cars. With the latest design upgrade, it now has real wheels.
This DIY wooden car rack from What About Wood holds 35 to 40 toy cars.
This Little Miss Alizzi shelving unit once served as a cassette shelf. Now it's great storage for cars with a chalkboard instead of a back wall.
Do you have your own unusual ways to store toy cars? Share with us in the comments!
How to reliably strengthen a structure
We made a rack of boxes with our own hands, but will it be strong and reliable enough? You can strengthen the structure in different ways. For example:
- Make double walls by gluing two or three sheets of thick cardboard.
- Reinforce the walls with stiffeners made from accordion-folded cardboard strips.
- Make a lattice structure from slats and attach it to the back of the rack.
By showing your imagination and creativity to the fullest, you will create a unique interior masterpiece that will be admired by your family and guests at your home.
More complex designs can be made from cardboard, with shaped elements, themed decor and fittings. In most cases, you will have to draw a sketch and drawing, take measurements and think through each stage of making furniture with your own hands.
Don’t be afraid to experiment, keep up with the times, because cardboard furniture is not only affordable, but also an original option for creating comfort and a unique atmosphere.
DIY typewriter shelf: convenient storage
Collecting scale models has become a favorite hobby
many people.
One of the directions is small copies of various cars. These can be cars, trucks, or special-purpose vehicles.
When a collection becomes large, the need to house it arises. A DIY typewriter shelf will help with this.
You can purchase a ready-made product in the store. But it’s not always possible to buy a shelf that fits the size. And realizing your fantasies, making something exclusive is much more interesting.
In addition, you can make sure that the shelf fits harmoniously into the interior of the room. The most accessible materials for its manufacture will be:
- Wood (natural or chipboard);
- Plastic;
- Metal;
- Glass;
- A combination of the listed materials.
Working with them does not require any special knowledge or skills.
The tool you will need is the simplest one. The shelf can be floor-mounted or wall-mounted.
Wood shelf
When choosing this material for making a shelf, you need to decide what it will be. Both wood and chipboard have their advantages and disadvantages.
The board is easier to work with; good types of wood do not absorb moisture. Particleboards, as a rule, have a high-quality factory coating. Accordingly, you don’t have to paint them.
In addition, when working with chipboard, in furniture stores you can find various accessories for sealing corners and edges in the desired color.
In both cases, individual structural elements can be connected using ordinary self-tapping screws.
A stronger connection will be achieved if you use so-called “confirmants”. These are special screws that are used in furniture production.
Plastic
Nowadays, in building materials stores you can choose suitable panels from this material. Large selection of colors.
Plastic
Nowadays, in building materials stores you can choose suitable panels from this material. Large selection of colors.
It is easy to work with and bends easily with a little heat. This will allow you to make your own cars completely individual.
When choosing this material, you should take into account its low strength. You can connect the parts with glue or self-tapping screws.
DIY typewriter shelf: convenient storage
Collecting scale models has become a favorite hobby
many people.
One of the directions is small copies of various cars. These can be cars, trucks, or special-purpose vehicles.
When a collection becomes large, the need to house it arises. A DIY typewriter shelf will help with this.
You can purchase a ready-made product in the store. But it’s not always possible to buy a shelf that fits the size. And realizing your fantasies, making something exclusive is much more interesting.
In addition, you can make sure that the shelf fits harmoniously into the interior of the room. The most accessible materials for its manufacture will be:
- Wood (natural or chipboard);
- Plastic;
- Metal;
- Glass;
- A combination of the listed materials.
Working with them does not require any special knowledge or skills.
Suitcase for cars
If your child’s collection includes at least 100 cars, then such a suitcase will be a real find for you. All the cars will be neatly folded, and the suitcase can be stored in the closet or under the bed. This suitcase costs about $20 on Amazon.
You can also find a spacious suitcase for cars on Aliexpress. You can order one here.
Wood shelf
When choosing this material for making a shelf, you need to decide what it will be. Both wood and chipboard have their advantages and disadvantages.
The board is easier to work with; good types of wood do not absorb moisture. Particleboards, as a rule, have a high-quality factory coating. Accordingly, you don’t have to paint them.
In addition, when working with chipboard, in furniture stores you can find various accessories for sealing corners and edges in the desired color.
In both cases, individual structural elements can be connected using ordinary self-tapping screws.
A stronger connection will be achieved if you use so-called “confirmants”. These are special screws that are used in furniture production.
Glass shelf
It looks very impressive made of glass. To do this, it is better to order it from a glass-cutting workshop. Here they will be made to the required dimensions and the edges will be polished.
This must be done to avoid cuts. Cutting glass shelves to size yourself is not difficult, but it is better to entrust the processing of sharp corners to professionals.
You can make the entire structure entirely from glass using special silicone glue. This glue is designed for gluing aquariums.
You need to work with it using respiratory and eye protection, because... it releases substances harmful to the body.
Dry the glued surfaces in a well-ventilated area for at least 24 hours. Canopies for wall mounting are also glued with this silicone adhesive.
You should take into account the weight of the structure, because glass itself is not light. In addition, car models are most often made of metal, and they also have some weight.
One of the problems with collections placed on shelves is dust. Models have many small details and when dust gets on them, their outlines are smoothed out.
In addition, the color of the object is lost. Therefore, a hermetically sealed shelf for DIY typewriters will be more practical.
To do this, when designing it, it is necessary to provide for the presence of front glass doors. They can be movable.
Master class on the topic:
To do this, guides are made at the bottom and top. You can use special furniture mounts for glass, which are sold in hardware stores. Installing them won't be difficult either.
Manufacturing and fastening stages
Making non-slip accessories for shoes does not require any special skills or abilities. The process will also take a little time. Having prepared the necessary materials and tools, you can proceed to practice. Below we will discuss how to make various types of ice access.
From a bicycle camera
The manufacturing algorithm is as follows:
- Thin rings are cut from an old bicycle tube with scissors. They should be 5-7 mm wide. You will need about 80 rings for both feet - the exact number depends on your shoe size.
- Two long strips of 60-70 cm each are cut out from the remaining rubber.
- Turning the shoes upside down, they begin the process of weaving anti-icing “lace”. In places where the base comes into contact with the ground, nuts are threaded onto the rings. For convenience and speed when weaving, you can use round-nose or long-nose pliers.
- Having weaved the rubber protection according to the size of the sole, one of the cut out long strips is threaded into the loops sticking out at the edges. The ends are tightened so that the resulting structure holds securely on the shoe, and tied neatly above the heel.
For the second leg, exactly the same ice drift is made - and you can safely set off on a slippery road.
From a can lid
Every home has a couple of old metal screw-on can lids that have already begun to rust. They can be used to make excellent ice protection. The procedure is as follows:
- Make small holes on the inside of the lid using a corkscrew or a large nail. It will be more convenient to do the work if you put something soft under the lid: a rag folded in several layers, a piece of foam plastic, foamed polyurethane insulation for pipes.
- Four more holes are made on the side walls of the lid.
- An elastic band is threaded through them, with the help of which the structure is attached to the shoe.
Ice drifts can be made more durable. Instead of a lid, a metal plate or piece of plywood is used as a base. If you are wondering how spikes are made for shoes, you can try using 3 mm screws secured with lock washers. It will turn out perfect: your feet won’t slip and it’s comfortable to walk.
From bottle caps
Another idea on how to make ice drifts from improvised materials is the use of ordinary bottle caps. Perhaps in the near future they will become a rarity, but for now, resourceful and skillful people can safely put them into use. A detailed algorithm for making shoe spikes from the specified material:
- Several covers need to be slightly bent in half and holes made on the fold.
- Thread a lace through them, like through a button with two holes. String 3-4 caps.
- Attach the resulting “beads” with a cord across the sole with the sharp edges of the caps facing down.
The resulting devices will be reliably protected from falls on slippery road surfaces. If desired, you can place two rows of covers on each leg. Do-it-yourself ice access bars will serve no worse than store-bought ones.
Rubber pads
Ice drifts with removable rubber pads are not difficult to make, but they have significant advantages - they are easy to use and effective in protection. The material you can use is an old car inner tube or a piece of thicker rubber (2-3 mm thick). Procedure:
- The base is cut out of rubber to fit the shoe. If the material chosen is a camera from a car, 2-3 layers should be taken at the places where the spikes are attached.
- Use any sharp instrument, such as a leather punch, to make holes in the rubber.
- Screw 6-8 mm bolts into the resulting recesses and secure them with washers (preferably lockers) and nuts, self-locking for reliability.
The resulting “spike” is attached to the boot using rubber bands. When using thin automotive rubber, the clamps are cut out immediately with the base. It turns out to be a stylish winter accessory.
From sandpaper
Perhaps the simplest are ice drifts made from sandpaper. Additionally, to make them you will need a tube of “Moment” type glue.
Shoes that will be given non-slip properties must first be thoroughly washed and completely dried. Then glue is applied in strips to the sole, where it touches the ground, and sandpaper is attached to the top. Please note that the sandpaper must be coarse-grained (No. 3 or No. 4), otherwise the desired effect will not be achieved. It is recommended to wait a day until the glue dries completely, and then you can safely use the shoes.
The choice of the type of ice drift depends on personal tastes, the availability of materials for their manufacture and financial capabilities - everyone can find a suitable option for themselves. A do-it-yourself device is, of course, inferior in aesthetic parameters to store-bought analogues, but it will serve for a long time and reliably.
Metal rack
A shelf made of this material will bring an element of something extraordinary and unusual to the interior of the room. Since it will weigh significantly, it is better to make it floor-mounted.
Working with metal is more difficult than working with wood or plastic. But made of aluminum or nickel-plated steel, such shelves will look beautiful for many years.
- Reliability;
- Durability;
- Exquisite style;
- Practicality;
- Originality;
- Combined shelves for models.
The design consists of the shelf itself and the jumpers between them. Therefore, different materials can be used.
Make a shelf, for example, from glass, and the side walls from wood or plastic. Or vice versa. You can experiment with angles.