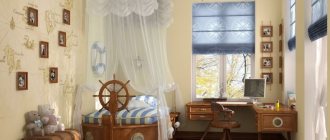
We present an interesting solution for a nursery - a shelf in the shape of a house. This design will appeal to any child aged 3 to 10 years. Its purpose is to store toys and other entertainment accessories.
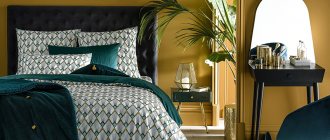
House shelves in a children's room are additional storage space for books, toys, photo frames, souvenirs and other small items.
They are perfect for any children's room, complementing its interior and making it more fabulous.
Dollhouses with shelves make children's rooms match their hobbies in style, while also fulfilling their practical function.
Now the child will not be afraid of cleaning the room and will love it, because with such furniture, arranging toys and books will become a real pleasure!
The shelves inside this cabinet can be arranged as you wish, so that operation is as convenient as possible.
Design Features
Children's shelf houses are products that imitate the walls and triangular roof of buildings. The design is open, there are no doors, and the number of shelves is arbitrary. In some models, the inter-ceiling space is additionally divided into sections.
This design will appeal to any child aged 3 to 10 years.
Such houses, also called dollhouses, have a number of advantages:
- Versatility. Perfect for placing books, toys, children's sets and other children's “needs”.
- Affordable price.
- If you wish, you can make such a design yourself.
- Compactness. With a minimum of occupied space, maximum capacity and functionality are guaranteed.
Its purpose is to store toys and other entertainment accessories.
This design can be made in a floor or wall version. If the house is installed on the floor, then in addition to the storage function, it also serves as a favorite toy. The child has the opportunity to arrange such a “home” and come up with his own stories for games.
Making a toy rack with your own hands: step-by-step instructions
For a child, as for any adult, a room has the meaning of personal space, where he feels like a little master. Accordingly, this tiny world must fulfill the individual needs of the baby. In the understanding of adults, it should be light, clean and spacious. For the baby, the most important thing is the atmosphere of the room, where he feels comfortable, first of all, with his favorite things. And each of them should have its own place. An option for storing toys, in addition to regular boxes, is a rack. Making it yourself means being able to provide all the child’s preferences.
Accordingly, this tiny world must fulfill the individual needs of the baby.
Furniture made in a factory is devoid of individuality due to mass production. Production is on stream. Making your own items for storing toys has a number of advantages:
- ability to satisfy the most demanding requests;
- combination with the overall interior of the room;
- originality of execution;
- confidence in the quality of the materials used;
- convenience and functionality.
Making it yourself means being able to provide all the child’s preferences.
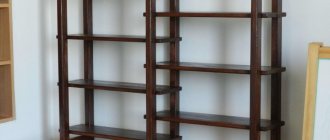
It's hard to imagine a children's room without a shelving unit. From birth, it is able to perform the function of storing personal hygiene items. As the baby grows up, it begins to be used for its intended purpose. Toys, books, and construction sets appear on it.
For the baby, the most important thing is the atmosphere of the room, where he feels comfortable, first of all, with his favorite things.
The design and construction of a toy storage rack must be selected based on personal needs, as well as taking into account the following requirements:
- stability - the structure must have good support;
- safety - the absence of sharp corners and protruding parts will reduce the risk of injury to a minimum.
The simplest option for making children's furniture for storing toys is from fabric stretched over a frame or thick cardboard.
Depending on the age of the child, the toy storage system can be classified as follows.
- Up to 1 year - as a rule, at this age a baby has a minimum set of toys that can fit in one box or section with several shelves.
- From one to 6 years is the most active and inquisitive age, which is why the functionality of the children's room and the storage system for children's toys increases. There are a lot of items to play with and more space is needed to accommodate them to maintain order. In this case, an integrated approach to the issue is required: creating several boxes for storing toys that are interconnected.
- From 6 to 10 years is a transitional age for games. Some children continue to actively play with toys, others devote more and more time to studying and reading books. Accordingly, the role of furniture is changing. This can be a separate drawer or box for storing toys, or shelves that combine several tasks.
- After 10 years, there are usually a few favorite toys left that don’t take up much space. Functionality is directed to the placement of school supplies. It is most convenient to store them in a hanging cabinet, with open or closed shelves.
Depending on the type of rack, the materials and tools used in production will vary.
Depending on the gender of the children, the design of the children's toy rack will vary. For boys, it is preferable to choose more restrained tones in the design and keep decorations to a minimum. Furniture for girls should be more romantic, in bright colors, with a variety of decorations. However, the toy storage item must fit organically into the overall interior of the room.
Depending on the skills and abilities, it is possible to create an object from wood or rods, chipboards, plastic.
You can initially make a shelving unit for a children's room with your own hands in such a way that, as the child grows up, it will grow with him.
It is optimal to place niches along the free wall, which can gradually increase in number.
Among the variety of types of furniture with specific functions, single boxes, drawers, groups of boxes, ottomans, hanging shelves for storing children's toys and much more are distinguished for a children's room. It is optimal to place niches along the free wall, which can gradually increase in number.
For convenience, the toy rack is equipped with wheels and lids.
Necessary materials
Depending on the type of rack, the materials and tools used in production will vary. Everything depends only on imagination. The simplest option for making children's furniture for storing toys is from fabric stretched over a frame or thick cardboard. This task will be feasible even for the mother of a baby. The choice of the fabric itself should be based on its ability to be durable and wear-resistant, i.e. have a tight weave of threads. These types include poplin, calico, satin, denim, as well as artificial leather and fur. Depending on the skills and abilities, it is possible to create an object from wood or rods, chipboards, plastic. For convenience, the toy rack is equipped with wheels and lids.
You can initially make a shelving unit for a children's room with your own hands in such a way that, as the child grows up, it will grow with him.
In addition to the basic materials you will need:
- glue – stationery, PVA, for gluing parts made of wood and plastic;
- colored paper and cardboard - for decorating the product;
- frame wire - for making fabric items;
- plywood - for the back walls.
Having decided on the type, design and construction of the toy storage rack, you need to make a sketch of it.
Step-by-step production
Having decided on the type, design and construction of the toy storage rack, you need to make a sketch of it. Great artistic abilities are not required in this case. This can be simply a sketch on which the dimensions and overall dimensions will be noted. From these data the required amount of materials is calculated.
For an item consisting of three vertical shelves, you will need 1.3 m of fabric with a width of 1.5.
The production of a fabric variation does not involve the construction of special patterns and patterns; as a rule, markings, taking into account future sizes, are applied directly to the fabric.
Furniture for girls should be more romantic, in bright colors, with a variety of decorations.
For an item consisting of three vertical shelves, you will need 1.3 m of fabric with a width of 1.5. From the specified quantity, cut out and cut, taking into account seam allowances of 1.5-2 cm, elements of the following sizes:
- shelves – 4 pieces measuring 30*60 cm;
- side parts - 6 pieces measuring 30*30 cm;
- cardboard inserts – 4 pieces, size 28*28 cm;
- braid – 1 m.
The parts of the shelves are folded in half and stitched with a pocket, similar to a pillowcase.
The parts of the shelves are folded in half and stitched with a pocket, similar to a pillowcase. Then they are connected to each other by the side parts. Cardboard is inserted into the pockets to strengthen the bases. A braid is sewn onto the top of the finished structure and tied for hanging in the right place.
For boys, it is preferable to choose more restrained tones in the design and keep decorations to a minimum.
This type of rack is convenient because it is completely mobile, and the soft side walls, devoid of frame support, allow it to be folded like an accordion. The shelf is ideally placed in a closet if its purpose is to store children's supplies. Equipping the design with side pockets will provide additional storage space. This type will serve as a good alternative to a regular box.
A braid is sewn onto the top of the finished structure and tied for hanging in the right place.
Making a version from wood planks or chipboard will require more advanced skills, such as metalworking.
This type of rack is convenient because it is completely mobile, and the soft side walls, devoid of frame support, allow it to be folded like an accordion.
The manufacture of the frame begins with the walls: side, top and bottom. They are cut from laminated chipboard with a thickness of approximately 16 mm, according to the dimensions. Ordinary plywood is also perfect for the back wall.
Depending on the gender of the children, the design of the children's toy rack will vary.
The next step is making shelves with dividers. Rebates are cut out on the finished parts and grooves are made in the right places. The joints are glued with special wood glue and dried well. To ensure reliability of the structure, the elements are tightened from the inside with a metal angle. The boards must be provided with a good corner connection, which can be equipped with additional spikes and eyes. The sampling is performed with a chisel or chisel.
Making a version from wood planks or chipboard will require more advanced skills, such as metalworking.
Now you need to connect the shelves and vertical walls with nails and additionally glue them. The intermediate shelves are connected to each other with wooden pins. To do this, you need to make a through hole in the frame board, and drill sockets two-thirds the length of the pin in the shelves. They sit on glue. The back wall of plywood is nailed.
The design and construction of a toy storage rack must be chosen based on personal needs.
To equip a structure with drawers, it is important to accurately determine their dimensions. Installation takes place on special furniture casters.
According to psychologists, from early childhood a child must be taught order.
Finally, the finished structure is processed with sandpaper, the existing holes are filled with putty, and excess glue is removed.
And the evening collection of toys can be turned into a kind of ritual.
The wooden model is quite heavy, and therefore, in order to prevent falling and injury, it must be attached to the wall with a metal corner. In this way, sustainability will be ensured.
As the baby grows up, it begins to be used for its intended purpose.
Decoration
Depending on who the children's toy storage rack is intended for - a boy or a girl, as well as the interior of the room, its decor is also carried out. But, despite all the strict rules, it should give the baby a feeling of joy and comfort. Any option can be combined with decorative elements such as butterflies, flowers, bows, cars or fairy-tale characters. They can be made of fabric or special paper and glued to the finished product. It can also be a ready-made decorative element purchased in a store.
- The finished wooden product, after finishing work, can be painted in the required color and varnished in the desired shade.
- Drawer fronts can be made directly using colored chipboard.
- The installation of melamine edging works well as a decoration. To do this, it must be applied to the end parts and ironed with a hot iron. After it is firmly fixed, the residues are removed with a knife. Another type of design is installing a baguette. This will make the rack look neater and more interesting.
- An interesting option would be to invite your child to decorate his children's bookcase himself.
It's hard to imagine a children's room without a shelving unit.
According to psychologists, from early childhood a child must be taught order. And this, in turn, is the baby’s personal belongings and toys laid out and placed in their places, forming a single storage system. Having a separate place will also be useful if a small family member does not have his own children's room. And the evening collection of toys can be turned into a kind of ritual.
Furniture made in a factory is devoid of individuality due to mass production.
Having a separate place will also be useful if a small family member does not have his own children's room.
VIDEO: Toy rack
50 photo ideas on how to make a toy rack with your own hands
We recommend articles on the topic
berkem.ru
How to choose?
Since the range of designs is large, you will have to choose a model that is ideal for your child and harmoniously complements the interior.
Shelves in the children's room provide additional storage space for toys.
To ensure safety, plywood shelves are most often chosen. Eco-friendly and lightweight material is ideal for creating accessories for a child's room. The main thing is that the plywood is well processed, has no “burrs”, and is “densely” covered with paint.
The shelf house can be made in any color.
If you purchase such a shelf in a store, remember that this product, like all others, must undergo mandatory certification, and this is an advantage. However, purchased models, as a rule, do not have much variety. Therefore, if you want to purchase a special design, unique in its kind, you will have to either order it from a workshop or make it yourself.
You can arrange the shelves inside the house yourself.
Hand-crafted houses often have an unusual design, asymmetrical shelves, can be semi-closed, with a unique finish.
Homemade children's shelves - ideas and master classes
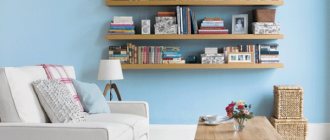
Shelves in a children's room are additional storage space for books, toys, photo frames, souvenirs and other small items. They are good because they allow you not to hide all the most necessary and beautiful things, but, on the contrary, to display them for easy access and interior decoration.
- You can also make shelves easily and on a low budget with your own hands in literally 1 evening. In this case, you will have the opportunity to come up with an “exclusive design” that the baby will like and fit perfectly into the interior of the nursery.
For creative parents, we have prepared a large selection of ideas and inspiring photos, as well as a master class on making a homemade shelf in 7 steps.
6 DIY Shelf Design Ideas
Idea 1. Curly shelves
Curly shelves may not be the most practical and functional, but they are definitely the most beautiful and fun. They are made easily and quickly. The main thing here is to show your imagination and... have a jigsaw.
- We will tell you more about making such a shelf in step-by-step instructions at the end of the article.
- You can search for ready-made figured shelves on Etsy.com or the Crafts Fair.
Here are original and easy to implement ideas for a homemade floor shelf for books and toys.
A video tutorial from the Do It Sam channel will help you make a similar floor or wall-mounted children's book shelf, where a master makes a shelf in the shape of a sheep with several sections out of plywood.
Idea 2. Hanging houses for toys
Wooden toy houses have long been a hit in modern children's interiors. You can make them from thin plywood yourself or order them from crafts moms on Instagram or Etsy.com.
However, toys can live not only in houses, but also in such sections and cells as in the photo below.
Idea 3. Hanging shelves for toys and decor
Another fashion trend is planks or boxes suspended on ropes or ropes from hooks. As you can see, the design of hanging shelves is simple and can be done very quickly.
Idea 4. Use available materials
Shelves can be made not only from plywood, chipboard, MDF or wood, but also from pallets, boxes, cardboard boxes, old chests, skateboards and other scrap materials. We present examples of such shelves in the following photo selection.
You can watch how to make a shelf from a pallet with your own hands in this video master class:
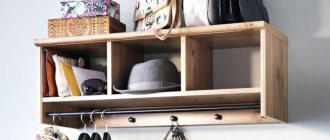
Idea 4. Shelves with hooks
Shelves with hooks for hanging clothes are a more functional and practical solution. Such a shelf would be especially relevant in a newborn baby’s room, because it can be installed above/near the changing table, then all the most necessary things will always be at hand for the mother. You can make a hanger shelf with your own hands by simply screwing the hooks on the back of the board to the board.
Idea 5. Involve angles
To make the most of a small space, you should choose corner shelves for storing books and toys. You can make them with your own hands from a triangle or a quarter of a circle (from the selected material) and a pair of brackets, or form a corner from two adjacent shelves.
Idea 6. Narrow slats for a children's library
Do you want to instill in your child an interest in reading? Narrow slats will help you with this, on which you can display books not with their ends, but with their covers forward. Then the bright library will always attract the attention of the young reader and at the same time decorate the walls of the children's room.
- It’s not difficult to make such a ledge for books with your own hands; to do this, you need to construct it from three narrow boards - a support, the shelf itself and the side. To make the plank more beautiful, you can decorate it with ceiling molding. By the way, some types of moldings themselves may well become shelves after a simple alteration.
However, the slats are intended not only for books, but also for storing icons, decor, paintings or photo frames.
Master class - how to make and hang a children's shelf
To work you will need:
- Plywood with a thickness of at least 15 mm or wooden boards made of soft wood, such as pine.
- Brackets, for example, are made of untreated wood, which are sold at Ikea or any hardware store. When purchasing brackets, be sure to check the permissible load weight for them.
- Also prepare screws with dowels, a drill or hammer drill with a drill (the tool must match the wall), a building level, clamps, a pencil, and paintwork with a brush.
Step 1. Draw a silhouette of the mountains on one board, and make markings for cutting on the other.
Step 2. Secure the boards to the table with clamps. To avoid leaving traces of clamps on the wood between the board and the clamp, you can lay fabric. Then we cut out our “mountains” with a jigsaw exactly along the marked lines, and also cut out the shelf itself.
Step 3. Carefully process the material with sandpaper along the ends and, if necessary, over the entire surface.
Step 4. The next stage is assembling the structure. We attach the “mountains” to the shelf (on the reverse side) with nails, self-tapping screws or self-tapping screws. It is advisable to do this in such a way that the fastening points can later be hidden by brackets.
Step 5. Now you need to paint it with two layers of paint or cover it with matte acrylic varnish.
Step 6. While the workpiece is drying, you can begin attaching the brackets. To do this, you first need to make sure that there is no electrical wiring in the desired location, then you need to draw markings on the wall using a building level and mark the fastening points.
- Before work, do not forget to lay a rag or newspaper on the floor so as not to get the floor too dirty. It’s even better to use a special dust collector for a rotary hammer or simply stick the bag on masking tape under the drilling site.
Then we take the following steps:
- We use a center punch to punch a hole at the attachment point as shown in the photo below. This is necessary so that when you start drilling, the drill stays exactly in the center and does not move.
- Using a hammer drill, we drill holes in the wall to a depth slightly greater than the length of the dowel (taking into account the dust that will remain in the hole). Keep in mind that the thickness of the drill should be slightly larger than the diameter of the dowel, and the dowel itself should be selected based on the expected load on the future shelf (a consultant in the store will definitely help you choose the appropriate option). You need to drill the wall strictly horizontally or slightly from top to bottom.
- Insert dowels into the resulting holes. Next, holding the brackets in place, fasten the screws.
Step 7. Hooray, almost done! All that remains is to secure our workpiece (with the paint/varnish already completely dried) to the bracket. To do this, simply place it on the corners and screw it onto the screws from below. Of course, they should be of such length as not to extend onto the front side of the product. Well, that’s all, we check our shelf for reliability and evenness and hurry to put something on it.
(Rate the material! Already voted: 21 average rating: 4.81 out of 5)
How to make a shelf with your own hands
Any interior detail made with your own hands looks special and brings a unique atmosphere of coziness and comfort. And the shelf house is no exception.
Not only do you have the opportunity to make a model that will fit perfectly into the scale of the room and will personally meet your needs. You have a wonderful opportunity to put a little bit of your soul into the interior.
Prepare all tools and materials.
Moreover, to make such a structure you do not have to be a professional carpenter. So, you will need:
- Several boards (their number depends on the model you choose), you may need plywood, thick cardboard (this also depends on your idea and capabilities);
- Screws (or nails);
- Screwdriver (hammer);
- Hacksaw;
- Quick-drying paint for treating wood surfaces.
Wooden rulers and corners are quite suitable as additional consumables. Wood putty will help hide imperfect joints.
After puttying, the furniture is sanded.
Before you start working, make a sketch of your future masterpiece.
It is important to choose high-quality putty and other materials.
Children's shelf-houses, in addition to their pleasant “appearance,” must be distinguished by good processing - no burrs or roughness are allowed. Therefore, before starting to create a structure, carefully process all the boards.
First, the frame is made, and then they begin to create the roof.
If it is planned that your house will have a complex structure, and the shelves will be divided into sections, then the partitions are also installed before the roof is “put on.” Alternatively, the structure can be made of different materials: the base - walls and partitions - made of wood, and the roof - made of plywood, or even thick cardboard.
Houses can be made in different shapes.
Every parent wants their beloved child to have a special house, a model that is not similar to those of other children. As for the finishing, it’s all at your discretion; make your wildest fantasies and your children’s come true.
Use quality materials for the house.
Some people complement the basic design with balconies, staircases with railings, and attics. Others additionally make windows and decorate them as full-fledged window openings - window sills, curtains, and even flower pots. Others create a main entrance and an emergency exit... Garlands and an openwork roof are used as decoration for the structure. In general, go for it!
Use your imagination when creating a shelf.
But remember, the more additional elements, the more difficult it will be to use the house as a storage system. It becomes a spectacular toy, part of children's fun and entertainment. And for the most practical model, you only need walls, partitions and a roof.
You can quickly make a house with your own hands.
Building a house with your own hands will allow you not only to spend several hours doing an interesting, and perhaps unusual, activity for you, but also to save money. The models presented in the store are not cheap.
Natural wood has been used to create furniture for many centuries.
Materials can be purchased either in specialized construction stores or on numerous Internet sites that sell a similar range.
Shelf houses for a children's room - 50 photo ideas:
PreviousShelves and racks How to make a bookcase with your own hands?
Next
Shelves and racksWe make a rack for toys with our own hands
Where else can a shelf house come in handy?
To be fair, it is worth noting that shelves as such appeared a very long time ago. Almost from the time when people learned to build their own homes and began to make do with simple household utensils. Initially, the shelves were attached almost to the ceiling (and the ceilings, of course, were much lower than today). This was considered a characteristic feature of peasant houses.
The shelves inside this cabinet can be arranged however you want.
And over time, the shelf began to perform not only a practical function, but also to decorate the home, making it different from the others, the neighbors. Today we can no longer imagine life without shelves. Their sizes and configurations are so varied that they simply defy description. However, the functionality of this interior detail cannot be overestimated.
Only environmentally friendly and child-safe materials are used in their production.
Therefore, we can safely say: there were, are and will be shelves in any style and design. If you think that a shelf-house is an attribute exclusively for children's space, then you are mistaken. Wall “houses” are a full-fledged component of the design concept, capable of supporting any style or direction.
A house in the hallway is an opportunity to organize numerous keys and other little things that must be at hand. In the kitchen there is a shelf for spices or kitchen utensils. A shelf in the living room will adequately present your collections to visitors, just gifts from people dear to your heart or souvenirs from interesting travels.
You can also choose any color for the house according to the child’s wishes.
Shelf houses for a children's room, living room or kitchen differ in their design and size. But they are united by the following: a simpler, and at the same time, functional interior detail has not yet been invented, and it is unlikely that they will ever be invented. Regardless of what you prefer: hand-made or a stylish designer model, rest assured that the house shelf is a convenient system for storing a wide variety of things.
A house for dolls made of plywood with dimensions and assembly diagrams, a crib made from leftovers
Waste optimization is the best way to make plywood furniture with minimal investment. When all the material is left without a trace, you can be sure of maximum savings.
But you can always “put” the leftovers into action. Let's consider this case using the example of a drawing of a dollhouse as in the photo.
How to make a doll house shelf out of plywood with your own hands
A scale drawing and assembly diagram with dimensions will look like this.
In order not to miss details when calculating and to take into account the nuances of connections, it is better to immediately number all the elements on the assembly diagram.
When calculating the detailing and cutting it into a sheet of plywood measuring 2440x1220, it becomes clear that complete with a dollhouse for Barbie dolls, you can also make a crib.
Parts with figured cuts can be made by hand using a jigsaw, file, chisels, sandpaper and other carpentry tools. But first you need to draw a life-size template.
Also, such figured cuts are made by hand automatically, using a CNC machine. In this case, the templates are drawn in special vector programs.
Shelves-houses in the interior in the photo
How to assemble and how to paint a plywood house shelf for dolls?
Assembling furniture from plywood with your own hands has its own specifics, but is not much different from the standard methods used for furniture panels. Most often, craftsmen use furniture dowels for internal fastening with gluing. It is not as fast as assembly with self-tapping screws, since you need to wait for the glue to dry. But more accurate.
The accuracy of gluing and the process itself will speed up the use of clamps. With their help, you can clamp the parts in the desired position until the glue dries completely.
If you planned to paint your own plywood doll house in different colors, then it is better to do this before gluing. Water-based paints and varnishes are used for coloring; they are absolutely non-toxic and safe for use in children's rooms. These can be acrylic paints that can be mixed. Before painting, the surface of the shelf parts must be sanded, sanded and primed so that the paint applies evenly.