A toy house for your favorite doll, equipped with furniture and appliances, is the dream of every little girl. Of course, you can pick up ready-made chairs, cribs and chests of drawers in any children's store, but it is much more interesting to create them for your child yourself. Despite the fact that the furniture is made of dolls, and it can be assembled from any available materials, for the little fidget it is a whole world filled with magic. It is important to understand that decorating the home of Barbie or Winx fairies with your own hands is not only a pleasant leisure activity that allows parents and children to get even closer together, but also the development of children’s imagination and aesthetic taste. That is why it is worth approaching the implementation of the task as responsibly as possible, having carefully studied the intricacies of making toy furniture.
How to decide on sizes
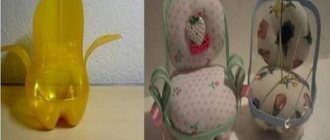
The dolls, their houses and furnishings are smaller copies of us and our homes. And the most reliable way to make doll furniture with your own hands and not make a mistake is to measure real objects, reduce them several times, and then work with the obtained values.
Furniture for dolls - copies of our furniture
How much to reduce the actual dimensions depends on how small or large the doll is, because they range from 7 cm to 60 cm or even higher. Accordingly, they need furniture of different sizes. To determine the number by which the actual dimensions should be divided, divide the average human height in centimeters (170 cm) by the height of the doll. Let's get some number. This is how you will need to divide the dimensions of real furniture.
For example, the height of the doll is 15 cm. We calculate: 170 cm / 15 cm = 11.3. It is by this number that we divide all the parameters of “human” furniture. It is also worth saying that 14-15 cm is the most popular size among the doll population. Therefore, most of the finished furniture is made in a ratio of 1:12. We can also use the existing dimensions, at least so that we can navigate the scale of the required parts and the amount of materials.
Approximate dimensions of furniture for doll children
So, the most common doll sizes are:
- male doll 150 mm;
- female doll - 140 mm;
- child doll - 75-100 mm;
- toy baby - 65-75 mm.
If you need furniture for dolls of similar sizes, its parameters will be as follows:
- Bed: double – 160*130 mm;
- single - 160*75 mm;
The size of the setting depends on the height of the inhabitants
If the toys you have are slightly larger/smaller, you don’t have to adjust the sizes. If the difference is large, you will have to increase or decrease (or you can calculate it yourself).
Doll furniture made from matchboxes
The easiest way to make furniture for dolls with your own hands is from ordinary matchboxes. They are glued together using PVA glue, creating certain structures, then covered with paper or fabric, self-adhesive film, etc. You can use wooden beads as legs, handles for drawers can be made from small buttons on legs or from long beads.
Simple homemade doll furniture from matchboxes
You can make chairs, a table, a chest of drawers, a bed, and a bedside table from matchboxes. Another thing is that furniture is made for very small dolls, no more than 10 cm high. Although, you can use a larger number of boxes, gluing them into blocks, and from these blocks create furniture for dolls about 15 cm high. Also an option, but work with others materials are not much more complicated, but they are more flexible and allow you to create products of more elegant shapes.
Toy dressing table made from matchboxes
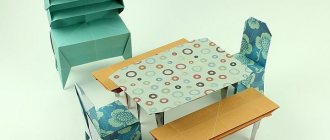
DIY doll desk
Dining table and chairs made from matchboxes for a dollhouse
How to glue boxes
Several design techniques for finishing a homemade toy chest of drawers from matchboxes
This may be your first experience in making doll furniture. Later you can take on something more serious.
Design and decor
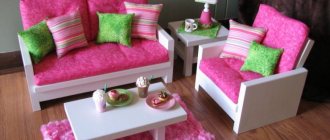
Considering the variety of materials and their unlimited possibilities, doll furniture can be made in any style. The main thing is that the products look harmonious in the toy house. It will be easier for beginners to create an interior with a minimum number of objects of simple shapes. To decorate the facades of doll cabinets, chests of drawers, bed sides, and other items, the following are often used:
- Solid or stencil painting, covering all or only part of the product.
- Decoupage, in which pictures of various themes are glued to the surface of furniture and secured with a special varnish.
- Colored or imitating natural materials self-adhesive film.
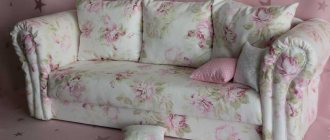
- Fabrics, leather for upholstery and decoration.
- Mirrors, glass, ribbons.
When making collectible miniatures, craftsmen, as a rule, fully duplicate original interior items. The same materials and types of decor are used. Compositions consisting of several elements are always performed in the same style.
Furniture for a dollhouse made of cardboard
You can try your hand at making furniture for dolls using cardboard. The material is inexpensive, accessible, you can try and make mistakes, redo it. Cardboard is usually joined using PVA glue; you can use a glue gun or any universal glue that can glue cardboard, fabric, or wood. By simply making furniture for dolls with your own hands from cardboard, you will also use these materials. If we talk about convenience, then a glue gun is preferable - it glues quickly, it’s convenient to work, and the connection is reliable.
Without finishing, doll furniture made of cardboard does not look very good
To make furniture for dolls, you can use regular packaging cardboard. It is cheap, but the furniture it makes is very delicate. It is unlikely that it will be enough for a child for a long time. But, as a “first experience”, this is a good option. Cardboard products for scrapbooking are more reliable. It is more dense, homogeneous, has different thicknesses (from 2 mm and more), and can have a textured surface, embossed monochromatic patterns, or a pattern on one or both sides. The disadvantage of such cardboard is that you have to buy it, and some types of such cardboard are not very cheap.
Cardboard bed for a doll
This cardboard doll bed is designed for a large doll - up to 50 cm in height. If necessary, all specified dimensions can be reduced.
You can make such a bed out of cardboard in a few minutes
This option can be done in literally 10-20 minutes. There is no need for glue or other fixatives. The parts are held in place by grooves cut into the cardboard. The width of the groove is equal to the thickness of the cardboard, the length of the slots and the dimensions of the workpieces are indicated in the diagram.
Bed diagram for dolls
Green and yellow dots indicate compatible cuts. They are inserted one into the other, where the assembly ends. If you like this model, it can also be made from plywood.
Schemes for making cardboard doll furniture
Basically, furniture for dolls made of cardboard is glued. It is unlikely that it will be possible to make something delicate or very complex from this material, but making simple models will not take much time. Having a diagram with dimensions, you can even do without explanations. Everything is clear.
Chair diagram for dolls
Such models can be made “by eye”. Without the “upholstery” they look unsightly, but after that they look quite decent
It’s not difficult to make a bed, but with kitchen cabinets you’ll have to be a little tricky
A bedside table with doors and an open shelf - one diagram, different designs Another model of a bedside table for making from cardboard or plywood Do-it-yourself toy table for dolls using this scheme is not a problem
Floor lamp for dolls made of cardboard
Furniture patterns for dolls can be used not only for making from cardboard. They can be transferred to plywood and cut out using a jigsaw.
Wardrobe for dolls made from scrap materials
The toy cabinet can be made of plywood, painted or covered with wrapping paper or self-adhesive film. There probably won’t be any questions here - everything is clear, and if you have questions, you can see their solution in the “natural” closet. But it can be made from very inexpensive materials. The good thing about making do-it-yourself furniture for dolls is that its cost is very low.
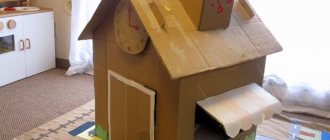
From a cardboard box
The main task is to find a thick cardboard box of the appropriate size. Moreover, it will be easier to work if it is packaging - with folded edges. This folding part is a ready-made door. All that remains is to finish it - hang a mirror, attach a handle, etc.
One of the options for homemade furniture for dolls is a wardrobe
What do you need for work?
To work, you will need good tape, preferably paper-based, as it will be easier to glue the trim to it later. If you have a glue gun or a construction stapler (a large stationery one will do) with staples, that’s also good. If you will use other materials in addition to cardboard and paper, it is better to find a universal glue that glues paper, cardboard, fabric, and plastic. You will also need scissors, a stationery knife, and a ruler.
How to make a doll wardrobe from a cardboard box
If the box you find is too large, you can make it smaller by cutting off the excess. To ensure that the folds are even, take a ruler. We apply it to the place of the future fold, we pass along the ruler several times with a blunt hard object (the stem of a spoon or fork). After this, the cardboard will be easy to bend.
Filling for a toy cabinet
We cut out shelves from scraps or another box. They should be slightly - 5-8 mm - longer and wider than the internal space of the cabinet. We bend the excess so that sides are formed on all sides. Folds form in the corners; carefully cut them off. We bend one of the parts 180° and glue it to the shelf itself. This side of the shelf will “look into the world.” We bend the other three parts at an angle of 90°, coat them with glue and glue the shelves into the cabinet. The photo on the right shows how the shelves are glued. But so that the gluing points are not conspicuous, it is better to turn the sides down.
Making furniture for dolls with your own hands is no less fun than playing with it later.
In addition to shelves, you can also make a crossbar for hangers. It can be made from bamboo skewers, for example, you can try using a juice straw, wire, etc. Hangers can also be twisted from colored wire or cut from juice bags, plastic bottles, etc.
Finishing is a creative process
Next comes the finishing touches. You can paint the cardboard with watercolor or acrylic (preferably) paints, glue it with wrapping paper, fabric, felt. You can imitate a mirror surface by covering it with foil (food foil, for example). If you want to make a “plastic” surface, look for water bottles of the desired color, cut off the neck and bottom, and use the “body” as a finishing material.
Finishing is a creative process, but first, use simpler, softer, thinner materials; they are easier to work with
Handles can be made from wire, beads, or long beads. For larger toy cabinets, you can find buttons or buttons. We glue all this “beauty” after we have “lined” the cabinet.
Doll wardrobe made from newspapers
You will need old newspapers, PVA glue with a brush, a glue gun, a couple of pieces of wire or thread, wrapping paper for finishing the cabinet or paint.
We roll up tight tubes from newspapers, coat them with PVA around the edges and leave them to dry. Then the tubes can be glued together. A glue gun is better suited for this operation. There are two ways: first collect large blocks, then cut them into fragments of the required length, or immediately cut the tubes of the required length and immediately glue the blanks to size. The second way is more painstaking, but there is less waste.
Assembling planes from newspaper tubes
The finished cabinet walls must be fastened together. To firmly fix an angle of 90°, it is better to use a thin wire. First coat the joints with glue, then use wire to pull the walls together. If the wires are in the way, they can be removed after the glue has dried.
We glue holders under the shelves
Using the same technology, the bottom, top, and shelves are glued. The doors will need to be made a little differently. To make them open, two strips about 1.5 cm wide are cut out of tape. Tape is glued along the edge of the door so that a little more than half hangs in the air. We glue the door to the wall with this loose tape, but so that there is a gap of 2-3 mm between the wall and the door (it’s just tape there). This will make it possible to close the doors. We fix the glued door on the other side with a second strip of tape.
Fastening the door with wire
The second way to secure the doors is with wire. Only this time it should be tough and thick enough. Cut a piece that is 2 cm longer than the height of the cabinet. Immediately make a loop on the wire on one side using 1 cm. We bend the loop at an angle of 90° to the wire. We make holes in the bottom and roof, pass a wire through the bottom, the loop remains at the bottom. We put the door on the wire, using the outer tube instead of hinges. Slightly bending the wire, we thread it through the hole in the cabinet roof, bend the excess, fixing the door. We repeat the same operation with the other door. Please note that you need to attach the door with tape before finishing the cabinet, but you can attach it with wire after.
Ready-made wardrobe for dolls made from newspapers
There are still some little things that need to be said a few words. Cabinet legs and handles can also be made from paper tubes. You just need to roll them from the paper you use to decorate the toy. Roll it into a tight roll, glue the edge with glue, then cut it into pieces of the required length and glue it in the right places. Instead of tubes there can be wooden sticks, beads, etc.
Beautiful design
When decorating the stand, you should take into account that it should optimally fit the image of the doll, being its organic continuation.
You should adhere to a simple rule: the stronger the visual load on the doll’s outfit, the simpler the stand under it should have. Options for this design include pasting with felt in a harmonizing color and tying with contrasting ribbons.
Real collectors often have the need to make a stand for a doll with their own hands.
To decorate wooden coasters, you can use the aging effect. You can do this in several ways:
- Cover the workpiece with stain or dark acrylic paint, then apply Vaseline to the areas for aging, and on top - a second paint of a contrasting color. Once completely dry, the paint must be wiped off and the stand coated with a medium or aging wax. When all layers are dry, the base should be coated with acrylic varnish.
- Sand and treat the workpiece with an acrylic primer, then cover it with two layers of dark paint. Sand with wrapping paper and treat the stand with a candle in those places where a worn effect is needed. Next, cover the wood with light paint in one layer and leave to dry, then melt the wax using a hairdryer. Remove excess wax with a rag.
It is important that not only the collection surprises with its originality, but also that the holder suits the favorite one hundred percent.
Before you make a stand for a doll, you need to decide on the mounting method and design style. The resulting product will become a functional addition to the collection, ensuring its convenient placement.
The stands can be decorated at your own discretion. You can paint it with paints, cover it with fabric or corrugated paper.
Doll bookcase or shelf made of rulers
You can make furniture for dolls with your own hands from school wooden rulers. They are good because they are already processed and have the same width and thickness. In the stationery store you can find the right size - larger/smaller, wider/narrower - as desired. For example, to make a doll bookcase you need 6 rulers 15 cm long.
Making a toy bookshelf from wooden rulers is easy.
You will also need a jigsaw for the job. If you have an electric one, great; if not, a manual one will do, since there’s not too much work. You also need fine-grain sandpaper, glue (PVA or wood glue) and paints (acrylic or gouache).
We cut segments from the rulers: 4 pieces of 6 cm, one - 8 cm. Sand the edges until smooth, and also remove the markings and barcodes. Between the two rulers we place the shelves (which are 6 cm each), on top we leave approximately the same distance - under the lid (a segment of 8 cm). We coat the joints with PVA or carpentry glue, connect them and tighten them with masking tape, and leave them for a day. When the glue dries, glue on the very last part - the lid on top. Actually, the shelf itself is ready, all that remains is to paint it.
You can use rulers to make other pieces of furniture for dolls.
To obtain an even and bright color, it is better to cover the structure with white, and after drying, paint it with the desired shade. You can also decorate doll furniture made by yourself using the decoupage technique.
Other furniture contents
A photo of do-it-yourself furniture for dolls will help you decide on those interior items that your daughter needs for her ideal house.
A sofa made from small kitchen sponges, a kitchen wall made from cardboard blocks, a sink made from the bottom of a plastic cup or miniature plate, a faucet made from a plastic straw, etc. can serve as a complement to the decor.
Household appliances:
- Microwave – sharpener, with a removable lid;
- Refrigerator – tea box;
- TV – a matchbox with a picture pasted on;
- A floor lamp or lamp - a tube and an old wooden spool of thread.
The variety of ideas is huge, the main thing is desire, and the materials will be found on your own. Encourage your little housewife to create furniture, then these items will be filled not only with new creative thoughts, but also with great love.
Furniture for dolls: photo ideas
You can make furniture for dolls with your own hands from the most unexpected materials. You have already seen how to use newspapers and wooden rulers. But you can make tables, chairs, armchairs, sofas, beds, shelves, cabinets, etc. from ice cream sticks.
It’s better to start with something simple: a table and chairs for dolls made from ice cream sticks
You can make armchairs and sofas Garden bench or sofa - depending on the finish Almost the same designs with soft upholstery Making a chest of drawers like this for dolls = this is a more difficult task
You can also assemble a crib
You probably already understand why this material is good - it has rounded, processed edges, is the same in size and is well processed. If the sticks seem too rough, sand them down smooth using fine-grit sandpaper.
Clothespins make good armchairs and stools. They are disassembled into halves and joined using wood glue. Curly products are obtained in almost a few tens of minutes.
This sofa can be assembled from wooden clothespins
An armchair, a table - you can also make it from clothespins. If you add a few holes, you get an openwork product
It’s not difficult to make a round table for dolls from clothespins
Original legs made from three halves of clothespins Rocking chair for dolls Toy stools Chairs with armrests for a dollhouse
Wooden clothespins are almost always used to make doll furniture. But no one forbids taking plastic ones. Working with them is exactly the same, only the difficulty is that wooden ones are easier to modify by changing the thickness, shape, etc. If the product is simple and does not require any modification, you can use plastic ones. They are more varied in shape and size, and are already painted, so there is less fuss with them.
As your skill increases, you can move on to more complex materials - plywood or wood. The difficulty is that turning and cutting out miniature parts requires filigree precision, perseverance and takes a lot of time. But you can do whatever you want.
You can make furniture for dolls with your own hands of any size and style. Several models of plywood doll chairs
Toy bed for baby doll
For those who have a lot of patience
Carved wooden doll bed Corner desk for a doll....everything is like the real thing Styles vary
Kitchen furniture in a dollhouse
Wardrobe for dolls made of plywood - very high reproduction accuracy Kitchen cabinet with filling
Plywood bed for dolls
DIY toy kitchen tables made of plywood
Chairs for playing with dolls
Buy or make it yourself
Making toys for girls and boys yourself is much more interesting than buying ready-made ones in a store, although such activities require a lot of time, effort, and financial expenses for materials and tools. Different products may require jigsaws, knives, measuring devices, special varnishes, paints and other consumables.
Handicrafts develop creativity, perseverance, attention, and improve motor skills in children and adults. And it doesn’t matter what kind of furniture you end up with - a knitted sofa, a paper chest of drawers or a wooden chair, any activity will be beneficial. This approach has other advantages:
- Confidence in the safety of the materials used.
- Possibility of creating furniture in any style.
- There is no need to select products of a certain size.
When choosing ready-made doll furniture, you should make sure of the proper quality of the products - many manufacturers save money on this. The most common are wooden and plastic toys. The latter are more durable, but the former are safer.
Many factories produce entire sets of furniture for the kitchen, bedroom, bathroom, and other rooms of the dollhouse. When purchasing these, a significant amount of time is saved, because the need to select suitable products for elements already purchased separately disappears.
Handicrafts develop creativity, perseverance, attention, and improve motor skills in children and adults.
When choosing ready-made doll furniture, you should make sure of the proper quality of the products