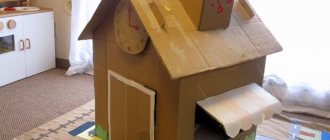
The use of cardboard furniture is a very rare and rather exotic option for furnishing an apartment. It is used either by large originals, or by those who like to not only create objects with their own hands, but also experiment with materials unusual for the furniture industry.
But everyone should understand that the service life of such items is very short, and it is impossible to accurately predict it. The use of the furniture may end when one of the new guests tries to use the item for its intended purpose.
DIY cardboard furniture. Sofa
Corrugated cardboard is most often used for production. Thanks to its special structure, it has significantly higher strength indicators than ordinary sheet metal. In addition, corrugated cardboard is a fairly thick material, which makes the process of creating furniture much easier.
DIY cardboard stool
Paper doll cabinet
The easiest and fastest way to give your child a complete doll wardrobe is to use paper.
You will need:
- sample;
- remnants of wallpaper or whatman paper;
- old newspapers;
- PVA glue;
- press;
- water-based paint;
- door hinges;
- pens.
Step-by-step instruction
- To make the template, you need to cut out the back, sides, top and bottom panels, and doors. When marking the future cabinet, remember that it should be rectangular in shape.
- For each part, cut out 10 to 15 blanks according to the template.
- Then start gluing the layers together. Coat each part well with PVA glue and combine it with the previous one until all 10-15 pieces are in one glued stack.
- All elements of the future wardrobe must be placed under a press and wait until the pieces dry and harden.
- Then, using miniature door hinges and handles, assemble the cabinet. The sides that should not have loops on them can be glued together.
- To create a unique design, you can paint the cabinet with artistic paints.
- As soon as the patterned layer dries, coat the resulting cabinet with varnish.
- Secure the legs.
Such a wardrobe is beautiful, but short-lived - a child will quickly render the paper unusable. To get a more durable cabinet, it is better to use materials with higher strength.
Suitable for a paper doll.
Option for postcards
A simple origami strawberry model can be folded in just five minutes according to the following scheme. You will need a sheet of paper with two contrasting sides - ideally red and green. However, if you couldn’t find such a combination, don’t be upset. At the end of the assembly, the strawberry sepals can be painted or decorated with a stylized berry, matching the rest of the decor to it.
Step-by-step instruction:
We start working from the green side (or its color analogue).
- Fold the square sheet in half diagonally.
- We also bend the triangle in half.
- Open the left “pocket” to the right.
- Let's flatten it.
- Turn the workpiece over.
- Repeat steps 3 and 4 on the back.
- Turn the “Double Square” over with the open edge facing away from you.
- We bend the top of the first layer along the dotted line.
- For the second one, we move the ends apart.
- Fold the side edges along the dotted lines.
- Lower the top of the figure.
- You can draw characteristic points with a marker.
A slightly more complex version from Korean origamists:
Strawberries are often combined on postcards with other origami fruits.
Required tools and materials
Origami.
master class with step-by-step photos. modular origami. Father Frost. step-by-step assembly Origami furniture is an interesting area that requires special attention. Making such figures does not take much time, and the resulting result pleases adults and children with its appearance. The main feature of the products is their maximum similarity to real furniture items: sofas, tables, cabinets, armchairs and chests of drawers.
It is unlikely that you will be able to use such furniture in real life, but the items will be a good option for creating a model of a future room or designing a dollhouse. To achieve similarity with real furniture, textured paper is used during construction to imitate various surfaces: stone, leather, fabric, wood and metal. When creating objects, it is better to use paint that does not completely saturate the material, but only gives it color.
The following materials are used for production:
- Material for the base – matchboxes, some corrugated cardboard, colored thick paper;
- Pieces of fabric, decorative film and textured paper for finishing finished items;
- Scissors;
- Black pencil or pen;
- PVA glue or any other for working with paper.
Kettle
A realistic snow-white teapot can be made using ordinary paper, glue and a toothpick. Cut several long strips, coat them with PVA glue on one side and wrap them around a toothpick. Once you have the desired diameter, the toothpick can be removed.
Next, you need to cut a circle out of paper that perfectly matches the diameter of the base. Glue them together to form the bottom. The handle should be cut out of paper and glued to the base.
Such a toy teapot can be decorated with paintings or painted in a bright, unusual color using gouache or acrylic paint.
We use matchboxes
How to make garden furniture with your own hands?
This method can be compared to children's blocks. A different number of matchboxes will allow you to make a stylish chest of drawers or a large three-leaf wardrobe.
Expert opinion Tatyana Leontyeva Professional housewife
Talk to your fashionista and find out what size doll storage to make. If it is a small bedside table, then 2-3 matchboxes should be placed one above the other. For a large chest of drawers with a lot of compartments, the boxes will be glued not only to each other, but also to the sides.
So let's get started:
- Glue the boxes together.
- Wrap the resulting chest of drawers with thick paper.
- Trim it and varnish the top.
- Decorate the retractable elements with paper, paint or fabric.
- Make handles from screws.
Then you can decorate and decorate the resulting chest of drawers at your own discretion.
Matchboxes - a convenient template for creativity
What is needed to make a homemade sofa
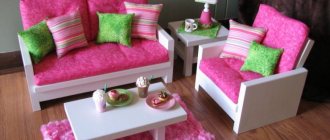
DIY furniture for Barbie: simple master classes
Before work, you need to be patient, wooden pallets or blocks, as well as tools that simplify the work:
- universal tool;
- screwdriver;
- grinder;
- Screwdriver Set;
- wood glue;
- tape measure and pencil for marking;
- jigsaw (for sawing plywood) or hacksaw;
- construction stapler;
- large tailor's scissors;
- sewing machine (for covers or upholstery).
The choice of materials depends on the type of product.
The base of the backrest and armrests can even be made from scraps of plastic pipes, connected with couplings. Provide the finished back with regular pillows, and wrap the armrests with any porous material.
It's interesting to know
In ancient Rome, the legend about the goddess of love Venus and the hunter Adonis was very popular. The young man, the son of the Cypriot king, was famous for his rare beauty. It is not surprising that Venus showed favor to him and almost never separated from her lover. However, Adonis soon died during a hunt, from the fangs of a wild boar. According to the myth, roses and anemones grew in the place where the blood of the young king was shed. And the tears of the saddened Venus, falling to the ground, turned into drop-shaped red berries, their sweetness reminiscent of love.
In honor of Adonis, whose cult was borrowed first by the ancient Greeks and then by the Romans from the peoples of Western Asia, spring fertility festivals were held. Their participants always ate strawberries - a symbol of the sun, blossoming nature and love pleasures. The Romans especially revered this berry, considering it a strong aphrodisiac, as well as a remedy for mental and heart illness. Strawberries are really rich in folic acid, which stimulates the production of so-called “happiness hormones”. And wealthy Roman women made themselves strawberry “beauty masks.”
In medieval Italy, the cult of Adonis was replaced by the veneration of St. Anthony of Padua. In memory of him, large-scale celebrations were held in many cities on May 13. The people of Rome celebrated the day with a colorful festival known as the Triumph of the Strawberries. A statue of the saint was placed in a huge basket, about 2 m in diameter, and around there were small boxes, pots and other containers filled with aromatic berries. Several people carried this symbol of fertility at the head of the solemn procession, walking around the central streets. At the end of the holiday, baskets of berries were generously distributed to everyone.
Since 1870, due to disagreements between the papal church and the Italian government, the festival was banned. It was revived in 1922, but moved to the province of Rome - the small town of Nemi, where it is still held. Starting from mid-May, tourists flock to the small resort village to taste the sweetest and most aromatic strawberries, which have no equal in Italy. Festivals dedicated to the “queen of berries” are also held in Japan, Russia, Germany, Finland and the UK.
Weaving paper tubes as one of the ways to make doll furniture
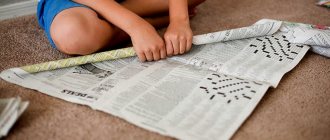
Weaving is a fairly ancient and popular type of needlework. Today it is experiencing a new revival. However, modern craftsmen increasingly use paper tubes or ribbons for weaving rather than wicker. The finished product is painted and then varnished and in this form can serve for many years.
When choosing a way to make paper furniture for Barbie with your own hands, it would be nice to take advantage of this: today the tendency to use wicker paper furniture in your homes is becoming more and more fashionable.
Among the advantages of this technique are the elegance and strength of the finished furniture, as well as its realism. In addition, the materials will cost nothing, because these are unnecessary old newspaper or magazine sheets.
But among the disadvantages - to make doll furniture using this method, you must first master the weaving technique, and also have a certain pattern.
But, having learned how to create toy tables, cabinets or chairs for Barbie, it would be nice to try your hand at making human-sized furniture.
About “women’s” day itself
The date March 8 is closely connected with the names of two German activists who fought for women's equality - Clara Zetkin and Rosa Luxemburg. Although for the first time a feminist holiday was celebrated in New York at the initiative of the US Socialist Party. This happened in February 1909. A year later, American fighters for gender equality arrived in Copenhagen, where they met with Clara Zetkin, who warmly supported their initiative.
Members of the international feminist movement were going to use the holiday as a tool in the fight for women's rights. Every year on the last Sunday of February they went out to rallies, advocating for improved working conditions, higher wages, social protection, and so on. Feminists also demanded that women be allowed to participate in elections, since at the beginning of the 20th century this was an exclusively male privilege. The holiday gained popularity in many countries, but did not have a single date until 1975.
March 8 used to be February 23
Immediately after the revolution in Russia, women's holiday was celebrated on February 23. On this day, workers from the outskirts of Petrograd went on mass strikes, which led to the signing of a decree on the right to vote for women. When in 2022 the Bolsheviks passed a decree replacing the Julian calendar with the Gregorian one, the countdown shifted, and February 23 automatically became March 8.
The world community has been celebrating March 8 since 1975
A single date for International Women's Day was established by a special UN decision. On this holiday, it is customary to discuss gender issues in society at the state level. However, in the 21st century, it is gradually losing its feminist “color”, since modern women, after a hundred years of emancipation, again want to be gentle, charming, fragile and surrounded by care.
In some countries, March 8 is also celebrated as Mother's Day. These are Uzbekistan, Serbia, Albania, Macedonia and others. In Italy, France and Germany, March 8 is not officially celebrated, and generally not very popular. Women are also celebrated here on Mother's Day, which is held on the last Sunday in November.
Japan has its own Women's Day
Although March 8 has been present in the Japanese holiday calendar since 1923, it has never become widespread. But on March 3, Girls' Day is celebrated - Hinamatsuri, which is very colorful, with rich traditions and multifaceted overtones. The rituals of the holiday, which originated at the beginning of the 17th century, became more complex with each imperial dynasty. However, the main focus: the formation of family values in girls, the development of cultural and practical skills, remain unchanged. You can call Hinamatsuri the only and true women's day dedicated to beauty, love and harmony.
Making doll furniture from color schemes
In the old days, paper cutting houses could be purchased at almost any bookstore. Follow the instructions and use scissors and glue to create a charming dollhouse or palace with furniture.
Knowing the basics of working with any graphic editors and the principles of constructing such diagrams, you can easily make similar blanks. If making a whole palace for a doll is not part of your plans, it wouldn’t be a bad idea to create a wardrobe, chair or bed and, after printing them, make vintage furniture for your favorite. Needless to say, only laser printing is suitable for this method, since inkjet printing, although more colorful, can float or simply fade over time when it comes into contact with water.
As for the choice of glue for this furniture, it is best to use double-sided tape or a stationery glue stick
It is also acceptable to use a glue gun, but very carefully
Modular decor
If you need voluminous inscriptions that will be viewed from both sides, for example, for a table or hanging structures, it is better to use origami letters from modules. They are connected with a chain and secured with glue. From universal triangular elements you can assemble any words and even entire phrases by adding numbers or popular symbols to them: hearts, stars, emoticons, and so on.
There are other techniques that allow you to make larger and more massive decor. You can “peep” the algorithm for assembling such alphabet elements in embroidery patterns.
Papier mache
Among the many ways to make furniture out of paper, the papier-mâché method (using paper mass and glue for modeling) stands out.
Most often, this method is used to make masks or some kind of figures, but it is also quite suitable for doll furniture. Like weaving from paper tubes, the papier-mâché technique is very economical, but at the same time it is simpler.
Furniture made in this way must have a frame and dry well before it is coated with paint or varnish. By the way, if you add a little gypsum to the paper mixture, the product will become much stronger.
Each of the above methods for making paper furniture is unique in its own way. Some are complex, others are simpler to implement. But no matter which one is chosen, the main thing is to put your soul into your work. Then the result will definitely please you, and your favorite children's doll will have the best home in the world.
Not every adult can remember the last time they visited a zoo. But the child will not only remember, but also tell in detail who he saw there. For most children, the topic of animals is very close. Of course, every child has his own preferences - some like fish and hamsters, while others adore predators. If your family has a little animal lover, then invite her to make...
If life is a game, then the best actors in it are children. From childhood, a child, playing with dolls and soft toys, is completely immersed in the world he has invented. Most girls love to play with dolls, imitating the lives of adults. Therefore, they require toy furniture, clothes and other accessories. You can help your daughter make little things for her dolls to play with. This master class will help you..
All parents love to pamper their children - they take them to entertainment centers, the circus, a puppet theater, or simply buy toys and sweets. And yet, children receive maximum entertainment and gifts on their birthday. This is perhaps the most favorite holiday for every child, so parents try to prepare for this celebration. You can please your child by using...
Have you ever noticed that all girls, especially little ones, love to dress up? Very often, the contents of my mother’s dressing table and wardrobe are demonstrated in front of guests at an impromptu fashion show. Of course, this is all great and fun, but should your child be allowed to take expensive jewelry? In this case, your daughter should have her own accessories, including those made by herself. Help your child replenish...
When presenting the recipient with a sum of money instead of an item as a gift, you can put it in a gift envelope. We propose to make it out of paper using photographs and descriptions that this master class contains and display the stages of work on the craft...
Don’t know how to diversify children’s leisure time in anticipation of the New Year? And how to brighten up such an annoying wait? Start making paper Christmas tree decorations. It will not only be fun, but also useful for the child, for the development of his imagination and fine motor skills. One of the most beloved and easy-to-make decorations are balls. Anyone can make paper balls...
This master class invites you to make a fly out of paper using the origami technique for your own fun or for your child. Let this craft in the form of a paper insect, made by you according to the description and photographs, please your child and awaken his interest in making it himself...
Today you can offer your child, with your help, to start mastering making paper crafts using the quilling technique, which will surely appeal to both boys and girls of a certain age and will be able to develop fine motor skills for further mastery of writing text. In addition, making paper crafts using this technique can develop a child's confidence in his...
In this master class on making a craft - a paper shrimp using the origami technique - there are photographs and descriptions reflecting all the work step by step. Shrimp are crustaceans. Their body is protected by a shell and compressed from the sides. There are several varieties of shrimp: freshwater, sea and bottom. Among the deep-sea species, there are even those that can glow in...
The giraffe always surprises both children and adults. After all, such an animal looks very unusual! For example, it has a long neck and spotted coloring all over its surface. He can get the freshest and most beautiful green leaves from very tall trees. So it’s impossible not to make such a cute animal out of paper in the form of a craft...
Simple models
For young children, the ability of an origami paper airplane to fly rapidly and perform intricate pirouettes is much more important than its resemblance to a real fighter plane. Several models have been developed that can cover distances of up to 10 meters and all of them have simple circuits that are accessible from 6 to 7 years of age. Since the shape of such toys resembles a glider, they can be classified as a stylized type of fighter.
Scheme No. 1
Step-by-step instruction:
- Divide the A4 sheet into 3 parts along the short side and cut off 1/3. Fold the resulting rectangle in half. We open it and place the long side towards us.
- We bend the lower and upper corners on the left towards the center.
- Make a fold as shown in the picture.
- We bend the corners again from the left to the middle.
- We tuck the protruding triangle.
- We bend the figure into a “mountain”.
- Fold the wings on the bias.
Scheme No. 2
Step-by-step instruction:
- We divide the A4 sheet in half crosswise.
- We bend the upper corners towards the center.
- We lower the extreme point of the workpiece down to the base.
- Bend it up.
- We fold the workpiece into a “mountain”.
- Rotate it 90° counterclockwise.
- Make a bias fold, forming a wing. We repeat the same action on the back.
- We bend the edges of the wings.
Scheme No. 3
Step-by-step instruction:
- Divide the A4 sheet in half lengthwise.
- Fold the top left corner down.
- We bend the resulting triangle in height.
- Bend the far left corner to the right.
- We close the figure with a “valley”.
- Fold the front layer along the dotted line.
- Repeat step 6 on the back.
- We tuck the bottom edges of the product.
- We raise the wings so that they are parallel to the ground.
Initial stage of work
The beauty of self-made household items, clothing or furniture is that it is unique.
For these purposes, available materials are used, missing ones are purchased, some parts have to be ordered from the carpentry shop. It will still be much cheaper than buying a ready-made sofa, and creative work will bring pleasure.
The basis is sketches and drawings for making a corner sofa with your own hands. There are options:
- do it yourself;
- order from a specialist;
- borrow from the Internet (take it from our website).
Ready-made drawings are convenient as a starting sample. They have to be adjusted to suit your materials and capabilities. Based on the finished sketches, the dimensions are specified.
For furniture made from plastic bottles, you will need a large number of identical containers to make entire blocks with tape. The number of bottles determines the dimensions of the sofa, which are adjusted in the drawings.
Schemes for folding furniture using origami technique
Paper furniture is in demand in interior decoration; you can make simple shapes with your own hands. Another area of application for these items is toys for children. Every child will want to have a dollhouse with beautiful paper furniture made with their own hands. To make such products, you do not need additional origami skills, you just need to follow the instructions provided.
Origami furniture is an interesting trend that requires special attention. Making such figures does not take much time, and the resulting result pleases adults and children with its appearance. The main feature of the products is their maximum similarity to real furniture items: sofas, tables, cabinets, armchairs and chests of drawers.
It is unlikely that you will be able to use such furniture in real life, but the items will be a good option for creating a model of a future room or designing a dollhouse. To achieve similarity with real furniture, textured paper is used during construction to imitate various surfaces: stone, leather, fabric, wood and metal. When creating objects, it is better to use paint that does not completely saturate the material, but only gives it color.
The following materials are used for production:
- Material for the base – matchboxes, some corrugated cardboard, colored thick paper;
- Pieces of fabric, decorative film and textured paper for finishing finished items;
- Scissors;
- Black pencil or pen;
- PVA glue or any other for working with paper.
Video
You can make anything from paper. You just need to show imagination and perseverance. Let's consider master classes on making popular types of furniture. Based on detailed instructions, you can make other types of interior items. The most popular are:
- Sofa;
- Dresser;
- Armchair;
- Closet;
- Table.
To find out how to properly construct paper furniture, you need to consider each option separately.
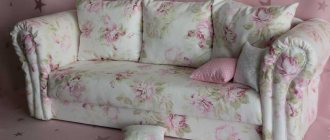
Sofa
A paper sofa will look great both in a dollhouse and in a miniature copy of a real interior. Before you start, pay attention to the paper sizes:
- For miniature options, you should choose colored paper 10x10 cm;
- For execution in medium sizes, you need to give preference to a workpiece of 20x20 cm;
- To create a large-sized sofa, the dimensions of the material increase proportionally.
The color of the paper can be chosen as desired, but it is better that it fits into the future interior or imitates real furniture. Having selected the materials, you can begin manufacturing:
- The square sheet is folded in half, after which it is opened and folded perpendicular to the first one;
- The next step will be an additional hem. The bottom edge is folded to the middle fold line, then folded again. The output is 3 fold lines, not counting the central one;
- The lower thin strip is folded onto the first fold, after which two identical triangles are laid by folding the side parts diagonally;
- The accordion is folded to the end, and the upper part of the workpiece is bent to the middle. The workpiece is turned over;
- The lower corners are folded up in turn, and the upper corners are bent down diagonally;
- The workpiece is turned over again, bending one corner inward. This is how the back is formed.
After turning the product over, you need to form the legs of the sofa and it will be ready. Such a beautiful and original item will become a real decoration for a toy living room or an original art object.
Fold the sheet in half
In half again Make three folds at the bottom Make corners at the bottom
Raise the bottom part up Make bends on the sides Align the back
Making legs Finished product
Dresser
The most optimal and profitable way to create a paper chest of drawers is to use matchboxes. They slide out conveniently, so making the item will not be difficult. If you want to make a chest of drawers out of paper, then you should use paper blanks. This chest of drawers is convenient for storing small, lightweight items. This will perfectly include beads, beads, clasps, clips and other little things for creativity and handicrafts. The top of the chest of drawers can be painted with colored markers, giving it an original look.
Construction of a paper chest of drawers consists of the following steps:
- Drawing a diagram for creating boxes: this stage is skipped if ready-made matchboxes or other blanks are used;
- Cutting out diagrams along the lines, as well as assembling boxes for future chest of drawers;
- The entire chest of drawers is covered with cardboard for strength, but there is no need to seal the front part where the drawers will be inserted;
- The fronts of the drawers are covered with any material - fabric, film, leather, and a bead or button is also attached as a handle;
- Legs for a chest of drawers can be made from push pins - for miniature furniture or toilet paper tubes - for large items.
This chest of drawers is also a good gift for a girl with a lot of jewelry: the drawers will fit all the jewelry.
Making boxes
We create the elements of the drawers We connect the elements We decorate the coverings with rags
We glue the fronts of the drawers
Creating handles
Finished chest of drawers
Armchair
Making a stylish chair from colored paper is also not difficult. To create it you don’t even need glue or tape, you only need a sheet of paper of the required color. It is worth noting that cutting out blanks from beautiful textured paper will give better results than furniture made from ordinary plain material. In addition, if you find diagrams that show parts of furniture made in different styles, you can make a chair that is as similar as possible to real furniture. To work you will need one sheet of paper in the shape of a square. Its dimensions are selected depending on the dimensions of the future product:
- Bend the square sheet in half, then open it and press one of the halves to the center fold line;
- Also press the second part of the square to the center of the workpiece. Next, walk your hand along all the fold lines to clearly outline the resulting lines. Open the workpiece and turn it over with the front side facing you;
- One part of the 4 resulting lines must be cut: this is done using scissors or a metal ruler;
- Fold the workpiece across the resulting lines, visually marking the center, and bend the triangle to the right. Do the same with the left side, you should end up with two triangles superimposed on each other;
- The middle strip remaining at the bottom is folded over the triangles. Each fold line is additionally smoothed with your fingers;
- The strip that was previously bent up is bent back - it will serve as a seat. The side parts will become supports for the hands; they must be glued from the inside to the seat.
The result is an original and easy-to-make paper chair. To diversify its surface, decorative paper that imitates leather can be glued to the seat.
Stage 1-6
Stage 7-8
Closet
The construction of the cabinet is similar to the construction of the chest of drawers, which was described earlier. The difference will be that the frame must be higher, and in addition to drawers, shelves are needed. Some nuances of making a paper cabinet:
- For the workpiece, you must use a scanner made from a rectangular sheet of thick paper;
- The ideal size would be A4 format; if you need a larger product, the dimensions are increased proportionally;
- After you have drawn the diagram, you need to cut it out: first, cut out the main elements along the lines, and then start cutting out the overhead valves;
- The frame of the model is glued together without doors;
- The doors are cut out of the same paper. Later they can be decorated with film: the adhesive layer of such material will allow you to apply it to the base without any problems.
Finally, decorative handles are glued to the doors. Buttons or beads are suitable for this. The legs are made of thick cardboard.
Table
Assembling a table from paper is not difficult, especially if you already have experience working with this material. There are many options for creating tables, but beginners should choose a less complicated method. It consists of the following actions:
- For work, use a square sheet of paper;
- All sides of the square are folded inward, forming mini-squares;
- Each square is folded inward to form triangles;
- The triangles curve outward;
- The final stage is the formation of the legs.
To elevate the tabletop, stick beautiful decorative paper on it or paint it with colored felt-tip pens and acrylic.
Making a sofa with your own hands
So, let’s build a sofa without a folding mechanism:
We select the material for the frame (pallets, plywood, wood), from which we make a base in the form of a frame based on the model of the product that our product should look like.
We decide on the supports; the easiest way is to purchase ready-made wooden legs; for moving it is recommended to equip them with small wheels.
The shape of the backrest is frame or frame; the consumption of materials and the shape of the sofa itself depend on this. It is advisable that the backrest be tilted - it’s more comfortable to sit.
Selects armrests, sides or supports. These parts not only significantly influence the design, but also largely determine the comfort of a homemade sofa.
We connect all parts of the base. To fill the frame, we use ready-made pallets or make a plywood liner, which we secure well with metal corners on a wooden frame. It will take more time to make the elastic base on the belts.
We make the soft base of the seat (a place to sleep) and the backrest from foam rubber (another porous material), cut to the size of the frame.
It is recommended to sand the wooden parts at the corners and cover them with a double layer of synthetic padding.
Next, we lay out all the parts of the seat and backrest, and make the upholstery with practical furniture textiles using a stapler. An option is to put on a ready-made cover.
As you can see, there is nothing complicated. For those who have not decided on the model of future upholstered furniture, we recommend viewing the gallery with photos. A video on how to make a sofa with your own hands will demonstrate more detailed practical instructions.