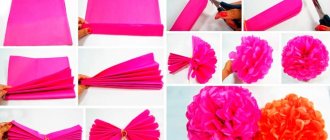
Weaving from wicker, straw and other plant fibers is a fascinating activity, but ordinary newspaper tubes can be a modern alternative. After all, natural materials are quite capricious; a lot of effort must be spent on their proper preparation, which is very problematic in an apartment.
Therefore, paper wicker weaving is rapidly gaining popularity. This hobby requires minimal investment, and the products are very beautiful and durable. In addition, you can easily get rid of piles of accumulated newspapers and magazines, turning them into hand-made masterpieces and delighting your friends with unusual gifts.
In this article we will reveal all the secrets: how to make newspaper tubes and color them, how to properly prepare a man-made paper vine for weaving and other little tricks so that your crafts are impeccable.
What you will need
DIY crafts from newspaper tubes require a competent approach to choosing the material you will be dealing with. The lighter the paper, the better, as it is easier to weave with. Give your preference to unnecessary newspapers and non-glossy magazines.
We will also need:
- A sharp stationery knife with which we will obtain strips of paper.
- Using scissors we will trim the ends of the weave.
- A knitting needle onto which strips of newspaper are wrapped; the thinner it is, the better. Wooden or metal will do, as long as it is long.
- A short wooden stick, such as a skewer, to help thread the ends of the weave through each other.
- Two types of glue: PVA for preparing the material from which we will weave and “Moment” for more complex connections in a finished structure.
- The form in which you will paint (if necessary) your tubes. There can be one or several containers.
What to make paper vine from
If you decide to turn mountains of waste paper into elegant baskets and flowerpots, we support your desire to make this world a better place and will help you choose the right material for making paper vines.
Newspapers
We recommend starting your acquaintance with the fashion hobby with newspaper
. Firstly, this is the cheapest, or rather even free, consumable material. Secondly, they are soft and obedient. Newspaper pages are easy to roll into a neat tube; even an absolute beginner can handle this task.
Consumer paper 45-48 g/m2
If you have not found any deposits of unnecessary newspapers, visit the nearest stationery store and purchase a couple of packs of consumer paper. It can also be found under the names offset or newspaper.
We advise you to pay attention to the following manufacturers: Kondopoga, Syktyvkar and OfficeSpace. The paper of the latter is slightly thicker and crystal white.
This category of raw materials also includes fax paper. Its density will also allow you to prepare tubes without problems.
Glossy magazines
If you have accumulated a whole collection of glossy magazines that you can’t bear to throw away, then donate it to a good cause. Magazine pages, all kinds of flyers and even leaflets are also suitable for rolling tubes. But we want to warn you right away: products made from them turn out to be rough. In addition, dense, glossy wicker is more difficult to paint than paper.
Therefore, such rigid tubes are most often used to create frames for large products, frames, finishing mirrors and shelves. That is, everything that requires additional strength and rigidity of the structure.
Office paper
This is the most unsuitable material due to its rather high density (A4/A3 office paper has a density of 80 g/m2). The tubes made from it are too dense and unyielding. Using office paper of any format, you will encounter difficulties already at the preparation stage: rolling it into a tube will take much longer than when using other types of raw materials. And the most important thing: the finished vine will turn out to be too rigid, it will be difficult to fit it into the weave, and twists and creases will be noticeable in the finished product.
Having analyzed all of the above, we can highlight our favorites. By a large margin, newspapers and newsprint (aka consumer) paper with a density of 45–48 g/m² are in the lead in terms of the number of advantages.
It is this raw material that we recommend using for preparing paper vines.
Making straws
Next, we begin making the tubes, for which we take half a newspaper spread and, using a black marker, measure out the divisions at a distance of ten centimeters from each other. Using a knife or scissors, cut into strips and take one sheet and set the rest aside for now.
Looking at the photo of crafts made from newspaper tubes, you may not immediately notice, but a tighter twist is used for the base. To achieve this, place the knitting needle on the corner of the strip and start winding the paper at an angle of 45 degrees.
If you need a thinner tube, increase the angle to 60 degrees. When finished, coat the end of the paper with PVA glue, press and remove the knitting needle.
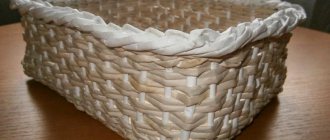
Fungus for the garden
To decorate the garden with decorative wicker fungus you need to prepare:
- newspaper tubes;
- glue;
- scissors;
- deep bowl.
How to do:
- We take 8 tubes as a basis. For a stronger base, you can insert wire inside. The base is like a square that needs to be braided.
- To give the base a convex shape, place the base over a bowl and braid until a mushroom cap is formed.
- To create a leg, bend the tubes as in the photo and continue braiding. In the middle of the leg you need to make a small bulge and braid it to the end.
Let's get started
There are a number of techniques that you need to know, since each of them allows you to achieve a unique and inimitable result for your work. Considering these techniques in isolation from practice will not give you anything. Therefore, we suggest moving from simple products to more complex ones, learning the basics of weaving.
Photos and patterns of weaving bottoms of different shapes
As you gain experience, you will want to make products of other shapes - oval, rectangular, multi-faceted.
The section contains several diagrams showing how to make forms more elegant and complex.
forest owl
For the owl, you need to prepare five dark tubes and two of any other color in advance.
- Form small spirals of a centimeter in length from two light tubes and, without cutting them, glue them to the base - the eyes are ready.
- Place the spirals next to each other so that the base of each of them is in different directions from each other.
- Bend one dark tube slightly into a semicircle and place it above your eyes, then take a second strip and glue its ends to the middle. You should get a kind of figure eight. Place it above the owl's head, next to the existing blanks.
- Slide another one under all the tubes so that its middle is located directly under the eyes and begin to wrap around each side. As a result, you should get wings, so make a couple of turns around them, do not do this anymore, concentrating only on the body.
- If desired, the owl can be decorated with a nose and slightly fluffed tassels in the head area.
How to twist paper straws
It's time to move from theory to practice and learn how to properly and quickly twist tubes from newspapers. At first, this may seem like something incredibly complicated. But in this matter the main thing is to start and get used to it. A little training - and you will see that the spell that prevented your fingers from obeying has dissipated and the tubes will begin to appear almost on their own.
To work you will need:
- Paper
. We talked about it in detail above. Let us only add that newspapers for folding must be taken fresh, whole and uncrumpled. Substandard does not suit us. A clean newspaper edge is suitable for tubes without letters; we will also discuss this in detail below. - Stationery knife.
Make sure you have spare blades, they get dull very quickly on paper. It will be more difficult to work with scissors, leave them for other types of creativity. - Glue stick
. It is necessary for fixing the edges of the workpieces. But often when painting, the ends of the tubes come off after the glue stick, so experienced craftswomen recommend using Glue Moment Joiner PVA in a red jar, you can find it in construction stores. Or PVA glue LUCH in yellow packaging. Or any polymer glue (most often it is sold in large bottles, which is inconvenient for our creativity, so for convenience you can pour it into a syringe). - Long thin knitting needle
. For a beginner, its optimal thickness is 1.5 mm. If you choose a thicker one, then the tubes will turn out to be thicker, with a cavity inside, and will form creases in the weaving. Once you become familiar with the process of winding tubes, we recommend looking for an even thinner knitting needle, ideally 1 mm. If you (or your grandmother’s) do not have such a thin knitting needle, then take a knitting needle from an old umbrella or sparkler, a piece of thin wire, etc.
The thinner the base (knitting needle), the higher quality raw materials you can produce for your masterpieces. Therefore, immediately strive for the ideal and try to gradually accustom yourself to rolling the thinnest, dense tubes possible.
We are preparing a newspaper
- Place the newspaper directly in front of you. If there are a lot of sheets, remove some of them. Fold the newspaper in half vertically.
- Cut it along the fold with a knife.
- Fold half of the newspaper in half again vertically and cut along the fold.
- If you did everything correctly, you will end up with neat, long strips of newspaper.
They are distinguished by the presence or absence of a pure white edge. Tubes rolled from strips with a clean newspaper edge will be white and without letters. Products from the remaining bands will have typographic fonts or designs.
To weave medium-sized products, you will need to use a knitting needle 1 mm or 1.5 mm thick and strips 7-10 cm wide. Remember, the lower the paper density, the wider the strip should be for twisting the tube.
Develop your own experience and experiment with the thickness of the workpieces that is convenient for you. In the meantime, we recommend that for medium-sized crafts, when using a 1-1.5 mm knitting needle, take strips of newsprint 7-8 cm wide, and for massive products increase the width of the strips to 10 cm.
We do not recommend twisting long tubes to a full spread of a newspaper sheet, since with such a strip length the tube does not turn out even. This leads to problems with extensions and, ultimately, with the appearance of the product. So, for beginners, we recommend that you avoid long tubes longer than 40 cm and instead twist tubes from strips 30 cm long; as a result, you will no longer have problems with extensions and the appearance of the product will undoubtedly improve.
The main secret to successfully preparing paper is to cut it along the grain.
When cutting the first strips, beginners often notice that in one direction everything goes like clockwork, but in the other it is much more difficult to cut, and the cut turns out to be “shaggy”. Similar difficulties can be encountered when twisting the vine.
These apparent anomalies are related to the direction of the cellulose fibers in the sheet of paper. That is, before cutting, you need to determine their location.
Method No. 1
Tear the newspaper in different directions (vertically and horizontally). The tear along the fiber will be smooth and straight, its edges will be less shaggy. Accordingly, breaks across the fibers will be uneven. For this method of testing, the familiar but slightly modified rule from childhood is suitable: tear seven times - cut once.
Method No. 2
Fold a sheet of paper in two perpendicular directions and smooth the folds with your fingers. The fold running along the fibers will be smooth and even to the touch, while the fold that runs across will be rough and slightly broken.
From all of the above, let us formulate a simple but very important rule: always cut strips for tubes along the paper fibers.
Spin it on a knitting needle
Now it's time to learn how to properly twist your first newspaper tubes for weaving. Be patient and look at the step-by-step photos, everything is much simpler than it seems at first glance, just don’t forget to strictly follow our instructions.
Advice:
It will not be very convenient to twist on a bare table, since the paper on a smooth surface slides and does not adhere well to the knitting needle. We recommend rolling it on a silicone baking mat; these are sold in hardware stores, Ikea, and Fix Price.
It is desirable that the surface be slightly rubberized, then the grip will be very good, the knitting needle will not fidget and the tube will be wound more tightly. Be sure to pay attention to this important nuance!
Some craftswomen advise using a piece of vinyl wallpaper instead of expensive rugs. Vinyl also gives excellent grip and is a budget option.
Experiment with the choice of bedding and rugs, only then will you understand what will be more convenient for you to do this on.
Method of torsion on the table
Place a strip of newspaper in front of you. Place a knitting needle on its lower right corner at an angle of 30 degrees and begin twisting the newspaper onto it.
At the very beginning, you need to firmly press the knitting needle against the paper with your fingers so that it tucks under the knitting needle, as if swinging it back and forth, then the newspaper will grab a little under the knitting needle and adhere to it. For convenience, you can lightly moisten your fingers with water.
, then the paper will adhere well to the knitting needle.
Try not to make a large angle between the strip and the knitting needle. By placing the knitting needle at an acute angle, we lengthen the tube as much as possible. Do not allow it to move while twisting and make sure that the turns are parallel to each other. This way the workpiece will be the same thickness along its entire length.
Different angles and widths of the turns will give the finished wicker product a sloppy appearance.
Try to press the knitting needle against the newspaper as tightly as possible so that the tube turns out smooth and dense.
After twisting the tip, place your hands like on a rolling pin and twist the rest of the strip.
When a small “tail” remains of it, coat it with glue and twist the tube completely. Finally the knitting needle can be removed.
As a result, you get two types of tubes: light (from white newspaper edge) and with letters.
We would like to give one more important piece of advice. Try to twist the tubes as tightly and tightly as possible. With the correct technique, the turns of paper are arranged so tightly that they form a single canvas. Such raw materials will produce high-quality products, and the weaving process will be easy and enjoyable.
Photo frame
Crafts from newspaper tubes or a master class from them allow you to make not only various kinds of animals, but also something useful for your home, for example, a photo frame. For it you will need a dense rectangular base on which you need to glue a sheet of newsprint. When everything is dry, take the blanks and apply glue along the edge to form the sides.
Start placing newspaper tubes in each corner at a forty-five degree angle. Their number will depend on the size of the photograph or painting that you place in the frame.
When you're done with the corners, start forming the inner sides. Glue only the corners, leaving the sides free to pass through. The frame can also be decorated with various patterns to suit your taste.
Second bottom option
In the second case, we place an odd number of paired guides on the table and begin to braid them with two tubes, one of which is threaded from above, and the second from below.
Having reached the end, the tube is bent, and then the following guides are inserted into the edges. When inserting the guides, help yourself with scissors by cutting one of its ends.
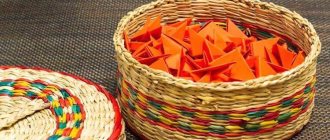
Round bottom for large items
It will be a little easier if you cross several tubes laid one next to the other. In the photo (see below) we took five tubes and intertwined them relative to each other. To make the bottom less voluminous, it must be flattened. The easiest way to do this is with a rolling pin or a bottle - rolling it several times.
To make it easier to work further, coat the intersections with PVA glue.
Next, we take the straw and begin to tie the bottom, passing the straw through three tubes (the rope method). So - through three tubes - we make two rows. Then - several rows - after two.
A few is to ensure that the dimensions of the bottom are almost “right” - in shape.
We weave the last two or three rows through one tube. During weaving, the warp tubes must be spaced at the same distance.
This is actually how it works, you just need to make sure that the distance is the same.
When switching to weaving the walls, we cross the base tubes one with the other. This makes the product more stable and the transition more reliable.
To weave the walls, you can use the working tubes that were used to weave the bottom.
Weaving walls
Two tubes are inserted into the base of the basket and braided around the posts - one goes in the front and the other in the back. Cut the part you will be inserting diagonally to continue weaving.
Press the inner paper vine with your fingernail to help it bend better. Continue this until the basket reaches the required height. If necessary, increase the guides by extending them with additional tubes.
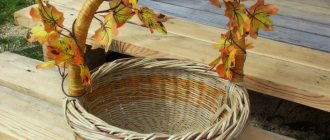
Round basket with handle
Weaving from newspaper tubes, namely crafts from them, can turn out better if you use a frame. Such a frame can be a round plate on which the bottom or the entire work will be formed.
Take eight guide posts and connect them together, intertwining them with each other. They should form a square and face perpendicular directions. Next, take two tubes and insert them into the resulting base and begin to weave in a circle, forming the bottom and moving down.
The handle is made of woven paper vine, on which several tubes are wound.
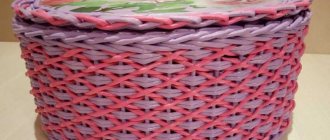
Basket
- Several vertical tubes are fixed parallel to each other and an additional long tube is passed through them, which must first pass under one, then over the other tube.
- The tube must periodically be lengthened by attaching another one to it, so the bottom must be completed completely. Then walls are made on its basis. To do this, the remaining racks are enlarged by attaching additional tubes to them.
- Two vines are crossed, the one that went under the vine needs to be bent and go around the second one. One of them should be in the rack, and the second should lie on the surface. Thus, it is necessary to raise all the racks and begin weaving the walls using the technique presented for making the bottom. At the end, the remaining posts need to be folded and the edges woven together as shown above.
Weaving the bottom of the basket (diagram)
Master class on weaving a basket from newspaper tubes