- July 29, 2019
- Crafts
- Natalia Penchkovskaya
A basket is a necessary item in the household. It is convenient to store small items, fruits and vegetables, cosmetics or threads and yarn for knitting. There are large and small, round, oval or rectangular baskets. The easiest way is to go and buy a wicker container at the market, but the cost of a beautiful product is considerable, and crafts made from wicker are quite heavy.
It is much more interesting to make your own basket from newspaper tubes. If you have a large number of old newspapers, weaving it is easier than ever. We will look further in the article on how to fold the details of a craft with your own hands and what weaving methods exist. Our master class will help novice craftsmen cope with making a simple product of any shape on a cardboard base and with a wicker bottom. You will learn how to step by step when weaving the sides and how to fold the edge. We will also explain how to twist a durable handle to carry the product.
The finished basket of newspaper tubes can be left unchanged or painted and varnished. Paper treated in this way will be durable and waterproof. Some craftsmen first coat the tubes with stain, giving them the natural colors of natural vine. After covering the surface with glossy varnish, no one will distinguish a paper basket from a product made from wicker. Both in appearance and in quality the crafts will be completely similar.
Before you start weaving a basket from newspaper tubes with your own hands, you need to prepare a large number of thin and long parts. We’ll look at how to quickly twist them in more detail later in the article.
How to roll a newspaper tube
Recently, many master classes on making various crafts from newspaper tubes have appeared on the Internet. However, many people still do not know about their existence. If you belong to this number, then this section is intended for you.
Old newspapers need to be cut into strips 10-12 cm wide. Starting from the corner of the rectangle, roll the paper with your fingers, pressing the turns tightly so that the tube turns out to be thin and long.
Many craftsmen advise using a knitting needle for convenience, but some do not like this facilitating method, since the tubes turn out to be slightly conical, that is, by the end of winding the diameter of the product increases. To weave, the tube must be smooth and thin. Try to ensure that all the parts are the same diameter, otherwise a basket made of newspaper tubes will look untidy.
In the photo above you can see how the master rolls a thin tube out of paper with his hands. If you don’t manage to do it neatly the first time, don’t worry, with experience you’ll get the hang of twisting weaving blanks in 1 minute. At the end, coat the extreme corner of the paper with PVA glue and attach it to the last turn. Unevenness in length and edges are trimmed with scissors at the end, when many elements have been made.
Weaving a basket from newspaper tubes requires long parts, so immediately try gluing two pieces into one. Lubricate the edge of the first element with glue and screw it into the hole of the second from the end side. After hardening, weaving can be safely continued. In this way you can weave a basket the size of a person, because the tubes can be extended many times.
Best answers
Maria Klimova:
I remember in the early 90s there were problems with cigarettes and tobacco, our men smoked tea and brooms :) True, true. They made tubes out of newspaper (they wrapped pieces of newspaper around a pencil, then removed them from the pencil to form a neat tube), filled them with tea and smoked. And the brooms were like this: they broke off the stem from the handle of the broom, set it on fire and smoked it like a cigarette. I don’t know how it feels, I haven’t tried it.
1 `:
I remember I made it out of toilet paper, it turned out great,... it smells like some kind of dope, you don’t get high, but your head sticks out in a special way... It's better to drink it.
}{PO”:
well, respect, smoking, well, probably like everyone else
Andrey Mikhailov:
Better not, you'll suffocate
Anastasia Morozova:
You can, but don’t take long puffs, otherwise your throat will be sore, it sticks out funny
Cardboard base
For beginners, it is more convenient to decorate a basket of newspaper tubes on a cardboard base. To make the bottom of the craft durable, they mainly use packaging corrugated cardboard in one or two layers. Draw the desired geometric shape on the sheet and cut out the part with scissors. Stepping 1 cm from the edge of the cardboard, use an awl to make holes at regular intervals. In our sample it is 2 cm. Then insert a newspaper tube into each hole to the middle and bend it in half, pointing upward.
The first row of weaving begins from the corner of the future basket, if it is square or rectangular. Pull a piece bent in half onto the outermost newspaper tube and twist it in an “X” shape, alternately along the entire perimeter of the bottom, going around each piece sticking up. Change the position of the halves all the time: one in front, the other at the back of the canvas. The next step is done in reverse. When you run out of paper, attach another tube to the two ends using PVA glue and continue working until the desired height of the basket. This is the simplest weaving option, which can be handled by craftsmen who are taking on such work for the first time.
Laundry baskets
The main advantage of working with this technique is its practical side: having learned to weave baskets from scrap materials, you can easily create household items.
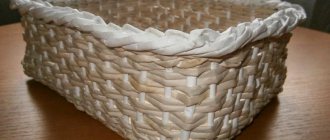
One of these useful devices is a laundry basket - the work is simple, the difficulties lie only in the size of the product itself. To weave a laundry basket from rolled newspapers yourself, be patient and have the necessary materials.
Option for storing laundry
Prepare the following materials and tools:
- thick cardboard, some needlewomen use corrugated cardboard;
- wallpaper or colored paper for gluing the bottom;
- paper tubes, pre-painted in the required color and covered with stain;
- clear varnish;
- PVA glue;
- fabric for the liner on the base.
You will also need clothespins to secure the bottom while it dries and heavy objects such as a weight or a stack of books. A box, the size of which the basket will be woven, will not be superfluous. It will add stability to the bottom and make the basket the correct shape.
The first thing to do is paste the wallpaper onto cardboard and wait for it to dry. After this, take the prepared tubes and distribute them along the bottom, securing them with glue. Place a second sheet of cardboard on the sticks and secure them firmly with glue and clothespins, waiting until they dry completely.
When the material has dried, you can proceed to braiding the walls. To do this, the tubes are bent with each subsequent roll and pulled up. A box of a suitable size is placed in the center of the bottom so that the weaving takes on the correct shape.
The work uses the technique of layer-by-layer weaving with several tubes at once.
You can use both single-color convolutions and two-color options. The tube is inserted behind the base of the axle, then brought out in front of the axle - thus creating a weave similar to calico fibers.
When the height is reached, you can proceed to making handles. To do this, lifting rows are made on opposite sides of the basket, simulating a handle. At the end of the work, the tubes are cut and hidden inside, fixing with glue. The decoration of the basket is made according to your wishes: often this is a single-color painting with acrylic paint.
Weaving a round bottom
Next, we’ll look at how to make a basket from newspaper tubes with a wicker round bottom. The step-by-step photo below clearly shows the order of laying out the tubes on the table surface before starting work.
First, place three elements side by side vertically and horizontally with a “+” sign, then place a similar number of pieces on top with the letter “X”. To prevent the newspaper tubes from slipping or slipping during further work, press down the middle of the workpiece a little. You can use an iron or a regular rolling pin.
Weaving is done in a circle. Bend one tube in half and place three tubes standing in a stack. Press down the fold with your fingers. Next, we weave a basket of newspaper tubes in pairs, that is, we visually divide the three elements into pairs and go around them with halves of the main part in the manner described above. When a little material remains, make a coupling: glue one more to each end of the tubes and continue weaving to the desired diameter. You can make a cardboard template or measure the bottom using a regular glass container.
Flowers
In order to make flowers, several tubes are taken, around which weaving will take place. They need to be placed in the shape of a snowflake and glued to each other, after which you need to take an additional tube from the newspaper and start weaving in a circle.
You need to make 4 rows and bend the end of the tube inward. Then you should take 6 more tubes of the same size and bend each in half. Their tips must be greased with glue and inserted into the weaving between the openings. A flower stick can be made by inserting one dense vine into a round weave and securing it with glue.
Another option for a round bottom
Circular weaving of a basket from newspaper tubes can also be done with large stitches. Getting started is completely consistent with the previous option, already described above. The main tube is highlighted in white in the photograph. It is bent, as usual, in half and crossed around packs of three parts, without separating them in pairs. To continue working on the round basket of newspaper tubes once the desired diameter is reached, lift all the elements perpendicular to the table surface upward.
There are baskets in the shape of a truncated cone, that is, with an expansion at the top, then you will need to insert a template inside the workpiece. It is most convenient to make it from corrugated packaging cardboard, already familiar to the reader. To prevent the tops of the parts from bending under the weight of the paper, they are attached to the template with clothespins. And the main newspaper tube, which is used for the actual weaving, continues to be twisted around each vertically protruding knitting needle. For convenience, you can temporarily remove the clothespin, stretch the tube and attach the clothespin to the previous place.
The use of homemade boxes
A box in the house for a woman is a very useful thing, and for a needlewoman it is simply necessary. Moreover, the more of them, the better: in one there are embroidery threads, in the second - balls, in the third - knitting needles, hooks and needles, in the next - ribbons and braid. And somewhere else you need to put scissors, glue, a stationery knife, stencil staplers... The more hobbies you have, the more boxes, chests and boxes you need.
Small boxes are suitable for small items, and a large box can be intended for laundry prepared for washing.
In addition to the fact that the box is a necessary thing in the house, it is also a wonderful gift: as an independent gift or as a box for the main gift. A wide variety of design options will make it, depending on the occasion, spectacular and original, festive and discreet.
Square base
The bottom of a basket made of newspaper tubes can be not only round, but also with right angles on four sides. Both the square and the rectangle are woven as follows. On the table surface, tubes are laid out in a row at equal distances from each other horizontally and vertically. To ensure their correct location, place a drawing on a sheet of Whatman paper under the workpiece. Several squares of increasing size are drawn on it with one central point.
To prevent the newspaper tubes from moving, secure their ends with clothespins. The last thing you need to do is determine the middle of the square. To do this, two parts are laid out diagonally in accordance with the drawing and also secured with clothespins.
To weave a basket from newspaper tubes, the main part is folded in half and folded onto the corner of the square, that is, onto the diagonal element. Then they do the usual weaving with changing the position of the tube back and forth. Each row is pressed tightly with your fingers towards the previous one. The bottom turns out to be very dense and strong. This basket can withstand a large load. When the square in the drawing reaches the required size, all the tubes are bent perpendicularly upward, and weaving of the sides begins to the desired height.
What stages will you have to go through?
Step one. Fold the newspaper in half and cut it in half. Wrap one finished piece of newspaper in wire or knitting needle.
Oval bottom of the basket
It is easy to weave a basket from newspaper tubes with your own hands and is oval in shape. The principle of assembling the bottom of the craft is clearly visible in the photo below. The tubes are laid out on the table surface perpendicular to each other. Lay 7 pieces from top to bottom, reinforcing the outer parts in pairs. 9 pieces are placed horizontally, dividing them into three bundles of 3 elements each, directed in different directions. Weaving, as usual, is carried out with a working tube bent in half. But for the oval shape of the bottom of the basket, not one, but two working parts are used. The work begins with putting a fold on 9 side tubes on both sides. To keep them tight, the main part is wrapped in an “X” shape. Next, vertical elements are used, and the side side is braided, dividing the nine into bundles of three pieces.
The same procedure is carried out with the other tube. Since all weaving is done clockwise, it is put on with a fold from top to bottom, and the work is carried out in the opposite direction.
Next comes a simple increase in the size of the bottom of the basket. Weaving is done by crossing the main element around each part along its path. If necessary, the tubes are extended in length using PVA glue. This continues until the required size of the base of the basket is reached. All elements are folded upward and attached with clothespins to a cardboard template.
The height of the product, that is, all the sides, can be woven in different ways. For beginners, it is easier to continue working by changing the position of the two halves of the main tube in the same way. For experienced craftsmen, there are many beautiful weaving patterns.
Shutdown
In order for the product to look neat, it is necessary, firstly, to remove the working tubes, and secondly, to somehow form the edge and do something with the stands.
Some weaving elements are more complex. It’s best to master them after you’ve made a couple of simple baskets
We fix the working tubes
First you need to secure the working tubes. Usually they are hidden in the weave - in the nearest binding. For this operation you will need a knitting needle or a long wooden skewer.
- Having retreated down three or four rows, we insert the skewer so that it comes out not far from the working tube.
- Bend the tube and place it on a skewer. We carefully place the entire structure in the place where the skewer was inserted.
- We cut the tube as close to the weave as possible.
- We repeat from the second.
- We straighten the weaving from newspaper tubes so that the scraps are not visible.
This is a simple and reliable way to secure the working tubes. Their ends are hidden in the weaving, but are securely fixed and clamped. For those who are just starting to master paper weaving, this is perhaps the best option.
Weaving the edge - the main technique
Next, you can begin to close the edge. There are many different ways - more or less complicated. The simplest one is to do the same as with the workers, but bend them inside the product. But then the edge is not very beautiful. If you want to make it more aesthetically pleasing, you can try the “rod” edge. It is not too difficult for beginners to master, and it looks interesting.
To close the edge with a “rod”, you need an auxiliary tube or you can take a skewer or knitting needle. With its help, we bend the first post to the right, bring it behind the next post and bring it forward. We bend it to the right in the same way, hook it behind the next one and bring two more posts forward. In total, we have three bent.
From now on we will always work with the leftmost tube. We take it, move it to the right, go around the two posts in front (one bent, one standing), take it behind the third, bring it forward and bend it.
We cut it with pliers so that 8-9 mm of tube remains behind the stand. To fix this trim, we bend the first of the standing posts to the right, pressing the trimmed edge. Again we have three tubes (bent) at work. Again we take the left one and repeat everything again.
A side is gradually formed that covers the top of the weave. We repeat all these steps until three stands remain: two bent and one standing. It’s easy to track this moment, it’s important not to miss it. This is where you need to be careful. If everything is done correctly, it will be impossible to find the place where the work begins/ends.
Final chords
When three racks remain uncovered, you need to make sure that the newspaper tubes are laid in the same sequence and in the same direction, so that they lie the same way as before. We take out the auxiliary tube or skewer with which we began to close the edge.
Again we take the leftmost tube, in front we go around the last standing post and then, according to the previous weaving algorithm, we need to lead it behind the next post. This stand is already bent and secured. This is the one with which they began to close the edge. We insert the tube from the back, slip it under the first curved post (it’s more convenient with a skewer) and pull it forward, laying the tube like the rest. We cut it off.
Further according to the algorithm, it must be covered with the previous stand. In this case, it's the last one standing. We bend it, bring it behind the weaving and push it behind the cut-off post.
Now there are no standing racks, only three working ones remain. They must be laid in the same way as those that are already secured. We take the far left one, it must be pulled under the third post. Look carefully. This is the first stand that does not have a cut tube near it. Stretch, lay, cut.
We lay the left tube along the top, covering the tubes we just laid. We start it from the back, pull it under the counter, in front of the laid tube.
We repeat the same operations with the next leftmost one. It must be placed behind an “empty” stand, near which there is no cut tube. This stand is located to the right of the one we just worked with. Here you can’t do without a skewer - you need to slip a newspaper tube under the two already laid (look at the photo).
We lay the tube on top, hiding the cut one above. We start it from the back, put it on a skewer and pull it out. Holding it with your fingers, we rock it from side to side so that there is a place for it and it “lies down.” We cut it off.
All that was left was a newspaper tube sticking out. We start it behind the third rack. It’s not difficult to find your way: under the first two there are already scraps of the ones that were just laid. We insert the skewer under the laid turns and bring it out near the bent post.
Using a skewer, we bring the last rack out and lay it out so that it lies the same way as the others. Now it can be trimmed. The edge of the basket is ready and it is impossible to find where the row begins and ends.
An original solution for beginners
But since our article is intended for beginners, we will take a closer look at how to weave a basket from newspaper tubes in a simple way, and as a result get an original product.
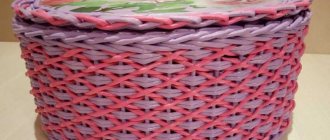
Before starting work, all paper tubes are painted in different shades of brown using stain. After drying, work begins with the darker parts first, raising the height of the basket by 3-4 rows. Then the light elements are connected and with simple weaving they go around the vertical tubes once. In order not to get confused when weaving in a circle with the number of rows made, a mark of a contrasting color is placed on one of the parts. In our sample, blue electrical tape is wound on top. Now the master can clearly see the beginning and end of each row and will not make mistakes when weaving.
Then the fun begins. As you know, weaving is carried out with a tube bent in half, that is, in two parts. To create an original pattern, one of the halves is extended with a light, beige element, and the other with a dark, brown element. Despite the simplest weaving, the design of the product turns out to be interesting. A novice craftsman who is just mastering a new weaving technique will be able to diversify his crafts by painting parts in different colors, using not only stains of different shades, but also brighter paints.
Useful tips from experienced needlewomen
1 3
In the process of work, unexpected moments and ordinary nuances may arise that are understandable to professionals, but cause confusion and difficulties for beginners. Experienced handmakers are happy to share recommendations.
Edge folding
You now know how to get started and raise the height of the product with a simple cross weave method. But it is very important to know how to finish a basket of newspaper tubes, to properly process the edge so that it looks neat. Folding the edge also has several options. For beginners, we will explain the easiest way. The tubes sticking up are alternately bent to the side and intertwined with each other along the entire perimeter of the craft.
The remaining ends are cut with scissors, saving only 4-5 cm of their length for further work. Using a wooden skewer or knitting needle, these parts are carefully inserted between the weaving from below, hiding them inside. Secure the ends using PVA glue or a glue gun. If the basket does not need handles, then the work can be considered completed. Next, we’ll figure out how to attach a reliable handle to a wicker basket, if necessary.
Materials and tools
Paper. Let's go to the paper vine harvesting! What is the best material to make tubes for weaving from? First of all, from old newspapers. Newsprint paper is thin, curls well, and absorbs paint well. Low density A4 paper (60–65 g/m2) is also suitable. It is called “newspaper” or “consumer”, “writing”.
In addition, you can use magazines, old notebooks, cash register tape, etc. to make straws.
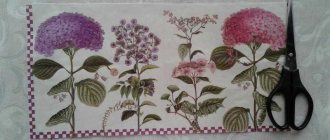
How to cut paper Paper is a fibrous material, and, like fabric, it has a longitudinal and transverse direction of fibers. Typically, small-format newspapers (57x40 cm) have fibers along the long side, and large-format newspapers (84x57 cm) have fibers along the short side. In A4 paper, the fibers often run along the long side, but sometimes you come across paper cut crosswise by manufacturers. Before cutting the entire pack into strips, check the curl of the material on one of the sheets. Place the sheet on a damp surface - it will begin to roll itself into a roll in the longitudinal direction. This is the direction you need to cut.
Glue. To work with newspaper tubes, you can choose any glue suitable for paper. For example, PVA or glue stick
It is important that it has good fixing properties, otherwise your tubes may unwind during painting
Density also matters. If the glue is too liquid, the tubes will get wet during extension.
Water-based wood stains will help you paint paper straws in the colors of pine, maple, oak, rosewood and even ebony wood. You can find about two dozen shades on sale. There is a powdered stain that is diluted with water before use.
A mixture of construction primer and color is also very suitable for painting tubes. Before use, be sure to dilute the primer with water, as indicated in the instructions on the bottle. Keep in mind that paper is a highly absorbent surface.
How else to color the tubes To give the tubes the desired color, you can use dyes for wool, fabric, printer, food coloring, hot decoction of onion peels, brilliant green and potassium permanganate.
Varnish. To make your work durable and not afraid of dampness, it needs to be varnished. Any wood varnish will do, but indoors it is best to use acrylic. It is odorless, after application it dries quickly and becomes transparent, forming a protective film.
Knitting needles and skewers. To twist paper strips into tubes, you will need knitting needles of different diameters - from 1.5 to 4.5 mm - or wooden skewers for kebab. Tubes twisted on a thin knitting needle look most like a vine. They are dense and almost do not wrinkle during weaving. And on a thick knitting needle you get tubes that are easy to flatten. And if they are twisted from very thin paper, then they can be woven like straw.
Scissors or knife. You will need one of these tools to cut newspapers into strips. But twisted tubes are best cut with pliers.
A spray bottle is needed to moisten dry tubes: sprinkle them with water and put them in a plastic bag. They will become flexible and obedient again. The spray bottle can also be used to apply paint to crafts.
Brushes are used to paint finished crafts and - sometimes - tubes. You will need wide and thin brushes.
Clothespins secure the tubes, prevent the weaving from unraveling and make gluing the parts easier.
Holes are made with an awl, the rows of weaving are moved apart, and tubes are pulled between them.
Basket handle made from newspaper tubes
It is convenient to carry the wicker product when the handle is made. On square or rectangular crafts, you can simply leave a hole by skipping a few rows on the sides. Anyone who knows how to knit with threads knows perfectly well that to get a hole, the knitting in the right place is turned over to the wrong side and carried out in the opposite direction. The same thing happens when weaving with newspaper tubes: they mark the place of the future handle on the basket canvas and turn it in the opposite direction, raising several rows up. Next, using the type of “air” loops in knitting, a free row of the length of the handle is woven, connecting it to the fabric on the other side of the basket. The same procedure is performed for the second handle.
A round or oval product usually has only one long handle, as in the photo above. To do this, mark the places where it will be attached and insert a long piece between the tubes on the sides of the craft, bending it in half. But this will turn out to be a flimsy handle, so it needs to be sealed. To do this, a separate tube is wound alternately around the first and second arcs along its entire length. The ends of the paper are hidden inside the canvas using a knitting needle, as when folding. The entire structure is attached with PVA glue or a glue gun.
You can make a handle by simply twisting a bunch of tubes. Masters advise to blot all the elements with a foam sponge soaked in water before doing this. After the paper dries, the curl will be incredibly strong. A braided handle also looks interesting, and everyone has been familiar with this type of weaving since childhood.
Beautiful examples
Wickerwork not only decorates the interior, but also performs practical functions. Large baskets and boxes store laundry. Small ones can be used to store spices. The book box is a convenient place to store documents or jewelry.
The quality and beauty of the craft depends on the experience and skills of the craftswoman. Large wicker baskets are great for storing balls of yarn. Wicker boxes with an additional element inside are suitable for storing sewing accessories. This is a flat piece with sticks on which spools of thread are threaded.
Wickerwork in the form of original souvenirs of various shapes is good. For skilled hands it will not be difficult to weave a box in the shape of an apple, melon, or mushroom.
Heart-shaped boxes are popular. The bottom for this box is cut out in the shape of a heart from hard cardboard or plywood. Additionally, they make a decoration for it to cover the ends of the glued posts. Weave with any pattern upwards, maximally observing the shape of the heart. The lid for this box is made similarly to the bottom. Braid the workpiece in one of the ways. It is advisable to decorate a heart-shaped box with flowers, ribbons, beads and much more, which is up to the imagination of the craftswoman.
How to weave a box with your own hands, watch the video.
Decorating crafts
Now you know how to weave a simple basket from newspaper tubes. The master class given in the article is designed to teach beginners. In order for the craft to have a finished look, it needs to be painted. For this, it is best to use acrylic paints and a soft natural brush. After drying, the product can additionally be coated with acrylic varnish.
Some craftsmen use ordinary white sheets without printing ink in their work. They can be coated with one or more layers of stain, giving the paper the desired shade. To make the basket exactly like a product made from wicker, apply two layers of acrylic glossy varnish. After drying, the basket will shine beautifully and gain strength. It can be washed under water, wiped with a damp cloth, that is, used like an ordinary wicker basket from the market.
In the article, we tried to describe in detail all the tricks and secrets of weaving paper tubes. Now you know how to roll them from old sheets of newspaper, how to shape the bottom and raise the height of the weaving, you can independently make the correct fold of the top edge and attach the handle. As you can see, weaving from newspaper tubes is interesting, creative and absolutely uncomplicated.
Be sure to try making your own crafts! Creative success!
About priming and painting
The finished basket must be primed in several layers with waterproof paint or PVA glue, which will have to be diluted a little with water. It should be applied with a brush with dense bristles. After priming, the product must dry, then only the outer side is painted. The paint is also applied several times, the basket is dried again, and then varnished.
Painting wickerwork
Tinting blanks
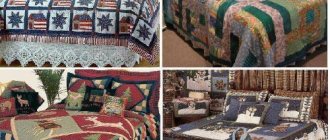
Many needlewomen use pages of colored glossy magazines instead of newspapers, then the basket acquires its charm, like a patchwork quilt, and resembles an ethnic style.