Embroidery using carpet technique has its own characteristics, since it is not at all similar to other types of embroidery. The finished products are distinguished by their softness and similarity to a real carpet. Used to create pillows, blankets, paintings, bedspreads, toys. Today we will look at carpet needle embroidery and describe the methods and technology for creating the work.
What is carpet embroidery
Carpet embroidery is a special technique that is a bit similar to cross stitch or satin stitch, but the patterns here are created not smooth, but voluminous. The image is also transferred to the fabric using colored threads that create terry loops or fluffy pile.
Pile or loops are created on fabric using two options:
- Loop technique or non-woven tapestry. The design is transferred to the fabric using a special needle, which creates loops. To do this, you can use any thick fabric, and you can simply download patterns for carpet embroidery on the Internet or even draw them yourself.
- The knotting technique involves the use of short pieces of yarn that are knotted to the fabric. They are tied on a special mesh, which can be purchased separately or in an embroidery kit.
Carpet embroidery is done in two ways - looped and knotted.
Carpet technology appeared and became popular in the Middle Ages, namely in the 15th century. Back then, princesses in cold castles created such cozy embroideries.
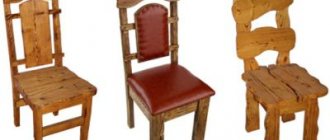
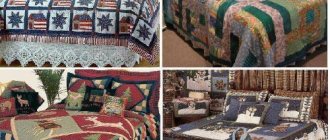
Cute little things in the house, made in the style of carpet embroidery, will create an atmosphere of warmth and comfort.
Warmth and comfort are the main features of this type of needlework, with which you can create:
- Nice rugs for feet.
- Bedspreads.
- Carpets.
- Original panels.
- Antique tapestries or embroidered paintings.
- Sofa cushions.
- Warm blankets.
Carpet technology can be used both to decorate the entire product and to create individual applications.
An applique made using this technique will look good on children's clothing.
Volumetric figures will look original especially on children's clothing:
- Scarf.
- Hats.
- Sweaters.
- Bags.
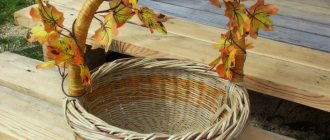
You can even use carpet technology to create toys.
Look how original a handbag made in the style of carpet embroidery looks.
Looped
You will need a compacted fabric or mesh. Use natural or synthetic embroidery threads. If you want a more voluminous weave, take a thicker thread.
Use a special needle for carpet embroidery.
Work begins by transferring the drawing with a marker onto the base. Transferred with tracing paper. Fabric tension is required - use a hoop or a special frame. They embroider from the inside out, and the pattern is applied there. The frequency of the stitches creates the pattern - the denser they are, the more voluminous the picture.
The base itself needs to be pulled well onto the frame, because the needle can pierce the fabric during operation.
On the Internet you can find drawings and instructions for embroidering a rug on a mesh. This technique is believed to help create tapestries. On the Internet you will find diagrams of carpet techniques for embroidered tapestries.
The surface of the embroidery in this case turns out to be soft and fluffy, one might say “carpet-like”, since the design itself is obtained due to the loose threads released. .
Advantages and disadvantages of carpet embroidery
This unusual embroidery technique has its advantages and disadvantages compared to other forms of hand-made product design. Main advantages:
- Simply executed, the technique can be mastered even by a child.
- The plasticity of the design, the transferred image will be soft, so embroidery is convenient to use for clothing.
- The design is easy to create - you can simply apply it to the fabric and embroider along the contour.
- Originality and softness of the design.
- The ability to create three-dimensional shapes on fabric.
Carpet embroidery is distinguished by its ease of execution and the ability to create three-dimensional designs.
The main disadvantage of the method is that it requires a lot of time. It will take quite a long time to embroider an entire rug or blanket in this way. At the same time, this disadvantage can also be a kind of advantage, since this method allows you to develop patience and perseverance.
Those who decide to take up carpet embroidery should be patient and persevering.
Main seams
The basic rule for carpet stitching is that the threads must be stretched tightly and evenly. The most common and simplest seam is a cross stitch. It serves as the basis for the carpet seam. You need to start from the first half of the cross, moving from left to right, evenly stitching. The second half of the cross is also done with crosses, only the direction changes: from right to left. They should cover the stitches of the first half.
The second type of seam is elongated. The working thread should pass through two horizontal and one vertical threads of the canvas. All rows must follow this order: the working thread is laid in the direction of the seam from right to left. Covered with the first row from left to right, and back in the same order.
Ready product
A half-cross stitch is made with a thin thread. The canvas should be thicker than thread. The working thread is carried in a straight direction from right to left, without stitches. A semi-cross is made on top of it in the direction from left to right.
When embroidering with a straight tapestry stitch, you must not forget about the oblique tapestry stitch. There are two methods of embroidering with a straight tapestry stitch.
Carpet embroidery is not limited to just these stitches, there are many different stitches, but basically all masters use only these.
Varieties
There are two main types of techniques: loop and knot. Each of them requires its own tools and circuit. Therefore, before starting work, you need to select a specific equipment and purchase it for it:
- The basis for the drawing or outline.
- Scheme.
- Hoop or frame.
- Tools: needle or hooks.
- Threads.
There are two techniques for performing this embroidery - loop and knot.
Advice. The loop technique or carpet needle embroidery will be more convenient and understandable for beginners, as it is more similar to regular embroidery. Therefore, it is recommended to start mastering this skill with this method.
Craft stores sell ready-made kits that contain all the necessary tools and materials, as well as detailed instructions.
Ready-made kits can be purchased in specialized stores.
Important! To begin with, it is better to purchase a ready-made set, since everything will be included in the kit and you will not have to buy missing tools or yarn later.
Looped
For the loop technique you will need materials and tools:
- Canvas or fabric. For carpet needle embroidery for beginners, it is better to use thicker fabric. This will make it easier to secure the threads. Subsequently, you can switch to regular thin cotton fabric, which will be convenient to sew onto the finished product.
- A drawing or diagram that can be found on websites or purchased separately.
- A special needle that has a limiter. The limiter allows you to create loops of a strictly defined length. Experienced craftswomen use several needles with different stops. Thanks to this, the drawing turns out voluminous.
- Hoop or frame. For beginners, it is better to use a hoop. They will allow you to stretch the fabric well, making it easier to pierce it, and the work will go faster.
- Threads. Regular embroidery thread or floss will do. You can also use thin wool or acrylic yarn.
- PVA glue, which will allow you to secure the resulting loops.
Before you begin, you should carefully study this embroidery technique.
The design and the embroidery itself using the loop technique are applied from the reverse side. The fabric is then stretched onto a hoop and loops are created using a needle. After which they are fixed with glue and embroidery is obtained.
The result is voluminous and fluffy products that will delight you with their originality and pleasant, cozy appearance.
Nodular
The knotting technique will require other tools:
- Special mesh or canvas. It must be purchased separately each time.
- Special hook for creating loops and knots.
- Threads. For this method, regular yarn is more suitable: wool, cotton or acrylic. You should not choose floss, as it will be inconvenient to make knots with these threads.
- Embroidery patterns, which can also be found on the Internet. This method will require special circuits that are suitable for the grid.
- Hoop. Their use here is optional. But carpet weaving for beginners is recommended to be done using this tool. It will allow you to accurately hold the grid and diagram. It is easier to weave knots on a stretched mesh.
This technique is a little more difficult to work with than the loop technique.
The procedure for using the knot technique is simple. First, the diagram and grid are secured using a hoop. Then the threads are cut into small pieces - 5 cm. Each piece is woven around the mesh using a hook, where a knot is formed. This method is more labor intensive than using a needle. Craft kits sell pieces of the required length.
Knotted embroidery can be used to decorate clothes, hats, and handbags in an unusual way.
Description and application of technology
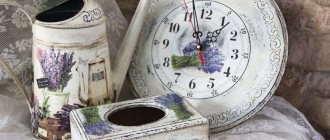
The technique of embroidery on carpets has its own unique history, which dates back to the fifteenth century. Nowadays it is very much in demand in the interior decor department. The name of this type of handmade technique speaks for itself. Here are some interior decoration items:
- wall and floor paintings;
- unusual panels;
- artificially aged tapestries;
- small rugs - rugs.
What gives such things a special charm is the energy transferred to objects through the hands of their creator. This subtype of art is considered no less interesting and unusual, expressed in the manufacture of various bags, toys, small decorative items and much more.
Most world-famous couturiers use the technique of carpet embroidery in almost every collection, richly decorating their creations with original decor. At the same time, the process is so simple and uncomplicated that even children can easily master all the subtleties of producing various objects on the first try.
Many people believe that making rugs with your own hands is a niche exclusively for professionals. But this is far from true. Anyone can master this type of art - you just need to put in a little effort and effort, and show interest. First of all, you can use ready-made student embroidery kits as experimental specimens. They are sold everywhere and include a standard set of tools:
- A canvas on which a drawing has previously been applied. It is the basis of how the embroidery will look in the end.
- A set of threads selected in accordance with the provided pattern.
- Specialized hook for making carpet embroidery.
- A needle for carpet embroidery of large sizes with an equally large eye.
The base plays a big role in the execution of this technique. To achieve the desired result in their work, craftsmen use a specialized canvas. It has a pronounced texture and a much more rigid structure, compared to the usual canvas. It is made from raw flax. It is best not to skimp on the store and choose a more expensive variation of the foundation. This is very important when, as a result, you want to get some kind of unusual thing. These are items such as:
- textured multi-colored tapestry;
- a small decorative rug for the wall or floor;
- bedspread with an enveloping texture.
A product made on a double-thread fabric base will look good. She perfectly holds the shape that the master gives her during the work process. Fillet mesh is also suitable for the job. The cells to work with it need to be of medium size. This is required to obtain a fabric that is soft and pleasant to the body.
How to choose a needle or hook
The main tools for embroidery are a needle or a hook, so you need to choose them very carefully. Many craftswomen have in their arsenal several similar tools for threads of different thicknesses and for creating three-dimensional designs.
- The needle must first of all have a comfortable handle, because you will have to hold it in your hand for a long time. Usually it has an anatomically shaped wooden handle. The thickness of the tool should correspond to the thickness of the yarn. As a general rule, the needle should be slightly thicker than the yarn. If you plan to use materials of different thicknesses, then you will need several different needles.
This is what an embroidery needle looks like. - The hook is selected according to the same principle as the needle. You can also use a regular crochet hook. But a special hook for carpet weaving has a special movable lock, with which it is more convenient to make knots and thread the thread into the mesh. The hook should have a comfortable handle, as it will have to be held for quite a long time. The thickness of the hook depends on the yarn, which should be slightly thinner than the tool.
This is what an embroidery hook looks like.
Advice. Ready-made kits for creativity sell threads and tools already selected according to thickness. Therefore, for carpet weaving for beginners, it is better to purchase them. Later, when choosing yarn and tools, you can focus on samples from the finished set.
How to embroider - step by step instructions
Crochet embroidery
Crochet embroidery sequence:
- A piece of thread is folded in half .
- Pulling the folded thread with a hook through 1 thread of the mesh (the tool passes from one hole to the next one).
- Threading the ends of the thread through a loop that is pulled through the warp. This knot must be tightened very tightly so that the thread does not slip out.
- Filling the area of the entire pattern in a similar way.
- Trimming . To make the front side even, the finished embroidery is cut with sharp scissors so that all the threads are the same height.
Editorial Voice
Matryona
Fan of embroidery and sewing
Ask a Question
With the knot method, to simplify the work on the grid, you can use a marker or pencil to highlight areas of the same color so as not to constantly check the diagram.
Punch needle embroidery
The loop technique, after transferring the pattern onto the fabric, is performed in the following order:
- Threading a needle.
- Punching fabric . The needle is inserted strictly vertically. If it is tilted, the loops will get tangled and the item will be damaged. Sudden movements and great efforts should not be made when piercing. Gently press on the tool until its end completely comes out on the other side of the base.
- Subsequent loops . They are placed at a distance of 1 mm from existing ones, moving in rows. Sometimes after 7-10 loops have been made, the thread begins to tug and tighten them. In this case, it must be cut and embroidery continued with a new thread, separated from the existing loops.
To understand whether you like the carpet embroidery technique or not, you can try it on a simple job. It’s easy to find diagrams of various levels of complexity, but it’s even easier to purchase a ready-made set that contains everything you need.
How to do embroidery using the loop technique
Carpet embroidery with a needle for beginners using the loop technique is not difficult. The operating procedure here is as follows:
- A diagram is applied to the reverse side of the fabric. You can use a pencil or marker for this.
- The fabric is stretched onto the hoop with the wrong side up.
- The thread is inserted into the needle and the outlines of the designs are first embroidered using the needle. There is no need to secure the thread; just leave a loose end.
- After the outline is created, the main drawing is filled in.
- To create loops, the fabric is pierced with a needle until it stops and then the needle is pulled back.
- The loops are created at a distance of 3 mm from each other. If the threads are very thin, then loops can be created more often, but this will take more time.
- After creating the pattern, the ends of the threads are secured. Additionally, the loops can be secured from the inside with PVA glue.
There are two techniques for performing this embroidery - loop and knot.
Important! When embroidering, the thread should be loosely tensioned, otherwise the loops will turn out uneven, which will look ugly. In order for the yarn to have even tension, it is recommended to raise the needle low from the fabric - no more than 3-5 cm.
Carpet technique with thread pulling
– the needle is positioned perpendicular to the plane of the fabric placed in the hoop;
– place the thread located at the top of the needle behind your hand, and also make sure that no knots form;
– pull it back until the tip is located above the working material. Step back a little from the seam you made and thread it again. Maintain perpendicularity!
– over time, loops form on the front side of the fabric, which will soon become a pattern;
– once several stitches are completed, it is necessary to cut the remaining end at a distance of 0.5 cm from the fabric. This must be done very carefully so as not to damage or pull out the tip, because. there is a possibility of job dissolution.
Replacing the thread
– when the tip of the working thread disappears in the upper plane of the needle, make a few more stitches, press the end stitch with your finger and release the thread;
– cut the thread as close to the fabric as possible. To fix the tip, use textile glue;
– it is not recommended to place the needle away from the stitch in order to embroider the next fragment; it is more convenient to cut it and start again.
Filling empty fragments
– we start with volumetric fragments, and then – small and straight parts;
– we embroider the outline, and then fill the inside with circular movements or in a linear way. Methods are allowed to be combined;
– to make straight lines, use thread pulling in several rows to create a clearer line.
Features of the knot technique
The knotting technique requires more perseverance, but many experienced craftswomen prefer it. Step-by-step instructions for weaving:
- Put the diagram and grid together. Stretch them onto a hoop or frame.
- A hook without thread is passed through the mesh and after that a 5 cm piece is put on it.
- The hook catches the yarn exactly in the middle, after which the lock closes on it.
- Using a hook, the thread is threaded through the mesh and a knot is created. This leaves two free ends on the front side, and a knot appears on the back side.
Experienced craftswomen prefer the knotted embroidery technique.
After mastering each technique, work will go quickly. To create a small rug measuring 40x40 cm, an experienced craftswoman will need about five hours of pure time.
Carpet technology is simple and accessible even for beginner needlewomen.
A beginner embroiderer will need more time. But in any case, the result will surprise and delight loved ones and the craftswoman herself.
Tools and materials
To create a craft you need to have a special tool. The main ones are a hook for one technique and a needle for another.
- Punching needle . This special tool allows you to make loops on fabric. Outwardly, it resembles a significantly enlarged syringe needle. Its tip is also cut at an angle; inside it is hollow, since a thread is pulled through it. The front side of the tool is considered to be the one on which there is a beveled cut, and the back side is the one on which the needle is completely straight. Just starting to master non-woven tapestry, you should choose an automatic tool. It will allow you to get perfectly even loops, since the length of the thread is adjusted in advance, so you won’t have to monitor it during the embroidery process. The device is usually equipped with several replaceable needles so that the needlewoman can use yarn of different thicknesses. While working, the needle should be held with the side or front side facing the embroidery. It does not matter in which direction the work will be carried out; the craftswoman can do it in the way that is most convenient for her.
- Hook . It has a special bend that allows it to be easily passed through the base mesh; as well as a latch that prevents the picked up thread from slipping out. Kits usually include a hook; if it is not, you will need to purchase the tool at a craft store.
With the loop technique, you also need to have a frame or hoop to work. Without this, you won’t be able to tighten the base sufficiently, and you won’t be able to make the loops evenly and beautifully. It is optimal if the devices are the size of the entire picture . This allows you to avoid creasing the threads in the finished areas and ensures maximum attractiveness and neatness of the finished item in the future.
Threads
To create products using carpet technology, you need to use special threads that have sufficient thickness .
With the knot method, the choice is made in favor of acrylic or wool yarn. Thin threads will not look good in such work. They will not allow you to create a fluffy surface; they will droop downwards, making the appearance of the thing unattractive.
Yarn is also used for the loop technique , but it can be thinner. In this case, in addition to acrylic and wool threads, cotton and less often viscose threads are used.