Such a piece of furniture as a folding table has become a rather necessary shoal in many families. If you don’t want to spend money on a purchase, you can make it yourself. Making a book table with your own hands is quite simple and it doesn’t even take much time. Just a few hours and you will have a convenient folding model at your disposal at all times. In addition, you will definitely be sure that the table can serve you for many years.
Using decorative film
Why throw away some furniture because of its outdated appearance, when it can be modernized, and even at a not very high price? Just choose the exact color that suits your interior. At the same time, the process of pasting the film itself is not particularly difficult.
But remember: to apply the film correctly, you must follow the manufacturer's instructions and be very careful. Often, adhesive films come with a lined back, so you can use exactly the right amount of material.
Thirty photos of successful conversion of Soviet furniture
I can’t even believe that this is my grandmother’s old wall!
I think some (if not many) still have old Soviet furniture. This furniture, although old, is quite strong, many items are made of natural wood, they would last for many more years, but the appearance has worn out over many decades, because we are not only talking about furniture from the eighties and nineties of the last century, but also about specimens much older, inherited from our grandmothers and even great-grandmothers.
They don’t fit into a modern interior, and it’s a pity to throw them away - so ancient chests of drawers, sideboards, chairs and armchairs live out their lives in basements, barns, attics and storage rooms. But they could be given a second life.
But while vintage furniture is beautiful in itself, the same cannot be said about Soviet “walls” and wardrobes. These bulky structures spanning the entire length of the room were not distinguished by any design refinements, or their level was very primitive.
However, it is these furniture sets that are most common in houses and apartments in the post-Soviet space, where they remain standing to this day. Are they really doomed to be thrown into the trash, or is there still a chance to turn them into something original and attractive?
In this publication you will see thirty examples of restored and repurposed old furniture. And we will begin our review with those same Soviet “walls”.
***
***
***
***
And here is a shabby Soviet secretary, which was turned into a cute pink locker for a girl. In the reflection you can see that all the furniture in the children's room is made in this style.
And here they made a children's kitchen from the TV section. This is the gift some dad made for his daughter! Great! Better than all the toys in Children's World combined!
It's time for the chests of drawers.
Many people probably have similar pieces of furniture left over from their grandparents. I even have several of these. Now I know that they can fit perfectly into a modern interior after some modification through the eyes of a designer and the hands of a craftsman.
As you can see, you can choose a single color, or you can experiment with different colors and designs, patterns, and beautiful handles. As an option, some drawers are removed, and shelves and niches remain instead - also a very interesting solution.
***
***
***
***
And here an old chest of drawers was turned into... a modern TV stand. The top drawers were removed to create niches for a player, receiver, game console and subwoofer. And in the remaining drawers you can hide discs with movies and games, remote controls, wires, adapters, tees, chargers and other small things that are usually kept in the living room. For me this is an awesome decision!
Well, since we’re talking about nightstands, here are examples of remaking all sorts of nightstands. It would seem that this is the first thing to be thrown out without the slightest hesitation. But you can also work wonders with these objects, turning them from old junk into real works of modern design art. Don't believe me?
See for yourself and next time think carefully before throwing away the old bedside table you found while clearing out the rubble in the attic of your parents’ house.
***
***
But we had one like this. And we threw it away =( Now, after what I saw, I would never have taken this bedside table to the landfill - I think there would have been a craftsman who would have turned it into a beautiful piece of furniture. I regret my decision.
Wardrobes or wardrobes or wardrobes - people call them differently, but their meaning is the same - storing clothes on shelves and hangers. As a rule, these cabinets are also among the first to be sent to the trash heap when the question arises of selecting modern furniture for an updated interior. But it turns out that they too can be brought into proper shape.
I think everyone remembers such cabinets; they were, if not in every home, then in every second family for sure. Just look at what the craftsmen turned them into.
***
***
And from this cabinet they made an excellent element of the hallway - a cabinet with shelves. Moreover, note that in the modern version the wardrobe is turned upside down - a good solution, since now the former mezzanine can be used to store shoes, and even the longest raincoats and coats can fit in the upper section. It’s just that there’s not enough mirror between the shelves, it seems to me.
And the attentive reader will notice above the front door another mezzanine from the same old Soviet “wall” - there is nothing superfluous left, everything has a use.
Buffets, sideboards, “slides” - these cabinets and cupboards with glass doors and open shelves demonstrated the wealth of the people of that time - everything that was difficult to get and cost more than usual was displayed on these shelves - crystal, sets, figurines, books, jewelry , candlesticks, decorative elements. Sometimes there were photographs on open shelves.
It seems to me that there were such things in every house of the older generations of our families. Today you can hardly find such furniture in a modern interior. However, it can also be remade and modernized. See for yourself.
***
***
And even an ordinary bookcase with open shelves can be turned into a chic, practical and fashionable element of a modern interior. We just had one of these lying around idle - it’s worth trying to put it in order. Would you try it too?
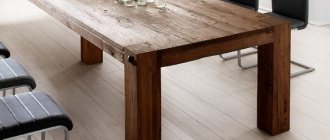
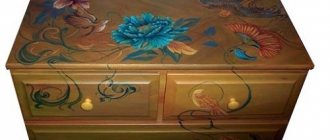
A couple of tables to demonstrate that they too can be given a second life. Look, the updated old table goes so well with the ultra-modern MacBook. The table fits into modern life - I think you can’t think of a better proof.
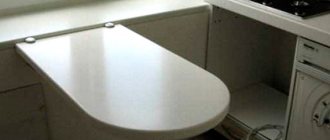
Well, this book-table was in every family; not a single feast was complete without it. And the design chosen was very successful; it is still popular.
We ourselves recently bought just such a table, since it is very convenient, mobile, when folded it takes up minimal space, and when unfolded it can seat a dozen guests around it, and it unfolds and folds in half a minute. It turns out that there was no need to throw away the old one, but just give it an updated look. I'll keep it on mind.
Well, this is actually a masterpiece, I think. An old radio was repurposed into a stunning bedside table. Actually, only the body was left. At the bottom we made a shelf for books with sliding sliding doors. Higher up, inside the radio itself, they made a box for storing various items. Between the bottom and top there is a niche for magazines and newspapers, and on the top and sides there are surfaces for decorative elements or dishes. Rotary knobs, buttons, radio frequency scales create an unusual vintage atmosphere.
A great option, the best in the entire selection, in my opinion. What do you think about this option?
I hope that after what you have seen, you will not rush to throw away your old furniture.
Remaking a high-quality old item may not only be cheaper than purchasing a new one, but will also allow you to realize your fantasies and ideas, and will also guarantee originality and exclusivity, and this is quite important in our time. All advantages.
Did you like the post? Share it with your family, friends and girlfriends!
Source
humorpluse.ru
Complete restoration of original appearance
This method of “rehabilitating” a table made 30-40 years ago is more expensive than simply covering it with film. First, you will need to completely remove the paint layer and polish the wood thoroughly. Since you will need to put the appearance of the entire “object” in order, you need to expect that it will take quite a lot of not only time, but strength and patience.
After you have thoroughly polished the wood, you need to dust off the surface of the particle board and the legs of the structure. After the described procedures, you can stick on special structural paper. This must be done as carefully as possible so that the joints are not noticeable.
Remaking a Soviet lacquered table – Fair of Masters
We received an old, varnished table from a customer.
All dirty, covered in marks from hot dishes. In general, it looks sad, the owner wanted it in the trash. When we took it for restoration, we realized that it was made of solid beech and veneered with walnut. We thought this was simply a priceless specimen, and after consulting with the customer, we decided not to repaint it, but to remove the old varnish and whiten it.
I'll show you a little bit of the process.
We didn’t have time to take a photo of the old table as assembled; it was taken from the customer in a disassembled, sad state. Below is a photo of the tabletop. It is obvious that they did not spare it; they put hot dishes on it, cut it with a knife and dirty it with anything.
So, we got to work. To begin with, the most difficult and time-consuming thing is to remove several layers of varnish. We filmed in two ways. The first is sanding with a sander. And the second method was to heat the surface with a construction hairdryer and pry off the varnish layer with a chisel. The varnish gave in perfectly and was removed in one layer, like leather))) Below is a photo with and without varnish. We discovered a stunningly beautiful walnut veneer.
The customer has a light interior, so the table was ordered in a light version. After consulting, we decided to cover it with white furniture varnish. In this way we both protect the surface (the varnish has a very high resistance to scratches, stains and water) and do not block the beautiful veneer pattern.
This is what ended up happening.
In my opinion, this is an amazing rescue of a valuable specimen))
All the best,
Family workshop, Andrey and Anna Panikhin
www.livemaster.ru
Acrylic coating
When choosing this particular decoration method, all surfaces must be properly sanded. If you are a creative person and draw a little, then this may work to your advantage in this case. However, even if you do not have artistic talents, you can still make a unique piece of furniture.
First you need to apply the first layer, the background layer, to the entire surface of the structure.
Interesting!
Then you can draw something interesting on this “canvas” yourself, come up with an elaborate pattern. You can also use tulle. Choose the one with the most elegant design, place it on the table and blot it with paint - the pattern will appear on the background covering.
Interesting ideas for repurposing old furniture
Contents
The new review has collected several wonderful examples of how you can easily transform old furniture, turning it into something completely new and immaculate. The most important thing is that each of these ideas can be brought to life independently. We look and remember.
Sofa in the hallway
A sofa from an old cabinet. An old Soviet-style cabinet can be turned into a comfortable compact sofa with a soft seat and space for storing shoes.
Stylish high chair
New life for an old chair. Careful painting and bright upholstery of the seat will allow you to breathe new life into an old shabby chair and turn a burden into a stylish piece of furniture.
Bright stool
New stool design. The decoupage technique will help transform an old, dilapidated stool, which will allow you to transfer a bright pattern or an entire picture to nondescript furniture. Video bonus:
Flower armchair
New upholstery for an old chair. A little painting of some of its parts and upholstery of the cushions with thick fabric with a beautiful print will help breathe new life into an old, unattractive chair.
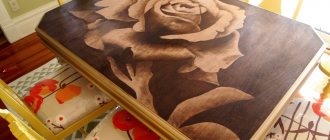
Dinner table
Transformation of an old table. Incredible transformation of an old shabby table into a white dining table with a round top, decorated with a floral print, made using the decoupage technique.
Desk
New desk design. A simple transformation of a featureless wooden table, which was achieved with the help of neat white painting and original fittings.
Bright cabinet
Redesign of an old cabinet. A stunning transformation of an unnecessary Soviet-style cabinet into a bright new piece of furniture, which was achieved by removing the door and carefully painting it.
Dresser
New facade of an old chest of drawers. Careful painting and decoupage of the drawers gave this worn and worn chest of drawers a new, modern look.
Exclusive locker
A charming cabinet with a bright print.
Decoupage doors combined with bright painting made it possible to turn this useless cabinet into an exclusive piece of furniture that will fit perfectly into the interior of a country house.
Desktop
Desk from an old dressing table. A fresh new color, decoupage of the cabinet drawers, and removal of the large mirror transformed this bulky and outdated vanity into a charming desk.
Sideboard
New stylish design of an old sideboard. An old sideboard took on a completely new look thanks to chalk paper glued to the doors. Video bonus:
Play kitchen
Toy kitchen from a sideboard. A little imagination, paint and fittings will allow you to turn an old sideboard into a wonderful toy kitchen that the young housewife will undoubtedly love.
Sofa with cabinet
A sofa from an old chest of drawers. Dismantling some elements, careful painting and soft furniture cushions made it possible to transform a gloomy chest of drawers into a charming sofa with storage space.
Stylish facade
Dresser decor. Self-adhesive paper and new fittings will help give your old chest of drawers a new, sophisticated look.
Decorative fireplace
Decorative fireplace from a cabinet. A stunning decorative fireplace made from a small wooden cabinet will be a wonderful addition to any living room.
Table
Ottoman table. An adorable DIY slipcover with pockets turned an old, unwanted footrest into an adorable coffee table.
Cozy sofa
Sofa from bed parts.
The shaped headboards of an old bed can be used to create an original small sofa. vashesamodelkino.ru
Laminate countertops
If you have a special set of woodworking tools, you can simply buy new wooden tabletops, cut them to the contour of the old ones and place them in their place.
Important!
However, remember that you also need an edge strip. On sale you can find ones in which the adhesive base melts under the influence of temperature. Just run an iron over the film and your new countertop is ready!
remodeling a desk – DIY and master classes
Surely, many people at their dacha have furniture that has fallen into a “Soviet coma”, which over time either lies there and becomes covered with dust, or is thrown away. But there is another option - when such furniture becomes a challenge for the decorator, for example, an old “single-pedestal” desk from the Pravdinsky furniture plant “Minlesdrevprom”.
Today we will try to bring a Soviet-era desk to the south of France. Do-it-yourself garden furniture in Provence style is not so difficult.
For the remodel you will need:
- single-pedestal desk;
- corner relief block for construction work;
- brown primer;
- polyurethane moldings;
- miter box;
- file;
- ceramic furniture handles;
- facade paint matte white;
- grinder and sanding disc.
Step 1
This table is covered with a thick layer of varnish. To begin any work, it must first be sanded. It would not be possible to remove the old varnish by hand; only a grinder and a sanding disc can do it.
Step 2
After sanding, the surface of the table became very uneven, since, unfortunately, it is made of chipboard. To disguise the bumps and depressions, I had to cover it with a double layer of primer.
Step 3
The shape of the table is quite primitive. You could try replacing the tabletop with a new wooden one, but it’s not a fact that the game would be worth the candle. In order to somehow bring the table out of the “Soviet coma,” I decided to add one more element to the tabletop. A small block with a raised edge helped the tabletop become more interesting - it immediately became much more decent.
Step 4
We had to work hard and “improve the health” of the boxes, which were also influenced by Soviet design. Polyurethane moldings came to the rescue: we have already shown how you can use them to transform a chest of drawers. The scheme is the same here.
Step 5
To maintain the Provence style, the table must be painted correctly. façade white paint rather than enamel
: it is very pleasant to the touch and fits exactly as needed: it is the easiest way to imitate the surface characteristic of this style. A brush with hard bristles is ideal for painting, and you need to apply the paint in a thin layer - so that in some places the primer even shows through a little.
If you still choose enamel
, then you will have to tinker and rub the surface with a candle before applying paint, and then sand it a little, but the effect will still turn out to be less close to the charm that real furniture in the Provence style is endowed with.
Step 6
In principle, the table is already ready for use; you just need to screw in the handles. In order not to overload the composition, I suggest equipping the last drawer with a hook. In this case, a forged curtain holder is used. Such holders can be found in other interesting applications.
Photo: Voinova Nina
Provence, decor, do it yourself
kvartblog.ru
Decorating with tiles
The method is similar to the previous one (decorating with small details), but only on a larger scale. To begin, simply draw a contour along which you will lay the tiles, and then carefully degrease the surface. Remember that this type of coating must be installed on a dry surface.
Try to ensure that the tile fits as tightly as possible to the table and that all the pieces are as close to each other as possible.
Where to begin
First you need to understand the table into its component parts. There can be 3 or more of them, depending on the type of furniture, the presence of drawers, etc. It is recommended to remove fasteners, including nails, in advance, since they will become a real problem when sawing solid wood.
Disassemble the table, see how many components are available. This is the material that will be used to make future shelves. If you want to save money and use the existing array to the maximum, take small parts of the table as a basis. These could be the side walls. The tabletop is always larger, wider, longer, so if desired, it can be divided into several shelves.
Additional decor
There are a huge number of options for decorative shelf design. Careful treatment with stain helps to emphasize the natural structure of the fibers, making the wood more beautiful and expressive.
As an additional design you can use:
- mirrors are convenient, practical and help to visually expand the room;
- mosaic - quite difficult to make, but helps to achieve a stunning effect;
- carved decorative overlays - they can be cut from ordinary veneer using a stencil.
If you don’t like the way the screw heads look, you can cover them with plugs or ordinary stickers that resemble wood in texture.
Further actions
Having decided on the style, type, dimensions and parameters of the shelves, proceed to marking. Be guided by the truism: “Measure twice, cut once.” If desired, you can restore incorrectly sawn boards, but they will look ugly and sloppy.
When using measuring instruments, maintain a right angle of 90 degrees. This way you will be completely sure that the shelves will turn out even. Correctly measure each component part, if necessary, draw up a tentative diagram on a sheet of paper, write down the dimensions. Check everything several times, then mark with a pencil and start cutting.
The saw must be held confidently, firmly, straight. If the tool creeps, the saw will go downhill and the cut will be uneven. An ideal solution would be a jigsaw, since the flat metal sole ensures that the tool is held strictly perpendicular to the surface.