Photo: alltopcollections.com Any, even the most durable and expensive furniture, wears out over time and loses its aesthetic appeal. Quite often it is a pity to throw away such a thing, especially if warm memories are associated with it. We invite you to look at 14 easy but very beautiful ideas - how to decorate an old table with your own hands to breathe new life into it!
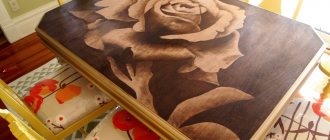
Decoupage
The simplest but most magnificent idea is the decoupage technique. To do this, you need to purchase napkins with patterns that will match the interior design. Multi-layer napkins need to be separated so that the material is as thin as possible.
The surface of the table, if it is wooden, must be thoroughly cleaned, sanded and made absolutely smooth. If the table is metal, it should be washed and degreased. Next, cover the surface with acrylic paint.
The design is applied quite simply: grease the tabletop with PVA glue, apply a napkin and smooth it, expelling any air bubbles that have formed. After finishing work, the table should dry well, then apply a protective layer of varnish, which will prolong its service life for a long time.
Photo: hsdeck.ru
Photo: sovkusom.ru
Sequence of restoration work
We talked about the final phase and decorative effect of each type of finishing, now we will analyze the technique of preparing the table for decoration, which, by the way, is common to all methods of restoring old furniture.
Determining the degree of wear
To determine the level of wear of furniture, it is advisable to completely disassemble it. Next, carefully inspect each element of the structure. In addition to obvious potholes, scratches and cracks, we are interested in places where façade cladding has peeled off and places eaten away by bark beetles.
The peeling coating is cleaned.
Choosing material
To carry out restoration work you will need the following materials:
- Putty for wood, you can use parquet compounds.
- Primer for wood. You select the composition taking into account the paint or varnish with which you plan to cover the furniture. For example, acrylic primer is used for acrylic paint, alkyd primer is used for alkyd paint, and oil paint needs to be primed with drying oil.
- Finish paint or varnish.
- To clean metal from rust, WD-40 is used.
- An assortment of emery sets, from coarse to velvet.
- There is no need to take a separate antiseptic for wood; it is easier to choose soil with an antiseptic effect.
It is advisable to take all materials from one manufacturer, so that there is no rejection.
Step-by-step instruction
| Illustrations | Recommendations |
| Step 1 First you need to remove the old coating. This can be done using coarse sandpaper or a hair dryer.
| |
| Step 2 All deep potholes and cracks are cleaned out and widened with a knife or chisel, after which they are primed and puttied. | |
| Step 3 All parts are sanded. Start with medium-grit sandpaper and gradually work your way up to velvet. | |
| Step 4 Cover the table with soil and leave it until completely dry. | |
| Step 5 Apply finishing paint or varnish in at least 2 layers. It is better to work with a spray gun; in the absence of a spray gun, brushes are used. |
Paint and stencils
Using paints, you can completely restore an old table, including the legs, which often have scuffs. If you are good with a brush, the work will be simplified - it will not be difficult for you to depict the desired design or pattern. If you have problems with drawing, use stencils that are easy to buy in craft stores.
First, you need to thoroughly clean the table, paint it with background paint and wait until it dries completely. Now you need to mark where the patterns will be located, you can also draw a light sketch with a pencil. Next, take stencils and apply images to your taste. When the decorated table is dry, cover it with a protective layer of varnish.
Another original solution for DIY decor is to use regular patterned tulle instead of a stencil: cover the tabletop with it, apply paint and then carefully remove it. You will get an original openwork table!
Photo: inrosstroy.ru Photo: verstakdoma.ru
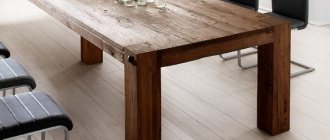
How to restore a table
Restoration is carried out in several stages - this is preliminary repair of the table (if there is a need), cleaning the surfaces from dirt and old coating, priming, painting, applying a protective layer, decorating. First you need to immediately prepare all the necessary tools and materials so that restoration work proceeds as quickly as possible.
The table restoration process occurs in several stages.
Selection of tools
Every homeowner has their own set of basic tools and materials needed to carry out home repairs. The necessary tools for restoring wooden tables can be found in any closet:
- Sander;
- sandpaper;
- sanding material;
- rubber spatula;
- roller;
- brushes (or spray gun).
To restore the table you will need a grinding machine and other materials.
For repairs and restoration you will also need putty, woodworking products, varnish, paint, glue, wooden cloth (if any element needs to be replaced), wax, and primer. All this must be prepared in advance.
It is also necessary to prepare means for treating the surface of the product.
Position assessment
Now you can begin to assess the condition of the piece of furniture. To do this, the table is carefully inspected to identify all defects (cracks, chips, broken functional elements). If the furniture is disassembled, then it is worth dismantling the parts. This will make repairs and cleaning easier. After which the structure is reassembled.
Before starting restoration, all defects and damage should be identified.
Dismantling the old coating
Old paint and varnish are removed. The product is polished with a special machine. If you don’t have a sanding machine in the house, they can easily be replaced with sandpaper of varying degrees of hardness. Polishing is carried out along the grain of the wood. Otherwise, defects may form that will be difficult to eliminate.
The old coating is removed using a sanding machine.
This is followed by sanding with sandpaper. All that remains is to remove all furniture dust and shavings and degrease the surfaces using solvents or alcohol.
The surface must be cleaned with sandpaper.
Masking chips and cracks
To mask all chips and cracks, a special putty for wooden surfaces is used. Repairing chips, scratches and cracks is not difficult if you prepare the tools in advance (a rubber spatula that easily penetrates into the recesses).
Cracks and chips are covered with putty.
Once the putty has dried, you need to go over the treated areas of the table with sandpaper with a small abrasive.
The furniture is degreased again and covered with protective agents against pests and mold.
Primer and preparation for painting
If you decide to restore the table top, frame and other elements of the table with paint, then you should take care of preparing the wood for painting.
Priming is done as follows:
- Apply a small amount of primer.
- Distributing the material with a roller or rubber spatula.
- Level the coating to create an even layer.
- Trimming meta transitions.
- Drying of the first layer (from 1 to 6 hours, depending on the composition).
- Apply a second coat and wait until completely dry.
After priming, grinding is carried out to smooth out unevenness and eliminate differences.
After priming, the table is sanded again.
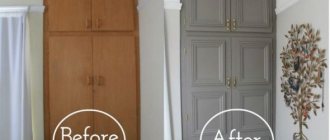
Painting
There are several ways to repair antique wood furniture. It doesn’t matter if it’s a kitchen table, a dining table, a coffee table, or a work table. The most popular restoration method is painting. Fast and inexpensive. At the same time, you can completely change the shade of the decorative coating, giving new life to the interior item.
Painting is the easiest way to restore.
To apply the material, use a spray gun or ordinary paint brushes. In addition, aerosol paints are often used. It is important to take care to prevent the formation of smudges during painting. To do this, the product to be painted is placed horizontally. Paint is applied in thin layers. It is necessary to paint in 2-3 layers, it all depends on the saturation of the enamel.
If the tabletop is noticeably lighter than the legs, do not be alarmed. It's quite normal. Since it is in the shade of the wooden top sheet. This effect is also possible in cases with carved products and veneered boards.
Protective covering
The result of decorative painting is secured with a protective layer of varnish or wax. Modern varnish compositions are quite durable. They are used to cover furniture that is used frequently. For example, for kitchen tables. Wax is often used to protect coffee tables.
A protective coating is applied over the paint.
If a varnish is chosen, then it is applied with a brush in one layer. Depending on the chosen composition, it dries within 18-36 hours.
In the case of wax, a special paste is used. It is applied with a cotton swab or brush.
Liquid wax is distributed over the entire surface of the structure. If a solid material is purchased, then it is first melted and then rubbed into the surface.
The surface is polished with wax.
Features of table decor
Paint itself is already a decorative coating. But a flight of fancy takes owners of old furniture further. The following is used as decoration:
- self-adhesive paper (film), characterized by its availability and ability to hide visible defects, and the design is quite bright;
- tiles laid on the countertop, which allows you to preserve the beautiful appearance of the furniture for a long time, protect the wood from moisture and temperature changes;
- tiled mosaic (gives a similar effect as tiles, but allows you to make more original patterns in different colors);
- decoupage from paper, fabric.
When simply painting with enamel, you can also play with the decor using figured rollers, tulle, and stencils. Or resorting to coloring the tabletop with different shades and gradations.
When painting, you can take a non-standard approach and play with shades.
Craquelure
If you want to give your table the look of an antique canvas, you should pay attention to a special cracking varnish - craquelure. It comes in two types: one-step and two-step.
One-step craquelure is used to add a vintage feel to plain tabletops without patterns. The varnish is applied in one layer and when dry it creates a “network” of cracks.
Two-step varnish helps create a stunning aged effect on the painting. Therefore, it should be used for a table surface with a pattern or made using the decoupage technique. In this case, two mixtures are used, which are applied one after the other. The desired effect manifests itself when they interact.
Photo: pinterest.com Photo: vsesamodelki.ru
Self-adhesive film
Another great solution is to decorate an old table with self-adhesive film. Moreover, the modern market has a huge assortment of it - from simple plain to mirrored, luminous and imitating natural textures.
To cut the film correctly, you need to use the centimeter markings located on the back side of it. It is important to thoroughly clean the surface of the table, since the self-adhesive will instantly reflect all the flaws.
Glue the film slowly, pressing it tightly and at the same time smoothing it with a soft towel so that no air bubbles form.
Photo: in.pinterest.com
Photo: styledegree.sg
10 cool ideas on how to decorate your apartment for the New Year
Ceramic tile
At the end of the renovation, there are often excess tiles left in the kitchen or bathroom, which can be safely used to decorate the table. In this way you can beautifully decorate an old dining table in the kitchen or on the open terrace.
Patchwork tiles in the patchwork style look great, as well as decorative tile panels and borders with patterns. No less impressive will be a tabletop made of tiles that imitate stone or expensive wood.
Photo: mebel-mart32.ru
Photo: maiolichevietresi.com
Decor under glass
To decorate an old table using the following method, you will have to work hard, but the result will be well worth the effort!
If the wooden tabletop is thick, cut out a recess inside and fill it with themed decor. You can, for example, decorate the seabed by laying shells, pebbles, sand, artificial seaweed, or even colorful Christmas tree decorations for the Christmas holidays. Finally, the finished “filling” must be covered with transparent glass.
If the tabletop is thin, just fill the edges with bars and paint them the same color as the table, then lay down the decor and also cover with glass cloth.
Photo: pinterest.ru
Photo: pinterest.ru
Getting rid of old coating
If a layer of varnish has been applied to the base and it has cracked over time, then this coating should be removed in order to apply a new one. It is convenient to carry out these works with a spatula or chemical means, that is, washes. Another good option for removing the old layer is to use sandpaper. Medium grain paper is suitable for this.
Popular articles Funny congratulations on March 8, 2022. Funny congratulations on March 8
The new life of an old table begins first of all with the elimination of defects, since the functional component is important for any furniture. If assembled correctly, the product will become more durable and stable.
When choosing to remove old coating with chemical compounds, do the following:
- Apply the product to the base with a brush.
- The active substances enter into a chemical reaction with the coating and after half an hour the composition can be removed with a soft sponge.
- After removing the paintwork, it is necessary to treat the wood with antiseptics.
The table requires mandatory impregnation with an antiseptic, which will protect against pests and fungi.
Before covering a wooden tabletop, you should carefully inspect the surface for damage and chips.
Photo collage
Select the best family photos, place them on the table and cover them with transparent glass. Such a photo collage will remind you of pleasant events in your life during a meal or tea party.
If you wish, you can change the selection of photos and add new interesting pictures. Pay attention to the glass - its edges must be sanded to avoid cuts.
Photo: ars.ru
Photo: kalbenimkalbimde.blogspot.com
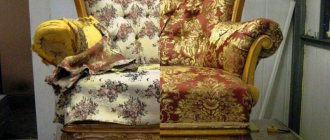
Pros and cons of updating furniture yourself
When restoring a table, there is no need to look for a craftsman and deal with the transportation of furniture. You can work from home at any convenient time. In addition, repairing the table yourself provides other advantages:
- Saving money. The services of furniture workshops are far from cheap, and not everyone can afford them. Home renovations are less expensive for the family budget.
- Opportunity for self-expression.
- Lack of control over craftsmen, the need for various approvals.
- The freedom of action. You can abandon the original idea at any time and do it differently.
Despite the advantages of self-restoration, it also has disadvantages. Most often, this is a lack of knowledge on how to update the table correctly, as well as dust, noise, and odors from chemicals. In addition, rarely does anyone stick to a set schedule. Most often, work is done in fits and starts in free time and inevitably drags on.
Saving money
Opportunity for self-expression Freedom of action
Epoxy resin
The main secret of epoxy resin is that it hardens quickly in the open air, creating the effect of an icy or amber surface.
If your old table has deep cracks, fill them with resin - it will look amazing! You can also add some decorations, for example, shells or sea pebbles.
Sophisticated creatives sometimes go even further - they introduce luminescent powder into the liquid resin composition. What do you think is happening? Absolutely right, incredible luminous surface!
Photo: mebel-mart32.ru
Photo: proraboff.rf
10 best ideas on how to decorate a room for the New Year
Covering with leather or dermantine
You can breathe a second life into an old coffee table, making it stunningly original, using regular leather or dermantine. Choose a material with large embossing, for example, crocodile leather or bright gold, which will certainly attract the eye.
Use a piece of dermantine to completely cover the top surface of the table top. The material should be pressed tightly and smoothed, getting rid of air bubbles. The final touch will be upholstering the sides of the table with nails with a wide head, which will be similar in color to leatherette.
Photo: pinterest.com Photo: stellag46.ru
Decoration
Modern stores sell a variety of decoupage materials for every taste.
Decorating your countertop with decor will give it a stunning look. To do this, you can use several options:
- Mosaic. Pieces of colored glass or ceramic tiles are laid out on a previously prepared surface, and different patterns are formed. After this, the seams between the tiles and the perimeter are rubbed with a special compound.
- Applying decor. If the countertop is large, then you can use not only small tiles, but also larger ones. The work is performed according to the algorithm indicated above, but the pattern will be geometric.
- Picture under glass (more suitable for rectangular or square tabletops). A frame is nailed around the perimeter, inside which pictures or photographs are glued; you can pour sand or lay out a pattern of shells). Glass is placed on top.
Do-it-yourself furniture decoupage can save you from pointless spending aimed at updating your decor; it will help you show your imagination and bring some of your soul’s creativity into your home.
Attention! Before choosing a decoration method, you should know the area of the base in order to calculate the required amount of material.
For painting it is preferable to use acrylic paints.
They can be diluted with water, mixed, and tinted with pigment pastes. Restoring a coffee table is a creative and individual job, and every owner will be able to realize his ideas. The main thing is to think through everything to the smallest detail.
twisted rope
This method of decorating an old tabletop is perfect for a round table. You will need any thick rope made of natural fabric (hemp, jute) and an adhesive gun.
Fix one end of the rope with glue in the center of the tabletop. Then, moistening the rope with adhesive, move around the circumference, winding circles around the center. Each next row should fit tightly to the previous one.
Photo: asusfone.ru
Photo: cpykami.ru
Chalkboard paint
The advantage of this wonderful coloring composition is that it creates a surface on which you can draw with crayons. Such table decoration can save your wallpaper and other furniture when the little artist in the child awakens.
Another secret - before covering the table with slate paint, apply a thin layer (2-3 mm) of magnetic primer. Sticky magnets will bring even more joy to your child.
Photo: tur.thehomelifemag.com Photo: an-vn.ru
Toning and painting the table
Before finishing, the surface should be treated with primer. Apply the composition to the tabletop and frame.
Restoring lacquered furniture is an excellent way to restore interior items, giving them an attractive appearance.
Stages of table processing:
- Rinse the surface and apply the composition in a thin layer using a spatula.
- After the first layer has dried, apply the next one.
- When all layers have dried, remove any unevenness with sandpaper.
If your problem concerns the darkening of the varnish, then restoring the furniture will also involve erasing the old varnish coating and applying a new one. You can do all these procedures yourself.
After priming, you can begin painting or tinting the surface. Renewal of the base can be done by simple painting with a brush and roller, or the paint can be applied through a stencil or tulle. Next comes the treatment of furniture with wax or varnish. The first provides excellent protection from the effects of adverse environmental factors. The surface is tinted using stain.
Using masking tape, a brush and paints, you can apply various designs to the surface of the table.
In order for the painting to be of high quality, it is important to apply the paint evenly, and after the first layer has dried, go over the base with sandpaper. Reapply paint in a perpendicular direction
All layers of dried paint must be sanded to ensure a smooth surface.
Monitor the application process carefully. After covering the entire surface, the first layer must be thoroughly dried.
Mosaic
Decorating an old table with mosaics is not only a great way to make a tabletop incredibly beautiful and original with your own hands, but also a rather exciting process in which you can involve a child.
Mosaic elements can be bought in a store or made from scrap materials, for example, broken mirrors or tiles. Draw a sketch of the design on the tabletop, pick up some glue and start creating your masterpiece!
Photo: proffstroygroup.ru
Photo: nashenasledie.livejournal.com
DIY decorative pillows (95 photos)
Required materials and tools
You need to start restoring the table by preparing in advance. First of all, acquire tools for restoration and materials, so that later you will not be distracted by searching for what is missing. Everything you need should be selected in accordance with the nature of the planned work and the characteristics of the furniture.
Step-by-step making of a desk with your own hands, examples of decor
During the work you may need:
- carpentry tools – hammer, screwdrivers, nail puller, screwdriver;
- fixing tools - vice, clamp;
- fastenings - screws, self-tapping screws, furniture glue or liquid nails;
- drill with a set of drills;
- painting tools – rollers, brushes;
- a sanding machine or a set of sandpaper of different grain sizes;
- compositions for wood – impregnations, stains;
- coloring and related products – primer, putty, paints, varnishes.
If the table is severely damaged and individual parts need to be replaced, you need to prepare new parts in advance. When planning decoration, select appropriate materials. Don’t forget about safety equipment: safety glasses, gloves, respirator.
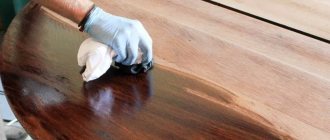
stain
A wooden table can be successfully decorated using stain. Using this tinting liquid, you can give the wood a new rich shade. It is noteworthy that after processing the wood texture is perfectly preserved. In addition, the tabletop will be protected from moisture and ultraviolet radiation.
The stain should be applied parallel to the grain. At the final stage, the surface must be covered with several layers of varnish.
Photo: leasary.com Photo: vortaro.ru
How to get rid of old coating?
You will need:
- scraper or sander; sandpaper; wood putty; spatula.
Restoring a coffee table begins with removing the old varnish
The easiest way is to use a sander, but in this case you should be extremely careful, as the tool can damage the wooden surface
You can use special solvents
Here it is important to calculate the thickness of the layer: the product should only dissolve the varnish without reaching the wood. If the solvent is absorbed into the surface of the coffee table, this will complicate all subsequent stages; the materials may not “make friends” with each other, resulting in swelling, peeling or cracking of the paint coating
The main materials and tools for decorating a coffee table are: acrylic paint, brushes, glue and pictures.
If the old varnish has many cracks and is worn out in places, it can be easily removed using regular sandpaper.
Take medium-grain paper, moisten it, wrap it around the block, and walk over the surface. When the sandpaper becomes clogged with dust, rinse it in water and get to work again. Under the influence of moisture, the old varnish will soften and can be easily removed.
After you remove the varnish, sand the surface of the coffee table with fine-grit sandpaper. You can clean off the old coating using a scraper or a piece of broken glass. In this case, you cannot do without work gloves.
The varnish gradually chips off the surface, but care must be taken not to damage the wood. All these methods have their advantages and disadvantages. Which one to choose is up to you.
After the old varnish is removed, it is necessary to fill all cracks, chips and scratches. The putty is applied using a spatula, leveled so that it does not protrude above the surface, left until completely dry, then sanded with fine sandpaper. If you plan to tint the table with stain, it is better to purchase putty to match the color of the wood.
Popular articles Page for a children's book in pop-up style
You will need:
Decorating a table with a mosaic allows you to hide cracks and stains that have appeared.
- primer; acrylic paint or stain; furniture wax; brushes; sandpaper.
Restoring a coffee table involves painting or tinting the product using stain (wax). First you need to prime the surface: use a special primer for wood, apply the composition with a brush in 1-2 layers with mandatory intermediate drying. If you use stain, the priming step can be omitted.
The paint is applied with a brush; for the tabletop it is more convenient to use a roller or a paint spatula. Hard-to-reach places are painted with a thin brush
It is important to apply the paint in a thin, even layer - then you can avoid sagging
After the first layer has dried, go over it with fine sandpaper. The second time the paint is applied in the opposite direction. All paint layers must be sanded with sandpaper - then the surface will be perfectly smooth, and the streaks from the brush will be invisible.
The table can be restored using stain or colored wax.
Stain can be water-based or alcohol-based, the former gives a softer tone. The stain is applied with a wide flat brush (flute). You can mix colors with each other, apply one tone to another, lighten the center, darken the edges - it all depends only on your imagination.
Instead of stain, you can use colored wax, which plays several roles at once when restoring a surface. With its help, toning and fixing the result are performed at the same time. By using asphalt wax over stain, depth of color can be achieved.
The wax is rubbed in with a soft cotton cloth in a very thin layer, but you must not return to the treated area, otherwise dark spots may appear. Some manufacturers recommend melting the wax in a water bath for a large amount of work, in which case it is applied with a brush.
After the first layer has dried, it is polished with a woolen cloth, then the next one is applied. This is done until the surface becomes perfectly smooth. If you painted the table with acrylic paint, it is better to use transparent furniture wax to secure the result.
Multi-colored tape
You can make a fun table if you decorate it with decorative tape of different colors. The striped “thing” will instantly turn into an accent spot against the background of any interior.
The tape can be applied to any surface. The metal countertop needs to be thoroughly cleaned. If there are small areas of rust, try to get rid of them with vinegar or a special product - moisten the surface and then treat it with a scraper. It is also advisable to degrease the canvas with an alcohol solution. The wooden tabletop needs to be sanded thoroughly.
You can completely cover the surface of the table with ribbons of multi-colored tape. But if you avoid excessive diversity, then initially paint the table white, black or any other color, and then make a design with a ribbon of one contrasting color.
Photo: berkem.ru Photo: trendodom.com
Features of self-restoration
Independent restoration of furniture is a complex, labor-intensive process that requires at least a little theoretical and practical knowledge. When working on outdated interior items, important points to consider:
- Furniture that is constantly in use needs to strengthen the frame. As a rule, the body of a cabinet, sofa or table becomes loose after 5-7 years of use, so restoration work must begin with strengthening the frame.
- You need to select tools and paints taking into account the material from which the base is made.
- If there are drawings on the object, then you need to work with them carefully, either choose the right shade of paint for painting, or use a thin brush to draw details.
- When restoring wooden furniture, the condition of the wood should be assessed. If it is severely rotten, then there is no point in restoring the item.
Before starting work, it is important to assess the general condition of the frame. In some cases, its restoration is impractical
You can replace the fittings and upholstery, repair the mechanism, but if the base is very dry, insects have eaten it, or rot has struck it, then it is better to abandon the restoration.
DIY old table decor - photos and ideas
Our photo gallery also presents many successful examples of decoration. Take any of them as a basis and, with a little imagination, turn your old table into a unique piece of furniture!
Photo: berkem.ru Photo: vse-otoplenie.ru Photo: handmade.vospitatelyu.ru Photo: museum-design.ru Photo: gidpokraske.ru Photo: livemaster.ru Photo: severdv.ru Photo: pinterest.com
Photo: motipdupli.ru
Photo: keywordbasket.com Photo: mebel-mart32.ru Photo: pulse.mail.ru Photo: pinterest.co.uk
Photo: decoratorist.com Photo: styleandinfluence.wordpress.com Photo: pinterest.ru Photo: realapex.ru
Photo: dekormyhome.ru
Photo: interior-experts.ru
Photo: ikeahackers.net
Photo: ideadigezt.com Photo: inkwellinspirations.com
Photo: luber-portal.ru Photo: pinterest.ru
Photo: design-homes.ru
Photo: finance.yahoo.com
Photo: severdv.ru Photo: severdv.ru
Core Technologies
The main restaurant methods include the following:
- Painting the table (usually special paint for wooden surfaces is used; it can be acrylic-based or enameled)
- Replacing the tabletop (the tabletop can be ordered ready-made to size, or you can make it yourself, as shown in the master classes below)
They can be used individually or combined depending on the damage and condition of your furniture.