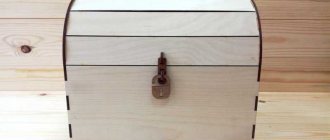
If you inherited an old chest from your great-grandmother, then you are truly lucky! This chest can take its rightful place in any room of your home and become its decoration. But don’t despair if you don’t own such a rare piece of furniture. You can easily make a chest out of a box with your own hands, without the help of professional craftsmen.
This material will be useful not only for those who want to make a new one, but also for those who do not know how to update an old chest. To do this, you can use various decorative and decoration techniques, as well as combine them. Find interesting ideas and master classes on decorating chests further in the material presented.
DIY chest decor: master class
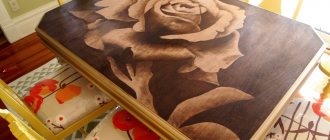
A stylized English travel trunk from the late 19th century can be easily made from an old box using modern acrylic paints and imagination.
To make a chest with your own hands at home you will need:
- wooden box for equipment;
- acrylic art paints: white, kraplak, ocher, olive, chromium oxide, natural umber;
- green acrylic interior paint -1 can;
- gold acrylic outline;
- acrylic paint - metallic gold color;
- white craquelure composition in an aerosol can;
- oil varnish;
- acrylic artistic primer;
- brushes: synthetic round No. 2,3, flute brushes – synthetic and bristle paint brushes;
- stencil, carbon copy;
- hole punch, masking tape;
- palette or disposable plate;
- medium and fine grit sandpaper;
- thick paper or cardboard;
- acrylic putty, spatula.
- Before decorating the chest with your own hands, use medium and then fine-grit sandpaper to remove the peeling paint and clean the surface, leaving the paint that has not peeled off.
- Places where there are potholes or surface damage, fill with wood putty and a metal spatula.
- After the putty has dried, sand the surface with medium-grit sandpaper. Drying time is recommended by the manufacturer.
- After removing dust from sanding with a damp cloth, prime the surface using acrylic primer. Drying time: 30 minutes.
- After the primer has dried, paint the surface with green acrylic paint in one layer. The time for complete drying of the paint is 1 hour.
- Cover the corners of the box with masking tape and cover the surface with green paint a second time.
- Without waiting for the green paint to dry, apply a one-step white craquelure spray to the surface of the box. Apply from a distance of no more than 15 cm. Be sure to use safety glasses, a respirator or a painting mask. Spray on the street or on the balcony.
- After the surface is dry, remove the masking tape with a sharp movement. The size and size of the cracks in the resulting craquelure will depend on the thickness of the spraying - the more paint, the larger the cracks. Drying time: 40 minutes.
- Before decorating the chest with carnations, make blanks to imitate them. Paint thick paper or cardboard with gold acrylic paint. Then use a hole punch to make round “nail caps.”
- Add natural umber to the putty, mix thoroughly until a homogeneous mass of dark color is obtained and, creating a texture, apply to those places on the surface where the tape was.
- While the putty is still wet, place round “nails” at equal distances from each other, lightly pressing them into the putty. Drying time is 40-60 minutes.
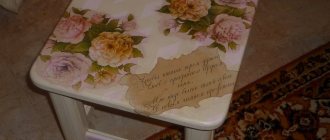
- After the surface of the box to be decorated is dry, transfer the rose design onto it using green carbon paper. Place it, color side down, on the surface of the box, place the design on top and trace along the outline with a pencil.
- Paint the drawing with gold acrylic paint using a synthetic art brush No. 2. Do not cover the flowers with paint. Transfer the drawing of roses not only to the lid of the box, but also to the sides, having previously marked the location of the drawings and their joining.
- Outline the roses with gold contour paint, creating volume.
- Paint over the roses with speckled paint mixed with a small amount of ocher - about 2%.
- After adding 20% white to the kraplak and obtaining a pink tint, add it to the color of rose petals. Cover the leaves and branches with paint using a mixture of 50% chromium oxide and 50% olive paint. Apply the paint loosely, leaving gaps of gold.
- Cover the top of the resulting chest with oil varnish. Oil varnish will darken after drying and give the surface a noble shade of patina.
To know how to paint a chest correctly, look at the photo, which shows the detailed technique of this process:
Selection of materials
The technology of how to make a chest from cardboard or plywood can differ significantly in the way materials are processed.
For beginning craftsmen, the optimal solution would be to make a practical craft from a ready-made cardboard box, and after practice, you can begin to use more practical materials.
How and how to decorate a pirate chest
To make a pirate chest with your own hands, buy a blank or make it yourself from sheets of plywood 80x50x40 cm. Take the fittings in a simple form - you will need handles, hinges, padlocks, a chain.
Before you make a pirate chest with your own hands, prepare all the tools and materials:
- box;
- decorative rubber tape;
- decorative impregnation for wood, water-based, color - dark oak;
- brown acrylic putty;
- matte water-based varnish;
- masking tape;
- glue “liquid nails”;
- synthetic round brush No. 2;
- flute synthetic brush No. 24;
- bristle construction brush;
- brown liner;
- acrylic contours on glass in gold, copper and bronze colors;
- acrylic art paints: white, black, violet, natural umber, burnt umber, English red, olive;
- metallic acrylic paint “medal gold” color;
- gold wax paste;
- drawings, tracing paper, carbon paper;
- accessories.
Follow the instructions:
- Make your own wooden chest using 80x50x40 cm plywood sheets.
- Apply decorative impregnation in dark oak color to the entire surface of the chest in two layers. Apply the impregnation along the wood grain with a flat synthetic brush.
- Use decorative rubber tape to trim the ends of the chest, thus simulating metal lining.
- Carefully glue the tape onto the “liquid nails” glue, pressing it to the surface and fixing it with your hand.
- Transfer the image of pistols and a monogram to the front of the chest (use carbon paper for this). Then paint the design with gold acrylic.
- Paint over the gold background with art acrylic using a round synthetic brush.
- Use contours of different colors and use them to draw the metal parts of the pistols.
- Before decorating the chest, use a stiff bristled brush to apply brown putty to the fittings. Then cover it with dark brown paint.
- In order to emphasize the created texture and create an imitation of old gilding, use gold wax paste.
- On the lid of the chest, mark the outline of an antique map and paint the surface with gold acrylic paint. And then - a thin, translucent layer of white paint.
- Paint the creases of the card with natural umber acrylic paint using a synthetic flute brush.
- All necessary inscriptions and drawings that should be on the map are transferred to the surface using carbon paper.
- Cover the lid of the chest, decorated with a map, with matte varnish1
- On the right side of the chest, draw a dead man’s hand with a map of the place where the treasure is hidden.
- Decorate the left side of the chest with a pirate design in the form of a skull and crossbones.
Restoration of a chest in the Old Russian style
We will turn the boxes, battered by life, into a merchant's chest, in which girls once kept their dowries.
We will need such materials
- Old wooden chest.
- Leather and fabric.
- Belts or synthetic webbing.
- Curly handles with overlays – 18 pcs.
- Water stain.
- Furniture nails with heads, self-tapping screws.
- Parquet varnish is semi-matte.
- PVA glue.
Tools for work
- Screwdriver or screwdriver.
- Drill, metal and nylon brushes for it.
- Furniture stapler.
- Hammer.
- Wide brush.
What can be made from an old chest: interior photos
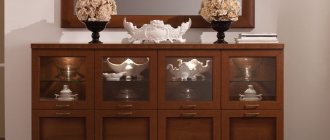
The chests that you have made and decorated can be a good addition to your interior. In addition to their functionality (storing various things), they can become a decoration for your home.
What to make from an old chest and how you can use it, read further in the material.
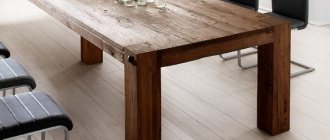
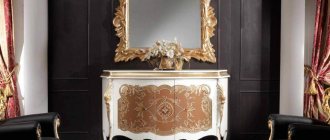
For example, chests with straight lids can be used as a side table or bedside table. In any case, an original item will appear in the interior, and its owner will feel a slight nostalgia for the wonderful times in which he never lived.
When creating the interior of a children's room for a boy, it would be a good idea to make a pirate chest. Any boy is fond of adventure films and books about pirates, in which chests always appear. And every self-respecting pirate should have a chest for jewelry. Therefore, your son really liked the idea of making a nursery in a pirate style. Moreover, a spacious chest will help you quickly get rid of the problem of scattered toys. Your child will love putting his treasures in the chest!
In conclusion, look at a selection of photos with chests in the interior, and you will see how easy it is to fit this piece of furniture into any room:
Tools for work
Depending on the selected idea and materials, you will need to prepare tools to apply the technology for processing them yourself.
The standard set is a stationery knife and scissors, glue with good adhesive properties, additional accessories and paints and varnishes.
Hallway
A large storage chest can be turned into an excellent shoe storage and placed in the hallway. In addition, you can sit on it when putting on your shoes or taking off your shoes, and if you place a mirror above it, you will get a kind of dressing table.
The chest can be used in the hallway as a cabinet under the mirror
Bathroom
Wicker options will look good in the bathroom, where you can fold towels and bathrobes. Things like baskets for dirty laundry are often used. You can use them to store various small things you need in the bathroom: powder, soap, shampoos and gels, as well as a variety of sponges, rags and gloves. It is convenient to use the storage system and place baskets and boxes with necessary and frequently used household items on the shelves.
The bathroom will be decorated with a Provence style chest
An interesting idea for the bathroom would be a “refrigerator chest”, on the shelves and doors of which you can place a variety of jars with shampoos and gels.
Simple decoupage of an antique chest
If you want to imitate an antique chest, then you need to find a suitable wooden blank. Ask your friends, it may be much cheaper to buy a workpiece directly from a craftsman. It can be fired to achieve greater stylization. After firing, you need to work with a brush, and cover the inside of the chest with stain.
Then proceed like this:
- It is necessary to make chips and notches. To do this, take a hacksaw and use it to make cuts on the edges of the chest, but to the required extent, do not overdo it.
- To decorate the chest lid you need pictures. Layer napkins or printouts on rice paper to create a thin film. Cut it into the required pieces.
- Apply primer to the tree, if it is pine, then in several layers. Then a layer of acrylic paint is applied, and only then is it printed. Each layer must dry.
- When the print has stuck and dried, it needs to be aged with a sanding sponge. You will get spectacular scratches.
- Next, you can tint the wood. Look at the images of the chests, try to repeat the color and texture. You can impregnate wood with several colors of paint. Usually green, dark green, light green, black, gray, beige are taken. The sequence of application is from light to dark.
- The cover with the printout is tinted in the same way.
Decoupage of an antique chest is carried out in several stages.
Then the chest can be aged even more - sawed through it, rubbed bitumen into the wood with a hard brush. You can apply wax to the wood and varnish to the lid. All that remains is to select the fittings and attach them. Now the chest is ready!