Vadim
8049 0 1
Vadim November 24, 2018
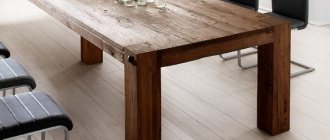
To this day, many houses still have Soviet coffee tables, dining tables and desks. The design itself is made soundly and with high quality, but the years have not been kind to the appearance. Let's look at 10 ways to restore such furniture at home, and craftsmen will receive a master class on restoring tables with their own hands.
It is quite possible to restore old but good furniture at home.
Features of self-restoration
Independent restoration of furniture is a complex, labor-intensive process that requires at least a little theoretical and practical knowledge. When working on outdated interior items, important points to consider:
- Furniture that is constantly in use needs to strengthen the frame. As a rule, the body of a cabinet, sofa or table becomes loose after 5-7 years of use, so restoration work must begin with strengthening the frame.
- You need to select tools and paints taking into account the material from which the base is made.
- If there are drawings on the object, then you need to work with them carefully, either choose the right shade of paint for painting, or use a thin brush to draw details.
- When restoring wooden furniture, the condition of the wood should be assessed. If it is severely rotten, then there is no point in restoring the item.
Before starting work, it is important to assess the general condition of the frame. In some cases, its restoration is impractical
You can replace the fittings and upholstery, repair the mechanism, but if the base is very dry, insects have eaten it, or rot has struck it, then it is better to abandon the restoration.
Decor options
Restoration and subsequent decoration of the table is a very long process. But the result is worth it, because you can get an exclusive designer item with which memories are already associated. Furniture decor can be completely original and at the same time fit very organically into the concept of using the item and the room.
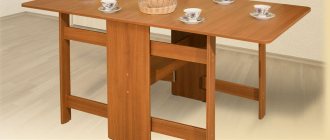
A laconic design is suitable for a book-like or folding table. It can be painted in one or two colors. Or you can add nobility and emphasize the natural structure of the tree.
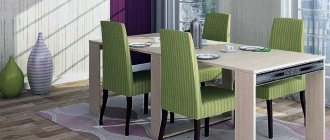
The sliding table can be decorated with drawings that can appear only when the tabletop is disassembled as much as possible. And of course, if this kind of table is used as a dining table, you can use a kitchen theme in its decor - images of food, fruits and vegetables, tableware. The kitchen table can be decorated with tiles and mosaics. This will be a very practical solution.
For a dressing table, due to its functionality, delicate pastel shades and light colors are suitable, as well as all kinds of “girly” prints (flowers, cosmetics, patterns).
The coffee table can be painted in a rich color or equipped with a bright pattern.
For a children's table you need to use only high-quality finishing materials. And you can decorate it with a variety of animals and cartoon characters.
A practical solution for a student would be to create a “cheat sheet” table, on the surface of which you can apply a variety of didactic materials (rules, diagrams, formulas).
Using a computer desk/stand requires high usage. Therefore, materials need to be selected appropriately – not easily soiled (the computer “attracts” dust), wear-resistant (especially to heat).
How to update a glass table?
A beautiful glass coffee table can often be found in modern apartments. As a result of improper care, a glass tabletop loses its attractive appearance.
The legs become loose, chips and scratches appear on the glass. If there are scratches on the tabletop that could fit a fingernail, then it is better to take the table to a special workshop, dispose of it, or replace the glass with a new one.
You can rid a glass countertop from scratches at home using either improvised means (toothpaste, soda, clear nail polish) or special means (GOI paste, car polishes, polishing agents for precious metals).
First you need to clean the surface, then carefully rub or apply the composition into the scratch. Do not overdo it, otherwise instead of one scratch you may get several more.
Wait a moment for the composition to set and clean the glass again.
To get rid of scratches, use the most ordinary, non-gel toothpaste. Soda is dissolved with water to a paste, approximately in a ratio of 1: 1. GOI paste must be used, proven and real. Transparent varnish will not completely eliminate the problem, but only partially. At a certain lighting angle, it will be noticeable that there were scratches in that place.
Wobbly table legs also need to be repaired. Typically, table legs are attached with special glue. This glue may dry out over time. It can be removed and replaced with new adhesive. If the legs are attached to screws or self-tapping screws, then they can be unscrewed and replaced with new ones.
Now the table can be given a completely new sound using various decorative techniques:
- Cover the reverse side of the table with decorative film. When covering the table with film, do not allow bubbles to form. It is better to glue the film little by little, gradually moving the backing away. If bubbles do appear, you can pierce them with a needle and smooth them out;
- Make decoupage. To do this, you will need pictures (for example, from napkins or on rice paper, or images specially prepared for this), PVC glue or one special for this work, brushes, a file, and decoupage varnish. The necessary equipment can be purchased in stores for creativity and scrapbooking;
- Paint with stained glass paints. Acrylic outline, stained glass paints, cotton swabs and napkins, alcohol for degreasing the surface, sketch of a drawing, tape - this is a set of items that will be needed for this work;
- Attach lighting and LED strip around the perimeter of the table;
- If the design allows, make a mini-garden, an aquarium or a bright composition of stones and shells. When the table has a small drawer, which is covered on top with a tabletop, you can place a tray on its bottom and plant succulents there (plants that do not need frequent watering). Or decorate the box with shells, stones or other things.
Option 2. Mosaic cladding
If the tabletop has been scratched during use, or dents have appeared on its surface, you can cover it with your own hands with a mosaic, which will hide all the defects and return the table to its former beauty.
For work, prepare:
- Mosaic in canvas
- Sandpaper
- Tile adhesive
- Dye
- Putty knife
- Scissors
- Scotch
Repair procedure:
- Check if the legs are holding well. If necessary, secure them properly using self-tapping screws.
- Degrease the surfaces of the tabletop and legs with alcohol or acetone.
- Sand and sand surfaces.
- Places that cannot be sanded should be puttied and then sanded.
- Cover all surfaces with a coat of paint. Leave until dry. For work it is better to use aerosol paint.
- Apply a good layer of glue on the table surface.
- Cut the mosaic and glue it with the grid down. Press the mosaic and smooth it down. Set aside work until the glue has completely hardened.
- Carefully seal the painted edges with tape and grout the mosaic.
- Wipe the table surface with a damp sponge.
- After a day, wipe the table with a small amount of vegetable oil.
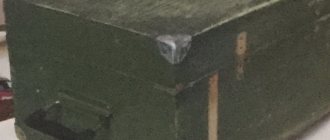
Restoration of old tables
Theoretically, you can restore an old table in any condition, even this one. Here the first thing to do is to remove the old MDF table tops and then glue on the wide panels... thickness in this case 16 mm. Then lightly sand the bases with a sanding sponge. The reason for painting the frame was because the drawers are MDF and the legs are made of wood. Take the top piece, cut to width and sanded. Round the edges using a router and install the tabletop using old screws. Apply 3 coats of glossy polyurethane - it should look cool.
Photo source: www.instructables.com/id/New-Life-for-Old-Tables/
Decoration
Decoration depends on the style of the interior. In hi-tech and minimalism, the main emphasis is transparency, simplicity of lines and geometry, so the table does not need additional decoration.
If we talk about the Art Nouveau style, then models with a colored or mosaic surface with metal legs look appropriate here. You can make a tabletop “with a secret” - place a tabletop made of wood or artificial stone under the glass (the Art Nouveau style loves natural materials).
Frosted or laminated glass of different shades will decorate the interior in a retro or fusion style. Sandblasting the material, photo printing, or manually applying a design with special paints will help with this. LED lighting is installed to add a bright accent. It looks especially stylish in modern industrial designs.
How to get rid of old coating?
You will need:
- scraper or sander; sandpaper; wood putty; spatula.
Restoring a coffee table begins with removing the old varnish
The easiest way is to use a sander, but in this case you should be extremely careful, as the tool can damage the wooden surface
You can use special solvents
Here it is important to calculate the thickness of the layer: the product should only dissolve the varnish without reaching the wood. If the solvent is absorbed into the surface of the coffee table, this will complicate all subsequent stages; the materials may not “make friends” with each other, resulting in swelling, peeling or cracking of the paint coating
The main materials and tools for decorating a coffee table are: acrylic paint, brushes, glue and pictures.
If the old varnish has many cracks and is worn out in places, it can be easily removed using regular sandpaper.
Take medium-grain paper, moisten it, wrap it around the block, and walk over the surface. When the sandpaper becomes clogged with dust, rinse it in water and get to work again. Under the influence of moisture, the old varnish will soften and can be easily removed.
After you remove the varnish, sand the surface of the coffee table with fine-grit sandpaper. You can clean off the old coating using a scraper or a piece of broken glass. In this case, you cannot do without work gloves.
The varnish gradually chips off the surface, but care must be taken not to damage the wood. All these methods have their advantages and disadvantages. Which one to choose is up to you.
After the old varnish is removed, it is necessary to fill all cracks, chips and scratches. The putty is applied using a spatula, leveled so that it does not protrude above the surface, left until completely dry, then sanded with fine sandpaper. If you plan to tint the table with stain, it is better to purchase putty to match the color of the wood.
Popular articles Page for a children's book in pop-up style
You will need:
Decorating a table with a mosaic allows you to hide cracks and stains that have appeared.
- primer; acrylic paint or stain; furniture wax; brushes; sandpaper.
Restoring a coffee table involves painting or tinting the product using stain (wax). First you need to prime the surface: use a special primer for wood, apply the composition with a brush in 1-2 layers with mandatory intermediate drying. If you use stain, the priming step can be omitted.
The paint is applied with a brush; for the tabletop it is more convenient to use a roller or a paint spatula. Hard-to-reach places are painted with a thin brush
It is important to apply the paint in a thin, even layer - then you can avoid sagging
After the first layer has dried, go over it with fine sandpaper. The second time the paint is applied in the opposite direction. All paint layers must be sanded with sandpaper - then the surface will be perfectly smooth, and the streaks from the brush will be invisible.
The table can be restored using stain or colored wax.
Stain can be water-based or alcohol-based, the former gives a softer tone. The stain is applied with a wide flat brush (flute). You can mix colors with each other, apply one tone to another, lighten the center, darken the edges - it all depends only on your imagination.
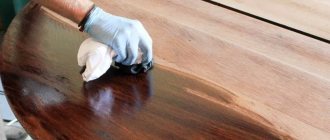
Instead of stain, you can use colored wax, which plays several roles at once when restoring a surface. With its help, toning and fixing the result are performed at the same time. By using asphalt wax over stain, depth of color can be achieved.
The wax is rubbed in with a soft cotton cloth in a very thin layer, but you must not return to the treated area, otherwise dark spots may appear. Some manufacturers recommend melting the wax in a water bath for a large amount of work, in which case it is applied with a brush.
After the first layer has dried, it is polished with a woolen cloth, then the next one is applied. This is done until the surface becomes perfectly smooth. If you painted the table with acrylic paint, it is better to use transparent furniture wax to secure the result.
Installation of mosaic tape
This technique is less labor-intensive, but differs from the one described above in limitations in appearance. This is due to the range of ready-made mosaics. There is an option to do it yourself. But since they prefer to decorate a coffee table with minimal cost and labor, the choice is made with factory-made mosaic models.
Surface preparation will require a lot of effort. It should be taken into account that the mosaic will have a certain thickness. Best of all, its upper plane will not protrude above the surface of the countertop. Therefore, restrictive sides are made of decorative veneer, the height of which is equal to the thickness of the mosaic.
Stages of work execution.
- Cleaning surfaces.
- If necessary, apply a layer of paint.
- After drying, a preliminary mosaic layout is performed. If the drawing is prefabricated, it is best to number each element.
- Adhesive base. To do this, it is necessary to use special compounds that will not damage the wood material. The layer should be the same thickness.
- Installation of mosaic.
After the glue has completely hardened, you can begin to use it. But before doing this work, you should check the compatibility of materials. This is especially true for wooden surfaces.
Often, the decor of a coffee table with mosaics is done not only for living rooms, but also for so-called “wet” rooms - the bathroom, dressing room, etc. In this way, the protective properties of the structure are improved, since a layer of varnish and mosaic prevents exposure to moisture.
Causes of breakdowns and repair of an old table
If you discover a breakdown of old furniture, you should immediately take care of repairing the table. Of course, you can repair a piece of furniture in a special workshop, but this pleasure is not the cheapest. All repair work can be easily done independently.
If there is a breakdown, it must be repaired.
The causes of breakdowns can be very diverse, ranging from careless use, deformation of mechanisms, ending with old material, environmental influences, termites, etc.
The causes and nature of breakdowns may be different.
The fallen parts are pushed into place and fixed with special furniture glue. In case of breakage and loss of thread elements, small similar wooden blanks are created.
If any parts have fallen off, they are reattached.
If the tabletop has become completely unusable, it should be replaced immediately. This is true in case of a large amount of rot. The new surface is securely fixed with a press. If deformation due to dampness is observed, the product is thoroughly dried. Its elements are set in the desired position and straightened under the press.
In some cases, a complete countertop replacement may be necessary.
Option 5. Decoupage
The decoupage technique is perfect for restoring old furniture. There is a huge variety of napkins and applications for decoupage on sale. Using this technology, you can decorate not only the table top, but also the sides and even the legs.
Prepare for work:
- Decoupage napkins
- PVA glue
- Brush
- Varnish
If you couldn’t find napkins for decoupage, instead of drawing from them, you can transfer an image from newspapers or magazines to the table surface.
Procedure:
- Prepare the table surface.
- Using glue, transfer the design to the tabletop and other surfaces. We wait until everything dries.
- We cover the table with varnish.
Toning and painting the table
Before finishing, the surface should be treated with primer. Apply the composition to the tabletop and frame.
Restoring lacquered furniture is an excellent way to restore interior items, giving them an attractive appearance.
Stages of table processing:
- Rinse the surface and apply the composition in a thin layer using a spatula.
- After the first layer has dried, apply the next one.
- When all layers have dried, remove any unevenness with sandpaper.
If your problem concerns the darkening of the varnish, then restoring the furniture will also involve erasing the old varnish coating and applying a new one. You can do all these procedures yourself.
After priming, you can begin painting or tinting the surface. Renewal of the base can be done by simple painting with a brush and roller, or the paint can be applied through a stencil or tulle. Next comes the treatment of furniture with wax or varnish. The first provides excellent protection from the effects of adverse environmental factors. The surface is tinted using stain.
Using masking tape, a brush and paints, you can apply various designs to the surface of the table.
In order for the painting to be of high quality, it is important to apply the paint evenly, and after the first layer has dried, go over the base with sandpaper. Reapply paint in a perpendicular direction
All layers of dried paint must be sanded to ensure a smooth surface.
Monitor the application process carefully. After covering the entire surface, the first layer must be thoroughly dried.
Option 5. Decoupage
The decoupage technique is perfect for restoring old furniture. There is a huge variety of napkins and applications for decoupage on sale. Using this technology, you can decorate not only the table top, but also the sides and even the legs.
Prepare for work:
- Decoupage napkins
- PVA glue
- Brush
- Varnish
If you couldn’t find napkins for decoupage, instead of drawing from them, you can transfer an image from newspapers or magazines to the table surface.
Procedure:
- Prepare the table surface.
- Using glue, transfer the design to the tabletop and other surfaces. We wait until everything dries.
- We cover the table with varnish.
Advice from restorers
To avoid disappointment when investing time and money into table restoration, pay attention to these important tips:
- Violation of work technology and the use of low-quality materials can lead to swelling, peeling and destruction of decorative coatings or premature loosening of table legs.
- When painting, give preference to special acrylic-based paints. They dry quickly, are environmentally friendly, do not smell and do not emit toxic substances.
- If you completely disassemble the table during restoration, mark the location of each leg so that after the renovation you can install them in their original places.
- When restoring a table with your own hands, a photo of the disassembly process will help you correctly assemble the furniture elements after completion of the work.
- Wooden surfaces should only be sanded along the grain. Transverse movements of the sandpaper will leave noticeable marks on the wood.
Option 2. Mosaic cladding
If the tabletop has been scratched during use, or dents have appeared on its surface, you can cover it with your own hands with a mosaic, which will hide all the defects and return the table to its former beauty.
For work, prepare:
- Mosaic in canvas
- Sandpaper
- Tile adhesive
- Dye
- Putty knife
- Scissors
- Scotch
Repair procedure:
- Check if the legs are holding well. If necessary, secure them properly using self-tapping screws.
- Degrease the surfaces of the tabletop and legs with alcohol or acetone.
- Sand and sand surfaces.
- Places that cannot be sanded should be puttied and then sanded.
- Cover all surfaces with a coat of paint. Leave until dry. For work it is better to use aerosol paint.
- Apply a good layer of glue on the table surface.
- Cut the mosaic and glue it with the grid down. Press the mosaic and smooth it down. Set aside work until the glue has completely hardened.
- Carefully seal the painted edges with tape and grout the mosaic.
- Wipe the table surface with a damp sponge.
- After a day, wipe the table with a small amount of vegetable oil.
Primary processing
Furniture restoration should begin by removing small cracks, scratches, chips or dents.
It is necessary to remove the old coating using a sanding machine. You can also use coarse-grit sandpaper at the beginning and fine-grit sandpaper at the end of sanding.
To do this, perform the following operations:
- Use a broom to sweep away the dust that has accumulated in the cracks.
- Apply wood putty to all detected defects.
- Remove excess putty from the surface, while leveling the latter.
- Leave for a while to allow the base to dry.
- Use sandpaper to remove any unevenness.
- If necessary, repeat puttying and sanding.
Small cracks up to 3 mm are sealed with putty and then sanded again so that there are no tubercles.
Sequence of work before painting:
- Remove old coating.
- Sand over all cavities and ridges.
- Glue all parts of the structure and tighten them with self-tapping screws.
- Replace the legs.
- Connect the frame to the tabletop.
Do-it-yourself furniture restoration requires patience and accuracy.
Sometimes you have to try several methods: damage varies, as do the materials used in manufacturing.
Preparatory stage
If you intend to update a couple of chairs or grandma's chest of drawers, you can do without a professional tool. You will need to solve the following tasks:
- To keep healthy. Stock up on a respirator and gloves.
- Remove old coating (paint, varnish) from facades and other large surfaces. For rough work, you need a grinding abrasive stone (coarse-grained).
- To erase the coating in difficult places where a block cannot cope, you cannot do it without sanding paper (coarse sandpaper on a fabric backing).
- In order to polish the surface before applying paint, you will need fine-grained sandpaper on a fabric or paper basis (with a grain size of P180-P240).
- If you plan to remove surface defects (cracks, uneven surfaces), keep a spatula and putty on hand.
Modern design trendsSource hzcdn.com
- A vacuum cleaner will help you quickly and efficiently remove dust and other debris.
- The preparatory stage includes the following work:
- Disassembling furniture. It simplifies all subsequent actions; you also need to remove the fittings. Before disassembling, take photographs of all hinges and fasteners.
- Removing old coating. Old paint and varnish are removed by sanding (if the layer has peeled off) or using a solvent.
Table and chairs in Scandinavian styleSource loveincorporated.net
- Leveling the surface. It is not necessary if you plan to get the effect of a vintage item. Otherwise, purchase wood putty or furniture wax.
- Preparing for painting. All surfaces are sanded with fine sandpaper. Then the dust is removed with a hairdryer, the parts are wiped with a damp cloth and allowed to dry.
- Coloring. The easiest way is to use water-based paint. It does not have a pungent odor, and it dries faster than other compounds (for example, alkyd).
Transformation of a display cabinetSource pinimg.com
Getting rid of old coating
If a layer of varnish has been applied to the base and it has cracked over time, then this coating should be removed in order to apply a new one. It is convenient to carry out these works with a spatula or chemical means, that is, washes. Another good option for removing the old layer is to use sandpaper. Medium grain paper is suitable for this.
Popular articles Funny congratulations on March 8, 2022. Funny congratulations on March 8
The new life of an old table begins first of all with the elimination of defects, since the functional component is important for any furniture. If assembled correctly, the product will become more durable and stable.
When choosing to remove old coating with chemical compounds, do the following:
- Apply the product to the base with a brush.
- The active substances enter into a chemical reaction with the coating and after half an hour the composition can be removed with a soft sponge.
- After removing the paintwork, it is necessary to treat the wood with antiseptics.
The table requires mandatory impregnation with an antiseptic, which will protect against pests and fungi. Before covering a wooden tabletop, you should carefully inspect the surface for damage and chips.
Assembly steps
Let's look at how to assemble a kitchen table with chrome legs. This option is simple and can be applied to any countertop. First, let's put marks for the subsequent screwing of the legs. Let's lean the mount against the tabletop and mark the points for the screws with a pencil. After this you need to screw the mount. To do this you will need a screwdriver or screwdriver. Then you need to install the leg into the mounting location. It easily screws into a special hole in the center. Similar actions need to be done with the remaining supports.
A more difficult question is how to screw the legs to a wooden kitchen table. Such a design is much more difficult to assemble, since you need to think about the types of connections.
Restoration of the dining table
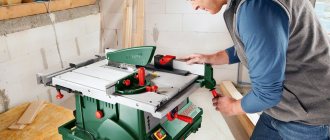
Do you have a worn out solid wood dining table that needs updating? See how to restore an old dining table using inexpensive floorboards. Clean the surface of the old table. Although construction adhesive is very strong, make sure the surface is clean, dry and free of oils for best adhesion. The frame around the tabletop will provide a smooth edge and will serve as a perimeter guide for the cutouts in the floor. To determine the height of the frame, add the thickness of the floorboard and the thickness of the countertop. Use a table saw to cut the tongues and grooves from the framing boards. This is a start, see the instructions on the website to continue.
Photo source: www.diynetwork.com/how-to/make-and-decorate/decorating/how-to-makeover-a-dining-room-table-with-hardwood-flooring
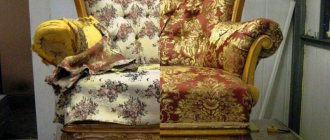
How to restore an old dining table
If you're tired of your old dining table, don't rush to throw it away. The author of this project wants to share all the details on how to restore an old dining table! Any good remodel needs to start at the beginning and show a before and after photo, here they are in the photo. Just in case, before, it's on the left (also looks decent).
The table before the restoration was in quite good condition, it’s just that the author was terribly annoyed by the mirrors. Agree, watching yourself eat is not very pleasant. In general, the goal of the reconstruction was to update the countertop. It was a lot of work, but it was worth it. Look at all the information on the website, perhaps this instruction will be useful to you for restoring your dining table.
Photo source: brepurposed.porch.com/2019/01/28/how-to-update-an-old-dining-room-table/
DIY dining table restoration
In this guide, the author of the project will tell you about the processes and stages of restoring a dining table with your own hands, which has seen better days. You'll learn how to update an old dining table that was bought very cheaply at a flea market, but it's a nice solid wood table, it just doesn't look the same. This is really more of a guide to restoring any wooden furniture. This is by no means exhaustive information that you should strictly adhere to, but the author simply believes that this method is the best. Link to instructions below.
Photo source: eastcoastcreativeblog.com/2012/10/refinished-dining-room-table-furniture.html
How to restore a kitchen table
Do you have a table that has fallen into disrepair over the years? This instruction is about how to update your kitchen table with your own hands. Here's a before and after photo.
Restoring the table will add great value and make it more attractive. It is not at all difficult and does not require any expense or experience in repairing wooden tables. Although all this will take a decent amount of time, the result will be visible immediately.
The approximate time it will take is up to you, but should take between five and seven days. The amount of actual working time on the project will be only eleven to fifteen hours. The rest of the time the table will dry. Before you begin the project, you will need to go to a hardware store and purchase the proper tools and clear coat. The total cost of the entire project will not exceed twenty-five dollars. Warning: Due to dust, sanding fumes and clear coating, work outdoors or in a ventilated area. Vapors may cause injury, so wear safety glasses. For a description of the restoration process, read the detailed instructions on the website.
Photo source: www.instructables.com/id/Refurbish-Kitchen-Table/
Required Tools
The following tools are used to restore old furniture:
- screwdrivers of different sections;
- knives, chisels;
- screwdriver;
- Sander;
- stapler;
- tailor's scissors.
If the furniture is heavily worn or has lost its color, it is recommended to completely remove the varnish from the surface and sand it.
You must use a wood saw as a cutter; with its help, the size of the fitted parts will be accurate. You can also contact a specialized store, where they will make blanks according to your calculations.
Restoring old furniture with your own hands allows you to independently detect all the shortcomings that have arisen as a result of the use of the products.
The wardrobe or chest of drawers should be disassembled first.
How to repaint?
Painting a table is the most popular restoration method. What could be more laconic than a white table? Only black. Therefore, the choice of paint (acrylic or oil, enamel) is very important. How long the restored table will last depends on what kind of paint the repair was made, or rather on its characteristics.
To choose a paint, you need to understand where and how the table will be used, and what materials it is made of.
- Water-dispersed acrylic paint is suitable for heated rooms and withstands humidity well. Dries quickly. Can be washed off with water during application. But after drying it is not susceptible to water. Alkyd compositions are considered more reliable.
- Oil paints are losing their popularity due to unreasonably high consumption.
- Wood enamels attract with their glossy surface and high performance. Nitro-enamel paints also set quickly.
The paint has been selected and purchased; further repair of the table involves painting it.
The surfaces must first be pre-treated, cleaned, removed the old coating, remove scratches and chips, putty, prime, protect decorative inserts, for example, glass, with tape. And only after the primer has dried can you paint.
To give an even color, the paint is applied in several layers. The first layer is actually rubbed into the surface.
To apply an additional design to the tabletop, you can use pre-prepared stencils or the most common tulle. When the base color has dried, the tulle (or stencil) is fixed and the paint of the design is applied. You can do this with a brush, but it is better to use a sponge or a can of paint. To make the finished product more aesthetically pleasing and strengthen the surface, we coat it with varnish.
To create a graphic design (lines, zigzags, diamonds, squares), you can use tape. Mark the future design with adhesive tape and apply the first color with paint. If necessary, repeat the procedure with other colors. Varnish the finished tabletop.
If it is necessary to achieve the effect of aged wood, then first a special composition is applied to the treated surface (cleaned, sanded and primed).
Patination can be done with a dark stain. Then the first coat of paint is applied to the wood. Then a second layer of lighter and more liquid paint is applied. When the paint is dry, we go over the surface with sandpaper. The desired effect has been achieved.
Surface preparation
Before you begin to consider individual decoration methods, it is advisable to study how to prepare the surface. After all, this step is the same for all tables, regardless of which restoration method you choose in the future.
First you need to remove the old coating.
It is risky to use solvents as they can damage the wood fiber. This is especially true for valuable antique pieces of furniture. In this case, it would be best to use coarse sandpaper and a sander.
As for the legs, if they are carved, you need to carefully sand them with special pieces of sandpaper for hard-to-reach places. It is strictly forbidden to remove the old coating with screwdrivers, chisels and knives. These tools can ruin the coating.
To level the surface of the table, it is necessary to cover it with a layer of primer.
If the legs are still quite problematic to clean due to their shallow relief, then you can use a thin wire tangle. And if this does not help, then you can use a little solvent. You just need to work with it very carefully, wrap a bandage around the match and dip it in the solvent.
When all the old coating has been removed, all cracks and flaws need to be well sealed.
To do this you need to use wood putty. But first, the entire table is covered with a primer, which will protect the wood from damage and will subsequently provide better adhesion to the putty and finishing material. When the primer is absorbed, you can work with putty.
A small spatula is used for this work. Putty can be used either ordinary white or special colored - everything will depend on how you plan to restore the table further. After the putty has dried, sand everything again with light sandpaper and re-coat with a thin layer of primer.
The table is ready.
Let's consider two main options for restoring a coffee table with your own hands.
They are considered the easiest for beginners and not so expensive in terms of money, which is especially important in conditions of limited resources.
Painting a table through tulle. Dyeing technology
Before you paint a wooden table, you need to arm yourself with:
- with a brush, roller and container (if paint is used) or spray (aerosol);
- goggles, mask, gloves, respirator (to avoid toxic substances getting into and on the body);
- antiseptic (necessary for protection against insects) and wood primer (reduces paint consumption).
Popular articles Headband in lilac tones
If you choose the color yourself, apply the mixed paint to the surface and let it dry to understand what the final color will be
Painting the table is carried out on a hard surface, previously covered with newspapers or plastic wrap to avoid paint getting on the floor. For those who decide to cover the table with varnish or non-water-based paint, it is better to carry out the restoration outdoors due to the strong toxic odor. If the piece of furniture is large enough, it is better to disassemble it into its component parts using a screwdriver, hammer drill, etc. Many experts argue that it is not worth violating the integrity of a wooden object, since in the future it may lose its shape. However, this statement is controversial. If you assemble all the parts together correctly and efficiently, this will not affect the life of the product, and it will be easier to paint.
Before repainting a varnished table, you must remove the old coating. To do this, you can use a chemical solvent, a spatula, or a metal sponge. At the initial stage, sandpaper should be selected coarse-grained, which does not abrade the surface so much. Next, you should sand the surface with fine-grained sandpaper, cover it with an antiseptic and primer and leave to dry. An antiseptic is needed so that pests cannot subsequently reach the wood. After the primer has dried, the surface must be sanded again and wiped with a dry cloth or vacuum cleaner.
Sanding the table surface
The paint is applied in at least two layers
Masking tape is useful if the wooden product has glass or plastic inserts that do not need updating. It is enough to seal unnecessary places and you can proceed directly to painting. If you use aerosol paint, be sure to wear a respirator, goggles and gloves. These methods of protection allow you to paint a wooden tabletop without harm. The substance should be sprayed at a distance of 30 cm from the wooden table. Next, you need to leave the product to dry, and then cover the wooden table with another 2-3 layers of paint. The same sequence is maintained when using conventional liquid paint, which should be applied with a roller or brush with soft bristles. To make sure that the furniture is ready for the next treatment, it is recommended to lightly touch the edge of the surface with your finger. If the paint does not stick, then you can proceed to the next step.
How to paint a tabletop, how to choose a varnish for a table? What varnish to cover the table with depends on the further purpose of the product, but the most universal coating option is acrylic varnish, which will protect the wooden surface from mechanical damage. After painting, you need to remove the masking tape and leave the product to dry for 8 hours (or better yet, a day). Only after this is it ready for use.
Methods
There are various approaches for updating old furniture. Restoration is a classic approach that involves restoring the original appearance of an object with all its previous characteristics. This method is used if you need to restore a valuable piece of furniture to its original form. This involves a fairly complex technique that will require the use of special-purpose chemicals to restore the coating, carpentry work to eliminate functional faults, and it may be necessary to replace part of the wood or veneer.
This requires special skills and professional carpentry tools, purchasing special types of wood. Complete restoration of chairs is justified for collecting purposes or in case of damage to one of the items of an expensive set. This is a rather expensive process, so it is better to entrust it to professionals.
If for certain reasons it is impossible to contact a carpentry restoration workshop, then repairing old chairs can be done at home with your own hands.
It is necessary to begin restoration work by sequentially performing the following actions:
- First, we think about the design of the future piece of furniture, how it will look in the interior, what color it should be, and what needs to be altered for ease of use.
- Then we disassemble the chair into its component parts, determine the degree of wear of parts and the need to replace some elements, and measure each part.
- After this, we make an estimate for consumables based on the dimensions of the chair parts, with this list we go to the store and purchase everything we need.
- Finally, we replace the worn parts and the coating with varnish or paint. If the chair has retained its strength, it is enough to simply repaint it to make a new piece of furniture. You can paint an old, peeling highchair in a new bright color and paint it with a simple pattern, which the child will be incredibly happy about.
Ceramic tile
There are no limits to the imagination of modern designers and a variety of materials are used to achieve a certain goal.
If none of the above methods for decorating a coffee or coffee table suit you, pay attention to the following unusual methods.
You can decorate the surface of any table in an original way using ceramic tiles. The only difficulty is to select the required quantity according to the size of the table. You can decorate it in different ways: lay out an original panel in the center, framed with monochromatic elements, or come up with a geometric pattern (zigzag, checkered pattern, squares, herringbone) - such decor will look original and fresh.
How to decorate a coffee table with ceramic tiles: master class
For work you will need:
First, decide on the pattern of how you will lay out the tiles: it is better to lay them out on a flat surface so that the pattern on the panel matches. The tiles should be laid the way they will lie on the table.
Then the material needs to be prepared: wipe the tiles from dust with a napkin - the back part should be dry and clean. We hope you have already prepared the surface of the table.
Apply the adhesive composition to the surface of the table with a notched trowel, laying each tile on it, carefully pressing down with your hands so that there are no bumps. Place crosses between the elements. Wipe the adhesive off the face of the tiles as needed.
After gluing, leave the table to dry for at least a day.
The next step is to fill the joints with grout. We hope you have chosen the appropriate composition and read the instructions on how to use it. Fill all the seams with a rubber spatula; remove excess with a damp sponge. As you fill, remove all spacer crosses from between the tile joints. If necessary, create seams using either your gloved fingers or a rubber spatula.
Once all the seams are filled, remove excess grout from the face of the tiles with a dry cloth, being careful not to touch the seams. Leave to dry for at least a day. Wet cleaning of the table can be carried out according to the instructions on the grout packaging.
Stages of work
The restoration process consists of several important stages:
- Selection and purchase of all necessary consumables. It's better to do all this in advance.
- Preliminary table repair. In the case of desk restoration, moving parts are lubricated and drawers and shelves are repaired.
- Identification and elimination of major defects for further restoration.
- Removing old varnish.
- Application of protective solutions.
- Surface decoration using various techniques.
Preliminary repair
At the preliminary stage of restoration, furniture is restored and repaired. You should start by assessing her condition. You need to carefully inspect the wooden table, see if the legs are broken, and check the integrity of all parts. A stable structure should not tilt or creak under load. Repairing a table begins with searching for visible defects. Next you need to disassemble it into its component parts. If the plywood that serves as the bottom of the boxes has delaminated, it must be dismantled and these parts replaced with new ones.
Moving parts are lubricated with machine oil, and if necessary, the mechanism itself is repaired. If corrosion appears on metal parts, they must be replaced with new ones. Outdated, unfashionable fittings can be replaced with more modern ones.
Poorly fastened elements are connected using glue. To make the table more stable, you need to replace its legs with wider ones. Not everyone knows how to restore a table if it becomes loose. The product can be strengthened using corner ties.
Non-classical solutions
You can still adhere to the rule of three (it's foolproof), but the groups can be changed.
For example, not flowers or a living plant, but a bowl of fruit. Not books, but a board game.
A simple way to reconstruct wooden furniture: decoupage
Beautiful pictures, pasted onto the surface and secured with varnish, can transform a table, a cabinet, or a desk. To transform your furniture yourself, choose the most suitable image, apply a little glue to the back of it and attach it to the wooden surface. Try to smooth the applique so as to prevent the formation of bubbles or voids under the picture. Calculate your forces and do not tear the thin paper. Let it all dry and seal with clear varnish. This way you can transform an old cabinet or turn a Soviet coffee table into an elegant and sophisticated work of art.
You can see the restoration process in more detail in the video.