Garden path made of wooden saw cuts
Wooden saw cuts look very organic on the site. Here, this natural material is most often used to create paths. Garden paths made from wooden parts can be very diverse, but the manufacturing principle is the same for all.
Saw the tree into round timber 5-10 cm thick. Treat all parts with a special compound that will protect the material from cracking and rotting and thus increase its service life. Level the area. Place dried wooden cuts on it. Tamp them down thoroughly. The simplest - single-row - track is ready.
Fill all free space with any mulching material: bark, sawdust, pebbles, etc. Soil is also poured into the holes between the round timbers.
When creating a more complex path with several rows, always lay the largest round timber first. When they take their places, begin to fill the space between them with cuts of a smaller diameter. And at the end, fill the remaining gaps with mulch.
Some people frame a garden path made from wooden saw cuts with a border. You can use ready-made concrete fencing as a border, or you can make it yourself from boards or stones. Flower lovers plant low-growing flowers along the path - the result is a lively and bright border.
What products can be made
Beautiful products can be created using not only saw cuts, but also knots that may remain after construction work. You can also use dried branches.
They can be easily decorated and created different products. Knots and irregularities add a distinct style, and the cut of the wood will add extra character.
Fence made of wooden saw cuts
Another way to use wooden cuts in your dacha is to make fences out of them. There are a lot of options here. The parts can be stuffed or glued onto a dull picket fence.
You can combine wooden saw cuts of different diameters and artificial stone in one fence. The fence looks not only impressive, but also quite unusual.
Stones are most often used to fill gabions. However, other materials, such as wood cuts, are often placed in the space between the mesh. As with any wooden structures located outside the home, they must be treated with protective impregnation before use.
- How to make gabions with your own hands?
Gabions are being used more and more often in landscape design. What it is? Is it possible to make gabions with your own hands?
Saw all the logs into round timber of the same thickness. To create a gabion, you can use any saw cuts whose size exceeds the size of the cells. Fill the grid from bottom to top, immediately placing smaller ones in the spaces between large elements.
Preparing wood for crafts
When cutting down trees, it is not always that the cut is so neat that such material can be suitable for crafts. As a rule, each cut needs to be modified.
- To do this, you will need a hacksaw, which will remove all the roughness.
- After which the bark is removed, the cut is ground and polished.
- It must be processed many times to more clearly identify the pattern, as well as to protect it from rot.
- The saw cuts are varnished.
This kind of preparatory work can take a lot of time. During this period of time, you can explore different ideas for crafts from saw cuts.
Table made of wooden saw cuts
Wooden saw cuts are also used to create furniture, most often tables and chairs. A massive wooden table made from a huge old tree will, of course, not fit into every setting. However, in the right environment it will certainly dominate the interior.
Tempered glass is often used as a tabletop. It will add lightness, airiness, and the table, despite the base made of wooden cuts, will not seem so massive.
Small tea tables are the easiest way to use round timber. For such a table made from wooden saw cuts, you only need metal legs and wood impregnation.
These tables can also be used as bedside tables or as flower stands.
Watch
This craft is difficult, but with due diligence everything will work out. You need to take the mechanism from an old watch as a basis. We use a saw cut as a display with numbers.
Numbers can be burned onto the surface, pasted, or decorated with decorative elements. It all depends on your imagination.
You need to cut a small circle in the center to insert a clock mechanism with hands. The circle must fit perfectly.
If it is too large, you will have to use additional decor, such as artificial moss, leaves or flowers.
In the photo in the interior, such watches look original and are ideal for styles such as country, Provence and derivatives of them.
They can be used in minimalism, but provided that they match the color scheme, as well as at least one decorative wooden element in the room.
On the back of the clock it is necessary to provide the possibility of mounting it on the wall. To do this, a recess is knocked out in a certain place.
Hot coasters
The process of creating square coasters for hot dishes from wooden saw cuts consists of the following steps:
- Take the trunk of any tree with a diameter of 1 to 3.5 cm. Saw it into round timber about 1.5 cm thick.
- On a sheet of plywood, starting from the edge, begin gluing the cuts with any wood glue. Use both large and small parts as you work.
- Fill the plywood to the width you need. After complete drying, cut it into strips of the desired size.
- Sand the workpieces thoroughly. They must be completely flat. After this, cut the strips into squares.
- Saturate the stands with wood oil.
- If desired, to protect the table, you can glue silicone legs to the bottom. Your coasters are ready.
The stands can also serve as a board for cutting food. To save space, they can be made two-tiered.
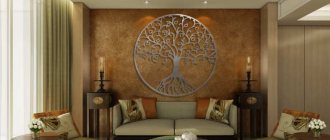
Panel
One of the most common crafts made from natural wood is a decorative panel. It has many varieties, can consist of any number of blanks, it all depends on the imagination of the person laying out the panel.
However, there are several characteristic features by which the panels can be divided:
- Made from dark wood
- Made from light wood
- Based
- Without reason
An easy option is a panel on a base onto which blanks are glued. As a rule, this is thin chipboard, on which blanks in the form of circles of wood are then placed.
To fill the space between cuts, branches, leaves, small stones, moss and natural materials are used.
It is more difficult to lay out panels without a base. In this case, you need to be careful, the panel should be smooth and firmly glued. It is recommended to use special wood glue when gluing joints between materials.
The result will be a kind of board of circles. Its advantage is that you can make a three-dimensional craft from it by adding details.
Very often a design is laid out from wood circles. Looks original. This is one of the simple and quick options to create a unique decorative element.
Room decor with wooden cuts
Wooden cuts are often used to create decorative elements.
Watch
Take apart traditional and unremarkable watches. From there you will need a clock mechanism and hands. In the center of the wooden cut, make a hole equal to the size of the clock mechanism. Draw numbers on the outside of the clock using a stencil. Attach the arrows and insert the battery. Agree, wooden watches look much more interesting than plastic ones.
Mirror frame
You can also trim a mirror frame using wooden saw cuts. Cut a circle out of plywood. Attach a mirror to it and trace its contours with a simple pencil. Use white acrylic paint to paint the part of the plywood that will be covered by the wood cuts. When the paint is dry, glue the round timber onto the plywood without going beyond the line. Try to ensure that the cuts that go along the outside cover the edge of the plywood. Treat the frame with varnish and attach the mirror to the plywood.
Wreath on the door
You can also make an interior wreath with your own hands from wooden cuts. Saw the tree into thin, up to 1 cm, round pieces (photo 1). Find a round base, such as a bowl of suitable diameter, and place the pieces around it (photo 2). Carefully, trying not to move the circles, remove the base. Take a new circle and apply hot glue to both edges. Glue this cut so that one of its edges is on one round piece of wood, and the other on the other. So repeat until the end. The top row will connect all the elements of the bottom row. All you have to do is decorate the wreath.
We hope that after our selection, your interior will also include several items made from wooden sawn cuts.
Hanger
Homemade hangers are ideal for decorating hallways of apartment and private houses and country houses. This is not even a craft, but real carpentry made from tree branches.
For production you will need:
- board. Its length and width are chosen arbitrarily, depending on the amount of clothing that will be placed on the hanger;
- thick tree branches with branch shoots, preferably located at an acute angle.
- self-tapping screws;
- saw;
- paints and varnishes.
The base board must be cut according to the specified dimensions, varnished or painted, having previously treated the surface with sandpaper.
Each thick branch is cut to a length of 30-40 cm, 1-2 shoots are left at the base, which will serve as hooks for clothes. The back surface of the knots can be trimmed to ensure a tight fit to the base.
The hook branches are attached with self-tapping screws; if the homemade hanger is not intended to be used for storing heavy items, you can get by with glue.
Wall decoration and methods for attaching wooden slats with your own hands
Fastening is carried out in two main ways:
- Glue. For this method you will have to carefully prepare the surface. Large irregularities will not allow for high-quality cladding. Special adhesives are used. The walls or ceiling are first primed for better adhesion.
- Frame or sheathing. This method of fastening is necessary when planning loads on the slats or in the presence of significant defects on the surface. The sheathing is made of wooden beams or boards. Fastening to the wall is carried out with dowels. The installation step is 40-60 cm.
Attaching the lamellas to the sheathing can be done using nails or screws. The caps should be recessed into the wood and not visually noticeable.
3 basic rules for working with rack structures
1. Include them in the interior if you plan to furnish an apartment or house in a modern style.
Designers extremely rarely use slatted structures for classic settings; at most they can add baffles to the TV area in the living room or the headboard in the bedroom in a restrained, “masculine” presentation of the classics.
2. The more structures and surfaces made of slats are used in the interior, the stricter and more geometric it will be.
Frequent, rhythmic repetition of identical modules of simple forms gives us a feeling of order, harmony, and completeness. The predominance of slats over plain, clean finishing surfaces will be appropriate in the setting of an office or a small entrance area. And where you want a more relaxed atmosphere, it is better to use slats in doses.
3. Vertically located lamellas can visually stretch out the space, horizontally - on the contrary, they can “eat up” a little of the height.
Be careful with finishing the ceiling with baffles in compact apartments and houses with low ceilings: the technique will visually make the room even lower.
Armchair
In the case of slatted structures, it is better to immediately consider a hybrid option in the form of a chaise lounge - a beach lounger. Other design options in the interior will look too rough.
Portable, lightweight design with a fabric back is easy to assemble and convenient to transport. It is recommended to make the load-bearing elements from maple wood, and the lintels on the seat from cherry, beech, and pine.
To make a chair, you need to prepare the legs: 2 parts 20x40x800 mm and 2 parts 20x40x560 mm each. The lower crossbars are also paired, 10x50x380 mm each. Top 1, size 20x40x380 mm. The crossbar for sitting is also needed in a single copy, 20x40x300 mm. You will also need 5 slats 20x40x400 mm and a piece of fabric for the back 600x500 mm.
The assembly order will be as follows:
- jumpers are attached to a long pair of legs at the top and bottom;
- fabric for the back is stretched over the resulting part;
- The seat is assembled: a jumper is attached to the short legs at the top, then 5 prepared slats;
- chair assembly: the second pair of legs is passed between the lower jumpers of the long part and secured with a movable connection.
- You can first paint or coat the chaise lounge frame with impregnation.
Features of working with wood
Wood is a unique material, which is distinguished by its special structure, naturalness, beautiful appearance, sufficient strength, and amazing flexibility in processing. It is drilled, sanded and fastened. Various wood species are successfully used as ornamental materials :
- Products of the woodworking industry - timber, lath, pressed panels, veneer.
- Parts of a tree - trunk, branches, roots, branches.
- Available materials - driftwood, stumps, logs, bark.
Crafts (especially homemade furniture) can be made from new, purchased wood. In this case, you should remember the need to pre-dry the material. Most often, free raw materials are used. High-quality wooden elements can be extracted from old, unnecessary furniture. A huge reserve is located in the forest. You just need to walk around it and pick up dry wood. There is no need to rush to dispose of the dried ones - trees and shrubs can give wonderful results.
You can make wooden crafts in different ways.
The following main types are distinguished:
- Joinery. They are made in a workshop, on a workbench, or by hand. The following hand-held (including electric) carpentry tools are used: hacksaw and saw, plane, jigsaw, chisel, knife, axe, hand router, grinder, drill, hammer.
- Machine products. Woodworking machines are used to create complex wooden elements. Parts with round profiles and other ideal shapes are obtained when processed on a lathe. Complex recesses can be made using a milling machine.
- Exclusive products. Most crafts fall into this category if they have a non-standard design and are made from non-standard wood material with your own hands. They are made by hand, piece by piece. Basic techniques - cutting, sawing, gouging, planing.
To give the craft an attractive appearance, finishing or finishing is carried out. Wood has a beautiful natural structure, which just needs to be emphasized and secured. Final processing includes the following techniques: sanding and polishing wood, varnishing, tinting impregnation.
It is used as painting, dyeing, veneering, film coating.