Making a chair with your own hands from wood is easy and fun, and such furniture will fit equally harmoniously into the interior of an apartment or a small country house. This item will undoubtedly become your favorite vacation spot. In addition, you can make it yourself, even if you have no woodworking skills.
To do this, you need a drawing, which you can make yourself or take a ready-made project. Otherwise, you will need to purchase materials for work and tools, and then begin this exciting process.
DIY wooden chair
Peculiarities
The simplest garden furniture is outdoor benches used in parks and squares. However, gardeners and vegetable gardeners often make chairs, benches, and benches designed for use in the garden, and not just on the veranda or gazebo.
Handmade, rustic furniture is much more durable than what you buy in furniture stores. In order to save money, furniture is often made from chipboard, somehow protected from moisture by an adhesive layer of film.
Sometimes wood dust is used together with plastic - scraps from other products, such as lumber. Both materials are diluted with epoxy resin or glue: for example, interior doors are cast. Establishing the production of such furniture for a summer house is not a problem: the slats and boards merged in this way have longitudinal voids inside and a box-shaped profile in cross-section.
However, natural wood, well dried and impregnated with a bioprotective composition (against microbes, fungi, mold), coated with a waterproof varnish that can last for years even in heat, frost and humidity, will last at least several decades.
An example is the same Soviet stores installed in city parks in the 70s of the last century, which in some places have survived to this day. There are no special secrets to their durability. These stores were painted with street paint every two years. Resistant to fading under conditions of annual changes in temperature, humidity and ultraviolet radiation.
Finally, making garden furniture is a test of the skills of a true owner. If you are a handyman, you can make a chair, for example, by having a dozen large pieces of wood after replacing the floors in the rooms.
What tools will you need?
You can easily find many photos of how to make a chair. This is the first thing you will need to have some idea about the product.
Next, let's figure out what tools you will need to make your own chair:
- plywood;
- self-tapping screws;
- marking tools;
- different vices;
- hacksaw;
- file;
- hammer;
- pliers;
- electric drill;
- chisel;
- set of adjustable wrenches.
What kind of chairs can you make with your own hands?
Before you start working, you need to clearly understand what types of wooden chairs can really be made at home:
- soft. Convenient option for home. For manufacturing, you will need to assemble a frame on which the soft upholstery will be attached;
- sliding An excellent option for saving space in the house. Their design is somewhat more complex than that of an ordinary wooden chair;
- folding. Just right for going out into nature. The complexity of manufacturing is compensated by its functionality;
- Kentucky. A simple construction of materials will require only bars. Wire or pins act as fasteners;
- on wheels - an option convenient for the elderly and disabled. The most critical stage in manufacturing will be the correct installation of the wheels, because such a chair should move effortlessly.
You can slightly modify an ordinary chair by attaching a high back to it. Both hard and soft models are made, it all depends on the imagination and skills of the master.
Sometimes you want to make a rocking chair with your own hands. The main difficulty here is preparing the arched base. But this problem can also be solved.
Choosing a model
There are many different options for wooden chairs. They all differ in type of design, design, and the presence of additional parts.
Table 1. Models of wooden products
| View, illustration | Description |
| On a frame with rigid parts | Such structures are characterized by good wear resistance; they rarely deform even as a result of constant use. Such products are installed in dining rooms, offices and other premises. Antique-made furniture pieces are especially popular. To do this, they use various paints in cans and special design techniques. |
| These are very comfortable chairs, they have an aesthetic appearance. Compared to the previous model, this product requires more careful care, otherwise it will quickly lose its original appearance. Such designs can be placed in any type of room: in the living room, children's room, even in the kitchen. The model involves a solid frame, and the seat, back, and armrests are upholstered with soft material. In addition, the products differ in the degree of filling. |
Table 2. Product types by design features
| View, illustration | Description |
| These are very compact structures that have a folding mechanism, due to which they can be moved without any problems. Such designs will be appreciated by travelers and lovers of country holidays. |
| Such products are ergonomic and suitable for small spaces. Similar designs come with a rigid frame or with soft upholstery. |
| This product has an unusual appearance and is easy to manufacture. The process uses hardwood and wire. This chair is ideal for a cottage or country house. |
| Pieces of furniture of this type have a truly royal appearance, because they resemble a high throne. They are made of wood and then can be upholstered with soft fabric. An armchair with high support will fit perfectly into any classic-style interior. |
| Rocking chair | The main feature of this product is the arched legs. Making it yourself is quite difficult, because not every beginner will be able to achieve the correct rounded shape of wooden blocks. This activity requires certain skills, but the result will be magnificent, and the rocking chair will become a favorite resting place for all family members. |
Main material
The reliability of the future chair, its stability, and ability to cope with loads and various climatic conditions will depend on the choice of wood and the method of final processing. You can use an old chair or armchair as a base, having previously disassembled it into its components, or, conversely, modify existing furniture.
- A material such as chipboard, which is used to make furniture, is not suitable for chairs, especially garden chairs. The reason for this is limited moisture resistance. In addition, chipboard is significantly inferior in strength to laminated and solid wood.
- Natural wood is an absolutely harmless, environmentally friendly material, although not the cheapest. Wood is best suited for making a chair with your own hands. Before starting work, the bars and boards must be inspected for cracks, knots and other defects. Next, the material is sanded, a protective coating is applied, and after that, assembly can begin.
Note! Among all types of wood, preference should be given to alder, ash, birch or oak.
The reason is simple - the unusual pattern of the fibers is combined with the durability and wear resistance of products made from them. It should be added that chairs made of such wood, when properly processed, do not crack over time and do not creak.
Wood is popular in furniture production not only because of its beauty and naturalness. It easily tolerates loads and shocks and is practically resistant to plastic deformation. The only disadvantages are flammability and deformation under the influence of moisture. The last problem is again solved by competent final processing.
Useful tips
Making furniture with your own hands is a very exciting activity. If the process is happening for the first time, make the simplest chair with clear lines and simple geometry. It will be easier to work, and the result will be neat.
Having experience in carpentry, you can surprise your family and friends with unusual shapes. The handcrafted round chair is effective and practical in any setting. Another easy way is to make a chair out of a car seat left in the garage.
By being creative and following the instructions, you can make a chair with your own hands that will be used for its intended purpose for many years. In addition, a product made with your own hands will become a source of pride for the owners and a source of pride for friends.
Simple chair for the garden
Having decided to make a chair for the dacha with your own hands from wood, having selected the drawings, you should not immediately take on complex projects. The first pancake is often lumpy, and to get the hang of it, you can try to implement the simplest options.
The simplest chair for a summer house consists of curved sides, bases, drawers and slats for the seat. Moreover, the only difficulty lies in cutting out the sidewalls. For production, plywood and wooden planks are used.
The sequence of actions is as follows:
- The sidewalls are cut out with a jigsaw from 30 mm thick euro plywood. Next, the parts are chamfered with an ordinary grinder or a manual milling cutter, after which the future spars are processed with emery cloth;
- the drawers (crossbars holding the sides together) are cut from the same plywood. The result should be 3 parts with dimensions 1200 x 100 mm. Sandpaper comes into play again;
- for a seat that smoothly flows into the back, you need to cut 35 identical strips 1200 mm long. The material will be timber with a section of 50 x 25 mm. The parts are chamfered and the surface is sanded with sandpaper;
- Next, you need to tie the sidewalls together with drawstrings. To do this, points are marked on one of them in three places, which are transferred to the second sidewall. Using an 8 mm drill, drill through holes at the designated points. Using a 5 mm drill, counter holes are drilled at the ends of all frames. Confirmats are used to connect elements;
- It's time to attach the bars that will form the seat. To do this, drill 2 holes on each side of all the blocks, and use self-tapping screws for fastening. To recess the fastener heads into the wood, the holes are pre-countersinked;
- All that remains is to treat the surface of the chair. To remove all cracks and dents, the wood is sanded. Next, the surfaces are treated with fine sandpaper, after which the wood is coated with a primer. The final stage is 3 thin layers of varnish.
Such a homemade chair for a summer house does not require much effort or complex measurements and calculations to make. However, the end result will be a truly chic piece of garden furniture. Experienced craftsmen can try making a more complex garden chair from bent plywood.
This is where both experience working with wood and a truly creative approach to the process will come in handy.
More to the dacha and more
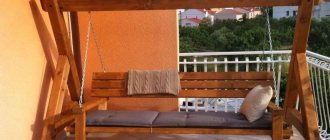
The rocking lounge chair is not everyone's cup of tea; Most vacationers prefer to sunbathe in regular sun loungers, if only because when folded they can be carried on the roof rack. In such a case - in Fig. drawings of a sun lounger for a summer house, picnic or beach. The difference from standard samples is that the backrest tilt adjustment system does not require shaped metal, which, however, requires making part 1, as well as round crossbars, from fairly hard wood.
Drawings of a chaise longue
On the trail. rice. – the design is interesting. This wooden chair in its original form will go to the country house, but it is easy to modify it into a quite prestigious one for the apartment:
- The mechanism for adjusting the backrest tilt is hidden, for which the sides of the backrest are made without slots. Next, articulated steel stops are attached to the sides of the back frame from the inside, and the lower ends of their arms are welded together with a steel rod to form a rigid frame. The ends of the rod should protrude outward by 15-20 mm. The support combs are transferred to the inner sides of the seat frame;
- Connections to places marked in red are made hidden. The easiest way is to use steel furniture corners and overlays in combination, so that the gap does not open up over time, with wedged dowels or blind tenons in the grooves on glue;
- The openings of the armrests are filled with decorative shields, made like a soft headboard of a bed or solid wooden ones, with carvings, inlays, etc. to your taste and depending on the overall design of the room;
- Place the chair on nylon pads.
Drawings of a chair for a summer house and home
Note: seat and back cushions about 10 cm thick are sewn as for the frameless chair described below.
Features of a shell-type chair
When making a shell, you will need skill in using a jigsaw, the ability to transfer the dimensions of parts from drawings to the material, and experience in deforming plywood in order to bend it in the correct shapes and directions.
Note! When cutting out parts, it is important to achieve smooth movements of the jigsaw, which is quite difficult for an untrained person.
When making a shell chair without experience working with bent plywood, you can use pieces of scrap wood to train your hand for practice. To fasten the parts of such a chair, wood glue is mainly used, and clamps are used for fixation. You can use self-tapping screws as fasteners, but in this case you will have to drown their heads in the wood fibers.
Once the bent plywood shell chair is fully assembled, all bumps and chips are sanded, after which the surface is cleaned of dirt and dust. To give the product an aesthetic appearance, it is coated with several layers of varnish.
Operating procedure
At the initial stage, it is necessary to prepare individual structural elements - parts. First of all, the preparation of metal components is carried out, since working with them takes longer. To make the workpiece, you need to cut off sections of the required length from the iron pipe, the value of which is indicated in the drawing. Since the chair is pendulum - adapted for swinging, the lower slats resting on the floor should have semicircular areas, which involves sawing off the primary workpiece with a margin of length, since it will decrease after giving it a semicircular shape.
You can bend the slats using a specialized pipe bender. If this is not available, you can bend it yourself. To do this, a piece of pipe must be clamped in a vice or between two stationary objects and begin to bend. To maintain uniformity, you need to perform the steps step by step: apply force to the bend, move the workpiece forward 10-15 cm, repeat the force. This must be continued until the corresponding semicircle is obtained. To achieve identity for both planks, you can fasten them together with tape. In this case, they should be located as parallel as possible relative to each other.
Next, the wooden planks for the seat and back of the chair are prepared. To do this, the main workpiece is cut into segments, the length of which is indicated in the drawings. The dimensional parameters of various elements - the main part, armrests and protective tabs on semicircular supports - must be identical for their group. After this, each component of the wooden frame is processed for the purpose of preliminary preparation. As part of these manipulations, grinding, jointing, drilling holes for fastenings, treatment with paints and varnishes and other actions are performed.
Frame
The frame is installed first. Using a welding machine, metal workpieces are connected. The work is performed sequentially, which allows you to achieve maximum symmetry and even shape. First, one side of the chair is welded. Solid posts are welded to the semicircular support. In profile projection, the resulting product will have the appearance of a trapezoid with rounded upper corners, and its base will have the appearance of a semicircle and edges protruding beyond the perimeter of the figure.
The production of the second half of the chair is made according to the template of the first. To do this, the first side is laid on a flat surface, and the blanks from which the second side will be welded are applied to the template in the appropriate places. At this stage, it is possible to correct the discrepancy between the dimensions of the parts and the deviation in the coincidence of their shapes. When both sides of the chair are ready, they must be connected using jumpers prepared in advance. The length of these jumpers must match the final width of the chair seat. When connecting two sidewalls, it is necessary to maintain perpendicularity and check for right angles between the workpieces. This will allow the assembly to be as smooth as possible.
Seat
The wooden strips used to form the seat and backrest are screwed to the frame. To do this, they must already have holes drilled in them at the appropriate attachment points. It is recommended to number the planks in the order in which they are located. After this, applying each workpiece to its location on the frame, marks are placed on it for drilling holes. You can complete the markings and then start drilling. Once completed, each plank is screwed to the frame using bolts. In this case, the fasteners are tightened until the bolt head drops below the surface of the wooden workpiece.
Painting
Coloring is done in stages. The metal frame must be painted before the strips are attached to it. This allows for more complete and high-quality painting. Wooden components are also painted in advance, but can be repainted after assembly. The color combination is selected in accordance with the stylistic characteristics of the room. In some cases, it will be advisable to varnish a homemade chair, which will prevent damage to the wood.
To learn how to make a metal rocking chair with your own hands, see the following video.
Application of pallets
To make some chairs, there is no need to look for drawings or practice wood processing. It is enough to take wooden products as a basis, which almost no one pays attention to. One of them is a pallet, or pallet, a rigid wooden container for transporting goods. A chair made from pallets will really look unusual and creative.
Another advantage of using this product is the high quality and strength of the wood from which it is made.
- The pallets are dismantled and all the nails are taken out. The elements of the future chair must be sanded, and then the tray must be assembled in the reverse order.
- The seat of the chair is formed by stacking pallets on top of each other to the desired height (usually 2 pieces are enough). The backrest also serves as a pallet, fixed perpendicular to the seat. By sawing the pallet crosswise into 2 parts, you can use it as armrests.
Before assembly, the parts are varnished in several layers. To ensure that the back and seat are not hard and look really chic, foam pillows in some unusual covers are placed on them.
Types of legs
The main support of the chairs are the legs, which are also the base of the furniture. Legs have always been given special importance, so each master made them in his own way. The most popular types of bases are:
- Direct. All 4 legs will be smooth, without bends, with the same height.
- Curved. They have a double bend and are decorated with carvings. The turned legs are thin; in the lower part you can see a slight thickening, reminiscent of an animal paw. This base gives the product elegance and unique charm.
- Inclined. Mounted to the body at a slight angle. The legs themselves are teardrop-shaped or even. Compared to straight ones, they will be more massive; in some cases, they are made of chrome-plated steel.
- Combined. The pair of hind legs are straight, the front legs are curved. An English fireplace chair with such a base looks unusual, but looks most impressive from the side.
- Globular. Only used on bergeres. The elements are short and even, ending in a small hemisphere.
- Stand. The basis is relevant for designer products (egg and some other models). The chair has only one leg, which ends in a semicircular base, located in the center.
- Cross. Suitable for gaming chairs only. As in the previous case, there will be only one leg. The design rests on a five-pointed cross with several movable wheels.
This is interesting: Poufs with a back - features, models and choice
Decor options
It should be said that even for such chairs, appearance is an extremely important aspect. At the same time, it is not necessary to buy any accessories for this at an exorbitant price. To do this, you can use some old unnecessary things. For example, the same pillows and bedspreads to make the chair not only beautiful, but also soft. For example, you can cover the seat and back with padding polyester, and simply stretch decorative fabric over this material.
It is better to fasten such upholstery using the simplest furniture stapler.
What if there is no carpentry?
Although shavings and sawdust are not dirt at all, wood processing is quite a garbage business. At the same time, modern materials and cutting methods make it possible to create printed garments that hold their shape under load without a frame. This is perhaps the main reason that frameless upholstered furniture is gaining increasing popularity among craftsmen and amateur craftswomen. The most common are embroidered chairs, because... the whole essence of a home chair is soft elasticity and, in general, it doesn’t need a functional frame.
Construction of a frameless bean bag chair
The structure of a sewn chair is shown in Fig. The purpose of the double cover, the choice of fabric and filling are described above; Here we only note that there is absolutely no need to put a zipper on the inner cover. Both covers are sewn inside out and the last seam of the inner one after filling in the filler is sewn up with the scar facing outwards. It’s easier, cheaper and more reliable, and the scar is still not visible. Before sewing the last seam or installing the fastener, the cover is turned inside out.
The last (detachable) seam of the outer cover should be 0.8-1 m long, because through it you will have to put the outer cover on the inner one that has taken shape. If the filling is solid (foam rubber, neoprene block), 2 half-length zippers are placed on the detachable seam, fastened towards each other, otherwise the inner bag will get stuck in the asymmetrical cut.
Homemade grommet
If the zipper is replaced with lacing, the allowances along the edges of the split seam are folded and ironed before turning the cover inside out, a thick, strong braid is inserted into the lapel, and the wings of the lapel are quilted. Then, using a hole punch, holes for the cord are punched in increments of 4-6 cm and framed with eyelets. In extreme cases, the holes are cut with petals, a ring of wire or durable plastic is applied, the petals are folded through it and glued with PVA; then the grommet is tightly covered with a harsh thread (see figure on the left) and glued again. Several types of chairs fit into this general design and sewing scheme.
Note: processing allowances are everywhere within 15-30 mm.
Pillows
Who, as a child, did not lie on a pillow placed upside down? The simplest sewn chair is a large pillow. But it’s only good for fun, but it’s not good for relaxation: either there’s no back, or there’s something sticking out between the legs. It also easily wrinkles and falls to the side. Therefore, the cushion chair is made only to look like a pillow under the head, but in fact it is quite ergonomic and stable.
Patterns of armchairs-pillows
The easiest way is to pattern a cushion chair according to pos. and on the left in Fig. There are only 2 parts with a bend, and even then a simple radius one. Filler – foam rubber. But this “pillow” looks angular and doesn’t really look like the real thing. To get a more elegant chair that looks more like a real rumpled pillow, pos. b, you need to reduce the bottom, narrow the back, and trim the remaining parts obliquely by 5 cm, as shown in Fig. In this case, the filler is foam or neoprene.
Ottoman
Structurally and in terms of material consumption, a chair-cushion is similar to a chair-pouf, like a footprint. rice. It is more difficult to tailor, but pouffe chairs have an important advantage: they are suitable as a play and recreational children’s chair “from zero to school.” But not a working chair, a high chair, or other functional children's furniture! Having got used to falling apart on something soft, the child runs a great risk of ruining his posture!
Bean bags for children
Pouf chairs are most often sewn according to a pattern of 3 parts: shell (ring sidewall), seat, bottom. But in operation it turns out that the only vertical seam (or zipper) soon separates or breaks. Therefore, it is best to sew a pouffe chair from 5 parts with an insert at the front, as shown in Fig. The liner works similar to the stitching on the toes of work or military boots. It doesn’t look good on weekend shoes, but the chair liner can be made decorative, and there won’t be any extra seams on the shell.
Sack and pear
It’s not far from a pouffe chair to a bean bag chair with a higher back. The simplest bean bag chair can be sewn from 3 parts, as on the left in Fig. The front vertical seam, due to the support of the rider on the back, is less loaded and quite reliable.
Patterns of a bean bag chair and a pear chair
A simple bean bag chair has its drawbacks: the filling, especially foam, tends to spread out, and the back does not provide full support. You won't fall apart in such a chair with all your heart; your back will be damaged. The pear-shaped chair on the right in Fig. is free from these ailments. Option of cutting the bottom (bottom) No. 2 allows you to save approximately 0.5 m of fabric with a width of 1.44 m, because When marking the cut, parts according to option No. 2 can be squeezed between the wedges. In any case, the zipper is located along the diameter of the bottom.
Ball
An excellent option for a sporty child or adult is a ball chair, see fig. Cutting fabric for it is not so difficult if you use not the dimensions from the network, which are most often incorrect and not tied to anything, but the radius of the generatrix and the central angle of the polygon. In Fig. they are given for a ball chair with a diameter of 80 cm; for a diameter of 60 cm it will be 165 and 128 mm, respectively, at the same angles.
Ball Chair Element Templates
Sewing a ball chair has some features:
- Because The detachable seam is short, the cover will have to be sewn single from antistatic fabric.
- To prevent errors from accumulating during sewing, which will negate all the work, the polygon templates are carefully checked, applying sides to each other. All sides of both templates must be the same length to within 0.5 mm; for an 80 cm ball – 100 mm. Unusual for cutting work, right? But when sewing, the error accumulates. For 20 6-gons + 12 5-gons, the discrepancy can reach 0.5x32 = 16 mm and then the corners cannot be reduced by any tightening.
- The filler is poured into the cover through a rolled-up cardboard pipe with a diameter of 60 mm. You can use a piece of plastic.
- If the ball is laced, the split seam is made with a valve, like in old leather soccer balls, so that the filling does not spill out.
Note: the filling volume for the described chair-cushions and 80 cm ball is about 250 l, and for the bag and pear about 350 l. The internal volume is filled completely, then washed.
Like real
Here in Fig. – frameless chair with foam filling, simulating a cabinet chair. Armrests, if needed, are sewn like a backrest. The entire product can serve as a module from which a sofa, chair-bed, etc. can be assembled. The base is foam rubber slabs of grade (density) 40-45, 10 cm thick, glued together with PVA in pairs to a thickness of 20 cm, pos. 1. Seat and foot zippers are located at the back, and backrest/armrest zippers are located at the bottom. They must be paired, pos. 2, because it is very difficult to push the foam rubber in any case into a deep cavity through an asymmetrical split seam.
Frameless chair for an apartment
Note: in the same way, but from foam rubber of a smaller thickness, the seat and back cushions of some of the chairs described above and below are made.
The tongues for sewing together chair elements about 10 cm wide (pos. 3) do not provide a complete guarantee against sideways displacement with distortion, so pairs of buttons, pos. 4. The backrest/armrests are sewn filled before filling the seat, and the seat and backing are sewn together after.
To prevent the lower (folded) decorative trim from getting dirty and rubbing against the floor, it is advisable to place the chair on a plywood or plank pallet with low (approx. 5 cm) legs. It unfolds through the bottom, pos. 5. In this case, you get a good temporary, say, at the dacha, crib for a child. And if you save a little on foam rubber and lengthen the legs due to the chosen height, you will get a good chaise lounge for the veranda, pos. 6. So that, again, the lower (when unfolded) edge of the footrest does not wear out, it is sheathed, including a corner, with technical fabric. When folded, the upholstery will be at the back between the pillows and will be almost invisible.
Recommendations
- Here are some useful tips that will make it even easier to make a chair from wood with your own hands. To begin with, let's say that before creating any structure made of wood, you should carefully think about how it will roughly look and what you want to see it as. This will allow you to at least approximately determine how much of a particular material you need.
- Another important aspect is that you should not neglect such a thing as drawings. For some reason, many people do not pay enough attention to them, which is why they end up with crooked chairs and armchairs. In this matter, everything should be thought through to the smallest detail and the parameters of each detail should be checked. It would not be superfluous to say that it would be better to use a circular saw for cutting longitudinal parts, and a jigsaw for transverse parts.
- Another important issue concerns the connection of the chair elements. Everything is quite simple here. In connections where the main load occurs, it is better to use self-tapping screws or self-tapping screws. But in other cases, you can use adhesive or chopsticks made of wood. Choppers can also be used to secure the upper parts.
- An important point will be the selection of materials for processing. But here everything will depend on how high-quality the wood is used. If it is “clean” and has no defects, then it will be enough to treat it with stain and apply varnish. But if there are stains on it and there are some defects, then you should putty them, then cover them with a primer and only then paint. Another important point is that you should not paint the wood right away. It must be pre-treated with drying oil. Otherwise, it will quickly be absorbed into the surface. Then there will be bald spots, which will ruin the appearance of the chair.
Preparation of materials and tools
In order to make a chair with your own hands, you need to do everything in stages. In accordance with the selected drawing, it is necessary to prepare materials. If the base is wooden, then you should purchase or select from available raw materials: plywood, timber, boards, chipboard.
Use quality materials for furniture.
Wood for the frame is the best option, environmentally friendly and inexpensive. You need to choose wood carefully. The presence of bark, splits, cracks, and uneven texture on the boards is not welcome.
The work will require certain tools.
Additionally, you may need fastening elements, wood glue, varnish or paint for application to the surface of the product, foam rubber, filler, textile fabric: velor, jacquard, tapestry, flock, leather (natural, artificial).
For the job you will need some construction tools.
Tools to prepare in advance:
- Screwdriver;
- Furniture stapler;
- Jigsaw, grinder, necessary attachments;
- Machine for sanding boards;
- Staples or screws;
- Chalk;
- Hammer;
- Scissors, upholstery sewing machine.
You can make a chair from wooden slats.
You can prepare the components of a wooden chair yourself or order it from a special enterprise, which can produce blanks according to the samples presented.
DIY rocking chair
During the manufacturing process the following will be required:
- plywood sheets;
- cardboard;
- putty;
- dye;
- pencil;
- ruler;
- tape measure;
- sandpaper
- jigsaw;
- fasteners;
- drill.
Step-by-step instruction
Step one: prepare the details. The entire structure of the chair consists of two side parts, three horizontal connecting strips and 35 crossbars (needed to create the seat).
In this design, the most labor-intensive stage is the creation of the sidewalls, so it is recommended to mark them on cardboard, then cut them out, and only then transfer them to the wood.
Step two: to make the side parts you need to take multi-layer plywood 3 centimeters thick. Then you should transfer the part from the cardboard to a plywood sheet and carefully cut it out with an electric jigsaw.
Step three: after which the side parts must be thoroughly sanded with sandpaper and their edges trimmed using a grinder or milling equipment.
Step four: from plywood of the same thickness you will need to make horizontal connecting strips 120 centimeters long and 10 centimeters wide. After which they need to be sanded with sandpaper, but you should not process the edges with a router.
Step five: you need to take a block of wood 5×2.5 centimeters and cut it into 35 pieces, 120 centimeters each. After which they should be sanded and the edges removed.
Step six: in the middle part of the outer arc of the sidewalls, at the back and near the legs, we mark the places where the horizontal strips are fixed. After which these marks should be duplicated on the other side. Then you can make holes for the fasteners.
Step seven: we make through holes on the end parts of the sidewalls, and then we connect the frame with horizontal strips using screws.
Step eight: next you need to take the bars that we prepared earlier and attach them one by one to the seat with self-tapping screws.
Step Nine: The last step will be thorough surface treatment. To do this, you must first fill all the holes and go over the wood with sandpaper. Then the surface is coated with a primer and several layers of varnish.
Pattern with detailed dimensions for children and adults
To make a pear chair you will need to make a pattern.
You can draw it yourself or find a ready-made version on the Internet. The pattern is drawn on graph paper. And then it is transferred to the fabric. The parts are cut along the contour.
Attention: when transferring the pattern to the fabric, do not forget to leave allowances of a few centimeters on each side.
The pattern of a chair for an adult will consist of the following parts:
- 6 pieces of wedge-shaped parts, 15 cm wide and 40 at the ends, with a diameter of 50 cm and a length of 130 cm;
- diamond-shaped top 15 cm on each side;
- The bottom is diamond-shaped, 40 cm on each side.
The pattern of a chair for a child will consist of the following 6 wedge-shaped parts:
- height – 90 cm;
- diameter – 45 cm;
- width – 40-22 cm.
The bean bag chair consists of:
- Internal zippered cover filled with polystyrene foam. Here you should choose thick cotton or raincoat fabric.
- Outer cover. Suitable for manufacturing: corduroy, leather, velor. You will need to sew a 1 meter long zipper onto the removable cover.
Solid wood chair
Making any furniture from solid wood at home will require a lot of time and effort from the craftsman, as well as the availability of special tools and equipment. In fact, the array can be used by beginners in their work, but the same chairs without the use of finishing techniques will look, to put it mildly, boring.
But if you decorate the products with various cuts and use wood carving skills, you can achieve a good look.
To fasten parts made from solid wood, one of two main methods is used.
- Bonding - gluing elements together with edges pre-processed on a jointer. This option is the simplest. To connect two parts, you need to form a ridge on one of them, and a groove on the other. As an option, two grooves are made into which the strip is inserted.
- The second method is docking. Wood glue and wooden dowels are used.
Create a drawing
Development of a drawing and modeling of furniture, as practice shows, is a process no less interesting and exciting than direct work with plywood
Here it is worth emphasizing two points - the first is the accuracy of the elaboration of all the details of the structural elements. The drawing is drawn down to the millimeter so that each leg, back or seat has all the calculated points
The second point is the rational arrangement of the pattern of parts on the sheet
This is important both for saving material and for cutting technology - the fewer cuts with a jigsaw, the better
The saying goes that you need to measure at least seven times. That is why, in order for a chair made of plywood, assembled with your own hands according to your own drawings, to be truly a chair and not require modification and modernization, it is recommended to use a method such as modeling. For the model, you can choose cardboard, paper or fiberboard. The model itself can be made in a reduced form, even on a scale of 1:5 or 1:7, it will show all the bottlenecks and miscalculations, saving a decent amount on real plywood.
The process of creating a drawing can be represented in the form of several stages - the first stage is a simple drawing, which embodies the concept of the future chair or stool.
Stage two involves drawing individual nodes or elements. Be sure to draw out all points and fastening points, places where individual elements will come into contact.
Stage three - drawing to scale with real dimensions. It is optimal at this stage to create a reduced model in order to make sure that the design direction is chosen correctly and the model does not require radical reworking.
Stage four - transferring life-size dimensions onto graph paper, searching for the optimal location on the sheet.
The last stage is preparation for transferring the drawing onto patterns for mass replication or directly onto plywood for a single copy.
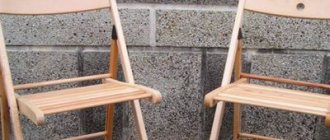
Folding design
Together with classic folding chairs, you can independently make a Kentucky-type folding chair that is simpler in design, but with an unusual appearance. It will require bars of the same cross-section, which must be cut in accordance with the selected drawing. 4 long pins are used as fasteners, connecting all the bars together in different places. The rigidity of the structure is adjusted by tightening the nuts on these studs.
In fact, the different Kentucky models are as similar as possible to each other, and most importantly, when assembled they take up minimal space.
Making furniture on your own is a real creative process. With the right amount of imagination, you can turn even old, unwanted chairs into works of art.
This exciting process also saves a lot of money. There is nothing better than combining business with pleasure.
Chairs on radius runners
They are especially popular with avid readers of newspapers and books. The frame can be different: with kinks (when the chair can change shape) and solid. Possible types of products:
- Classic rocking chair. The most common and simple model. It suits both modern and classic. Easy enough to create.
- Chairs with sides (the ends of the rails are bent in the other direction, preventing them from falling backwards). A variety with medium planting height.
- Furniture with elliptical arches. Smooth turning is guaranteed, but may accidentally tip over. Better equipped with bumpers
Materials for making a wooden chair
To make a wooden chair with your own hands, you need to select high-quality raw materials.
Main requirements for wood composition:
- the humidity level should be no more than 9-12%;
- cracks, deformations, branches, fungus on the surface are unacceptable;
- strength, dense structure, ease of processing are important;
- The amount of resin should be small.
It is recommended to buy raw materials with a small reserve, because During the furniture manufacturing process, chips and waste are possible when defects are detected.
- To create a solid wood structure, the grade is important. When creating chairs for the street (gazebo, recreation area), varieties with a dense structure are recommended. An array of elm, pine, oak, walnut, ash, larch, and rowan is suitable.
- For furniture intended for heavy loads, linden and alder wood is needed. Furniture made of yew looks impressive due to its red hue and texture with an original pattern. The dense structure of the array is difficult to process, but is more durable and resistant to mechanical damage.
- Country furniture is made from willow, alder, and rattan. To use the chair in warm climates, grape vines are used, complemented by rattan. Beginning craftsmen are recommended to use bird cherry, because... The material is plastic, easy to bend, durable.
- When preparing furniture for rooms with high humidity or installation near a pond, it is recommended to choose wood with a fine-pored structure. Oak, larch, and solid pine are optimal.
- Spruce chairs are lightweight, easy to process, but have low resistance to mechanical damage and are not resistant to chips and deformations.
Styles
Any piece of furniture should not only be practical, comfortable and safe, but also harmonize with the surrounding interior. You can make a chair with your own hands in any style. But the most popular directions are:
- Loft. This style refers to industrial and industrial. It is characterized by the use of natural and safe materials.
Therefore, the chair must be made of wood, metal or textile. For upholstery, it is recommended to use coarse fabric, such as linen or burlap in gray, white or bright colors.In this direction, chairs made from pallets will look harmonious, as they are distinguished by speed of production, minimal costs and exclusive appearance. Furniture made from profiled pipes also looks good in the interior.
- Provence.
This direction came to us from sunny France. Provence is associated with wheat, poppies, and lavender fields. Natural and safe materials and simple designs are appropriate here. The frame of the chairs is made of natural solid wood. Suitable upholstery options include linen, cotton, and chintz. Their color scheme should be colorful and bright, for example green, turquoise, red, purple, or soft and neutral - the color of fresh milk, golden fields, sandy beaches. A good choice for Provence would be wicker chairs made of rattan or wicker. Forged furniture items will also look beautiful here.
Attention: in the Provence style the use of modern furniture is not allowed. It should have an aged appearance, which can be achieved with patina.
Recommendations for choosing wood
The choice of lumber is a matter of taste, provided that the product has a protective coating. Otherwise, the wood for garden furniture must be resistant to the external environment. In this case, both broad-leaved (chestnut, acacia, oak) and coniferous (false beetle, pine) are optimal.
To make a chair, you can use wooden pallets and pallet elements.
It is better to choose wood based on the available tools. Working with hard rocks without a finger knife, band saw and grinder will be much more difficult - cutting and processing of parts will be delayed and will not be of high quality. Don't forget that garden furniture has to be moved frequently, so the weight of the material is also an important factor when choosing wood.
What is necessary
Before starting the work process, you need to prepare:
- 3 m calico or satin;
- a piece of fabric for covering (approximately 3.5 m);
- zipper 1 m;
- filler;
- material for application;
- scissors, pins, thread and needles.
Check it out here too!
How to make a bench from pallets: do-it-yourself bench from palletsInstructions on how to make a table with your own hands: step-by-step photo instructions, drawings, assembly diagrams for tables of different types for the garden and at home
How to make a hanging chair with your own hands - 100 photo ideas for chair design, instructions for their implementation. Creating the perfect vacation spot
Decorating wooden furniture
An equally important stage in furniture manufacturing is decor. At the same time, it is not necessary to purchase expensive accessories for such purposes, because you can even use old, unnecessary things, pillows.
You can cover the back and seat with padding polyester, and stretch decorative fabric on top. Fasten the upholstery to a wooden structure using a furniture stapler. In addition, the back is sometimes decorated with buttons, which are covered with the same fabric. You can hide the marks from the staples with decorative edging or various laces.
At this stage you will have to show your imagination. You can decorate the surface using paint of different colors - this will allow you to get a unique product that suits your interior specifically.
Upholstery and armrests
The next step will be upholstering the seat. Take the soft lining and use construction adhesive to glue it down. Then hide the entire lining with textile covering. This can also be done using construction glue or a regular stapler.
To learn more about this work, use thematic sites and carefully study the pattern and upholstery of the chairs with your own hands.
Don’t forget about an important element, namely the armrests; making them won’t be difficult. Prepare 4 bars and connect them to the bottom of the chair using a drill.
Frequently asked questions from beginning furniture makers
Before you start making this or that design, you should familiarize yourself with the list of questions that beginners in this business often have.
How to cut parts?
When cutting longitudinal parts, it is better to use a circular saw, and for transverse parts, an electric jigsaw.
How to connect parts of the structure?
For connections that carry the main load, you will need to use euroscrews or self-tapping screws. In other cases, the parts are assembled using wooden choppers and glue.
Paint or varnish?
The choice of materials for processing depends on the quality of the wood itself. If the material does not have any defects, it can be treated with stain and then a layer of varnish can be applied. If stains appear on the surface, the wood must first be puttied, coated with a primer, and only then painted.
How to reduce the consumption of paints and varnishes?
Quite often, during final finishing, the paint is quickly absorbed into the surface, which is why bald spots remain on it. This happens because natural wood has a porous structure. That is why professionals recommend pre-treating it with drying oil.
Where do we start?
From rocking chairs. A homemade rocking chair will provide the most significant savings in money compared to purchased ones - once. Its production is technologically simple; As for stationary equipment, it is enough to have a workbench (possibly also homemade) in some nook or two. And it will always come in handy at the dacha, even if the design with finishing from an inexperienced craftsman was screwed up - three. But you need to make a rocking chair with your own hands only and only according to proven samples, and you can design it yourself only if you have considerable experience as a furniture maker and/or solid knowledge in this matter.
The design of rocking chairs is similar to the design of sailing ships. There, the center of sail (CS), the location of which depends on the configuration of the surface part (most of all, the sailing rig), the direction and strength of the wind, should always be slightly behind the center of rotation (CV) of the vessel. The location of the central point is determined by the interaction of the underwater part of the vessel with the incoming water flow.
If the CP is ahead of the CV, the ship will be prone to yaw while moving and will have trouble staying on course, and with the tiller/wheel abandoned, it will fall to the wind and end up with the lag (side) to the wave, which is fraught with disaster. If the CP is far behind the CV, the ship without a rudder will be driven towards the wind and will take the wave on the bow, which is safer, but it will respond to rudder turns sluggishly and slowly, which also threatens to crash. Therefore, sailboats are designed so that during any evolutions of the vessel (maneuvers + changes in sail in any possible sailing conditions), the CPU behaves like a sly fox with a dog: it “teases” the CV, staying close to it from behind, but then immediately runs away a little, As soon as the CV comes close. In this case, the ship will be quite agile, but the uncontrollable one will still be driven into the wind.
In a rocking chair, the role of the CP is played by the common center of gravity (CG) of the chair and the person sitting in it, and the role of the CV is the line of contact (LC), passing through the points of contact of the support shoes (arcs) of the floor or ground. If the CG is far ahead of the LC, it will be difficult to swing, and when leaving the chair you can get, excuse me, a kick from him. If the CG is behind the LC, then an “overkill turn” is possible, which is not at all funny: doctors are well aware of cases where people broke their necks by tumbling over their heads from homemade rockers. That is, for a rocking chair to be safe, convenient and comfortable, its CG with a rider of any corpulence should always be slightly ahead of the LC.
Note: for reference, the CG of a normal-built human body is located at the border of the lower back and sacrum on the inside of the spinal column. During movements and in different poses, its position changes little - over millions of years of evolution, a kinematic system has been developed that allows us not to fall on our side with our arm outstretched.
Rocking chair designs
Due to the above, the first rocking chairs appeared relatively late, no earlier than the middle of the 18th century. By that time, science had given technology methods for calculating complex mechanical systems in dynamics and the first steam engines were chugging along. As for the rocking chairs, their classic design is arches elongated posteriorly with a radius of curvature smoothly decreasing from front to back, pos. 1 in Fig. In such a system, the further the seated person pumps back, the further the LC will move back from the CG and it will be more and more difficult to pump out until the stopper is reached - the rear ends of the arches turn into straight lines. This is the so-called. reverse-progressive support. It is often called simply progressive, because. a truly progressive one will throw the rider backwards from the slightest push and therefore is not used. For ergonomic reasons, progressive arches are not always comfortable (if someone steps on the heel of the arch, the rider will jerk), so at the same time they came up with the idea of moving the rocking chair forward, which shifts the overall CG there, pos. 2, but such chairs are only suitable for people whose body type they are designed for.
Rocking chairs on various types of support arches
The best way to create a rocking chair that is comfortable for anyone is to put arches on springs, pos. 3. At first, springs were made of wood, teak or dogwood (there is no replacement). Now rocker springs are made of carbon fiber (carbon, Kevlar) or special steel. Rockers on springs, in addition, swing for a long time and smoothly from a small push, lulling the rider in the most gentle way.
The simplest in design and the most safe are rocking stairs, pos. 4. In them, the stringers also serve as arcs, and the large length of their forming parts guarantees against tipping over. But single rocking stairs are chairs for individual use. If someone else sits in this one, with a CG that is even slightly shifted from the calculated one, it will either be difficult for him to swing, or he will find himself lying with his knees towards the sky. Therefore, according to the staircase design, as a rule, a pair of garden chairs or rocking benches are made. In this case, the general CG of the riders is less likely to leave the calculation area, and the large supporting area of the arcs ensures rocking when the rocking chair is installed directly on the ground. The structure and dimensions of a paired garden rocking chair are shown in Fig. Seat upholstery – slats 30x50; valleys - board 100x30.
Pair of garden rocking chairs
Drawings of a classic rocking chair
Product samples
On the trail. rice. – drawings of a classic rocking chair, relatively simple and not particularly material-intensive, but suitable for both the country house and the living room. In the latter case, the seat and back cushions are made 5-7 cm thick using the technology described below.
The next option is a garden rocking chair made of boards, see fig. Widened arches are designed for installation on the ground. When creating the design, we took into account the fact that on a lawn or gravel you won’t be able to sway for a long time from one push anyway. This made it possible to move the CG more forward from the LC by moving the seat, and use simple radius arcs. In addition, the resulting margin of stability made it possible to make the backrest adjustable in angle.
Drawings of a garden rocking chair with an adjustable backrest
Rocking chair in fig. above, it is structurally already close to a rocking chair-chaise lounge, in which the fixation of the rider’s CG relative to the PC is ensured by his very pose; simply - a rather deep failure of the dearest parts and, accordingly, a low-lying general CG. Drawings of a pair of rocking chairs are shown on the following. rice. On the left - it looks more elegant, but it is material-intensive: for each of the shaped sidewalls you will need a whole sheet of plywood 20 mm thick. On the right - simpler and more economical. Arcs 60 mm wide, 4-layer: 2 middle ones are cut out together with the corresponding parts of the side panels from 15 mm plywood, and overlays, cut separately, are added to them. All this together makes the structure very strong, and the additional downward displacement of its own CG due to the heavy arches makes it quite resistant to overturning.
Drawings of rocking chairs
Additional information about the options, history and designs of rocking chairs is well described here.