Every day, on the way to work, we dream of long-awaited holidays, weekends, to go to our favorite summer cottage, enjoy spending time with family and friends, and merge with nature.
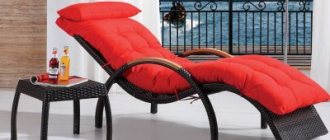
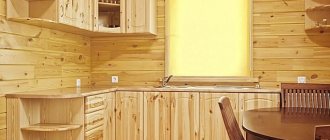
A wooden chair in a country house is an excellent element of the interior, allowing you to relax comfortably and drink tea on the terrace.
Today, a cozy, well-equipped dacha should not be an unattainable luxury that requires exorbitant expenses. Schemes, drawings, technologies, Internet resources offer hundreds of ideas for creating garden furniture.
We invite you to create a chair with your own hands for your home or cottage.
Throughout our lives we are surrounded by furniture. Furniture production technology is evolving and improving. Garden furniture, designer, original - it is everywhere, we are surrounded by furniture! It’s natural to want to purchase a high-quality, practical, stylish item for your garden at an affordable price.
Any owner can assemble a chair with his own hands for a summer cottage or private home.
Innovative furniture showrooms and designer garden furniture stores provide a range of services, selling stylish wooden chairs, for children and adults, with or without armrests, but not every average family can afford this kind of pleasure.
Your favorite area will be significantly transformed if it is decorated with a luxurious, reliable, hand-made chair.
It is not necessary to resort to enormous expenses to purchase a fashionable piece of country furniture. A handmade product will provide comfort and will harmoniously “fit” into the design of your favorite garden. A flight of fancy, a list of necessary tools - everything you need to make your dream come true in everyday life!
Wooden furniture has been and remains a classic that accompanies us everywhere.
Conditions for use of country furniture
In order for hand-made furniture to serve you for a long time, the design must meet certain parameters.
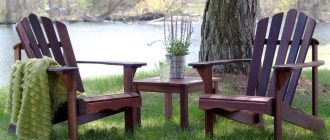
This chair is ideal for relaxing in the country and looks great in the garden.
| Transportability | As a rule, wooden chairs are used for relaxing in the fresh air, in the open air. In case of a sudden change in weather conditions, it is convenient to move the chair under a canopy if it is transportable. |
| Selection of quality raw materials | One of the important conditions in making a chair yourself is hardwood. Despite the high pricing policy, the design result, thanks to high-quality material, will be excellent. These species include: aspen, oak, pine, cedar. |
| Maximum weather protection | Exposing the chair to direct sunlight or heavy rain for a long time leads to a deterioration in its external condition. Preparation for protecting the finished chair begins at the earliest stages of design. High-quality, dry lumber is the key to success. If you initially purchased low-quality raw materials, dry the boards while working. Sand, saturate the workpieces with an antiseptic, and apply hot drying oil. At the final stage, after the finished product has completely dried, it must be opened with varnish. The material to get started is ready. |
Making a garden chair is not difficult; there are no complex connections or parts.
Painting
For painting, I took for testing decorative impregnation for wood FH-015 from FORUMHOUSE in chestnut color, suitable for both interior and exterior work. For painting you can use a brush, roller or spray gun.
The first point that I immediately liked: on all such cans it is always written “stir thoroughly before use”; this was not the case with this one. The impregnation, carried out in mid-2022, turned out to be completely homogeneous and immediately ready for use.
Second: the smell that we are used to feeling during painting work is completely absent; you can safely paint even in unventilated areas.
Third: the paint is very plastic and not flowing. I painted all the parts in two layers, and only the tip of the brush was dirty.
Fourth plus: drying speed. Yes, the can says 12-24 hours, but I don’t know under what conditions this is. Because I applied the second layer 1 hour after the first on completely dry parts, and the chair was assembled after 4 hours after the painting had started.
Fifth: efficiency.
It took me 100 grams for the first layer, no more than 50 for the second!!! This is what the jar and all the details looked like after two layers:
The coverage of the paint is excellent; you actually brush it once, and all the paint from the brush is applied in an even layer to the surface.
Now all that remains is to check its durability.
A set of standard questions for a self-taught furniture maker
How to make a chair out of wood with your own hands? Is it possible to build a garden chair with armrests yourself? How to make a child seat and where to find correctly drawn up drawings and diagrams? A number of similar questions will certainly flash through the mind of a novice home master. There are various models of wooden chairs for summer cottages: folding and standard metal structures, wooden rocking chairs, comfortable chairs for two, children's and adults with durable armrests and comfortable seating.
Such furniture can be used without worrying about scratches and annual painting.
Not always, each of the above structures contributes to proper rest. Let's look at the process of making a simple model - a wooden garden chair.
Types of chairs
If we talk about the types of chairs, they are usually:
- With solid construction;
- Soft;
- Semi-soft quality;
- In the form of rocking chairs.
In the first case, all elements are first manufactured separately. Then they are processed by making holes and applying paint or varnish. What is noteworthy is that chairs with a solid structure do not require upholstery material.
The soft type is completely upholstered in material and looks good in a home interior.
The version of the semi-soft chair must be made with a pair of armrests. They should have upholstery fabric, as well as internal padding where the back, seat and possibly armrests are located. Such models are convenient to use for the garden.
A universal option is a swinging chair, which can be placed both in the room and in the garden or on the terrace.
Preparing for work
The main component in the preparatory stage is the presence of a list of tools and materials that should be in the master’s arsenal.
Necessary materials:
- “Dowel” (24x60 mm) made of cedar – 30 pcs.;
- Brass screws - 4.5x50 mm and 4.5x32 mm, 20 pcs.;
- Sandpaper;
- Thermostatic glue;
- Furniture varnish for coatings;
- Drying oil;
- Masking tape;
- Cardboard for stencil.
After preparing the materials for the wooden chair, you can begin directly assembling the product.
Required tools:
- Saw (circular);
- Plane;
- Manual frezer;
- Wood hacksaw;
- Screwdriver;
- Drill;
- Clamps;
- Ruler, tape measure, pencil.
Tools for work.
A preliminary calculation of measurements for the components of a cedar wooden chair is as follows. Dimensions are indicated in millimeters.
- Legs 4 pcs. (rear 2 pcs., front 2 pcs.)
- Two front legs – 20x254x787;
- Two rear legs – 20x76x533.
- The back of the chair is 20x279x914.
- Chair armrest:
- Support - 2 pcs., (20x127x406);
- Rear support – 1 pc., (20x76x610).
- Jumper – 1 pc., (20x51x589).
- Insert strips – 2 pcs., (12x20x254).
The parts that make up a garden chair.
Application of pallets
To make some chairs, there is no need to look for drawings or practice wood processing. It is enough to take wooden products as a basis, which almost no one pays attention to. One of them is a pallet, or pallet, a rigid wooden container for transporting goods. A chair made from pallets will really look unusual and creative.
Another advantage of using this product is the high quality and strength of the wood from which it is made.
- The pallets are dismantled and all the nails are taken out. The elements of the future chair must be sanded, and then the tray must be assembled in the reverse order.
- The seat of the chair is formed by stacking pallets on top of each other to the desired height (usually 2 pieces are enough). The backrest also serves as a pallet, fixed perpendicular to the seat. By sawing the pallet crosswise into 2 parts, you can use it as armrests.
Before assembly, the parts are varnished in several layers. To ensure that the back and seat are not hard and look really chic, foam pillows in some unusual covers are placed on them.
The process of making a chair with your own hands: step-by-step instructions
Creating Basic Parts
As a rule, work begins with a preliminary stage - preparing the main elements. Having a drawing with detailed tips will facilitate the further process of making a wooden chair with your own hands.
Scheme for creating a garden chair with your own hands.
The most complex and time-consuming process is the manufacture of the side supports of the seat. You need to make a full-size template of the side support on cardboard.
Drawing of the side support of a garden chair.
1) Draw the first side of the part, lifting the segment on the left, then the next two at the appropriate angle.
2) Mark a perpendicular segment, heading towards point A.
3) Mark point C, draw a cutout under the transverse tie.
4) Extend the bottom side with a line, marking an angle of 75 degrees, with the vertex C.
5) Draw an arc, measuring the angle at point D. The radius of the arc is 116 mm. Connect the points with a segment.
6) Using a square grid, we draw roundings between points A and B.
7) Place the resulting template on a wooden board. We outline the parts and prepare for cutting.
To cut straight sections, you need to use a saw; for cutting out shaped sections, a jigsaw is perfect.
Drawings of garden chair parts.
IMPORTANT! In order for the cedar board to chip less, the cutting blade of the tool must be carried out in the direction of the grain!
After transferring the finished drawing to the board, we will mark a similar one according to the first diagram, using the already cut out part.
If you don’t have a ready-made armrest pattern, no problem! The circumference is not important.
1) It is necessary to make wedge-shaped supports for the armrests using a saw, bevelling the upper edges by 6 degrees.
To make it easier to connect parts, use a clamp.
2) Carefully screw the supports to the front legs. For fastening we use glue and screws.
3) We cut out the armrests and rear support.
4) Use sandpaper to clean the ends of the finished part.
5) Cut off the ends of the support.
6) Press the rear support piece against the backrest.
7) Mill the edges of the surfaces.
Attaching the armrests to the wedge-shaped support.
IMPORTANT! Glue plays an important role when making your own garden chair. Heat-resistant wood glue, unlike the common and frequently used PVA glue, will not lose its properties when exposed to high temperatures, moisture, and will not dry out or crumble. For this reason, to create a wooden product, we recommend using heat-resistant glue.
Features of a shell-type chair
When making a shell, you will need skill in using a jigsaw, the ability to transfer the dimensions of parts from drawings to the material, and experience in deforming plywood in order to bend it in the correct shapes and directions.
Note! When cutting out parts, it is important to achieve smooth movements of the jigsaw, which is quite difficult for an untrained person.
When making a shell chair without experience working with bent plywood, you can use pieces of scrap wood to train your hand for practice. To fasten the parts of such a chair, wood glue is mainly used, and clamps are used for fixation. You can use self-tapping screws as fasteners, but in this case you will have to drown their heads in the wood fibers.
Once the bent plywood shell chair is fully assembled, all bumps and chips are sanded, after which the surface is cleaned of dirt and dust. To give the product an aesthetic appearance, it is coated with several layers of varnish.
Making wooden garden furniture with your own hands
Decor is one of the important components. With the help of unnecessary things, pillows, bright rags, vine branches and painstaking work, you can achieve phenomenal results.
As you can see, making a garden wooden chair with armrests with your own hands is not at all difficult.
Fantasy, imagination, a charge of positivity, basic knowledge, diagrams and drawings - this is the entire list of necessary components for creating a wooden chair with your own hands. Desire and a little work are the key to success!
A wooden chair made by yourself will last for many years.
While maintaining its original appearance, such a chair will perfectly “fit” into the natural atmosphere and allow you to enjoy a comfortable rest.
Decor options
It should be said that even for such chairs, appearance is an extremely important aspect. At the same time, it is not necessary to buy any accessories for this at an exorbitant price. To do this, you can use some old unnecessary things. For example, the same pillows and bedspreads to make the chair not only beautiful, but also soft. For example, you can cover the seat and back with padding polyester, and simply stretch decorative fabric over this material.
It is better to fasten such upholstery using the simplest furniture stapler.
How does it swing?
Most home craftsmen make rocking chairs according to ready-made drawings, but prototypes often turn out to be developed and tailored to a specific person, and an exact replica is not so convenient. Therefore, before making a rocking chair, it is necessary to obtain at least initial information about its kinematics.
The CG of an upright person of normal build is located on the border of the lumbar and sacrum on the inside of the spinal column. In a sitting individual, it will blend somewhat forward and even less downwards.
In the chair-seat system, the overall CG shifts back almost to its original position and a little further down. The downward shift of the general CG for the design of a rocking chair is not particularly significant and we can assume that the projection of the general CG onto the supporting surface (floor) is approximately the same as that of a standing person.
In the future, the resulting error can be easily compensated by final balancing of the chair, see below.
The vertical location of the central center relative to the central center has a much stronger effect on the stability and comfort of the rocking chair; the latter is also a determining factor when designing rocking chairs on runners with variable curvature.
If the CG and CO coincide, this is an indifferent equilibrium: for any physically possible tilt of the chair, the projection of the CG on the floor falls on the point of contact of the runners O, pos. 1 and 1a in Fig.
The chair does not rock, and if you lean back too much, you will instantly somersault with the risk of breaking your neck. Fortunately, an exact match between the CG and the CO is only theoretically possible.
If the CG is higher than the CO, then its projection, at any inclination, “runs” outward, backward or forward, from the point of contact. At the slightest tilt, a tilting moment Mo occurs (positions 2 and 2a), and the rocking chair turns out to be unstable.
To avoid such a situation for a family rocking chair, it is designed and balanced for the tallest, heaviest and pot-bellied rider possible so that its CO is 450 mm or more higher than the CO. Then, when the chair is tilted, the point O will “run away” from the CG projection, the restoring moment Mv will constantly act (positions 3 and 3a) and the chair will not tip over when rocking within acceptable limits.
For those who are smaller, the excess of the CO over the CG will be too large, and the swaying will be harsh, but this can be easily compensated for by pillows under the back and seat.
In general, the lower the elevation of the CO above the CG, the softer and smoother the swaying, but the likelihood of capsizing, suddenly straightening up and standing up in a chair, is higher. Therefore, it is better for novice carpenters to set the CO exceeding within 600-700 mm.
There is no need to drag your own pillows with you into a chair on runners of variable curvature: it will itself rise to the position of greatest comfort. At the same time, the big guy will lean back more, and the slender one will sit straighter.
When swinging backwards, the point O will run away from the CG projection the further, the greater the angle of inclination, and it will simply not be possible to swing until it capsizes. And if you “pump” forward, which is actually difficult, the chair will smoothly drop the hyperactive person onto the floor: where should you rest? Go do something.
To construct a profile of runners of variable curvature, the radius of the generatrix of the circle (it is determined as in the previous case) will have to, firstly, be rotated several times by a fixed angle α; usually take α = 10 degrees.
Secondly, to build the rear branch of the runner, R is increased at each turn according to the law of geometric progression with the index k = 1.02-1.03. That is, it will be (see position 4 in Fig.) R1 = kR; R2 = kR1; R3 = kR2; R4 = kR3, etc., if required.
Actually, R changes according to some trigonometric function, but for furniture accuracy and the size of the rocking chair, it is more convenient to replace it with a progression, so it’s easier to calculate.
The construction of the anterior branch is carried out at a constant R, but with each rotation of the generatrix of the circle, the CO is raised vertically (ibid., in position 4 of the figure).
The initial elevation Δh1 is taken equal to 2-3% R, i.e. (0.02-0.03)R, and the subsequent ones also follow a geometric progression with the same indicator as for the posterior branch. Δh1 in this case is a fairly critical value; its smaller value should be taken for thin people, and its larger value for fat ones.
Finally, the resulting points are connected using a pattern with a smooth curve. Do not be embarrassed if the tangents to it turn out to be not perpendicular to the radii: in order for the chair to be stable, at each moment of rocking it should be on the opposite slope. When constructing, it is advisable to take the scale no smaller than 1:5.
How to choose material
Creative garden furniture
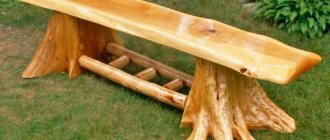
In order for pieces of furniture to blend harmoniously into the landscape, it is worth choosing natural wood. To do this, you can use branches, trunks or tree roots, which will help create unique works.
Natural wood has a variety of shapes, which makes it possible to produce original furniture items with minimal processing. When choosing materials, you should be creative and try to see the unusual in ordinary things.
If you want to decorate your garden with not only fashionable, but also reliable items, take a closer look at a table with a base made of concrete blocks, bonded with cement mortar and then tiled. To make a tabletop, you will need 5*10 cm bars, fixed with glue in a frame. The strips forming the surface of the table are attached to the resulting holes.
Exquisite wicker garden furniture
Stylish and economical products can be obtained from branches of flexible tree varieties. Nothing can compare in beauty to wicker garden furniture. If you do not have experience in this process, stop at bird cherry branches, which are easy to process and pliable.
Selecting a drawing or drawing it
Before you start work, you need to obtain an accurate drawing that will show the dimensions. If you couldn’t find it on the Internet, you can draw it yourself. True, without experience in furniture production or making accurate drawings with projections, you should not do this.
Limit yourself to what you can find on the Internet. This is due to the fact that the production of a chair requires knowledge of the anatomy of the human body, so that in the future the design will be comfortable and safe for sitting and swinging.
When the drawing has been selected, you need to enlarge it and transfer it to graph paper or thick cardboard. This will make it easier to cut out or complete individual elements.
When the stage is completed, you can proceed directly to cutting out the elements and assembling the complete structure.
Implementation of unusual ideas
Furniture made on site
To create interesting items for decorating the landscape, you can decorate tables, chairs and benches with beautiful original branches. Such furniture will become a wonderful and appropriate element of the garden exterior and will not leave any of the guests indifferent.
Another option for making a table for a summer house is to use a large cut of the trunk as a support and a horizontal cut of the butt as a cover. The horizontal cut is fixed on a shield made from parts of the trunk. To make the structure reliable, it must be supported with logs, the tops of which have been previously hewn off, and secured to support pillars.
Folding design
Together with classic folding chairs, you can independently make a Kentucky-type folding chair that is simpler in design, but with an unusual appearance. It will require bars of the same cross-section, which must be cut in accordance with the selected drawing. 4 long pins are used as fasteners, connecting all the bars together in different places. The rigidity of the structure is adjusted by tightening the nuts on these studs.
In fact, the different Kentucky models are as similar as possible to each other, and most importantly, when assembled they take up minimal space.
Making furniture on your own is a real creative process. With the right amount of imagination, you can turn even old, unwanted chairs into works of art.
This exciting process also saves a lot of money. There is nothing better than combining business with pleasure.
Adviсe
- When choosing materials, do not immediately run to the hardware store. Take a closer look at what you have available. Perhaps you or your friend have had beams and boards lying around for several years that you would hate to throw away. Stumps and snags that interfere with the site can also become a unique item or part of it. Do you remember if you have any hunting trophies lying around on your mezzanines? Antlers, skins and other paraphernalia will fit very harmoniously into the interior of your recreation area.
- Pallets (pallets) can be bought for little money at construction sites, in stores or online. You'll save significant time on cutting and assembly with these versatile designs.