The bumpers for cribs are a kind of fence that protects the baby. They perform several functions at once: firstly, they prevent the child from falling, secondly, they protect him from cold and drafts, and thirdly, they prevent him from injuring himself on the crib railing as a result of an unsuccessful movement. The price of bumpers in stores in most cases starts from 1,500 rubles. A little expensive, especially considering that after 1.5 years they will no longer be needed. Therefore, it is better to make the sides yourself. Let's talk about this in more detail.
Bumper in a crib for newborns - how to attach and tie pillows
You need to prepare in advance for the birth of a child and take all safety measures so that the newborn is not accidentally injured while in the crib.
The bumper for a baby crib is a seal that is attached using fasteners to the walls of the crib, and makes it soft and safe for the baby. This device is also called sides or protection. This kind of device can be four-sided, which completely blocks the entire space in the crib, thereby blocking the baby’s path to the edges of the sides on the bed. The protection can also consist of halves that cover only part of the space, thereby allowing the baby to explore the world around him.
Practical application of combination
Masking wall irregularities
Using this technique you can also disguise communications and details that spoil the interior. Using wallpaper of different colors, you can easily divide a room into zones without resorting to additional costs for arches and partitions.
Changing the size of the room. By highlighting one wall with bright wallpaper or a print, you can visually expand the room.
Decoration. With the help of bright accents, you can define the general idea of the entire room, set the mood for textiles and other decorative elements.
You can highlight one item and thereby make it the main one in the room, for example, use several stripes of contrasting wallpaper of the same color to highlight the bed area in the bedroom.
What is it needed for
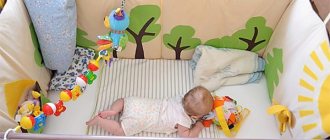
Borders for the crib are necessary for parental concern for the baby. They will help eliminate the need to check the child several times a night, as well as from constant monitoring and distraction from household chores during the day. After all, when the baby is active, he can toss and turn, roll from one side to the other, and this is fraught with bruises. The bumper helps prevent the development of traumatic situations.
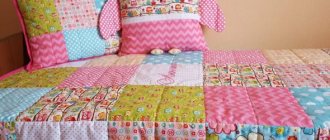
In the photo - a bumper in a crib for newborns:
Among other things, a child may roll over and hit the bed frame while sleeping or resting, which will contribute to his fear, moodiness and restlessness. With the bumper installed, this will not happen, and parents will be calm about the physical and mental health of their child.
Sides made on the basis of soft filler have gained considerable popularity. But do not forget that in addition to advantages, they have disadvantages. They are made in the form of pillows with ribbons, which are attached to any part of the crib and have certain functions.
For security
The main purpose of this protection is to protect the child from through blowing and all kinds of falls. If the crib is located near open sources of cold air, the installed side will serve as reliable protection from external factors.
Also, the bumper on the crib will not allow the baby to stick through its bars, which will help avoid getting stuck and bruised between them. A protective side, hung throughout the crib, promotes a peaceful sleep for the baby, since the fence can distract him from external irritants.
The disadvantages of a protective side for a baby, which is attached along the entire length of the bed, is that it blocks the outside world from the child, as a result of which every approach of the parents can frighten him. It is better to use only a partial bumper.
Read here for size standards for children's blankets.
For development and motor skills
An important component of the bumpers is its functionality, which will serve as a developmental factor for the baby. If you hang bumpers with printed drawings on the crib, the child will begin to develop faster and will be able to distinguish objects and details. Protective pillows of different colors will contribute to the child’s ability to quickly shift his gaze, and will also help develop concentration.
The main rule when buying bumpers is to choose not flashy colors with a small pattern, so as not to irritate the baby’s not yet fully formed eyeballs. Developmental boards are often equipped with different sound signals, light illumination, and small adhesive toys for training fine motor skills of the fingers.
Fabric and fillings
A bumper on a bed for a newborn should consist only of natural fabrics, such as baby calico, chintz, synthetic padding. Natural quality fillings have a stitched seam that does not form lumps or unevenness, even after washing.
You should not purchase bumpers made of foam filling due to the high likelihood of developing allergies in children. Fillers with chemical fibers also tolerate washing well, but are not safe for children, so they should not be used.
Towels for newborns are made from natural materials.
How to choose a blanket envelope for discharge in the summer?
Step-by-step instruction
The work of creating a side for a crib can be divided into several stages:
- creating a pattern and preparing fabric in accordance with it;
- directly sewing and filling the finished product;
- decorating things.
Let's look at each of these stages in more detail.
Preparing and cutting fabric
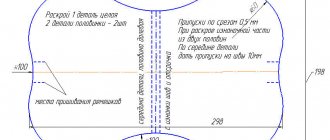
Before you start working, you need to create patterns from thick paper. They should repeat the outlines of the pieces of fabric that will make up the future product. To avoid confusion with sizes, it is better to download pattern layouts on the Internet and then transfer them to paper.
Fastening rules
The bumper can be easily attached to any type of crib, as they have fasteners in the form of ribbons, zippers, buttons or Velcro. After attaching the side, you need to make sure that the fasteners are secure.
The dimensions of the protective sides of a standard 140x70 crib are individual and have their own dimensions for each side. Before purchasing a bumper, you should consider the size of the crib.
Protective sides must consist of an anti-allergenic coating and real silicone filler. If you are not sure about the composition and material of manufacture, you should refuse the purchase.
Organization of water drainage in a summer shower
There are several ways to arrange a drain in a summer shower. Thus, water can be discharged into a filtration well or into a filtration field. In the latter option, channels are installed between the beds. This will allow you to irrigate the area at the same time without any special costs.
Diversions are carried out in open and closed ways. In the first option, ditches are made at a slight slope from the collection site. This option is often used on moisture-resistant soils. The closed method involves laying pipes in the ground.
You need to decide where the used water will flow, given that it will be soapy. Source pol-exp.com
Damage to soft crib bumpers
Despite the advantageous qualities of bumpers for cribs, there are a number of negative factors:
- When hanging the protective sides, dust accumulates inside, which has a harmful effect on the development of the baby’s pulmonary system.
- Sides made of soft fillers do not allow the child to breathe fresh air, and as a result, the lungs and brain vessels suffer.
- This device prevents the baby from observing what is happening around, and the parent from observing the child.
Product care
It is not recommended to sew the sides, as the product requires constant care at frequent intervals. What you need to do to keep the product clean:
- Washing is done at least once every 7 days. Only covers can be wet cleaned, and the base with the filler is well ventilated and dust is knocked out.
- After complete drying, double-sided ironing is carried out at high temperatures.
- In addition to washing, the product must be ventilated once a week.
Important! For washing, use only baby powders and fabric softeners.
Caring for soft sides
When choosing detergents, washing and ironing modes, you need to take into account recommendations related to the care of the type of fabric. The material may lose color, the texture may deteriorate, and defects may appear.
How to make sides for a crib with your own hands
The baby's crib must be protected with special bumpers. These products look like a kind of soft pads that are attached to the head of the crib and its sides. They perform many functions, protecting children from injuries, bruises, as well as drafts and other surprises. Making a border yourself is very simple, even if you have absolutely no experience in sewing. Crib bumpers can be an excellent and valuable gift for the birth of a baby.
We decide on the type, style, size
First, you need to decide on the design features of the product and understand the complexity of its tailoring. There is a wide variety of their types and forms. Each of them has its own pros and cons. Thus, the covers can be high, completely isolating the baby from the outside world, and low, only partially covering the bars of the crib. There are sides with replaceable covers in the form of pillowcases. The advantage of such a set is the possibility of frequent change and washing.
The following main types of sides are distinguished:
- a solid side that runs along the entire perimeter of the crib;
- pads in the form of pillows attached to the crib with ties;
- classic version, consisting of four covers for all sides of the crib.
ATTENTION! An interesting option are products with pockets on the outside of the crib. Their contents will always arouse the keen interest of the child.
Choosing fabric and filling
Choosing suitable materials for sewing children's clothes is a very important undertaking. It is best to use cotton fabrics. These are natural and hypoallergenic materials that are very pleasant to the touch, as well as easy to wash and iron. Most often, craftswomen choose calico, satin or flannel. Particular attention should be paid to the density of the fabric: it should not be very thin so that the filler does not show through. Various materials can be used as filler. The following types are most in demand:
- Foam rubber is a microfiller and requires special recommendations when washing, because... holds water well and dries for a long time.
- Holofiber is excellent for dense and voluminous overlays. It is non-toxic, dries quickly and regains its shape.
- Holcon is an artificial filler and is used mainly for flat and soft products. It also has unique heat resistance and high performance characteristics.
- Synthetic winterizer is one of the best fillers. It is easy to use, washes well, dries instantly, and is also inexpensive.
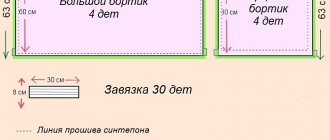
It is better to use satin or grosgrain ribbons up to 3 cm wide as ties.
Examples of patterns
Most patterns are focused on the usual crib configuration with dimensions of 120 cm in length and 60 cm in width. Therefore, before starting work, you should check the dimensions of the furniture in order to make adjustments if necessary. The height of the sides is not regulated and is determined by the personal wishes of the parents.
The most popular patterns are made from pillows. The usual size is 30-32 cm. Usually 4 elements are used on the long sides and two on the short sides. 8 (in this case, one side remains open) or 12 pillows can completely cover the perimeter of the crib. Also, a few centimeters are added to the indicated dimensions for processing the seams. Therefore, it is better to cut 35 cm squares. So, if the width of the fabric is one and a half meters, then you can fit 4 elements in a row and sew 2 pillows in this way. To completely furnish the perimeter of the crib you will need about two meters of fabric. The size of the pads can be increased up to 40 cm on each side. By increasing their height, you can make rectangular high sides. This will increase fabric consumption.
REFERENCE. In most cases, patterns are drawn directly onto the fabric using tailor's chalk or a bar of soap.
Instructions
Before starting work, a piece of fabric should be washed or treated with a steam generator so that it shrinks. The easiest way to sew pillows without covers. First, the necessary parts are cut out, and the filler is also cut. The resulting fabric parts are folded right side inward and three sides are sewn completely, and the fourth only 5-7 cm from each corner. It is important not to forget to sew ribbons or ties that will secure the pillow. The ribbons are sewn in immediately, so before joining the parts, they are placed in their places and secured with pins or a couple of stitches. To ensure reliability, the attachment points are stitched again on the machine. Next, the product is turned right side out, the filling is placed inside, and the unstitched edge is sewn up manually with a needle.
Making a barrier from plastic pipes
A barrier-limiter for a children's bed can also be made from plastic plumbing pipes. You will need a special tool to cut such products, pipes of small diameter and connecting corners of the same cross-section.
Using this scheme, take from 5 to 7 straight tubes of the same size, cut small connecting ones up to 20 cm, and assemble the structure using corners of different configurations. Straight sections of the barrier are secured with T-shaped corners, the edges with L-shaped corners. To attach the holder of the future barrier, choose them with 4 holes.
The result is a smooth and rounded product. It is easy to wash and easy to make.
Tips for creating baby crib bumpers
The easiest to manufacture and inexpensive option are sides made of cotton materials with synthetic padding. It's better to make two sets at once. This is very convenient, because while one of them is being washed, you can use the other. When sewing products yourself, you can show your imagination and come up with an interesting design. There is also an opportunity to experiment with color, which plays a big role in the development of the baby.
IMPORTANT! When making sides, you should take into account the fact that fastenings in the form of Velcro and ties may not hold up and tear when the baby plays and tries to stand up. It is better to sew the ties for fastening the overlays from a single piece of fabric; the raw edges are simply folded so that they are in the middle. Then only one seam is sewn along the edge of the tie.
Thus, sewing bumpers for a children's bed with your own hands is quite simple. It is better to use ordinary rectangles as patterns without using elements that complicate the design. We hope that this article was useful and will help you decorate your baby’s crib in an interesting way.
Main varieties
Expert opinion Ksenia Petrovna Romanova Expert in the field of interior design, as well as the head of a fabric sales salon
The stationary borders-limiters have shaped cutouts that are used by babies as a stop, allowing them to climb into the crib without the help of adults
For very young children, a barrier that completely covers the side of the bed is recommended. In addition, it should be high enough so that the child cannot fall over or climb over it.
For older children, a small limiter is sufficient, the purpose of which is to prevent accidental falls in their sleep. Such barriers usually cover only part of the length of the bed, and are often made retractable for convenience.
A removable children's bed restraint is considered an ideal solution for arranging a sleeping place
A common option is a removable restraint for a child, which can be conveniently removed when it is no longer needed. This removable barrier will also be indispensable if you are traveling with small children - you can easily take it with you and install it on any child or adult bed.
A built-in border-limiter for a children's bed is purchased along with the rest of the children's furniture
Depending on the material of manufacture, there are several types of protective edges.
- Soft - the simplest design would be a barrier made of foam rubber or padding polyester rolled into tubes. The resulting rollers are attached to each other, gaining the required height of the side. For more convenient care and an aesthetic appearance, such a limiter is covered with removable covers that can be washed in a machine. Such structures are usually attached with Velcro or ties to the bed mattress.
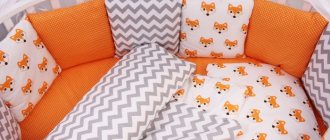
Beautiful soft side for a girl's bed
A net is a fairly effective way to protect your baby from falling during sleep. It is necessary to make sure that the material is strong; the child should not tear or push through the mesh with his weight. For fastening, you can make a frame from wood or metal slats.
Protective mesh on a metal frame
Plastic - such a barrier can not only be purchased, but also made independently. To do this, you will need ordinary plastic pipes for plumbing - they are easily cut and fastened together using corners. The result is an easy-to-use and neat-looking limiter that fits well into any children's room. The advantage of the design is the ability to disassemble it at any time, as well as good tolerance for wet cleaning.
Limiter-barrier for a children's bed made of plastic pipes
Wooden is the traditional option, the most labor-intensive, but best suited to a classic interior. This barrier is also characterized by the greatest strength and durability. A wide variety of designs and designs are possible. A wooden stopper is usually painted to match the color of the furniture, and decorative design options are often used.
Wooden side for baby's bed
Metal side limiter for loft bed
It is quite easy to make a barrier of any type yourself, it will not require large economic costs, and will serve no less reliably than a purchased one.
Unusual DIY budget limiter
How to sew bumpers for a baby crib: two simple ways
Soft sides or “bumpers” for a crib are a practical and necessary accessory that will protect the baby from unexpected injuries and protect him from drafts.
Soft rim made of 4 parts
You will need:
- Cotton in three colors: for external and internal parts of the sides, as well as for the ties;
- Sintepon;
- Scissors;
- Sewing thread and needle;
- Tape measure;
- Tailor's pins
DIY envelope for a newborn
Step 1
Measure the crib around the perimeter and write down the length and width of the crib, as well as the height of the side.
Step 2
From cotton of two different colors, cut out 4 rectangular pieces with a size equal to the length of the crib and the height of the side.
And 4 side parts equal in size to the width of the crib and the height of the side.