Do you need bumpers in a crib for a newborn?
The bumpers in a crib serve several functions and have many benefits. You can choose soft fencing, focusing not only on the advantages of the product, but also on your taste, taking into account the shades that predominate in the interior of the room.
Advantages and disadvantages
Children's bumpers have many advantages:
- protect the child from drafts and cold air;
- prevent the baby's arms and legs from getting into the space between the slats of the crib;
- participate in creating a cozy and comfortable atmosphere for the child;
- protect the baby from direct sunlight, which is especially important when the crib is located near a window;
- protect the child from impacts on hard parts of the sidewalls during sleep or wakefulness;
- decorate the room and maintain its uniform style.
The only disadvantage of soft fences is the need for periodic washing so that the products do not accumulate dust.
Permissible age - medical recommendations
Doctors and child psychologists believe that it is better to install soft bumpers in the second month after birth.
It is worth removing the fences at the age when the child begins to fully stand on his legs, holding onto the bars of the crib. In general, there are no serious restrictions in this matter.
How to choose and where to buy
Everyone's selection criteria are different. However, all parents purchase only hypoallergenic products from branded manufacturers for their children, regardless of how much they cost. No one will save on the health and safety of the angel, so everyone is wary of budget options. Today there is no shortage of models: high and low, with patterns and pictures, bright colors and pastel tones, for boys and girls. You can choose to suit every taste and budget. And it is imperative that they harmonize with the design of the children's room. The main nuances that are worth paying attention to are:
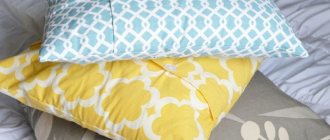
- Textile. A prerequisite is naturalness. It should be environmentally friendly, not cause allergic reactions, not get dirty or fade when washed, and dry quickly. It is advisable to give preference to baize, non-woven fabric, calico and chintz. These fabrics are the softest, most durable and natural. They can be washed and ironed frequently.
- Functions. The main task that the restraints are designed to solve is to protect the child from injury and drafts. The developing moment is important, but far from the main one. You can focus on pictures and figures. Any drawing will help the child develop. The colors should not be boring, nor should they be too bright. The baby should not be irritated or scared. You can choose models with pockets, attached toys and a variety of effects.
- Filler. Differs in density. The main goal is to protect the child from misunderstandings. Most models are equipped with dense fiber or padding polyester. The last option is the softest and is suitable for newborns. You can find models with foam rubber and natural fibers. If you choose foam filling, ask the seller for a safety certificate. Wool fillings are also available. They retain heat well, are soft, comfortable, but can cause an allergic reaction in the baby. You can hardly find them in specialized retail outlets. If you have chosen synthetic materials, you should make sure of their quality and safety.
- Size. It does not affect the functionality, but the parameter is quite important. Low models are suitable for babies who are not yet five months old. The low height allows fidgets to constantly monitor their parents and control the situation. In terms of protection, they are inferior to high-end analogues. It is advisable to buy higher restraints for children who are trying to sit or even stand up and hold onto the baby. The view, of course, will be significantly reduced, but you won’t be able to hit the wooden walls. And the handle won’t be able to get stuck when it has to fall after standing on fragile legs. For a sleeping place of 120-60 cm, you should choose restraints with a total length of 3.6 m. As for the height of the accessory, the optimal option is 30 cm. The baby should not stand on it, as it can “dive onto the floor.”
The question of where to buy is not difficult. Today there is no shortage of specialized retail outlets selling goods for children. They are everywhere: in megacities and small towns. It's better to visit the store yourself. There you can choose from the variety offered, get advice from a professional manager, and ask the price. There is another option - order goods from China using the AliExpress service. In terms of price, it may be cheaper. But there is no guarantee that the package received will satisfy you in full.
There are times when what arrives at the delivery point is not what you ordered, or the product does not meet the specified characteristics and quality. Before placing an order online, you should carefully study user reviews and check the integrity of the supplier. Otherwise, not only precious time will be lost, but also money.
What you need to sew bumpers
The main elements for sewing children's bumpers are:
- textile;
- filler;
- ties.
Tools worth preparing:
- scissors;
- threads;
- needles;
- pins;
- ruler;
- sewing machine;
- chalk.
Which fabric to choose
Before starting work, you should decide what fabric to purchase for sewing. In this matter, you should be guided by the following criteria.
- The material must be made from natural fibers .
- It is advisable to choose a fabric that is pleasant to the touch , because the child will often come into contact with the surface of soft fences.
- It is better to give preference to material of pastel colors with dim patterns in order to reduce the burden on the baby’s psyche.
- Textiles must be hypoallergenic .
Preferred fabrics for baby bumpers:
- satin;
- flannel;
- bike;
- calico;
- thick cotton.
Each of the presented materials does not cause allergies and does not lose its appearance after washing.
Many manufacturers offer fabrics with stylish prints, which will allow you to choose a fabric to suit every taste.
By the way, it’s better to buy fabric of different colors, because it will be even more original!
Filler
Choosing the right filler for children's bumpers is no less important than the fabric base.
Despite the fact that many synthetic materials are safe for babies, it is worth paying attention to their functionality.
For example, synthetic winterizer often loses its shape, forming clumps, especially after washing in a drum. But, if the sides with such filler are taken care of more carefully, they can last a long time.
Holofiber is a modern analogue of padding polyester. It is often used to make soft baby crib railings, as it is considered hypoallergenic and retains its appearance and shape even after thorough washing.
A few more worthy options that perfectly serve as filler for sides:
- Periotek – soft fabric, does not cause allergies;
- polyester – does not absorb foreign odors and moisture;
- hallcon – protects from cold air.
To make dense sides, it is better to use foam rubber, which does not lose its shape, does not break, and is quite durable.
The sides can also be filled with buckwheat husks. This product perfectly develops fine motor skills.
It is strictly not recommended to stuff products with down or cotton wool, which can cause allergies in a child and cause suffocation if inhaled. In addition, these materials cannot be washed.
Model type
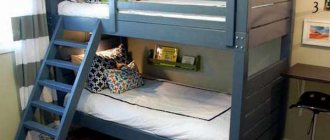
Children's bumpers can be high or low. Traditionally, the first option is used.
High fences can protect the baby from cold air, direct sunlight and prevent injuries. But such sides have a small disadvantage - they block the child’s view.
The best option is a combination of fences of different heights.
The low sides look quite neat and allow the baby to view the surrounding space without obstacles. But such products will not be able to provide full protection for the child.
Classic fences look like flat pillows. But more functional will be the sides in the shape of houses, animals, cars, which in the future can be used as interior toys.
Color spectrum
Soft fences in a crib act not only as protection for the baby, but also as an interesting decor in the room.
A wide range of modern fabrics in different colors makes it possible to choose the ideal option for any interior.
When choosing a color, you can rely on the classic division: blue fabrics for boys, pink fabrics for girls. But it is better to use delicate shades, diluting them with bright prints.
Expert opinion
Irina Klimova
I am 29 years old. I'm an interior designer. I love my profession and have been doing this activity for more than 8 years. About 100 projects have been implemented. I provide professional advice.
If the crib is located in the parents' bedroom, you can choose fences in neutral basic colors - milky, gray, beige. So, this piece of furniture will fit perfectly into an “adult” interior.
Excessively bright or dark sides will not be the best choice, as they can negatively affect the baby’s psyche.
Fabric consumption calculation
To make calculations, you should take into account the shape and dimensions of the sleeping place and crib.
- Classic soft fences consist of 4 products, so you need to know the exact width and length of the sides of the crib.
- If the sides are in the shape of pillows, then you need to sew 2 symmetrical parts on the headboard area and the sidewalls. You may need up to 4 – 5 products for the sides of the crib.
- To make shaped sides, you should be guided by the parameters and number of pillows.
Before sewing the fences, you need to measure the height, length, width of the crib and each bed.
If you are not from Russia, then follow the link to buy patterns
https://www.etsy.com/shop/MaranisBabyPattern?ref=l2-about-shopname
Hello, this is the Maranis company. In this article we will look at how to sew the sides of an animal with your own hands.
These soft pillows are ideal for a newborn's crib and will give it a great look. They also have a functional affiliation:
- They will protect the baby from injuries from the bed bars.
- Will protect from wind and drafts.
- They will be true friends for the entire period of the baby’s growing up. He will quickly begin to understand what this or that animal looks like.
We will teach you how to sew animal bumpers into a crib for a bunny, fox, cat, dog, moose, owl, unicorn, fish, sheep, hedgehog, pig, dragon. This is not difficult to do if you have at least some seamstress skills. All you need is an ordinary household sewing machine, fabrics and a great desire to do something with your own hands.
But we will need patterns which you can find by following the link:
Ready-made pattern diagrams for protective edges
At the last stage, when all the exact calculations have been made and the necessary material has been purchased, you need to make patterns for future bumpers. You can do them yourself or use our options.
[MASTER CLASS] Simple and quick sewing of square bumpers
To make a square bumper, prepare:
- 2 types of fabric;
- scissors;
- sewing machine;
- needles or pins;
- filler.
Step by step process:
| 1 | First you need to prepare a pattern measuring 32*32 cm. To do this, you can glue 4 A4 sheets together with tape. | |
| 2 | Then cut the sheets to size, leaving small gaps of 1 - 2 cm on each side for seams. | |
| 3 | Prepare the fabric for the sides, iron it well and fold it in half. Next, attach the pattern to it, with the fold positioned at the top, carefully trace and cut out the part. | |
| 4 | Do the same with the white fabric, which will act as a permanent pillowcase for the border. This detail will help keep the filling in the pillow. | |
| 5 | Then you need to make ties - 4 pieces for the 1st side. To do this, prepare 1 layer of main fabric, measure the length (70 cm) and width (3 cm) for each ribbon, draw and cut. Make marks in the middle of each piece. | |
| 6 | After this, fold each product in half along the long side and make a stitch, departing from the edges about 5 mm. In the center of each tape, leave a small indent of 2 - 3 cm from the mark. Then cut off a little fabric at all corners of the ties (as shown in the photo), leaving 2 - 3 mm before the seam. | |
| 7 | Turn the pieces right side out through the center hole. Then iron each tie well and sew up the indentations. | |
| 8 | Next, start assembling the side. To do this, fold the prepared fabric with the pattern inward and place it in a white “pillowcase”. | |
| 9 | Then unfold the piece and place the ties inside it, folding each in half. Using a pin or needle, secure one end of the tape in one of the corners of the fabric, retreating 2 - 3 cm, and the other in the middle. This must be done with the remaining ties. | |
| 10 | Next, cover this half of the fabric with the other, smooth it out and pin it together. | |
| 11 | Sew all sides of the border, leaving one small hole (about 8 cm) for filling the pillow. And carefully cut the corners, retreating 3 - 4 mm from the seam. | |
| 12 | Then turn the piece right side out, place the filling inside and carefully sew up the hole. | |
| 13 | Follow the same steps to sew the remaining pillows. |
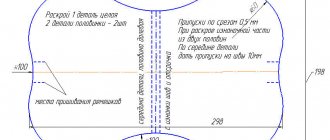
Pattern and fabric cutting
To make a pattern, you will need to take measurements (measure the length and width of the bottom of the stroller), pay attention to the fact that it has rounded corners. Exactly with the dimensions on thick paper, plastic film, or better yet on oilcloth - make a pattern and cut it out.
Place the pattern in the stroller and check for accuracy. If everything is correct, prepare the fabric:
- Wash it. This is necessary, firstly, for hygienic purposes, and secondly, to check the shrinkage of the fabric. Calico “sits” by 4-10%. It is better that it “sits down” before sewing, otherwise the mattress will become small later.
- Iron: cutting can only be done on neatly ironed fabric.
- Place the pattern on the fabric folded in half (along the grain thread!), remembering to leave seam allowances. Make them 5-6 cm on three sides, and at least 10 cm on the 4th (short) side to sew a zipper here. If you do not want to make the cover removable, the same 5-6 cm will be enough.
- Having measured, according to the proverb, seven times, cut out the fabric.
If you have an overlocker, or you can use a machine to make a zigzag seam, finish the edges of each piece.
Until this point, regardless of the mattress model, all operations were performed the same way. Further actions will depend on which product model you prefer and what filler you decide to use.
[MASTER CLASS] Beautiful sides that keep their shape
To sew sides that hold their shape, you need to prepare:
- a piece of panel and other type of fabric of equal size (34*34 cm);
- 2 rep ribbons 62 cm long;
- insulation sheet (38*38 cm);
- scissors;
- filler;
- needles or pins;
- sewing machine
Step by step process:
| 1 | To begin, place a panel on a sheet of padding polyester and cover the workpiece with a piece of other fabric. The squares should be facing each other. | |
| 2 | Treat the ends of the ribbons with a lighter. Place one of them on the edge of the canvas, measuring 8 cm with a ruler. | |
| 3 | Secure the tie with a pin, placing the entire length inside and leveling the fabric. | |
| 4 | Do the same on the opposite side. And secure the product with needles around the entire perimeter to make stitching easier. | |
| 5 | Make a mark at the bottom for the hole through which you will stuff the side (10 cm). | |
| 6 | Sew the product around the entire perimeter (except for the part left at the bottom) with a hidden seam. | |
| 7 | Turn the stitched part right side out, aligning the corners. | |
| 8 | Iron the product well and fill it through the hole left with holofiber or other hypoallergenic material, straightening the side and leveling the filler. | |
| 9 | Hand stitch the unstitched part with light threads, carefully folding the edges inward. | |
| 10 | It turns out a beautiful neat side. If necessary, make several more of these products using a similar pattern. |
How to stitch correctly
You can sew a set for a stroller for a newborn with your own hands either manually or using a machine. In the second option, the seams will be stronger and more durable. Before you start stitching, you need to choose a model for the mattress:
Step-by-step work:
If the mattress is provided with a cover, then a fastener is sewn into it. To do this, you need to fold the two cut out elements and carefully sew in a zipper. Then the sides are also stitched, and the mattress is stuffed with padding polyester. If desired, you can sew a pocket for small items. Such products can be used not only in a stroller, but also in a cradle. The work is ready.
Winter wool model
Washing such products is a rather complicated process. It is not recommended to use hot water or detergents containing chlorine and bleaches. This will cause the threads to become shiny and the product to fade. The optimal temperature for washing is 40–60 degrees; machine drying is prohibited, as it can cause the filling to clump. There is no need to wring out the mattress, you just need to let it drain, and it will air dry on its own. It is better to avoid direct exposure to the sun, as the pattern on cotton may lose its saturation.
Coconut filler
Many seamstresses recommend using liquid-based baby washing powders; they do not clog into the pores of the fabric and are easy to wash out. If the dirt is not very strong, you can remove it with a soft brush and soapy water. There is no need to iron the product, as it will smooth out during use. It is not recommended to wash children's clothes and accessories together with adult items. You need to store mattresses in plastic wrap in a dark place, as the fabric will fade in the sun and may lose its properties due to drying out.
Coloring for a boy
In conclusion, it should be noted that sewing a mattress into a stroller is quite simple. It consists of only two parts that need to be stuffed and sewn. If desired, you can decorate with some beads. Here it is important to include all your imagination in the process of work. Manufacturing takes literally a few hours. To clearly understand how to sew a mattress with your own hands, you can watch several lessons with master classes on websites for moms.
Source
[MASTER CLASS] Quilted sides - an easy and economical way
Sew a quilted crib border using:
- fabric of two colors;
- scissors;
- sewing machine;
- 10 rep ribbons (65 cm long);
- thin padding polyester;
- ruler;
- needles/pins.
Step by step process
| 1 | Use a lighter to burnish the ends of each ribbon. | |
| 2 | Then make a pattern for the sides, 120 cm long, 32 cm high, using both types of fabric and insulation, the edges of which should be 5 mm larger on each side. | |
| 3 | After this, lay the products on top of each other in several layers: first a sheet of padding polyester, then a single-color cut, and on top - the remaining part face down. Next, apply insulation again to the resulting workpiece. | |
| 4 | Fold the tape in half, secure it with your finger near the edge of the side (as shown in the photo), carefully cover it with fabric and insulation on top and secure this place with a needle or pin. | |
| 5 | Then secure the ties around the entire perimeter in a similar manner. | |
| 6 | There should be 4 tapes at the top and bottom (and two at the sides), fixed at an equal distance from each other. | |
| 7 | Sew the fabric around the perimeter, leaving room for turning (about 8 - 10 cm), and cut off the excess without touching the seam. It is also worth trimming the corners carefully. | |
| 8 | Turn the product right side out through the unstitched part and carefully straighten all the corners. Fold the edges and stitch the hole. | |
| 9 | Then make 4 equal marks around the perimeter of the workpiece, outline them with chalk and make lines strictly along the marked lines. If necessary, make one or two more similar sides. |
We sew a mattress into a stroller
Now you need to decide on the mattress model:
- A simple mattress with a non-removable cover.
- Mattress with zipper.
- Mattress with frill around the edges.
In the first case, the manufacturing technology is simple:
- Place the two cut pieces together, right sides to right sides.
- Stitch three sides.
- Turn the product inside out.
- Insert the filler.
- Carefully sew the fourth side by hand or on a machine, remembering to fold the edges inward.
If you decide to make a removable cover, you first need to sew in a zipper. To do this, fold the two cut parts and carefully sew in the lock. After this, sew the other three sides and insert the filling.
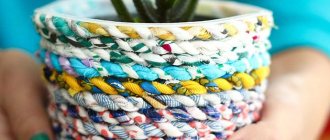
[MASTER CLASS] Sewing a velor braided side
To sew a braided border you will need:
- velor fabric in 2 colors;
- filler;
- scissors;
- 2 plastic pipes for stuffing the product with a diameter of 50 mm and 35-40 mm;
- light threads;
- needle.
Step by step process
| 1 | To begin, prepare 8 pieces of fabric 20 cm wide, 180 cm long in two colors. After this, sew the parts of each color together along the short side into one long strip. Make sure that the pile on the product is in one direction. | |
| 2 | After this, sew the blanks lengthwise, turning the fabric right side inward and fastening each with needles. Next, measure the length of the resulting product, which should be 6 m 80 cm, cut off the excess. | |
| 3 | Turn out the parts and start stuffing using a plastic pipe. To do this, put one of the strips on it and place the filler inside. | |
| 4 | You can fill the side first from one side to half, and then from the other. Push the material with a stick or a regular handle. Do the same with the remaining strip. | |
| 5 | You need to make a pigtail from the finished parts. To do this, carefully stack the products on top of each other, leveling them if necessary (as shown in the photo). | |
| 6 | Then sew the edges of all strips by hand, gathering the fabric inside. It is better to use light threads. | |
| 7 | Complete the braid and fasten the ends of the parts with hand stitching. | |
| 8 | If necessary, make another such side according to a similar pattern. |
Preparing fabric for stitching
The stitch can be done either manually or using a machine. The traditional option would be straight lines, which in the future will turn into small squares. If the craftswoman wants to add originality to the stitch, then you can find patterns where there are different snowflakes or flowers on the outer part of the product.
Preparing fabric for stitching begins with applying a pattern to the material. The mattress will be sewn along the stitch.
Attention! If you want to decorate the product with figures or designs, then you need to make it on paper in advance. Then, after making the pattern, the needlewoman only needs to attach the sketch to the material and simply trace it. Below is how to sew a mattress into a stroller.
Option for girls
[MASTER CLASS] Fence sides - a fashionable option
To sew a side fence, you need to prepare:
- 5 ties 66 cm long, 4 cm wide;
- 2 types of fabric;
- scissors;
- thin padding polyester (100 g);
- holofiber;
- sewing machine;
- ruler;
- needles;
- chalk.
With a width of 150-160 cm, you will need 1.4 m of fabric (excluding ties) for a round crib or 120*60 cm on three sides. For an oval crib or on all sides 120*60 2.1 m of fabric. The same amount of insulation. Holofiber from 1.5-2 kg.
Step by step process
| 1 | First, you should prepare 2 pieces of different types of fabric, 33 cm high and 120 cm long. | |
| 2 | Then iron the ties well, folding each one 1 cm inward (on the sides) and then in half. After this, stitch them, making bartacks at the ends and retreating 1 mm from the edge. | |
| 3 | Next, mark the stitches with chalk, departing from the edges on the right and left by 18 cm, dividing the rest of the space by 17 cm. Do the same on another piece of fabric. | |
| 4 | Then place the marked part on the padding polyester, secure it with needles along the edges and carefully cut the product along the contour. Sew the workpiece on all sides using a sewing machine, leaving 5 mm from the edges. Do the same with another piece of fabric. | |
| 5 | Place the ties on all sides of the part (as shown in the photo), folding them in half and making an indent of 1.5 - 2 cm. | |
| 6 | Place the remaining part on top with the right side inward, secure with needles and sew, retreating 1 cm from the edge on three sides of the side, without touching the bottom part. In this case, the ties must be removed by sewing only their tail. After this, trim off the excess fabric from the corners without touching the seam. | |
| 7 | Turn the product inside out and straighten the corners. Next, fasten the parts strictly along the previously outlined lines and sew a line along them on a sewing machine. | |
| 8 | After this, start stuffing the side through the lower holes, carefully leveling the filler inside. | |
| 9 | Secure the unstitched sides with needles, turning 1 cm of fabric inside, and make a stitch on a sewing machine, not forgetting about the bartacks. | |
| 10 | If necessary, make several more such sides according to a similar pattern. |
How much fabric will you need?
To calculate consumption, you need to know the size of the stroller and the width of the fabric. Calico usually has a width of more than a meter (1.2 or 2.2 m). Wide material is intended for bed linen - it is not profitable to buy it. The width is 1.2 meters - ideal for sewing a mattress into a stroller.
With this width, one length of the mattress + 10 cm for folding and sewing in a zipper will be enough. If the required mattress length is 80 cm, buy 100-110 cm of fabric. The stock is needed because cotton fabric shrinks.
Important! The length, width of the product, its shape must exactly match the bottom of the stroller, otherwise the mattress will bend or slide under the child’s body and quickly lose its shape.
Useful article about the right choice of children's mattresses https://matrasium.ru/matrasy/kak-vybrat/razmery-detskih-matrasov/
[MASTER CLASS] Sewing borders from panels with ties
To sew one soft side from panels with fabric ties you will need:
- panel;
- thick fabric;
- scissors;
- light threads;
- pins;
- thin padding polyester (60 g);
- filler;
- 4 ribbons 33 cm long, 6 cm wide.
Before making the side, it is advisable to iron the panel and other type of fabric well.
Step by step process
| 1 | To begin with, you should cut out a square measuring 33*33 cm from thick fabric and prepare the panel. | |
| 2 | Place the square-shaped piece on the panel and trim the edges along the contour. | |
| 3 | Next, you need to make ties for the side, folding each ribbon inward along the edges by 1 cm, then fold it in half and stitch. It is advisable to iron them before doing this. | |
| 4 | Then fold the padding polyester in half, place the panel on top with the front side up, and then fix the ties in the central part of the workpiece, placing them on top of each other (as shown in the photo). | |
| 5 | Place the remaining cut on top with the wrong side, level it, secure with needles and cut out the part along the contour. Trim the corners without touching the seams. | |
| 6 | Sew the side on all sides, departing 1 cm from the edges. Leave space at the bottom in the middle for stuffing the pillow (about 7 - 8 cm). After this, turn the product right side out. | |
| 7 | Smooth out all corners with your hands. Then, from below, through the unstitched part, fill the part with holofiber or other hypoallergenic material. | |
| 8 | Rub the pillow with your palms to remove any rough edges. Next, manually sew up the hole with a hidden seam using light threads and iron the product on both sides. | |
| 9 | The remaining sides can be made in a different color or alternated. |
Which filler to choose
Since the product is intended for street “transport”, the child will wear clothes on it, there is no need to impose particularly strict requirements on the filler, these could be:
- padding polyester;
- foam;
- batting;
- coconut coir.
Foam rubber and coir placed in the cover do not require additional preparation: it is enough to cut them exactly to the size of the bottom of the stroller. Sintepon, batting and other non-woven materials will need to be quilted.
You may be interested in recommendations on choosing mattress fillers
[MASTER CLASS] Animal bumpers with patterns
To sew a side in the shape of an animal, you need to prepare:
- pattern;
- sewing machine;
- thick fabric in 2 colors;
- threads;
- a needle;
- 2 satin ribbons 60 cm long, 1 cm wide;
- felt, felt of different colors for making elements;
- hypoallergenic soft filler;
- ruler;
- scissors;
- thermal pen for drawing (can be replaced with chalk or soap);
- pins for fixation.
Step by step process
| 1 | To begin with, you should print the pattern in real size on 4 A4 sheets and cut it out according to the drawing. Then glue the parts together with tape or glue. Patterns can be found on the Internet or drawn yourself. | |
| 2 | Place the finished stencil on the prepared plain fabric, folded in half, and cut along the contour. | |
| 3 | A strip 12 cm wide and 32 cm long should be cut out of another material, placed on a single-layer base of the side and secured with pins or needles. Trim the excess fabric along the contour. | |
| 4 | Next, carefully sew the strip with a zigzag. | |
| 5 | Then cut out the elements of the animal’s face on a piece of felt (ears, tail) and stitch them. Draw eyes, mouth, mustache on the product using soap, chalk or a thermal pen that can be easily erased. For better symmetry, it is better to use a ruler. Next, sew the drawn facial features with a thick seam. Make the cheeks out of felt and stitch them with a light thread. | |
| 6 | Place both pieces of plain fabric on top of each other, right sides facing inward. Then bend the prepared strips in half and insert them into the sides of the product. Fix the folded end of each tie to the side, and place the others below in the center of the part. | |
| 7 | Fasten the fabric with needles, then sew all sides of the workpiece, retreating 1 cm around the perimeter and leaving a hole at the bottom to fill the side of about 8 cm. | |
| 8 | Then make small cuts with scissors in the corners of the ears and on the top of the head so that the toy remains symmetrical when stuffing. Next, turn the product right side out and place the filling tightly through the hole left, which at the final stage must be carefully sewn up by hand with light threads. | |
| 9 | Using a similar pattern, sew other pads, and you can change the shape and color of the sides. |
Ready-made patterns (to download, right-click and select “Save link as”):
Preliminary preparations
Preliminary preparation for work consists of selecting the necessary tools and determining the size of the future size.
Tools for work
In order to get started, the needlewoman will need to prepare the following tools:
- Textile;
- Filler;
- Threads;
- Needles;
- Scissors;
- Set of pins;
- Chalk or soap;
- Pen;
- Oilcloth;
- Sewing machine.
Deciding on the sizes
An important stage of work is determining the size of the children's accessory. The mattress must match the dimensions of the bottom of the stroller. If the item is larger than what the vehicle requires, the accessory will twist and deform, which will cause a lot of inconvenience to the little person. If it is less, the mattress will move and slide.
[MASTER CLASS] Sides with removable covers
For a standard crib with a length of 120 - 140 cm and a width of 60 - 70 cm, you will need 12 pillows: 2 pcs. in the area of the legs and head, 4 on the sides.
To sew 1 side with a removable cover, prepare:
- white pillow (35*35 cm);
- a piece of plain fabric (37*37 cm);
- scissors;
- fabric for 2 ties, 50 cm long and 9 cm wide;
- zipper of a suitable size;
- printed coupon (37*37 cm);
- sewing machine;
- igloo;
- white threads.
Step by step process
| 1 | First you need to sew the pillowcase. To do this, prepare both types of fabric of equal size. Then place one material on top of the other (the right side should be on top) and smooth it out. | |
| 2 | Finish the edges on three sides using a sewing machine, turning them in 5 mm and cutting off the corners without touching the stitching. | |
| 3 | Turn the product inside out, place the open zipper right side to the raw side, leaving 1.5 - 2 cm from the seam on both ends and secure it with pins. | |
| 4 | Align the fold of the pillowcase with the edge of the fastener and stitch along the entire length. Make sure the seam is even. | |
| 5 | Close the zipper, place the remaining part on the other side of the pillowcase and secure with pins. After that, unfasten it and start sewing. Next, you need to step back 1.5 - 2 cm from the part, cut off the remnants of the zipper on each side and make a fastening, stitching the tail 2 - 3 times back and forth so that the slider does not pop out. After this, stitch along the edges of the entire pillowcase, leaving 1 cm. Trim the excess threads and turn the product inside out, straightening the corners. | |
| 6 | Then you should make ties for the side by wrapping 1 cm of the prepared fabric on each of three sides, folding the cut in half with the right side inward and stitching along the entire length. Next, sew short sections of the tape. | |
| 7 | Thread a white thread through a needle, place your hand inside the piece, attach the stitched tape, folded in half, and sew it by hand using straight stitches. Do the same with the other tie, sewing it to the opposite side of the pillowcase. | |
| 8 | Place the finished pillowcase on the pillow and fasten the zipper. | |
| 9 | To sew 12 similar items, follow the same steps using fabric with different prints. |
Manufacturing process
Before starting work, wash the foam rubber and fabric - they must be clean. Now you need to find out the size of the future mattress. To do this, measure the bottom of your stroller, namely the length and width. This is the required size. The height of the mattress should not be large, so purchase foam rubber only a couple of centimeters thick.
Let's start cutting out the foam rubber. Draw a rectangle on it using the measurements taken from the stroller. Carefully cut out the resulting rectangle. Now we do the same procedure, but with fabric and with some additions. You need to take into account the dimensions of the stroller + the height of the foam and + 2 cm for the seams (1 on each side). Have you measured it? Then we begin to carefully cut.
In order to sew a cover on foam rubber, we fold two pieces of fabric with the right sides and sew three sides on a sewing machine so that they turn out smooth and beautiful. We can start by sweeping the product by hand. Now we turn the resulting cover inside out and insert foam rubber into it. It will be clear whether we have selected the correct size of fabric and foam. We turn the edges of the fourth side inward and secure them with tailor's pins. Now we sew the last side with a zigzag and remove the needles.
As you can see, sewing a mattress into a stroller with your own hands is not at all easy. If you want to secure the fabric even more effectively, you can stitch squares across the entire surface of the mattress. These squares will also become an additional decoration for your product. You should not decorate the mattress with additional details. Be aware that it may be uncomfortable for your baby to lie on. Therefore, if you want to make your creation special, then it is better to choose a bright, interesting fabric and your mattress will be original and beautiful.
This mattress will be comfortable to use both in summer and winter. From the outside, it is no different from a store-bought one, but how much love and care has been put into it. Any mother who wants to can sew such a miracle. Such products can be easily and conveniently washed even in a washing machine. And how much pleasure you will get from the process of creating a gift for your baby is simply beyond words.
It happens that a baby stroller needs a good mattress, because the one included is often thin and causes discomfort to the baby. This problem often accompanies transformable strollers that are popular today. To correct the situation, a caring mother will have to go through many children's stores in search of the right color and size. But there is another option - sew a mattress into a baby stroller with your own hands.
The process of creating an accessory for a baby is quite simple and will not cause unnecessary trouble. At the same time, a thing created independently will meet all the requirements of quality and convenience. Mom can easily choose the color scheme and fabric to match the child's vehicle. In addition, her skillful hands will sew a mattress from high-quality materials.
Rules for caring for sides
The sides should be looked after as carefully as other things in the children's room. Removable bumper covers (if equipped) must be washed on a delicate cycle every 5 to 7 days.
To do this, use baby detergents that do not cause allergies. It is better to give preference to powders in liquid form, the particles of which do not remain on the surface of the material.
If soft fences do not have removable covers, they should be hand washed and dried in a horizontal position so that the pillow does not lose its shape.
To smooth the fabric on such edges, you should use a steam generator or steam iron.
It is also recommended to air the products at least once a week.
Winter and summer option
For the winter option, it is better to take the coconut option; it retains heat for a long time, but at the same time has increased rigidity. The bark is usually added to orthopedic mattresses. For summer walks, batting or synthetic down is used, which easily allows air to pass through. In winter, it is necessary to pay attention to ensure that the child does not sweat from the product, otherwise there will be a high risk of getting sick. Winter models are usually difficult to wash in a machine, as they are thicker than products for warm seasons. Therefore, it is advisable to use dry cleaning services so as not to spoil the accessory.
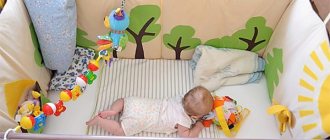
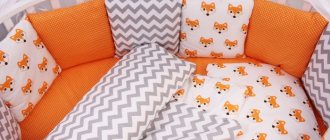
20 photos with ideas for protective bumpers for a baby crib
We bring to your attention a photo gallery of children's crib bumpers for inspiration and ideas.
Briefly about the main thing
- Babies need bumpers in their cribs after 2 months of birth.
- Recommended fabric for protective bumpers: satin, flannel, flannel, calico, thick cotton.
- Sintepon, holofiber, periotek, polyester, holkon, foam rubber, and buckwheat husks are recommended as fillers. DO NOT use fluff or cotton wool.
- The sides should be washed and aired weekly.
As you already understand, you can sew soft bumpers for a crib yourself. The main thing is to prepare all the necessary materials and tools, strictly measure the parts according to the given values and strictly follow the instructions. It is better to use bumpers with removable covers that can be easily removed and washed in the washing machine.
Practical Velcro bumper
The ties on the sides can be successfully replaced with Velcro. To do this, after cutting out the fabric for the sides, lean it against the bars of the crib and mark the places where the Velcro will be. To ensure that the Velcro holds securely, sew them first around the perimeter, and then sew the resulting rectangle also diagonally.
Velcro bumper