Bed linen is always in demand. Not a single home can do without it. Any novice seamstress can sew bed linen on her own. Despite the apparent complexity, sewing skills are not required at all.
A pillowcase is the smallest item in a bedding set. It’s worth starting with sewing it.
Only pillowcases with standard sizes are available for sale. If your pillows are non-standard, you will have to sew pillowcases yourself or to order.
What fabric is best to choose for sewing a pillowcase?
When choosing fabric for sewing a pillowcase, you need to pay attention not only to the external attractiveness of the material, but also to its properties.
The fabric should be as comfortable as possible for a particular user and not cause problems in care. All materials for pillowcases are usually divided into “summer” and “winter”.
In summer, you need a lightweight fabric that is breathable and absorbs moisture. In low temperatures, the greatest comfort will be provided by warm materials such as flannel or flannel.
In most cases, the best options are natural fabrics that do not cause allergic reactions. Cotton is easy to iron and wash, has increased strength and is not too expensive. However, over time, the bright colors on the fabric become faded and unattractive.
Linen fabrics are best suited for warm summers, as they have a so-called “cooling” effect. But not everyone will like the rough texture of linen, which can cause significant discomfort to delicate skin. In addition, such material wrinkles quickly and is difficult to smooth out.
Fans of natural silk can opt for this expensive material, which looks great, feels pleasant to the touch and cools the skin. But for a silk pillowcase to last a long time, it needs special care. Regular machine washing and hot ironing can quickly damage the fabric.
Natural satin is quite popular as a material for pillowcases. This is a strong and durable fabric with a very pleasant structure that does not harm even the most delicate baby skin. Satin does not fade over time, does not change shape after heat treatment and is easy to clean.
Thin cambric can provide comfort to the most demanding users, but it quickly loses its properties after repeated washing. For this reason, using cambric pillowcases on a daily basis is illogical.
Pillowcases made of natural wool will keep you warm in cold winters. At the same time, the material also has a number of useful properties, improving a person’s well-being during colds and reducing the intensity of joint pain.
But in order for a wool pillowcase to last a long time without deformation, it must be carefully looked after using special products.
Fabric selection
When choosing fabric for sewing bed linen, you should consider the following criteria:
- Fabric structure. The fabric can be made from natural fibers (linen, cotton, viscose), synthetic or mixed (contain both natural and synthetic fibers).
- Fabric color or pattern. Fabrics can be plain, with a chaotic pattern on the surface; the pattern can be arranged in coupons (when a composition (picture) is depicted on the fabric or repeated throughout the entire fabric. The disadvantage of coupon fabric is that it needs to be selected so that the coupons are intact, and also in on pillowcases, large compositions will be cut and it will not look aesthetically pleasing. Bright fabrics with an abundance of colors can fade. It is better to choose a fabric with a medium-sized pattern that will look good on the pillowcase. After all, the fabric will have to be cut and the pattern that looks good on a roll may not be cut at all lose your attractiveness.
- Fabric width. Fabrics for bed linen come in widths of 1.45 m, 2.2 m and 2.4 m. The width of the fabric determines how the patterns will be placed on the canvas and whether there will be waste from sewing (lunges).
- Fabric thickness.
The most suitable fabrics for sewing bedding, in particular pillowcases: chintz, calico, poplin, satin, linen, ecocotton, microfiber, silk, percale.
Their composition can be 100% natural or contain admixtures of synthetic fibers. Synthetic fiber increases the wear resistance of the fabric, the resistance of the fabric to shedding, this fabric shrinks less (decreases in size after washing or heat treatment:
- Chintz is a thin cotton fabric, inexpensive, and there are many color options on sale. The width of the chintz is 0.8 m, 1.45 m. The fabric has low wear resistance. Products made from such fabric will last no more than 5 years. After just 2-3 washes, the fabric will look significantly worse than when purchased. The colors will become paler, the fabric itself will look “worn”.
- Calico is a natural cotton fabric, slightly thicker and more expensive than chintz. The width of calico is 1.4 m, 2.2 m or 2.4 m. Calico is available for sale in a wide variety of colors and patterns. Will last a little longer than chintz.
- Poplin is a denser and thicker cotton fabric compared to chintz and calico. Retains its appearance for a long time. Poplin products can last up to 10 years, but such fabric is also more expensive.
- Satin is a more expensive cotton fabric. Has a dense weave of threads. The fabric looks glossy and feels smooth to the touch. This effect is achieved due to the satin weave of threads in the fabric. Service life - more than 10 years. The appearance of the fabric is preserved for a long time.
- Linen is a natural fabric made from flax fiber. The thickness of linen fabrics can vary. Linen fabric is a bit stiff, but gets softer with every wash. The fabric is expensive. During use, it wrinkles quickly, and you will have to put in a lot of effort to smooth it out. The service life is 8-10 years, but high quality linen can last for decades.
Important! Satin and silk are difficult fabrics to work with. It is better not to choose such fabrics for beginners. The fabric slips and because of this it will be difficult to make beautiful, even seams. The product may be warped.
How much fabric will you need, how to calculate
An important step in preparing to sew a pillowcase is counting the material. You need to decide in advance on the dimensions of the finished product, and then use these indicators to determine the amount of fabric.
When making a standard wraparound cover, you need to add about 25-30 cm to the length of the pattern, as well as at least 1.5 cm for tucking the edge of the pocket. Thus, for a pillowcase 50 by 70 cm we use the formula:
50x2 (sides) + 25 (flap) + 5 (seam allowances) = 130 cm.
For a pillowcase 70 by 70:
70x2 (sides) + 25 (flap) + 5 (seam allowances) = 170 cm.
If you plan to create a cover with a zipper, you just need to add 5 cm to the length of the pattern on each side. In this segment, the fastener will be embroidered.
When designing a pillowcase with buttons or snaps, 4 cm is added to the given length on each side. This is the width of the strap with slotted loops, taking into account the double hem.
Expert opinion
Alexandra Vilisova
Experienced seamstress
I recommend adding an additional 3% of material to the dimensions, allowing for shrinkage of the fabric after the first wash.
In some cases, it is advisable to wash and iron the fabric in advance before sewing the pillowcase. Then we can say that the resulting product will exactly fit a specific pillow.
Tips for choosing the right size
To choose the right linen, you should start by determining the size of the pillow. In addition to length and width, you need to take into account thickness. A particularly fluffy pillow can also add difficulty when choosing. If the sizes fall into the standard range, then you won’t have to spend a lot of time searching. If possible, you should measure your pillowcase in a store before purchasing it.
It is possible that the size declared by the manufacturer does not correspond to the actual size. You should pay attention to the material from which it is made. Some types of fabrics shrink a lot after washing
In this case, it is better to refuse the purchase and choose another model or take a larger pillowcase. In the case of non-standard sizes, it will be faster to sew a custom-made pillowcase. As a rule, ateliers and workshops offer a wide selection of fabrics, which will allow you to create unique linen for every taste.
Of course, a large pillowcase can be placed on any pillow. But you shouldn’t chase size. This will only lead to wrinkles and lumps. All this will make sleep less comfortable, lead to neck pain, and a feeling of weakness in the morning.
Constructing patterns for various types of pillowcases
The most popular pillows have dimensions of 50x70 cm. Traditionally, the cover or clasp is located on the smaller side of the pillowcase. Since the product is quite simple, there is no need to make patterns. Sewing patterns are built directly on the fabric from the wrong side.
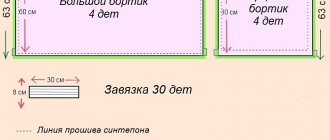
Above is a simple pillowcase with a scent for a 50x70 cm pillow. The canvas will consist of two parts of 70 cm, a small part of 5 cm and a 22 cm wrap. 1.5 cm strips are provided on both edges of the part for processing.
On the smaller side, it is recommended to allow 2.5 cm allowances for seams. The result will be a solid rectangle with dimensions of 170x55 cm.
Pillowcases measuring 70x70 cm are created in a similar way. Only one of the sizes changes.
The pattern includes two parts of 70 cm, a small part of 5 cm and a 22 cm wrap. On each side, 1.5 cm is provided for processing the edges. On the smaller sides there is another 2.5 cm allowance. The final rectangle measures 170x75 cm.
Pillowcases with a zipper are cut out without unnecessary elements in the form of a smell. Below is an example of a product diagram for a pillow with dimensions of 50x50 cm.
Pillowcases for decorative pillows are created in the same way. The only differences are in size, since such products are often smaller than regular sleeping pillows and usually have a square shape.
Quantity of material
Although pillows come in several standard sizes, be sure to take measurements before you begin. Consider the fullness of the pillow. If it is “empty”, the fabric can be cut strictly according to the measurements; if you have a “full”, high pillow, make a margin of 2 cm in each direction, otherwise it will be inconvenient to put on the pillowcase.
Now let’s calculate the dimensions of the fabric for a 50 by 70 pillow.
- 70*2=140 cm length + 5 cm (allowances for seams and zippers) = 145 cm length.
- 50*2=100 cm + 5 cm (for seams) = 105 cm width.
For a pillow measuring 40 by 60, you need the following fabric sizes.
- 60*2=120 cm length + 5 cm (allowances for seams and zippers) = 125 cm length.
- 40*2=80 cm + 5 cm (for seams) = 85 cm width.
Pillowcase sewing options
There are many pillow models that use certain types of pillowcases. In order for the sewn product to fit, it is necessary to make all the necessary measurements in advance.
Then, depending on the user’s preferences, one or another type of pillowcase is selected.
Sew a pillowcase on a pillow 50x70 cm
To sew a pillowcase with your own hands, you need to prepare fabric, thread, safety pins, chalk for marking, scissors, a ruler and a sewing machine.
Above we discussed how to mark the contours of the future product on the material. After the drawing is ready, all that remains is to cut out the figure from a single piece of fabric.
Next comes the actual sewing of the pillowcase:
- The sections are bent in width and processed using a sewing machine.
- Now the pillowcase folds. First, the desired rectangle is formed directly, and then the smell is placed on top. The structure is fixed with pins.
- The sides of the product are processed with a sewing machine, retreating the same distance from the edge.
All that remains is to turn out the finished pillowcase and try it on the pillow. If no problems arise, the work can be considered complete.
Simple pillowcase 70x70 cm
In the USSR, the standard products for pillows were pillowcases with dimensions of 70x70 cm. They are still popular today. A distinctive feature of this pillowcase is the presence of a special smell.
Production is carried out using a sewing machine, pre-marked fabric, thread, scissors and chalk.
Procedure:
- Turn the material with the wrong side facing the user and use chalk to apply the required markings.
- The wrap side is hemmed. The seam in this case is always located on the wrong side. The product is basted on both sides to form a kind of pocket.
- The sides are stitched with a strong backstitch.
- The pillowcase is folded right side inward.
- The seams are basted on the sides.
- The product is leveled.
- The basting is stitched.
Now the pillowcase is turned inside out and inspected. If there are no defects, you can immediately put it on the pillow.
How to sew a pillowcase 40x40 cm?
A pillowcase with dimensions is sewn using a similar algorithm:
- Markings are made on the material in the form of a rectangle with dimensions of 42x95 cm.
- The figure is cut out of fabric and overcast on the smaller side with an indentation of 2 cm.
- The overcast edges are processed using a machine. All threads are removed.
- Folds into a square with dimensions of 42x40 cm.
- The edges are overcast on a sewing machine with an indentation of 1 cm.
- The product is turned inside out and placed on the pillow.
For small decorative pillows, it is often not necessary to sew pillowcases with any fasteners or wraps. It is enough just to ensure a tight fit of the fabric to the product.
Decoration methods
Decorative pillowcases are often decorated with additional elements, such as embroidery or appliqué, frills or lace, beads and other elements. Elements can be fixed before the product is manufactured or after. Markings for decorations are applied to the outside of the product, then hidden or washed off after decoration is completed.
If you wish, you can also decorate pillowcases purchased at the store.
In addition to standard decoration methods, pillowcases for sofa cushions can initially be sewn from scraps of fabric, which will replace the appliqué effect. This method is more complex, but also economical. You can use unnecessary pieces of fabric or swatches from other products.
To make such a pillowcase, you need to make a pattern, attach scraps of fabric to it, and baste them. You can sew them together either by hand or by machine.
Decorative pillowcases can also be made from any old material, such as a torn shirt or jeans. This will also allow you to create a unique product design.
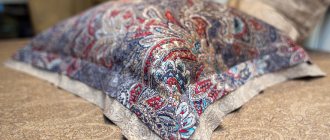
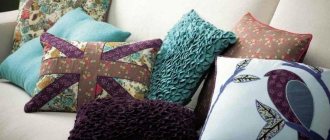
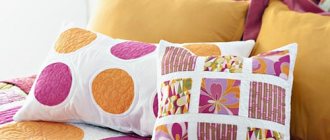
In the photo of pillowcases you can see different decoration options.
How to sew a pillowcase with a zipper: master class
Pillowcases with a sewn-in zipper are extremely convenient products that are easy to use and easy to maintain.
Instructions for sewing a pillowcase with a zipper:
- The pattern of the future product is built on the material. The pillowcase can be rectangular or square. To the dimensions of the pillow you need to add one centimeter on each side and additionally take into account seam allowances. Moreover, the part for sewing in a zipper should be 3-4 cm longer than the first part.
- The zipper is basted to the fabric with the edges of the parts folded and secured with non-woven tape.
- Now the machine stitches are laid, and the running stitch is unraveled. The parts along the edges of the zipper are also machine-seamed.
- The edges of the parts are folded in such a way as to hide the zipper. The material is first fixed with pins and then stitched on a machine.
- Now all that remains is to sweep the four sides of the pillowcase with threads and sew them on a typewriter. After basting, be sure to open the zipper slightly so that you can then turn out the finished pillowcase.
The product needs to be washed, ironed and put on a pillow.
Required tools and materials
To properly sew a pillowcase with your own hands you will need:
- high quality fabric;
- threads;
- sewing machine (an overlocker may be suitable);
- scissors;
- marker;
- ruler;
- triangle ruler;
- whatman.
Often, a pillowcase is made from a single piece of fabric, with a minimum number of seams. In terms of qualifications, even beginners can perform such tailoring. Let's consider the algorithm of actions.
- The required size of material is cut, taking into account seam allowances of 1.8 cm, then you will need to calculate the total area. Typically the size is 50 x 175 cm.
- Then the sides that are shorter in length are processed. This is done using a seam with a closed cut. The material is placed on a flat surface, the front side is at the bottom. An indent of 70.5 cm is taken from one of the edges and a line is drawn along the ruler with a marker. Then the future product is folded. One side will be thirty centimeters longer than the other.
- The longer side is wrapped around the edge. The edges of the fabric are lightly processed so that there is no deformation in thickness. Thus, it turns out that part of the product will be stitched and wrapped in two sections, the other part will be wrapped in three sections. The smell will also have to be added.
- After everything is done, the pillowcase should be ironed well.
How to sew a wrap pillowcase
Wrap pillowcases are the simplest products that even an inexperienced sewing machine user can easily handle. For sewing, a single piece of fabric is used without any additional elements.
Procedure:
- Markings of the future pillowcase are applied to the fabric, corresponding to the dimensions of the pillow. The smell is traditionally made about 20-25 cm.
- A rectangle is cut out of the material.
- The sections are folded and stitched to ensure reliability.
- Lay out the rectangle with the wrong side up. Measure 25 cm and fold so that the front side is at the top.
- On the other side, measure 70 cm and also bend it. Fasten the edges of the resulting structure together with pins.
- Hand stitch the sides using a regular linen stitch.
- Turn the structure inside out, not forgetting the valve. Carefully smooth out all corners and sides.
- Sew the sides with a sewing machine, leaving 1 cm from the edges.
All you have to do is turn out the pillowcase and put it on the pillow.
Step-by-step instruction
Mark the lines of the pillowcase drawing on the fabric (we repeat, the drawing is done with a simple pencil or chalk along the wrong side). Chalk will not leave marks on the product in the future. A simple pencil, unlike a ballpoint pen, can be easily removed when washed.
Allowances for side cuts will be 1.5 cm. Below there will be an explanation of this point.
After cutting it should look like this:
- Pillowcase – 1 one-piece piece that includes two sides of the pillowcase and a flap. The valve will hold the pillow in the pillowcase.
Hem one edge of the pillowcase and the edge of the flap using seam No. 1.
Now you can voice one sewing trick that will make the side seam strong. Sew the side sections of the pillowcase using a backstitch (seam No. 4).
This seam is used by professionals in the clothing industry. Linen sewn with such a seam will last its owners much longer.
This seam is achieved thanks to an allowance of 1.5 cm.
Fold the pillowcase with the cut edges right side inward. The height of the pillowcase should correspond to the size of the pillow (example: 70x70). The flap needs to be folded over the wrong sides.
The result is an envelope: the entrance to the pillowcase is inside. Stepping back 0.5 cm from the edge, stitch the sides.
Do not turn the future product inside out. The following steps are similar to creating seam No. 1. Fold the sides by 0.5 cm (the stitching should go inward) and another about 0.7-1 cm. Baste and stitch the hem. Turn out the pillowcase.
All that remains is to wish you a good rest and pleasant dreams.
How to cut a pillowcase and correctly fold the finished rectangle of the future pillowcase can be seen in the video.
Source
Sofa Cushion Cover with Zipper
In order to sew a pillowcase with a zipper, you need a twisted (spiral) zipper for the entire length of the turn. The width of the fold of the pillowcase using this sewing technology is only 10 cm. Its purpose is only to hide the zipper itself. By the way, the fabric consumption when cutting such a pillowcase is reduced by about 20 cm in length.
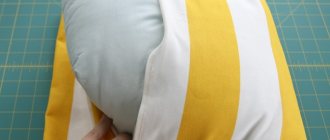
Before sewing the side seams of the pillowcase, sew a zipper on the edges, as shown in the photo. Close the zipper, leaving a small area open. Through it, you will then unzip the entire zipper and turn the pillowcase over your face. Sew the seams using a regular stitch on the machine and overlock the edges.
A pillowcase with a zipper can be made without a fold, then the zipper will be “there”, which is undesirable, but inserting such a zipper will not be difficult and will provide an additional savings of another 10 cm on the fabric.
Decorative pillowcases are sewn in much the same way as a pillowcase with a zipper, only the zipper does not have to be “hidden”. A zipper can be inserted into one of the seams, and even placed on the back side of a decorative pillow. Before sewing a pillowcase with a zipper or a decorative pillowcase for a sofa from “expensive” fabric, I recommend first sewing a pillowcase from calico or chintz for a pillow.
Volumetric, soft pillow letters are a stylish and original decoration for your bedroom, especially if the textile letters completely repeat your name. Such original decorative decorations are easy to make with your own hands. In addition, sewing just one three-dimensional initial letter of your name does not require a lot of fabric and other materials. For example, for the letter A, size 50x40cm, it is enough to buy 0.5 meters of any inexpensive fabric and a little padding polyester. It is only important to make the correct pattern and not get “confused” in the technology of sewing it. For more details, see the article on the “Sewing Master” website: DIY pillow letters.