New Year card with applique
The easiest way to make a postcard with your own hands is applique. It can be any thematic applique: snowflake, Christmas tree, snowman, Santa Claus and other winter motifs.
Snowman applique
Let's make an applique postcard for the New Year. Take a white sheet and draw a circle. You can use a compass or circle a glass. Cut out three circles of different diameters. Paint the edges blue with a sponge. Cut out a small blue rectangle with curly scissors. Glue the largest circle in the center. Then, attach the medium and small ones. Glue two red stripes as a scarf. We draw eyes and long arms. We make white snowflakes and glue them to the background. Making an unusual postcard with a snowman is suitable for children 4 years old.
Applique Christmas tree and gifts - step-by-step MK
The next version of the New Year's card is interesting using the origami technique. Let's take three green squares. We make bends along two diagonals. We bend the opposite triangles inward. We bend the right and left corners towards the center. It is necessary to repeat these steps with all squares. When all the triangles are ready, glue the white rectangle onto a blue sheet of cardboard. Place the Christmas tree on the right side of the card. Cut squares and rectangles from colored paper. We glue different ribbons to them and place them on the left side of the applique. All that remains is to add the inscription “Happy New Year!” and your handmade New Year's card is ready!
Ideas for New Year cards with applique
Snowmen made from palms
No holiday is complete without greeting cards. A child should be taught to be creative from childhood. You can make this card with a child of any age, because in fact, the main task of your baby is a palm print. Let's get started.
Let's take:
- colored cardboard,
- paints,
- colored paper and glue,
- markers.
A sheet of cardboard needs to be bent in half, this will be our future postcard.
Since paint spreads on cardboard, take a sheet of colored paper and glue it onto the cardboard. You need to put a child's handprint on a sheet of colored paper. To do this, we smear your child’s hand with white gouache and put an imprint on the sheet. To make the print even, you need to paint on the unpainted areas with a brush.
When the paint has dried, we draw a snowman from each finger.
The front side of the card is ready, now let's work on the inside.
We draw snowflakes and a snowman with white paint and write a wish. That's all.
More simple and easy options:
Hand-drawn New Year cards
Hand-drawn postcards look original. For drawing, you can use colored pencils, felt-tip pens, and paints. Even if you don’t know how to draw at all, with our step-by-step MKs you can create beautiful handmade crafts.
DIY watercolor New Year card
Let's consider different options for watercolor works and patterns suitable for postcards.
Beautiful patterns for postcards step by step
It is very easy to decorate a postcard with a simple lettering. On white paper we mark the place where the inscription will be located. Use a pencil to outline the word “merry” and add volume to the letters. Erase all the extra lines and start coloring. Carefully paint over all the letters with different colors. To make the picture more interesting, you can add splashes. We take watercolor with a small amount of water onto a brush and splash it onto the drawing.
You can also draw a simple wreath that will look good on any New Year's card. Using a simple pencil, draw an even circle. On the line we draw five circles, equidistant from each other. We paint them in different colors. Add brown twigs and cover them with green needles.
Another interesting idea is a New Year's garland. Draw a chaotic curved line and three large light bulbs. We paint the line and bases of the light bulbs green, and the light bulbs themselves pink, yellow and blue. Don't forget to leave highlights on the lamps and make shadows on the other side.
Let's draw a Christmas tree. On a piece of paper we show a tree with three tiers. Add brown stump. Draw a yellow circle on the top of the tree. We make a glow by gradually reducing the paint and adding more water. Between the tiers we add colored Christmas balls.
Any card can be decorated with a New Year's print, such as Christmas trees, red ribbons or a simple geometric pattern.
How to draw a New Year's lantern with watercolors step by step
Let's make a postcard using the “wet on” watercolor technique. We build the lantern and outline the branches. Using a wide brush, cover the entire sheet with water. While the paper is still wet, add bright yellow watercolor to the center. You can add a little orange around the edges. Cover the background with blue watercolor. You can sprinkle sea salt on damp paper to create beautiful stains. Draw the outline of the lantern in black with the addition of orange. For realism, we make the flashlight handle fuzzy. At the top of the picture we draw branches. Let's complete the details. The result was a fabulous New Year's card.
Drawing Christmas tree decorations in watercolors - step-by-step instructions
Using a simple pencil, draw three Christmas balls. We make the inscription and patterns. First, paint all the yellow parts. We add green and red colors. Now, you need to carefully cover the entire sheet except the balls with water. Add blue watercolor to the wet paper. You need to let the watercolor spread across the entire sheet. We complete the details with a black pen. The New Year's themed craft is ready.
Ready-made watercolor cards for inspiration
DIY gouache postcard for the New Year
If you don’t have watercolor paints, you can paint the card with ink.
Drawing a snowflake with gouache - master class
Take thick paper and seal the edges with tape. Cut out a snowflake from a notebook sheet. Place it in the center of the paper. We place the sponge in the blue gouache and, using driving movements, cover the entire sheet with gouache. Removing the snowflake. Cover the design with glue in the required places and sprinkle with glitter. We make an inscription and draw stars. All that remains is to fix the craft with hairspray. Making children's New Year's crafts is very exciting, and the work itself can be submitted to a competition.
Drawing a spruce forest with gouache - step-by-step instructions
The following craft can be done both for school and kindergarten. We draw several Christmas trees with green gouache. Cut them out and glue them onto white paper. We make gifts and stars for Christmas trees from colored paper. We make bows from black thread. We attach all the details and your creative DIY postcard is ready.
Ready-made New Year cards drawn in gouache for inspiration
DIY New Year's card in pencil
We make a sketch with a simple pencil. A small still life will consist of sweets, tangerines and gifts. Erase the extra lines and outline everything with a liner. To make the drawing seem realistic and interesting, we will use different shades. Paint the tangerines light orange in the center and darken the edges. We cover the leaves with light green and light green. We draw tangerine branches using different shades of brown. We color the gifts red and purple. We cover the remaining elements with blue and gold. Fill the background with blue, turning into dark blue. Draw shadow areas in black. Drawing this card is quite difficult, but if you put in all the effort, it will definitely work out!
Ready-made New Year cards for inspiration, drawn in pencil
DIY postcard with markers for the New Year
We draw a triangle to indicate where the future tree will be. Create a silhouette of a tree. Add Christmas balls, ribbons and a star. We finish drawing the gifts under the Christmas tree. We outline the picture with a black liner and erase the pencil lines. Color the tree with a green marker. Use a slightly darker shade to highlight individual branches. Paint over the balls, star and ribbons. Add color to the trunk and gifts.
Ideas for inspiration
DIY New Year card with felt-tip pens
You can also draw a postcard with felt-tip pens. The drawing will turn out bright and colorful, but you can’t make mistakes; you won’t be able to erase the extra line!
Drawing a gnome with felt-tip pens step by step
Let's draw a gnome on a New Year's card. To maintain proportions, mark the lines on the sheet. We fit the body and head of the gnome into the central rectangle. A little lower we draw the legs. Add a tall hat, a voluminous head and a face. We finish drawing such small details as stripes on the legs, boots and mittens. We paint the original gnome's clothes red. Add green and yellow elements. A cool gnome is ready for the New Year.
How to draw a polar bear step by step
Let's make a winter bear. We draw the outlines of the bear's body and head. Draw the hat and muzzle. Use a blue felt-tip pen to color the background, and a red marker to color the header. It turned out to be a cute New Year's card.
Finished works
Gifts and gift wrapping
A postcard with gifts is a new original solution for a greeting card. It is also made in 3D format, but looks more modern.
We will need 2 sheets of colored cardboard, glue, scissors, pencil. It’s good if you have beautiful wrapping paper at home, it will help decorate our card and make it more festive.
Master Class:
- We take a sheet of cardboard that will be the cover, fold it in half and draw our future boxes on it.
- Cut it out as shown in the picture.
- We unwrap and receive our future gifts.
- All that remains is to decorate the boxes beautifully. Wrapping paper, foil, ribbons, etc. are suitable here.
- To make the card beautiful not only from the inside, but also from the outside, you need to glue another sheet of cardboard to it, then it will look complete.
Simple and bright design of a postcard using the quilling technique.
This decoration can be used not only for cards, but also for decorating gift packaging.
Santa Claus and other New Year's characters
New Year is a fairy tale with Santa Claus, Snow Maiden, Snowman and other fairy-tale characters. Therefore, a New Year's card with such characters will look great and will delight the recipient.
Father Frost
A postcard with Santa Claus can be made in 20–30 minutes, together with the children.
You will need colored cardboard, colored paper, glue, scissors, pencil, felt-tip pens.
Master Class:
- Take a sheet of red cardboard and fold it in half. This is our basis.
- We cut out white cardboard to the size of the cover and draw two lines on it - the outline of the beard and hat.
- Cut it and try it on red cardboard.
- Draw and cut out the mustache.
- To obtain volume, it is better to make them from cardboard.
- Next we will make the face. To do this, cut out a rectangle of suitable size from flesh-colored paper.
- From the same paper we make an oval nose.
- You can draw eyes or cut out two circles from black paper. Highlights are drawn with a white felt-tip pen.
- We cut out fir branches from green paper; if desired, they can be decorated with red paper circles imitating rowan berries.
- Now we assemble our postcard and glue all the parts, starting with the face, beard, hat, then the mustache, nose, eyes, twigs and balls.
Snow Maiden
A postcard with the Snow Maiden can be made together with the children.
To make the card voluminous, we use improvised materials to decorate the outfit.
What we need:
- Cardboard.
- Colour pencils.
- Plasticine.
You can draw the Snow Maiden yourself or print a picture from the Internet. Next, paste the drawing onto cardboard and paint it. We make small balls from plasticine and attach them to a fur coat and mittens.
Snowman
We’ll also show with an example how you can quickly make a postcard with a three-dimensional Snowman.
We will need colored paper, cardboard, glue, pencil, compass, ruler, felt-tip pens, pieces of corrugated cardboard, foam plastic or other material, 0.3–0.4 cm thick.
Master Class:
- Take a sheet of white paper and use a compass to draw three circles of different diameters.
- We outline them with a blue felt-tip pen.
- We bend a sheet of blue cardboard in half - this is our future postcard.
- We cut out 3 rectangles of corrugated cardboard and glue them to both sides with double-sided tape.
- We glue a piece of corrugated cardboard onto each circle of the future snowman and assemble a postcard.
- All that remains is to decorate our card. We gave the snowman a red nose, twig arms, a hat, and eyes. The decoration of the postcard will be a beautiful inscription and a snowflake cut out of white paper.
Here is another version of a simple card with a snowman.
Simple drawings and primitives
A simple New Year's card can be used to make a stylish gift that will satisfy even the refined taste of an esthete.
We use only white cardboard and a black felt-tip pen. We draw Christmas tree balls made in high-tech style.
Another simple yet charming card.
She is an example of how you can quickly and inexpensively make a pleasant surprise even to a stranger. The decor uses paper with ornaments, pieces of genuine leather, self-adhesive rhinestones, and a napkin.
More Christmas tree ideas
There are never too many Christmas trees, and neither are homemade cards with them. We present you with more options where you can get ideas for creating your own unique postcard.
Christmas tree in origami style
Christmas tree using quilling technique
Here you just need to learn how to twist the rolls and form them into simple “eye” and “drop” elements.
3D cards with Christmas tree
Another option for a simple but original postcard
Stylish card with Christmas trees
Winter landscapes
Postcards with winter landscapes are mesmerizing. They can be very simple in execution, but this does not lose their charm.
Here's a very simple option.
You don't even need a master class here. Just take white cardboard and cut out trees, houses, and the moon. Then we glue this beauty to a black cardboard base. Please note that in this option it is better to use structured cardboard, it will give the card volume.
If you want to choose a more complex option, draw a classic winter landscape on a postcard, combining simplicity, silence and tranquility.
Or choose a different winter design.
A city landscape or an image of historical buildings will do; even gingerbread on a postcard conveys the holiday atmosphere.
Balloons
Postcards with voluminous balls look impressive and bright. You can use any materials: cardboard, colored paper, foil, wrapping paper, New Year's rain, garlands, confetti, Christmas tree tinsel, beads, etc.
Let's make a beautiful card with a Christmas ball with our own hands.
Required:
- A sheet of dark blue cardboard A4.
- Rhinestones are blue, light blue, white, of different diameters.
- Self-adhesive white pearls 50 pcs.
- Blue ribbon for bow.
- Glue, pencil, compass.
Master Class:
- We make the base out of cardboard - we simply bend it in half.
- Using a compass, draw a circle on it with a diameter of 6–7 cm.
- Glue white pearls around the circumference.
- To make it more convenient, you can use tweezers.
- Now we glue rhinestones inside the ball in a chaotic manner, trying to fill all the space.
- Glue 6 pearls on top of the ball.
- We make a bow from the ribbon and glue it to the card.
Another option for a cute simple card with balloons.
To make a ball, cut out 3-4 equal-sized circles from paper of different colors. Fold them in half and glue the halves together. We glue the two outer ones to the paper. We make as many balls as we want to place on the card. The tie here is green twine or woolen thread.
Postcard with orange slice balls in scrapbooking style.
The scrapbooking style is especially suitable for creating cards. This is an extremely beautiful, interesting and unusual technique for performing congratulations. You can literally use any materials for such cards, and choose a design as complex as your experience and skill allows.
A postcard with the romantic title “Time of Miracles.”
What we need:
- corrugated cardboard;
- pastel paper;
- scrap paper (2 sheets for background);
- glitter;
- glue;
- adhesive rhinestones;
- wooden base;
- priming;
- brads;
- decor (wooden blanks, stars, Christmas tree);
- double sided tape;
- stamp pad;
- napkins.
Master Class:
- We cut the pastel paper to size 13x20 and fold it in half. This is the basis.
- We cut out a sheet of the main background to the size of half and a slightly smaller sheet of the additional background.
- Glue the main tone onto the base, then a small piece of corrugated cardboard, then a sheet of additional background. This will give the card volume.
- Glue double-sided tape and a napkin to it.
- We process the edges of the picture that will participate in the plot with gold using a stamp pad. We paint thematic wooden cuttings in the same way.
- We insert brads into the picture, coat the paper cut-out of the Christmas tree with primer and sprinkle with pearlescent glitter until it dries.
- On top of the napkin we attach a wooden cutout and a golden curl.
- Under the cutting we attach a star, the main picture and the finished Christmas tree.
Tiger
In the coming year of the tiger, you cannot do without a postcard with his image. Here is the simplest cute tiger cub.
If you have drawing skills, you can make the card more interesting.
You can print the tiger from the Internet and paste it into a postcard or draw it yourself.
Candles
Candles are always beautiful, especially on New Year's Day. Postcards with candles look very beautiful, but it’s better to make them also voluminous, combining different materials when making them.
Snowflakes
You can make cards with snowflakes with children, there are a lot of options.
You can use the quilling technique.
Let's make a beautiful unusual three-dimensional card with snowflakes.
We will need:
- snowflakes cut out of paper, different sizes;
- colored cardboard;
- watercolor paper;
- narrow satin ribbon for bows;
- bead or sequin;
- blue gouache;
- sponge for stamping with paints;
- glue.
Master Class:
- Making a postcard cover . Take watercolor paper with the textured side facing out.
- Cut out a large snowflake so that it does not fit completely on the sheet. We spread blue gouache on a sheet of whatman paper and stamp it with a sponge through the snowflake. It's better to try it on a scrap piece of paper first. It is better to use a semi-dry sponge so that the paint layer is not very thick. It must be made translucent so that it resembles a coating of frost on glass. The paint layer should be thicker towards the center and transparent towards the edges.
- We try to preserve the composition , not to completely sketch the sheet; the combination of blue and blue with white should be organic.
- After everything is dry, we make a voluminous snowflake. Glue a snowflake made of blue paper down, white on top, decorate the center with a bow and a bead or sequin. This creates a multi-layer effect due to a large stencil pattern and 2 layers of snowflakes.
Another very beautiful, voluminous card with a snowflake.
Postcards for grandparents
The older generation is especially pleased if their grandchildren participate in the creation of the postcard. Even very young children will be able to contribute.
An example is a cute card with a baby's handprint.
Coat your palm with paint and apply it to the paper. Next, we paint the snowmen as we wish. To make the card voluminous, make scarves and hats from colored paper, and snowflakes from white.
New Year cards with photos
Postcards with photos of loved ones look very cute. It’s not difficult to make them, the main thing is to choose a good photo.
A black and white photo combined with a bright red decorative element looks very stylish and modern.
New Year cards for corporate parties
You can wish your colleagues a Happy New Year with a cheerful card. This will be the most budget-friendly, but pleasant option, you just have to prepare in advance.
Ideas for inspiration
A New Year's card can be more than just a congratulatory moment. This could be a real work of art that will be kept in the house and become its symbol.
Here are some awesome card ideas.
How to make a card with a New Year's garland with your own hands
Postcards with images of New Year's garlands are especially popular. And this is not surprising, because even a child can draw it with his own hands! In our MKs you will find two cool ideas for a New Year's card with a garland!
Draw a garland with felt-tip pens
First, we draw a garland. We outline it with a black felt-tip pen. All that remains is to paint it in any colors. This craft can be made for kindergarten.
Glowing garland using crayons - master class
For the next option you will need black paper and colored crayons. Using a white charcoal pencil we outline a curved line and bases for the light bulbs. Cut out the paper in the shape of a light bulb and apply it to the desired location. We paint around the template with chalk. Rub it with a cotton pad. We remove the template and repeat this with all the light bulbs. It turns out to be a cool garland.
DIY Santa Claus postcard
A postcard with a picture of Santa Claus will also be relevant. You can draw it or make an applique from colored paper.
Application from colored paper Santa Claus step by step
Let's make a postcard with Santa Claus. Cut out the white base. We make mustaches from the same paper. We glue red clothes and grandfather's beard onto the blue sheet. Add the face, hat, belt and head decoration. All that remains is to sign the postcard on the back side.
Application made of white and red paper - MK with photo
Children will really enjoy creating the next version of the postcard. We need to cut out two parts of the beard, the fur for the hat and the hat itself. We attach all the elements to craft paper. We bend the hat and beard. Glue on the eyes, nose and pompom.
"The Snowman Goes to the Masquerade"
My name is Olga Shevtsova, I am from the city of Kramatorsk. For the “Year of Creative Fleece” competition, I want to show you the work of my youngest son Dima (he is 3.5 years old) in the “Learning to be a Wizard” category. This is a New Year's card "The Snowman Goes to the Masquerade Party" .
Materials: • sheet of colored cardboard, • small blanks, • PVA glue.
The work was done using applique technique. So that the child can master most of it on his own.
We take a sheet of blue cardboard, and mom cuts out a white snowman.
Then, using curly scissors, we make a postcard from a simple sheet. It just makes beautiful edges.
Our snowman put on a mask - Mickey Mouse ears.
Mom helped with the eyes and mouth, as well as the carrot nose.
It's winter now, so you need to dress warmly. Let's make a scarf and buttons from a yellow napkin.
And there is also snow. From semolina. Like this:
When it dried, we shook off the cereal and this is what we got:
Another cute children's craft with surprises on video from YouTube:
Happy New Year!
Master class by Irina Kuleshova “DIY New Year’s card.”
New Year is one of the most fun and favorite holidays not only for children, but also for adults. Gifts are chosen and, of course, a postcard plays an important role in the gift. Naturally, you can buy it in a store, since they are produced in huge quantities. However, anyone will be pleased to receive a handmade New Year's card as a gift. Such a postcard will carry a positive charge and a sea of positivity.
Don’t believe it if you hear that making a postcard with your own hands is difficult. Let's try to dissuade you from this. In order for everything to work out, you will need a small amount of material, but the most important thing is a good mood and a little patience.
So, in order to make a postcard, you will need:
- white sheet of A4 paper;
- a small sheet of wallpaper or any other thick colored sheet of paper;
- wrapping paper, preferably with a picture of Santa Claus or any other New Year theme;
- multi-colored ribbons;
- a simple pencil;
- glue;
- scotch;
- ruler.
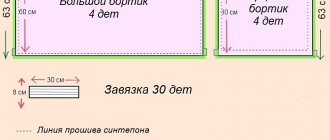
You can make a card of any size. It depends on your imagination. In our case, a piece 4.5 cm wide was cut from a sheet of white A4 paper.
On the finished white sheet, you need to make the following markings: measure 1.6 cm from the top, bottom and sides and draw the corresponding lines.
Next, take a sheet of wallpaper or thick paper. A piece of the same size as the central part of the white sheet is cut out of it. In our case, it was 17.5x21.5 cm. Future gift boxes must be marked on the same sheet. To do this, we bend the sheet in half lengthwise and indent the dimensions at the top and bottom by 3 cm. We make the boxes with dimensions of 2x2, 3x3 and 4x4 cm, taking into account the fold. Leave a space of 1 cm between them.
From gift paper we cut out leaves for gifts measuring 2x4, 3x6 and 4x8 cm. From the same paper we cut out a figure of Santa Claus for the front of the card.
Then we cut out the boxes on the wallpaper. At the same time, we make cuts, leaving intact lines parallel to the fold. We bend along the resulting fold line inside the paper with the pattern.
Glue the leaves previously cut out from gift paper onto the boxes. Let it dry.
Glue the thick paper onto a white sheet, aligning it along the drawn lines.
We attach ribbons to the resulting boxes using tape. Make a bow and attach it to the middle box.
You can decorate the inside of the card with some compositions cut out of wrapping paper.
Glue the figure of Santa Claus onto the front side of the folded white sheet.
To ensure that the card retains its shape, you can make ties from ribbon. To do this, punch a hole with an awl or a hole punch and insert a ribbon into it. Let's tie it up.
The postcard is ready.
At night, you can place it under a heavy object to dry thoroughly. You can give and please your loved one with your attention. In order not to forget the address of the page and share with friends, add it to your social networks: Do you want to know news about competitions or master classes?
Tags: Children's crafts, DIY cards
Attention! It is better to write urgent questions in the comments on the website (form at the bottom of the page) or, better yet, directly by email. There are no notifications about comments from the VKontakte form! This form is more for feedback. 
Discussion: 20 comments
- Tata:
March 2, 2022 at 4:44 amWell done kids, you made some interesting postcards.
Answer
- Olga:
November 17, 2015 at 01:47 pm
Well, wow, this is Santa Claus from the palm of his hand! Even a very small child can do such a gorgeous picture.
Answer
- Wilma:
January 15, 2015 at 01:10 pm
Cute
Answer
- Olga Shevtsova:
January 10, 2015 at 2:43 pm
Oh, thank you, thank you, Albina Nikolaevna, for your kind words! May your kindness return to you a hundredfold