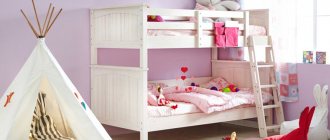
DIY bunk bed photo
If you have limited space in your child's bedroom or share a small apartment with friends, you can still make good use of the space by making your own bunk bed . Here we've compiled some of the best step-by-step instructions we could find online. All presented models have a unique design, so you can choose the best option for a master class on how to make a bunk bed out of wood with your own hands . So if you want to get a new comfortable bed and save some space in your home, check out our list of projects. We've even found a few examples of how to make your own three bunk bed so you can further improve your use of space. If you have the tools and some basic woodworking skills, you can make any of these beds. In each example you will find a link to the source website with detailed instructions. Be sure to look at all the projects to choose the most suitable bunk bed option.
Materials
When making a bunk bed at home, you need to choose the right material. Experts recommend paying attention to the following types:
- solid wood - from which beautiful, strong and durable structures are obtained. But working with it requires construction skills and abilities;
- lumber - which must be selected from high-quality dried specimens. Raw wood will not retain its shape, it will begin to move away, and cracks may appear;
- MDF is a modern analogue of ordinary wood. The products look attractive and stylish. You can choose laminated MDF boards. There is an option for a regular untreated slab, then it is finished finished with stain and varnish. If parts of the bed are ordered from a furniture factory, then specialists will process the edges with a special finish. The furniture will be neat, no different from the factory one;
- Chipboard (chipboard) is a material that is not suitable for all parts of the bed. You can use it to make drawers under the base of the frame, back, or panel. It is important to consider covering the ends of the parts with film;
- furniture panel - consisting of pieces glued together into a single whole. Natural wood is not just beautiful, it allows you to make carvings, make other ornaments, and implement interesting design solutions. Only a craftsman with carpentry skills can work with furniture panels.
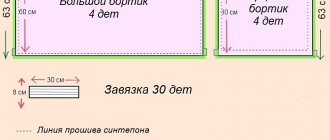
Drawings with dimensions
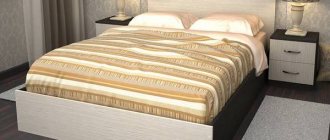
Regarding how big or small to make the bed when children are still small. In principle, you can immediately install a full-size bed. It just seems like it will take a long time for them to grow up. In fact, before you know it, “children’s” sizes will become small. And then the problem arises: where to put the old bed. Naturally, it’s a shame to throw it away, but used furniture doesn’t sell very well. Therefore, recommendations: make a standard size bed right away: 1*2 m or so.
Frame drawing for a bunk bed
Drawing of a bunk bed frame and necessary materials Drawing of a bunk bed with dimensions
Corner bed drawing
Corner bunk bed Bunk bed with wardrobe
Stairs to bunk beds
Drawings of stairs for two-level beds
How to update the appearance of old furniture can be read here.
Tools
Making two-tier furniture for children will not be difficult if you prepare all the necessary tools and remember your existing construction skills. Of course, it’s good if the master has already made something from wood and knows how to work with it.
To work you will need:
- saw - hacksaw;
- screwdriver;
- plane or grinder;
- knives;
- jigsaw (preferably electric);
- sandpaper;
- drill.
We need instruments and devices for measuring and fixing. You can't do your work without a simple pencil.
Stages of work
How to make a bunk bed yourself? This question is asked by everyone who has decided to correct the problem with the lack of sleeping space in the children's room. Let's try to consider the stages of making a bunk bed at home. Step-by-step instructions will help you complete this work without outside help.
The manufacturing process looks like this:
- the first thing you need to do is choose a bed model;
- draw up a drawing and diagram;
- purchase materials and prepare tools;
- based on the drawing, prepare parts of the required sizes;
- assemble the main frame;
- make the back, side walls, stairs, legs;
- assemble the overall structure.
During design and development, drawings of the bed are prepared. Particular attention is paid to the safety of the entire structure as a whole: strong frame, reliable side walls (fences), easy stair climb.
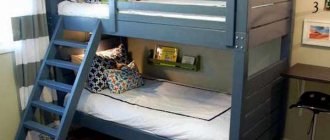
DIY bunk bed: photo report
To save space in a small room, it was decided to make a bed on the second floor, and equip a workstation for a computer on the first floor. If necessary, by adding a jumper in front and making a shield under the mattress, you can also make a sleeping place on the first tier.
A drawing was developed and materials were calculated. It was decided to make the frame from spliced boards. This is both cheaper and more reliable: a guarantee that the pillars will not twist when drying. Therefore, boards were purchased, as well as small-section timber for strapping. The width of the bed is made to match the size of the existing mattress
Drawing and purchased materials
The following materials were needed:
- for the workplace - a furniture board with a thickness of 18 mm and dimensions of 600 * 2000 mm;
- pine boards 90*45*3000 m - 16 pcs;
- pine beam 45*45*3000 m - 8 pcs;
- for the base under the mattress 2 sheets of plywood 9 mm thick, dimensions 1525 * 1525 mm;
- corners, screws, bolts.
The board was purchased already planed and sanded: the farm does not yet have equipment for processing it. Let's start right away with making the pillars:
- We cut it to size - the height of the pillars is 185 cm. A total of 10 identical ones are needed: in the corners and one pillar on the second side of the stairs.
- We fasten them in two: we lay one on top of the other evenly. At the same time, make sure that the annual rings are directed in different directions. This way, most likely, the pillars will remain level. We drill a hole at the top and bottom for the bolts and tighten the boards, placing washers under the head and nut. To prevent all this “beauty” from spoiling the appearance, we use a large-diameter drill to make indentations so that the nut and head are recessed. Then they can be closed with furniture plugs or covered with wood putty.
Ready racks - We begin assembling the frame. At a height of 145 cm, the first row of timber is the base for the mattress, at a height of 75 cm, the second row is the frame for the desktop. Under the timber we make a groove in one board half its width. We insert the bars into the resulting recesses and screw them into the end with self-tapping screws. Then we attach the corners to them, and then at the corners there are other pieces of strapping.
Start of frame assembly - We apply timber of the required length (145 cm) to the corners and fasten it with self-tapping screws. We attach the corners to the ends of the beam.
We attach the side bars to the first frame - We take two more posts and attach the corners of the side rails to them at the same height. Now the structure stands on its own. All that remains is to attach a long beam to the top trim.
The frame is almost assembled - At the top of the frame, another beam is screwed in length. This is a stiffening rib for plywood. You can make crossbars from short sections, but then to support them it is better to make support strips and nail the ribs to them. When nailing, you need to make sure that they are all in the same plane. Plywood is laid on top of the frame and nailed to the frame with small nails.
Longitudinal stiffening beam - A stand is installed that will serve as a support for the steps of the stairs. It can be made from one beam, which rests on the top frame, and one 185 cm long.
Installing the support post for the steps - If desired, steps can be embedded. If you have a jigsaw, this is not difficult. You can also plant them in the corners. It is less aesthetically pleasing, but reliable and simple.
We install the steps - In order to save money, we did not buy furniture panels, but made the tabletop from boards. If you also come to this decision, it is also advisable to place a support beam under the outer edge of the boards, otherwise the board will sag under load (put your elbows on the table). How the tabletop is made
- All that remains is finishing work: stuffing the railings, covering the nails with wood putty. After drying, sand and coat with paint or varnish.
Bunk bed: you can make it yourself
The option is simple. To implement it, you only needed a screwdriver, a wood saw and fasteners. This assembly option is for those who are unfamiliar with carpentry and find it difficult to make cuts and grooves. If you really don’t like the protruding fasteners, you can cover them with decorative overlays: thin planks can be placed on glue. They will hide all the imperfections of the assembly.
For another option for assembling a homemade bunk bed, see the video.
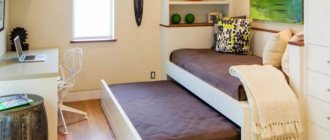
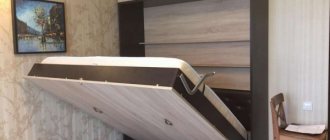
Roll-out from laminated chipboard
To make such a model you will need the following materials:
- laminated chipboard sheet (19 mm) - for the main parts;
- furniture board (22 mm) - for the bottom;
- accessories, fasteners.
The assembly diagram includes the following steps:
- the sheet is cut into separate parts according to the drawing;
- assemble the structure using corners and fasteners;
- The lower tier is equipped with wheels so that the sleeping place can move freely.
A roll-out bed is an ideal option for a small apartment.
The most durable is metal
Metal products have the greatest strength and reliability.
Note!
Do-it-yourself sliding wardrobe - manufacturing manual with a full description of the stages, types of structures, choice of manufacturing materials (photo + video)Do-it-yourself carriage screed: step-by-step instructions for creating it yourself, diagrams and drawings for beginners, selection of materials and tools (photo + video)
DIY stool - types of stools, manufacturing materials, step-by-step master class with simple diagrams and drawings for beginners
A frame made of any type of metal profile, round, square, rectangular or flat, looks stylish, ensures structural reliability, withstands significant loads, is not subject to mechanical damage, is easy to wipe clean, and has a service life of several decades.
Compared to other materials, metal will be more expensive, but with welding skills you can save on the services of a welder.
Decoration
One of the options for decorating furniture made from pipes is to use different colors of the material. A table with blue legs will become a bright element in the room. Products come in different colors: white, black, blue, blue, yellow. Connecting elements also come in different shades. Thus, the pipes will be one color, and the fasteners will be another. Combinations of white and blue or black and red look beautiful.
When it comes to armchairs and chairs, they are decorated with decorative pillows. The foam lining on the back and seat is covered with a beautiful bright fabric. Decorative pillows decorate the product, making it cozy, comfortable, and original. They come with embroidery, buttons or tassels. The color range of pillows is varied. When choosing it, it is necessary to take into account the overall design of the entire room.
Children's furniture should be interesting and colorful. It is recommended to cover the chair or high chair with durable fabric with a bright pattern. This could be a cartoon character, toy cars, dolls, stars and much more. Pay special attention to furniture made from PVC pipes for children; it must be safe, without sharp elements. Otherwise, the kids may get hurt.
Making furniture from PVC pipes is easy. It will become a highlight in the room and will attract the attention of guests. Plastic pipes are inexpensive, so you can save a lot of money, since new furniture is expensive.
Economical option
The use of MDF, furniture panels, chipboards for furniture assembly simplifies the work and makes it more cost-effective. It is enough to cut out the necessary parts from the sheet and connect them together. Cutting into parts can be ordered in construction stores and construction markets.
Multi-storey structures involve the use of additional materials, metal, wood to impart stability, ensure reliability and strength.
Furniture panels are mainly intended for covering the finished frame. What is the advantage of mastering such material, its ready-made appearance, wide range of “wood-like” colors. It is already covered with a smooth, laminated sheet with a water-repellent surface and does not require additional impregnation.
The disadvantages of operation include the release of the adhesive composition used in the production of shields. To reduce the effect, all edges are securely insulated.
Children's hospital
You will need the following materials:
- vertical posts (38 mm);
- frame boards (38 mm);
- boards for slats, planks, railings, steps (20–30 mm thick).
The instructions for assembling a children's bunk crib are quite simple:
- according to the drawing, prepare all the details;
- assemble the ends of the bed from posts and supports;
- attach the side supporting frames to the support;
- fix the cross slats for laying the mattress;
- Attach the protective guard to the headboards at the top;
- assemble a ladder for a bunk bed according to the drawing with your own hands;
- varnish the finished structure.
A crib located on the second floor must have a special fall protection system. The stairs are also subject to increased safety requirements.
Features of the bed
Considering the obvious advantages, it is necessary to note the existing disadvantages, among which are:
Safety must come first. For a small child, there should be sides on the top shelf; on the bottom they will also protect against falling.
When choosing a bed design, carefully inspect the stairs. A simple, vertical one is suitable for older children.
For kids, it is better to choose an inclined option, with comfortable wide steps and handrails. The space under the steps can be used for spacious drawers for clothes, toys, and household items.
Detailed master class on manufacturing
Step 1: Determining the bed design. Calculation of consumables. Sleeping place 190x90 cm. You can independently adjust the dimensions of the structure with the transfer of changing the size of the necessary parts. Construction of a drawing (you can download ready-made diagrams from the Internet with attached cutting and dimensions).
Step 2. Processing, drying, impregnation of wood. The material must be dry to avoid deformation later.
Step 3. Cut into parts. For assembly you will need 4 longitudinal posts, staircase parts with transverse footrests, boards for a berth with holes for ventilation - 2 pieces, fencing sides made of timber - at least 5 pieces (for double boards or decorative decorations, parts are added locally, based on their drawing designs).
Step 4. Assembling the structure. It is better to connect the parts of the bed in the room where it will stand, so as not to run into the problem of a large product drifting with its significant weight.
Step 5. Finishing. Painting, varnishing. Experts recommend applying several layers, allowing each layer to dry thoroughly.