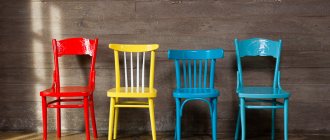
Hi all! I can say with confidence that even old Soviet lacquered furniture has a second chance. It can be restored and given a completely new appearance without changing the design. Today we’ll talk about such a procedure as restoration of lacquered furniture.
We are mainly talking about furniture made of wood. Although we cannot exclude the possibility of restoring structures made of chipboard, veneer boards and other materials, on top of which several layers of varnish were applied.
You can restore polished lacquered furniture to its original appearance, or even improve it, with your own hands. Work carried out at home requires accuracy, attentiveness and consistency. But the result in the end may pleasantly surprise you.
What is the essence of restoration?
As you remember, we already talked to you about updating an old closet and giving it new life. One of the methods of restoration was the restoration of varnish or paint coating.
Restoring lacquered products is a great way to breathe new life into old furniture, providing it with excellent external characteristics. If the structure has multiple scratches and damage to the varnish, it will be enough to remove it, then apply a new layer and restore the polishing with special compounds and tools. But it is not always possible to limit yourself to minor damage.
Over time, even very high-quality varnish darkens. Because of this, a cloudy effect is observed on old furniture. The surface is no longer glossy as before. As a result, the furniture loses its presentability.
If the varnish has darkened, restoration will require removing the old worn coating and applying a new one. All this can be done with your own hands. Such alterations usually do not cause serious difficulties. Moreover, it is often possible to do without sanding by using special means for removing varnish and paint.
Functional Features
As a rule, fixing coatings are some combination of a special film-forming substance with an organic solvent. After drying, the surface of the furniture is covered with a transparent layer, and it can be given shades of matte/glossy shine. All the protective characteristics of the varnish will depend on its composition, in other words, its variety. With the help of the substances in question, furniture can be transformed and retain its original qualities for a long time, whether it is assembled from MDF or chipboard, plywood or wood. Basically, fixing varnishes are designed to perform the following functions:
- Adding a special shine to surfaces;
- Protection from pests, water and dirt;
- Preservation of color qualities;
- Giving furniture strength and durability;
- Resists swelling/cracking over time;
- Resistance to conditions of elevated temperatures, various atmospheric aggressive factors;
- Masking of some surface defects (hiding small chips, scratches or cracks);
- Preventing accidental injury to people (eg eliminating the risk of splinters).
Assessment of the degree of coating wear
After looking at numerous photos before and after restoration, many people are inspired. After that, they try to work on improving their own furniture.
I can say that it is no more difficult than restoring a mirror. But it’s no easier compared to repairing wooden chairs or, even more so, restoring a Viennese chair. We have already talked about these procedures, and therefore I suggest you follow the links and read our materials, leave reviews and share your personal experience.
At the first stage of restoration, it is necessary to visually assess the current condition of the surfaces. The first sign is visual aging. Darkening often appears near threaded connections, the varnish cracks, and a large number of chips can also form. The aging of the varnish and the end of its life cycle are indicated by small meshes on the surface. Yes, small defects do not always significantly affect the overall picture.
But there are also cases when simply removing the old layer and applying a new coating cannot be done.
Consider whether restoration makes sense. If yes, then get to work.
Where to begin?
Do-it-yourself furniture repair begins with an initial examination of the extent of surface damage. This procedure determines the sequence of further actions. The degree of damage varies and is determined by natural aging or mechanical stress. Let's list some signs:
- visual determination of aging, loss of gloss of the varnish coating, appearance of minor stains;
- the appearance of a web of cobwebs on the surface of lacquered furniture;
- the appearance of deep cracks or chips.
If any signs appear, there is no need to be upset. Restoring lacquered or polished furniture is a simple solution to the problem; such work can be done carefully without losing the value of the product or disturbing the surface structure. After restoration of the paintwork, your favorite things will delight you for a long time.
Before updating old furniture, remember that it is not always necessary to immediately change the varnish layer. Some natural aging factors give antique furniture a special charm and increase its value.
Material selection
Many home craftsmen are sure that you can take the first solvent you come across, or even use ordinary alcohol, and then remove the old peeling varnish with a swab. And then take any varnish and then cover the furniture with it.
For restoration, use special compounds designed to remove the old layer and apply a subsequent new decorative and protective coating.
There are several materials that even the masters in the videos often forget to mention, although they use them exactly.
Shellac polishes
. Varnishes that can perfectly highlight the texture of wood and provide an original shade. In the field of restoration of lacquered furniture, polish is called one of the oldest materials used. The structure of this varnish resembles water. To restore furniture, you need to apply from 40 to 60 very thin layers. It's long and difficult.
Nitrocellulose varnishes
. Often professionals talk about them. Although in relation to home use this is a categorically incorrect recommendation.
This varnish is used for coating and restoration of surfaces with a fairly large area. For professional application, special sprayers are used to distribute the product over the surface. Here the main role is played by high application speed. If you use a regular paint sprayer, bubbles will remain on the surface.
Nitrocellulose varnishes are not suitable for restoration at home.
So we immediately reject this option.
The best option
In fact, the home handyman has only one option.
This is pentaphthalic varnish
. Very easy to use. The optimal choice for working at home. Does not require special technique for application. Dries quickly. When applying it, it is recommended to use at least 4 layers. Moreover, the varnish itself, diluted 10-15% with a solvent, acts as a primer. To create a semi-matte surface, it is better to use tampons. For glossiness, it is recommended to use brushes, and then carefully sand the surface.
Choose a color to suit your taste. These can be colorless coatings, as well as varnish with a certain shade. This largely depends on the furniture design and the result you want to get in the end.
In general, I would like to recommend a separate material on the choice of varnish at the link. There this issue is considered in more detail. Really useful, informative and essential if you are planning on doing any paint work at home.
The best solvent-based furniture varnishes
Yaroslavl paints Bystrolak alkyd
This product from a domestic manufacturer is available in transparent color, as well as in several color options that will imitate natural wood. For example, pine, oak, rosewood, Oregon, etc. This product has a fairly economical consumption, and is also not afraid of exposure to sunlight, precipitation or temperature changes. Thanks to this, Bystrolak can be used for both garden and indoor furniture.
After drying, the coating will have a gloss. Therefore, Bystrolak can be used for both decorative and protective purposes. This product will take 5 hours to dry. It is worth noting that the product consumption is 13-14 sq.m/kg.
The average cost is 350 rubles.
VARNISH Yaroslavl paints Bystrolak alkyd
Advantages:
- Economical consumption;
- Weather resistance;
- Applies evenly;
- Quick drying;
- Affordable price.
Flaws:
- Has a strong smell.
Tikkurila Unica Super 20 alkyd-urethane
"Tikkurila Unica Super 20" can be used to protect and decorate both indoor and outdoor furniture. The main feature of this product is the presence of components that will slow down the appearance of yellowness on the coating. This will also protect the product from the harmful effects of sunlight, moisture, and create protection from mechanical stress. In addition, the varnish layer is resistant to chemicals, fats and various lubricants. “Tikkurila Unica Super 20” is highly resistant to wear, so this product can be used to cover not only furniture, but also walls or floors.
It will take 1-2 hours for one layer of Tikkurila Unica Super 20 to dry, but the next layer can be applied only after 6 hours. The coated product will reach its final resistance to wear within a month. The consumption of “Tikkurila Unica Super 20” is 8-10 sq.m/l. This product is available in cans of 0.9, 2.7, 9 liters.
The average cost of a 900 ml can is 1,100 rubles.
Tikkurila Unica Super 20 alkyd-urethane VARNISH
Advantages:
- Ease of application;
- Emphasizes texture;
- Opaque;
- Economical consumption;
- Fast drying.
Flaws:
- High price.
Dufa Retail Parkett alkyd-urethane
Although this product is called parquet, it can also be used to cover walls, furniture, window frames or doors. When applied, “Dufa Retail Parkett” spreads well, thanks to which the layer is even and has no bald spots or drips. After drying, you get a uniform gloss that will please the eye. This varnish coating is wear-resistant and is not afraid of moisture, so Dufa Retail Parkett can be used in rooms with high humidity levels. In addition, this product is available with a matte and semi-matte effect.
It will take 24 hours for the layer to dry completely. The consumption of “Dufa Retail Parkett” is 10-12 sq. m/l. This varnish is available in cans of 0.75, 2.5 and 10 liters.
The average cost of a 2.5 liter can is 1,350 rubles.
Dufa Retail Parkett alkyd-urethane varnish
Advantages:
- Wear resistance;
- Moisture resistance;
- Uniform coverage;
- Economical consumption.
Flaws:
- Not detected.
Teknos Helo 15 alkyd-urethane
This transparent product has a matte effect. If desired, it can be painted with a special color and achieve the desired shade. After drying, not only a durable but also elastic film is obtained. Thanks to this, the product will withstand not only moisture, mechanical stress, but also shocks. Oil, grease or detergents will not adversely affect the coating. In addition to moisture resistance, this product is also resistant to atmospheric influences and temperature changes.
Teknos Helo 15 can be applied using a sprayer, brush or roller. It will take 12 hours for one layer to dry, and a day for complete drying. The consumption of Teknos Helo 15 is 10-14 sq.m/l.
The average cost is 900 rubles.
VARNISH Teknos Helo 15 alkyd-urethane
Advantages:
- Moisture resistance;
- Weather resistance;
- Ease of application.
Flaws:
- Drying time.
Tools and materials
See also:
Hanging bed: do it yourself, design options
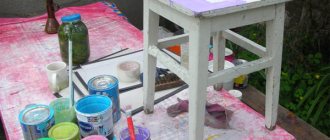
To carry out restoration work, you will first need to not only select a varnish, but also prepare some necessary materials and tools.
Of the main consumables you need to take:
- nail polish remover (solution);
- masking tape;
- tassels;
- sandpaper of different grain sizes;
- metal scraper;
- spatulas;
- wood putty;
- rags and brushes for cleaning dirt;
- soft sponges;
- cardboard or film to protect adjacent surfaces;
- regular solvent such as White Spirit.
All work is divided into several stages. This includes preparation, application and sanding.
Preparatory activities
At the first stage, you need to prepare all the materials and conveniently place the tools around you.
Before painting the furniture, it must be brought into appropriate condition. For this:
- the varnished surface is washed with a solution to remove varnish;
- then washed with plain warm water;
- peeled off areas of varnish are removed with a scraper;
- The surfaces are sanded with sandpaper until they become matte;
- dust is removed;
- the furniture is thoroughly dried.
This completes the preparation.
Varnish layer renewal technology
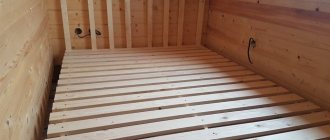
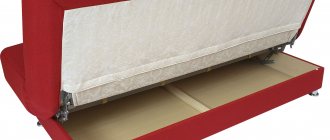
The process of restoring wooden furniture with your own hands consists of several stages. As an example, the restoration of a crib will be given:
1. Preliminary preparation. Before refinishing polished furniture, it must be disassembled. Next, apply a cleaning solution to the surface, then rinse thoroughly with warm water. This procedure will soften the old polish, the varnish will crack and peel off in some places. Its remains must be removed using a scraper. Next, sanding is carried out with sandpaper. You need to start with a coarser abrasive and finish with a fine one. The surface should become matte and uniform. Next, remove the dust with a brush or damp cloth.
2. Application of paint and varnish composition. Depending on the chosen varnish material for the furniture being restored, the number of layers to be applied is determined. Each subsequent layer is applied after the previous one has completely dried (drying for at least 8 hours). If acrylic varnish is used, then to apply the first layer the composition must be diluted with white spirit. Further restoration of the furniture is accompanied by sanding the surface, after which another 2-3 layers of undiluted varnish are applied.
3. Stage of grinding the restored layer. Sanding of the restored areas is carried out carefully with sandpaper with the finest grit until a uniform matte surface is obtained. Next, everything is thoroughly wiped with a rag. Repairing an old item allowed us to get a completely new bed.
On video: restoration of a crib.
Instead of an epilogue
A study of the assortment of fixative varnishes on the Russian market found that most of it is occupied by the lower price segment, represented by domestic manufacturers. Budget prices are explained only by the small volume of the container in which the varnishes are supplied, since they are primarily intended for fixing/repairing various damages, rather than for fixing the decor applied to furniture. Moreover, these samples are applied with a brush and, with rare exceptions, are sprays. The middle segment turned out to be divided by both price and quality indicators. For repair work, the buyer prefers Russian high-quality aerosols, and for large-scale work, Western samples are already selected, which are applied either with a roller or a large brush. The price for both is approximately the same. The premium class is represented exclusively by foreign-made universal sprays, which have a considerable cost and are capable of both fixing decorative patterns and performing repair tasks.
Preparing the base
• The base surface must be dry and clean. • Untreated wood: lightly sand and thoroughly clean from dust. • Previously varnished wood: carefully sand mechanically to the state of untreated wood, then carefully remove any resulting dust. • Waxed wood: remove the wax layer to the state of untreated wood and clean off any resulting dust. • Laminated surfaces: clean thoroughly, rinse with clean water, dry.
Tools
• Fine sanding paper with grit 120 and 150. • Mechanical paint stirrer or wide stick. • Brush/roller/spray
How to restore veneer
Do-it-yourself restoration of antique furniture
Veneered furniture requires a special approach. The means are basically the same, the methods are different. For example, if after getting hit the veneer is swollen, fill a disposable syringe with PVA glue, pierce the bubble, and inject glue into the cavity. Place a piece of thick fabric on top and place a weight. If the surface is uneven (convex or concave), use a thick fabric bag with heated sand as a load.
If the veneer is glued with alcohol glue, you can return the swollen part to its place by ironing it through a rag with a hot iron. But do not overheat the iron: the veneer may stretch. Heating level is medium.
If ironing with a dry cloth does not help, try repeating the operation with a damp cloth (wet it and wring it out well). There is a chance that the wood will swell and become more elastic. To reliably fix the swelling, you can introduce PVA there and then heat it with an iron.
If the swelling is cracked, you can also try to seal it with heating (through a rag). If it doesn’t work, tear off the peeled piece. You don’t cut it, but rather break it off: on veneer, breaks after restoration are less noticeable than cuts. Therefore, you break off the lagging piece. Remove the old glue from the damaged area and the piece of veneer (with sandpaper or a nail file, depending on the size). Next, the repair of veneer on furniture is standard: spread it with PVA glue, lay it down, aligning the fault lines, lay a thick fabric on top and place a weight until it dries.
Scratches and traces of restoration on veneer are removed in the same way as on wood: they are painted over with a furniture marker of a suitable shade. If the scratch is deep, a little melted furniture restoration wax is applied to it (with a spatula). After drying, the wax is ground, and if necessary, fine-grain sandpaper is used, but after this treatment, the restored piece is covered with a layer of varnish.
Do-it-yourself furniture restoration requires patience and accuracy. You have to act gradually and methodically: smear it, wait for it to dry, level it, smear it again, etc. Sometimes you have to try several methods: damage varies, as do the materials used in production (glue, varnish, etc.). But as a result, the furniture will look much better.
Over time, wooden furniture becomes dull, becomes covered with cracks, chips and ceases to please the eye. Is it possible to return things dear to your heart to their original appearance? And how, and most importantly - how to do it?
The easiest and most popular way to get rid of old varnish is to use a special composition, which can be used as a variety of professional products, for example, “Chief Technologist” gel or “Prestige” remover.
Well-known universal solvents - acetone or denatured alcohol - are also suitable.
Using a paint brush, apply the remover composition to the damaged surface. In order for it to be properly absorbed, cover the product with plastic film and leave it for a day. During this time, the remover will penetrate deeply into the structure of the varnish, due to which it will become so soft that it can be easily scraped off with a regular spatula. After the old coating is removed, wipe the work surface with a sponge soaked in warm water. After 24 hours, we will clean the wood with fine, fine-grained sandpaper, and then begin to apply a new coat of varnish.