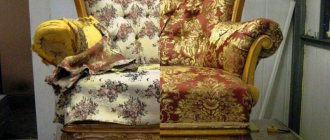
Throwing away furniture that is completely suitable for further use because of worn upholstery and dented filling is an unjustified waste. An old “grandmother’s” chair, collecting dust in the country for years, may well get a new life, especially if the frame of the product is still strong. Any model of this type of upholstered furniture, the reliability and convenience of which has been tested over years of operation, can be updated globally or fragmentarily. Often, restoration of a chair becomes a salvation if a once-loved product, for a number of reasons, no longer fits into the interior. You can carry out upholstery of furniture, replace springs, repair armrests and seats yourself, without involving professional craftsmen in the process. The tools necessary for the work can be found in every home; you just need to first study the procedure for restoration.
Tools and materials for work
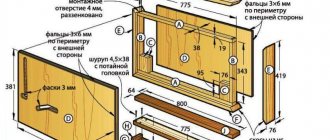
Restoring a chair involves disassembling it, performing a number of works of varying complexity, assembling and decorating.
You will need the following set of tools:
- roulette;
- hacksaw, chisel, screwdriver, hammer;
- stationery knife;
- drill;
- Sander;
- scissors, pliers, stapler;
- paint brush.
List of materials:
- paint, varnish;
- primer, antiseptic;
- wood glue;
- foam rubber or latex;
- textile wide sling;
- sandpaper;
- upholstery fabric;
- self-tapping screws, bolts, nuts;
- plywood, timber, boards.
The work should be performed in protective glasses and gloves, and when using paints and varnishes, in a respirator.
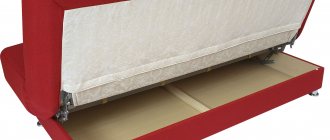
Bottom
The lower part of the chair is most often covered with a separate sheet of fiberboard. It rests behind a thin layer of upholstery that needs to be removed. It is better to work with gloves and a tool, even an ordinary screwdriver
Old furniture may have nails sticking out that are not visible behind the upholstery, so you need to remain careful
Now we have access to the main fastenings of the outer trim. These should be staples that need to be gradually bent. Do this as carefully as possible, because you will still need this upholstery case when creating a new one. If the fabric does not pull back, do not apply extra force, but simply check to see if you have missed a staple somewhere.
Restoration of a Soviet armchair with wooden armrests
To fully assess the degree of wear of the product, it must be disassembled. It is important not to damage the furniture by applying excessive force.
First, you should study the design of the chair.
Unscrew the armrests and other collapsible parts.
Pull out the staples that secure the upholstery. The removed fabric should be saved, as it is convenient to make patterns using it.
As you disassemble, you should take photographs to make it easier to reassemble the furniture later. Parts should be marked.
Worn parts - sagging springs, crumbled filler - can be immediately thrown away so that they do not interfere with work.
Replacing belts
Shock-absorbing belts stretched over the frame over time stretch greatly and sometimes break. As a result, the seat becomes deformed and sags, making it extremely uncomfortable to sit on.
It is recommended to replace belts in the following sequence:
- Carefully remove the fasteners so as not to damage the frame.
- Check the condition of the frame. Treat it with an antiseptic and primer.
- Take a tape measure, pencil and paper, take measurements, write down the length and width of the base.
- Cut new belts so that they will be attached to the frame with the ends folded in half.
- Secure new passes first in one direction and then in the other, weaving them in a checkerboard pattern. They need to be nailed with two nails, having previously been pulled tightly with pliers.
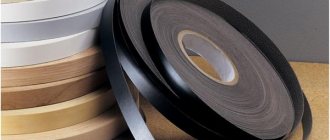
Tape should be stapled over the rows of nails. It will protect the soft part from mechanical damage, as well as from rust stains if the caps become corroded.
Replacing the filler
Previously, foam rubber was used for filling, the service life of which is no more than ten years. After this, the material shrinks, hardens and crumbles. We definitely need to get rid of it.
Instead, modern foam rubber with improved performance characteristics is purchased. The type of filler is selected based on the weight of the users . For a person with an average build, the standard ST and HR are suitable. People with light weights should choose a soft HS, while heavyweights should choose a super-hard HL.
A good option is natural and artificial latex . This is a new, environmentally friendly material with good elasticity and memory effect. Its service life is at least fifty years.
To repair a chair, one piece 5 cm thick is enough. The material is cut into slabs with the required parameters, and then glued to the base. It is recommended to attach dense natural fabric on top of it. This way the pressure on the filler will be distributed more evenly, and the filler itself will not float the body.
Upholstery replacement
For reupholstery, you must use durable fabric that is resistant to abrasion and detergents. Jacquard, flock and faux leather are best suited for this.
Cut the fabric to size with a margin. Pull first on the sides, finally on the corners. Attach to the base with a stapler. Carefully trim excess pieces of fabric with scissors. Cover the back with upholstery fabric.
Frame restoration
During operation, the wooden frame becomes loose, cracks appear on it, and some parts may rot.
The following list of restoration works is possible:
Restoration of armrests . The old varnish coating is removed, the cracks are sealed with putty, after which the surface is treated with a primer. After it has dried, the parts are coated with varnish or paint, depending on the design and interior of the room.
Adding inserts to the grooves through which the frame elements are joined. First, the recess is leveled with a chisel, then wooden slats of the appropriate size are glued into it.
Repairing broken and cracked boards . If the fracture is longitudinal, glue is added to it, and the fragment itself is compressed with clamps or placed under pressure. Transverse damage is eliminated by attaching longitudinal pads on both sides of the part.
After troubleshooting, the frame is assembled to its original state. For fastening in the tongue-and-groove system, wood glue or PVA is used.
Features of restoration of models with a spring mechanism
If the unfolding mechanism stops working, the product cannot be unfolded and then reassembled to its original state.
The reason for this phenomenon may be wear of parts, weakening of springs or deformation. To gain access to the unit, you need to remove the side panels, which are secured with three bolts. Then you should find out the causes of the malfunction. Sometimes it is enough to align the guides, clean and lubricate the parts . If this does not help, you will have to change the entire mechanism.
Benefits of self-updating
Repairing furniture yourself is actually not as difficult as it seems. If you have sufficient skills, and they will be acquired, accumulated and improved with each step, even a beginner in this matter can update a chair at home. According to experts, the main thing here is to act carefully and not deviate from the plan - in this case, the end result will impress the household. In addition, reupholstering furniture yourself has an undeniable advantage - it will cost much less than turning to professionals or buying a new product. And if you show a little imagination and creativity and think in advance about how to update an old chair with your own hands, changing the design that has lost its trendiness or improving the shape, you can turn it into a completely new element of furniture.
Examples of restored chairs
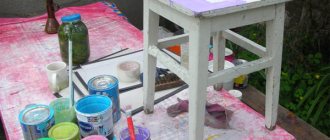
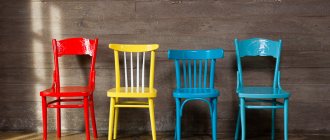
Method number 1: decorating a chair with paint
Not only the real “old man’s” Soviet chair, but also the wooden “Vienna” and folding country versions can be easily transformed with paint.
Dyeing technology
To paint old chairs you will need:
- acrylic paint;
- flat synthetic brushes (separately for varnish, paint and putty);
- gloves;
- putty;
- white spirit (for metal);
- varnish remover (for varnished models);
- matte varnish or wax;
- fine and medium grain sandpaper.
Restore old chairs according to this scheme:
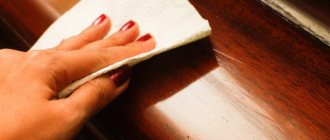
- The first step is to prepare the furniture for painting: wash it, sand it with sandpaper. The surface should remain slightly rough.
- It is better to degrease the iron model with white spirit before painting.
- Treat lacquered furniture with a special varnish remover.
- Mask all cracks and scratches on the surface of the legs and back with furniture putty.
- After this, paint the entire surface of the furniture in 2-3 layers, waiting for each layer to dry completely. Open the product with varnish.
Useful tips for coloring
If you haven't decided what color to paint your furniture, you can't go wrong with a bright white shade. This color is universal and goes well with all bright upholstery materials.
Restoration of a leather chair
The main value of a leather sofa is its upholstery. Over time, scuffs, cracks, and sometimes holes appear on it. The filler also suffers.
Leather furniture should be completely restored, but try to preserve the upholstery as much as possible.
You can restore it in the following ways:
By painting. You need to purchase a special composition, sold in cans. The material takes on a presentable appearance, is waterproof, and small cracks are filled with a solution.
Installing patches. Torn edges are trimmed and smoothed. Then they are glued to a fabric of a suitable color. After painting, the repaired area will not be noticeable.
Partial replacement. Usually this operation is carried out on the armrests, which suffer the most during operation. A budget option is leatherette, which can be found in any haberdashery store.
Andrey Peregubsky
Furniture handyman
Ask a Question
However, updated leather will not brighten up a dented seat or eliminate squeaks and play. The chair will have to be disassembled, the frame repaired, the filling replaced, and the wood undergoes sanitary and technological treatment. It takes time, but the end result is worth it.
Method No. 3: sewing a cover with gathers in the corners
The clear advantage of sewing a cover is that this method is much cheaper than reupholstering a seat.
It is enough to purchase 2-2.5 m of fabric, make the pattern correctly and sew it.
The fabric is selected on the basis of resistance to wear, since products are constantly subject to increased stress, especially in the dining room and kitchen.
To sew a cover for an old chair, follow these steps:
First of all, you need a pattern. For measurements you will need masking tape, paper or newspapers. Attach a large spread of newspaper to one or another part of the product, mark the outlines of the furniture on the paper, and remove the excess with scissors. Prepare the second part and attach it to the first, gluing it with masking tape. Having assembled the pattern completely, cut it in the places where the seams will be. Thus, you will have a more or less accurate pattern specifically for your product shape. Remember that you need to leave seam allowances and take into account the directional direction of the fabric, especially if it has a pattern in the form of stripes or large flowers
Pay special attention to the back. It happens that in order to recreate exact bends you will have to cut out a separate part along its side part
If you do not have the goal of conveying all the delights, it is enough to make wide allowances of 5-7 cm along the side cut of the back.
Peculiarities
Previously, furniture from the USSR times was shamelessly taken to landfills or, at best, sent to the dacha. It seemed that a polished table or a full-wall set would never become relevant again. Today, fashion, which has taken another turn, believes that the same polished table can become the highlight of the interior, and grandfather’s old chair will fit perfectly into the cozy picture of your living room.
Small apartments would not have accommodated the bulky, massive furniture of the earlier Soviet period, so the Thaw designers were inspired by the concept of minimalism.
To reduce the cost of furniture, affordable and cheap materials began to be used: chipboard, plywood, polymers. That is why armchairs and sofas with wooden backs and armrests, purchased in the 30s, could survive to this day in more solid condition than armchairs from the 60s. During the “thaw” period, furniture began to be varnished more and more.
In most cases, armchairs were sold in sets: they could come as a set together with a sofa or coffee table. These were mainly models with wooden armrests. They could not be called quite comfortable - the minimalist concept did not imply that a home chair would promote relaxation. But modern people miss such furniture from childhood, are imbued with its laconicism, simple aesthetics and want to see it in their interior.
In Vasmer Max's dictionary
armchair; also dial. "flooring for slaughter"; Ukrainian krislo, krislaty “spread out”, blr. armchair, Bulgarian armchair (Mladenov 257), Czech. křeslo, slvts. krieslo “chair”, Old Polish. and dial. krzasɫo, Polish. krzesɫo – the same, krzasɫowaty, krzesɫowaty “hunched over, knotty, crooked.” Another stage of alternation is cross (see). Related Lit. krė́slas “chair”, LT. krēsls – the same, Old Prussian. creslan; with different vocalism: lit. krãsė “chair”, further litsh. kreša “stool”, kreslis “removable back of a sleigh” (M.–E. 2, 274, 276; Endzelin, SBE 196; Buga, KS 1, 139 et seq.; Bernecker 1, 614 et seq.; Trautman, Arr. Sprd. 363; BSW 141; Frenkel, KZ 63, 203; Sobolevsky, ZhMNP, 1886, September, p. 146; Brückner 275). There are no further connections; lat. crēna “notch, notch”, attracted by Mehringer (SWA 144, 6, 95 et seq.), is explained differently (see Meillet, Ét. 415; Walde-Hofm. 1, 288). Judging by the apophonic variants, the borrowing is Balt. words from glory excluded (contrary to Brückner, FW 97); The opinion about reverse borrowing - from lit. in glory, contrary to Mikkola (BB 21, 120), Karsky (RFV 49, 20); see Bernecker, ibid.; Trautman, BSW 141; Buga, “Švietimo darbas”, 1921, No. 9–10, p. 29; Uhlenbeck, AfslPh 16, 378.
Method No. 4: Decoupage a chair with paper
Remaking old chairs with your own hands does not always require drastic changes. Sometimes you can make a new chair out of an old one if you disguise minor defects, scratches and stains with an original fashionable print or beautiful patterns.
Decoupage will help you. Take:
- multi-layer napkins with the desired print;
- PVA glue;
- a pair of brushes;
- scissors;
- matte clear varnish;
- roller
To make original designer furniture from old chairs, follow this algorithm:
- Clean the furniture, paint as described in method No. 1.
- Separate the top layer of the napkin with the pattern, cut out the desired size fragment from it.
- If you want to change the entire decor of an old chair: from the back to the legs, then chaotically tear the napkin into 10x10 cm pieces.
- Apply PVA glue liberally to the desired area of the future decor. Place a cut piece of napkin on the desired area of furniture, smooth it with a brush with the remaining PVA, removing bubbles and smoothing out the wrinkles with a roller.
- The top layer of PVA should be as thin as possible. Leave it to dry for a day.
- Finally, cover the entire surface of the furniture with clear varnish in 3-4 layers, allowing each layer to dry.
As you can see, remaking an old chair is not as problematic as it might seem at first glance.