Good day everyone and have a good spring mood! I think you will agree that drawers in a wardrobe are sometimes a necessity.
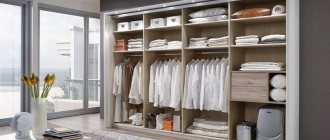
These are sections that are part of the filling of the wardrobe, which are installed inside the furniture and can be rolled out of it, opening the main doors. This simplifies access to the contents in the depths of the cabinet.
But in order for everything to work clearly and efficiently, you need to understand what types of boxes there are, how they are installed and what else should be taken into account, how to install such elements.
What size can you make a closet?
When making calculations, first of all, they proceed from the size of the room or part of the space (say, a corridor or hallway) that they decided to allocate for a built-in closet.
However, there are several significant aspects that need to be taken into account. Depth The standard depth of a wardrobe with hinged doors is 60 cm. This is enough for hangers with clothes to fit freely on a regular longitudinal rod: for a convenient arrangement of outerwear, at least 55 cm is required, for light clothing - 5 cm less. If it is a closet with sliding doors, you need to add another 10 cm - that’s how much the “compartment” design will “eat”. Width The minimum width of the cabinet is not regulated, but there is no point in making it less than 40 cm - otherwise boxes with shoes will not fit. In a cabinet with a depth of less than 50 cm, you will have to replace the longitudinal rod with end rods. Calculate their number correctly: on average, 8 hangers are placed on a 40-centimeter end rod.
What tools are needed to make a drawer with your own hands?
It all depends on what work you decide to do yourself and what to delegate to specialists. For example:
- To cut the parts to size, you will need a jigsaw with a file for chipboard or wood, a grinder or a router to align the ends for rolling the edge. Cutting parts to size can be ordered at a furniture shop.
- To seam the ends with melamine edges, you will need an edge with glue of the required size, an iron, a stationery knife and sandpaper to cut and sand the edges. The PVC edge sticker can be ordered along with the cut, indicating the sides corresponding to the sides of the parts.
Everything else - drilling the blanks, assembling the drawer boxes and installing them in the closet - will have to be done with your own hands. However, this can also be delegated to third-party specialists, but then what’s the point of studying this issue?
- To drill the connecting holes, you will need a drill with a confirmation drill, as well as drills with a diameter of 5 and 7 mm.
- Assembling the drawers (twisting them onto confirmations, fastening the fiberboard bottom and guides with 3x16 self-tapping screws) can be done with the same drill or screwdriver. Since the amount of work is small, you can get by with a ratchet screwdriver with the appropriate hex and Phillips bits.
- Small hand tools you will need are a tape measure, an awl, screwdrivers, a pencil, and a square.
The list is not so long and can easily be found among a set of home tools. We recommend that you read the article about cabinet fittings to purchase all the hardware and fasteners necessary for making drawers.
How to plan the interior space of a closet?
Designers recommend that before planning your closet, make a list of all the things that you will store in it, and then add another 20% “for the growth of your wardrobe.” Decide what will go on the shelf or in baskets (knitwear) and what will hang (pants, jackets). And how many things do you have in each category? Decide on the price: the internal filling of the cabinet can vary greatly in cost. Therefore, limit the budget you plan to meet in advance.
Longitudinal and end rods
Clothes hanging on hangers will take up the largest compartments. For women's clothing, we plan a box with a height of 150-160 cm. If long men's coats or raincoats will hang in the closet, set a height of 175 cm. Estimate at least approximately the number of items of clothing that will hang on hangers. You can put 5 cm on each hanger - this will be the width of the compartment (and the length of the longitudinal rod).
If you have a narrow closet with end rods, allow 60 cm of the width of the compartment on each hanger. There are usually not many end hangers - 2-3 pieces. Sometimes it’s worth making separate boxes with a bar for short items: skirts, trousers, shirts and blouses. They require a smaller height - 80-100 cm, which means they save space.
If men's trousers are hung without bending, allow 120 cm in height for them.
If you require a longitudinal rod length of more than 120 cm, provide a vertical support rod in the middle. It is positioned between the upper and lower partitions and is connected to the horizontal rod with a special coupling. This is necessary so that the longitudinal rod does not bend under the weight of things. If heavy things are hanging on hangers - fur coats, coats - the length of the bar without support should not exceed 100 cm.
Another important nuance: if the wardrobe is not built into a niche, but has side walls, do not plan a compartment with a rod immediately behind the outer wall. Make better ordinary horizontal shelves there. Sliding doors, rolling back and forth, push the side wall, creating an impact load. Horizontal shelves located close to the side plate will connect it with the rest of the supporting structures of the cabinet. One barbell will not provide such a strong connection.
Bar with lift (pantograph)
A pantograph is a special device that allows you to lower and raise a barbell. Such designs are quite expensive, but are indispensable in tall cabinets when you have to use space right under the ceiling. The pantograph will lower jackets and skirts directly into your hands, and then again remove the bar with things to an unattainable height.
Shelves Built-in wardrobes are ordered not only for clothes. On open shelves you can store almost everything (except for what needs to be hung): bed linen and knitwear, books and dishes. For clothes, you can use long shelves (80-120 cm), and for heavy books and dishes, the length of the shelf should not exceed 80 cm. A convenient distance between shelves is at least 40 cm.
If you are making a shelf longer than 80 cm, provide a vertical partition underneath it as additional support. Otherwise, the shelf may bend during use. In addition, the shelves are suitable for storing neatly folded jeans, bags, jewelry boxes, and hats. So make more shelves - they will all come in handy.
Special shelves
Wide shelves are designed at the top of the closet for blankets, rugs and bed linen. In addition, it would be nice to provide compartments for sports equipment. Think about what exactly you will store there. Four pairs of roller skates? Tennis rocket? Yoga mat? It is better to measure especially large devices in advance. At this moment you understand the advantage of a chess player over a bodybuilder. In addition, at the very top there is usually a large long shelf for suitcases, bags and travel equipment. Height - 45-50 cm.
How to keep your shelves tidy?
Clothes can slide off shallow shelves, but on long shelves they quickly turn into a shapeless heap. To prevent this from happening, make small shelves with a side or divide a long rack into separate square cells: this way, each stack of clothes will have its own cell. Maintaining order will become much easier. Another way to organize the contents of open shelves is to put everything in boxes.
Roll-out shelves
Roll-out shelves are more convenient than fixed ones - they make it easy to find and get what you need. And the distance between them may be less than between ordinary ones. True, convenience does not come cheap.
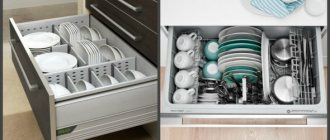
Drawers Drawers are also much more convenient than their stationary counterparts - they allow you to easily view the contents. And besides, they save cabinet space: the height of a standard drawer is 20-25 cm, the height of a shelf is 35-40 cm. The drawers better protect the contents from dust. They have one downside - they cost significantly more than shelves, so it makes sense to use them locally: for all sorts of small things that are inconvenient or impractical to store on shelves: hats, gloves, scarves and other accessories. For stockings, socks and underwear, shallow drawers are used - about 12 cm high. The most convenient drawer models are those with a transparent front wall. They allow you to see the contents of the drawer without pulling it out.
When designing a drawer and calculating its width, be sure to take into account the width of hinges on swing doors and door joints in wardrobes. If the drawer is made to the full width to the maximum, it may simply not slide out.
Organizers
Drawer dividers and organizers help prevent chaos. They can be built into the box, or they can be sold separately from it. If you hate piled-up laundry, it’s better to invest in this additional option and enjoy putting your socks into bins. Like solitaire.
How to store shoes? Special inclined shoe shelves are a very convenient way to store shoes and boots. Alas, such shelves are not very spacious. It is more rational to divide shoes into two parts: those that are worn now, and those that need to be stored - seasonal, elegant, for special occasions. Leave what you need on the shelves, and put the rest in boxes and put them in the far corners of the closet. Shoe shelves are usually designed at the bottom of the closet. Their standard length is 80-100 cm.
If shoes and bags play an important role in your life, you can allocate each item a separate place in the closet.
How to properly arrange a mezzanine?
Mezzanine is a separate space at the top of the cabinet. It’s not so easy to get there, so basically the mezzanine functions as a storage room: seasonal items and sports equipment, suitcases and dresses that “I’ll wear when I lose weight” are put away here. Inside the mezzanine, as a rule, there are no additional compartments and drawers. If the height of the cabinet allows it, you should not add separate doors to the mezzanine - this will only increase the cost of the cabinet. A separate sliding door will be especially expensive, so if you have to, it’s better to make it hinged or folding.
How to correctly calculate the dimensions of drawer parts
There is nothing complicated in calculating a drawer; the main thing is to know a couple of formulas and not get confused in the numbers.
Let's look at the example of calculating a module for two boxes. Let it be designed for installation in a cabinet niche W/D/H 500x500x400.
Since the front of the drawer must slide “inside” the depth of the cabinet itself, the depth of the side of the module is 480 mm (we allocate 20 mm for the front).
Calculation of parts for drawers will look like this:
| № | Part name | length | width | quantity |
| 1 | Top/bottom of module | 500 | 500 | 2 |
| 2 | Module sides | 368 | 480 | 2 |
| 3 | Side of the drawer | 450 | 150 | 4 |
| 4 | Drawer forehead | 410 | 150 | 4 |
| 1 | Drawer bottom (fibreboard) | 440 | 448 | 2 |
| 2 | Drawer front (chipboard, MDF, solid wood) | 181 | 497 | 2 |
Chipboard thickness 16 mm.
The sides of the module are “sandwiched” between two thicknesses of chipboard, so their height is 400-16x2=368.
The side of the drawer is equal to the length of the module guide. At a depth of 480 mm, guides 450 can be installed.
There are no special standards for calculating the height of drawers. At a height of 368/2=184 you can install two drawers with a height of 80-150 mm.
The front of the box (front and back panels of the box) is calculated using the formula 500-90=410. The value 90 is the addition of all the thicknesses of 16x4 laminated chipboards and the gaps for installing 13x2 guides. That is, 16x4+13x2=90.
For ease of fastening, the bottom of the box is laid slightly smaller than the box frame, 1 mm on each side. The box itself turned out to be 450x442, so the bottom is 488x440.
You can read about the calculation of drawer fronts and hinged cabinet doors here.
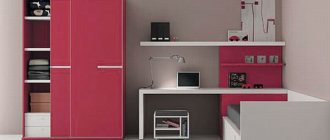
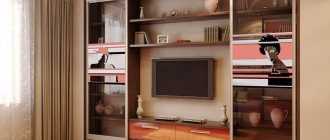
Sliding wardrobe or wardrobe with hinged doors?
It is not necessary to hide the contents of the sections behind large monolithic doors.
Each section and block can have its own separate swing doors. In this case, the drawers will become part of the facade. You will get quick access to things, and the front will look more interesting - if, of course, you have planned the design aesthetically. Shelves and drawers hidden behind large doors can be arranged based solely on logic rather than aesthetics. Additionally, keep in mind that wardrobe doors “eat up” 10 cm of space, while a hinged door is only the thickness of a chipboard or MDF board (10 or 18 mm).
And most importantly, solid facades will cost less.
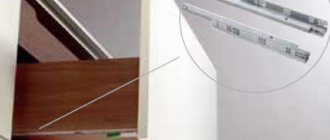
Which guides to choose for drawers
If you decide to make drawers with your own hands, then you should decide on the type of guides and their length. The varieties were briefly defined in the article about cabinet fittings.
- Roller guides are the most budget option. If you plan to meet the smallest amount, then choose them. Their only drawback is that they do not extend completely: the drawer in the closet will extend approximately 2/3. The calculation of parts for a drawer on roller guides is exactly the same as for telescopic ones. That is, you can always change one type of extension to another if the need suddenly arises.
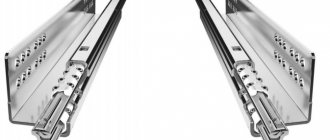
- Ball (telescopic) guides can be fully extended and are more reliable in terms of operation. For strength, you can put two sets on one box, then the container can be used to store the same tools (the bottom is better made of chipboard, fiberboard will not withstand a heavy load).
- Metaboxes (or metalboxes) are mainly used for installation in kitchen cabinets. The design and calculations of parts for this type of guides are fundamentally different from the first two. The fact is that the metaboxes themselves are the sides of the drawer (height 54, 86, 118 or 150 to choose from), and only the bottom and back side are made from chipboard. During assembly, the entire structure is rigidly attached to the facade.
In length, all guides start at 250 mm, for installation on drawers with a depth of 250 mm, respectively. And then, in increments of 50 mm to 550-600 mm (that is, 300, 350, 400, etc.).
The depth of the cabinet side should be 20-50 mm greater than the depth of the drawer. That is, on a cabinet with a depth of 520 mm we install drawers with 500 mm guides, on a cabinet with a depth of 400 mm we install drawers with 350 mm, etc. Do not forget that the box installed inside must be “recessed” to the thickness of the facade.
The design of the guides is such that it is impossible to cut them to length. Therefore, choose the “right” size from the beginning.
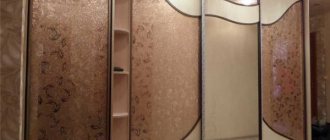
Mirror, plinth and lighting
Mirror The most popular way to place a mirror in a closet is to make the doors mirrored. You can cover the closet with mirrors completely or partially. It is ergonomic: the mirror does not take up additional space, and reflective surfaces add shine, light and volume to the interior. If you are not a fan of large mirror surfaces in the interior, mirror the inner surfaces of the doors. True, this method is only suitable for swing structures. Two open doors with mirrors inside will provide the effect of a dressing table: you can see yourself both in front and behind.
Base This element of a built-in wardrobe is useful if you have an uneven floor, which means there may be problems with doors mounted to the very bottom. Coupe doors will slide downhill, and you won’t be able to install a guide on bumps. Swinging doors can also warp, in addition, there will be unsightly gaps between the door and the floor. The plinth allows you to level the lower level of the cabinet, eliminating these problems.
Lighting Additional lighting of the closet is effective, practical, but not at all necessary. Using lighting, you can make open shelves more interesting and the space behind glass doors more mysterious. After all, illuminated shelves make it easier to find what you need. Mounting lighting inside sections makes sense if you have open shelves and want a beautiful decorative effect. Lighting hidden inside one shelf will not reach another compartment. If you want to illuminate the contents of the closet so as not to rummage through things in the dark, install lamps in the canopy. Don't forget to leave a gap between the canopy and the top border of the swing doors so they don't get caught. The transformer for built-in lamps is usually installed on the roof of the cabinet.
Marking for drawer guides
According to the dimensions calculated above, you need to saw the parts of the drawer and roll up the visible ends with an edge.
Then the boxes are assembled and the bottom is filled with fiberboard. And only after this they begin marking for attaching the guides to the sides of the box itself and the inner sides of the stand. There is nothing complicated here; detailed instructions can be obtained from hardware suppliers.
For example, roller guides are attached under the “bottom” of the drawer, and telescopic guides in the center of the sides. Let's give a visual markup diagram using our module as an example.
It's simple:
We install the bottom drawer as low as possible so as not to waste internal space. It is enough to retreat 10-20 mm.
We distribute the remaining space evenly between the drawers. In our case:
How can you reduce the cost of a built-in wardrobe?
Reducing the price of a cabinet is, of course, a way of compromises, but not all of them will be painful for you. So what can you give up? If you are planning a wardrobe, replace the expensive aluminum system with a cheap steel one. It is, of course, less reliable, but if you do not look too far ahead, it will do just fine. The service life of an aluminum system is 20 years, while that of a steel system is on average 5-7. Well, the steel one is noisier. Another saving resource is the number and design of doors. If you replace narrow doors with fewer wide ones, it will be cheaper. In some places you can abandon doors altogether - make a combined façade with open shelves or install hinged doors instead of compartment doors.
You can reduce the cost of a cabinet by using the materials used. Instead of the expensive chipboard that goes on the facade, use a white or thinner board inside. It is usually significantly cheaper. If you plan the shelves correctly, their load-bearing capacity will not deteriorate. Full-extension drawers are convenient, but quite expensive. You can replace ball bearing guides with roller guides. Yes, the drawers will not slide as smoothly and they will not be able to be pulled out completely, but this is not always important. Or give up drawers in favor of regular shelves.
You can save on shelf fastenings. Instead of invisible eccentrics that pull shelves and sides together, use regular corners. In essence, there are no inconveniences from them - on the contrary: if you want, you can rearrange the shelves differently. The only case when it is impossible to refuse eccentrics is when the shelves serve as stiffening ribs that hold the cabinet structure, for example, in the outer section with an open, non-built-in side panel.
Information provided by the site mebeldok.com
Installation of structures and materials used
It is best to give preference to the sliding method of installing a mortise drawer. It is more convenient and allows for the smoothest opening. You can also easily take out all the contents.
If we talk about materials, it is not necessary to use too expensive products. In this situation, you can save money without sacrificing quality. It is better to choose poplar wood for the drawers. It is distinguished by its strength and lightness. At the same time, it has a relatively low cost. For the bottom it is worth purchasing six-millimeter birch plywood. It is strong and will not begin to change its original size over time, which often happens with more massive wood. In this case, the thickness of the birch plywood will be uniform around the entire perimeter.