When arranging a home interior, the question of organizing a place to store household items, belongings, and small accessories certainly arises. For this purpose, various cabinets, chests of drawers, wardrobes, and shelves are provided. However, such furniture is more suitable for storing large, medium-sized items. It is much more convenient to store various small things in drawers. This article discusses their main advantages and provides detailed manufacturing instructions.
Convenient storage of small parts in drawers
Advantages of drawers
The main task when arranging a home interior is to create a comfortable, functional, practical space. Ordinary cabinets cannot always cope with this task. In standard furniture, part of the space remains empty - you simply cannot reach there with your hand. Things that are in constant use should always be at hand. Drawers will help you store items easily.
Kitchen drawers allow you to place the necessary utensils as compactly and functionally as possible.
Such systems have become simply irreplaceable. They save space, have an attractive appearance, and are easy to assemble yourself. They are very convenient for storing underwear, cosmetics, kitchen utensils, towels, shoe laces, and other small items. Such furniture is needed in any room.
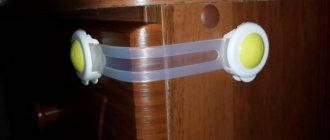
Very convenient drawers for shoes
Drawers for storing jewelry
Completion of the assembly stage
The principle of assembling the cabinet itself is not very different from making a drawer. The sides and rear wall are attached to the bottom in the same way. The front walls of the drawers will form the façade - these are what we will be installing now. To do this, the body of the cabinet must be assembled without the back wall, and the drawers must be put in place.
Table 3. Assembly
Step 1 - Assembling the Case
| Steps, photo | A comment |
| Once all the drawer slides are installed, you can assemble the box pieces together. The connection is made on confirmations. | |
Step 2 - Installing the Drawers | Place drawers without fronts in their regular places and check that they slide out easily. |
Step 3 — Marking the façade for drilling holes for the eccentric | Now you can start hanging the front strips on the drawers. Place the workpiece face down, and use a square to determine the points for fasteners. |
Step 4 - Marking the future hole with an awl | Punch the hole with an awl over the pencil mark. |
Step 5 - Drill the holes | The holes are drilled blind, the diameter should correspond to the diameter of the tie, and the depth should correspond to the length of its thread. |
Step 6 - Screw in the eccentrics | The ties are screwed into the holes on both sides up to the limiter. |
Step 7 – Putting the Drawer Front in Place | The eccentric legs are aligned with the holes in the ends of the side walls of the box, and the front strip is installed in its place. |
Step 8 - installing the eccentric head into the hole | Next, eccentric heads are placed in the wide side holes. |
Step 9 - Tightening the Connection | ... after which they need to be tightened with a screwdriver. |
Step 10 - Install the fittings | Install all the fronts on the drawers in the same way, mount the back wall - and, in principle, your cabinet is ready. |
Attention. Do not forget that before starting assembly, the ends of all workpieces must be covered with melamine edge. It is sold already with an adhesive layer; all you have to do is apply it to the cut and iron it with a hot iron.
In conclusion, all that remains is to screw the wheels to the bedside table - to make it convenient to move it, and install the handles on the drawers. If desired, the perimeter of the product body can be decorated with a wooden baguette or polyurethane molding.
Small-sized apartments exist not only in old Khrushchev-era buildings; completely new housing projects, designed for the poorer category of our fellow citizens, also save on passerby space. The industry takes into account the situation in the housing market and produces small-sized but very functional furniture specifically for such situations. In a special article you will find tips on choosing a cabinet for a small hallway, as well as instructions for assembling a door cabinet.
Video - How to make a cabinet with drawers
Varieties
Chipboard drawer
Chest of drawers made from furniture board
Spacious drawers are made in different sizes, shapes, and types. It is simply impossible to list all the variety of types developed by furniture technologists. Let's look at the types of such furniture, depending on the two most common classifications, in the table.
| Classification feature | Kinds |
| Case material | Chipboard. Cheap material, easy to process. Elements made from chipboard can last a long time with proper fastening and handling. |
| Furniture panels. Sold ready-made. They are distinguished by high strength and have sufficient density. Panels are more expensive than chipboards and last longer. | |
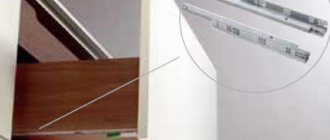
| Guides | Roller. The most popular type. Roller guides are inexpensive, have a reliable mechanism, and a simple design. |
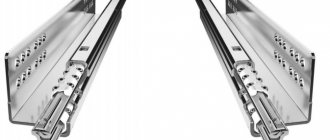
| Telescopic. There are guides with full rollout and incomplete rollout. The first ones are more practical and allow you to fully use the space. These guides are highly reliable. They are able to withstand a lot of weight - about forty kilograms, and are more expensive. | |
| Wooden planks. The most budget-friendly, simple option. Guides of this type can be made on your own from ordinary wood. They can be used to install small drawers. |
Roller guides for partial extension drawers
Full extension telescopic slides
Rails made of slats for drawers
Finishing the top of the cabinet storage
Remove the drawers from their cradle for finishing. Unscrew the slides from the drawers and sand the edges of the drawer with 120-grit sandpaper. Also prepare some test blocks for painting by using the scraps left over from the edges and sanding them down. We removed one cabinet door and took it to the paint store to have a matching stain custom mixed. If you have the patience to experiment, you can buy a couple of jars of stain and mix them to create your own. Either way, apply the stain to your test blocks before painting the edges. The match does not have to be perfect, since the sides will be obscured by the overhanging cabinet fronts. After painting the faces, we finished our drawer faces and boxes—with two coats of water-based polyurethane. Before reinstalling drawers, add pulls or drawer handles. We couldn't find pulls that closely matched our existing cabinet hardware, so we chose pulls that fit along the tops of the drawers and are hidden under the cabinets (see first photo).
.
End of form
Do-it-yourself features
Making drawers with your own hands is quite simple, following the detailed instructions presented below. Many people will find it easier to purchase ready-made products. However, the required size is not always available.
Making furniture yourself has its own characteristics. First you need to clearly decide on the materials. An excellent option would be to purchase the following elements: chipboard for the sides, fiberboard for the bottom, full roll-out guides. This is an excellent set of materials from which you can build a good-quality box.
The next stage is creating a graphic plan. On a regular piece of paper you need to draw the components of the future product, note their sizes and attachment points. This plan will help complete the assembly as quickly as possible. The most difficult of all of the above is calculating sizes. It is difficult to determine the required dimensions by eye. Incorrectly selected drawer sizes will significantly complicate the assembly and operation process.
Drawing programs
To independently calculate furniture dimensions, the following computer programs will help:
- PRO 100;
- "Basis furniture maker";
- Woody;
- "Aster".
Table of advantages and disadvantages of these programs:
| Name | pros | Minuses |
| PRO 100 | Clear interface. High-precision calculation of materials. Libraries with a rich information base. High quality visualization. Low cost of licensed software. | The program does not see the functional difference between objects. Limited functionality in demo version. More suitable for sellers and managers. |
| "Basis furniture maker" | Professional graphic editor. Creation of three-dimensional models. Setting up conditions, algorithm, automatic generation of specifications. | A large number of modules in which an incompetent user may get confused during installation. The need to spend time on training. Expensive licensed version. |
| Woody | Clear interface. 3D design function. Display each part on the screen with a marking diagram. Automation of the drawing process. | Has no updates. Not compatible with many operating systems. |
| "Aster" | Analogue of PRO-100. Low cost of licensed software. Improved cutting and filling functions. | Paid. Few opportunities for designers. Difficult initial training. |
Don't forget to watch the video on how to secure drawer fronts evenly and quickly. Two methods from Igor:
Calculation of parameters
Drawing for making a retractable furniture drawer
Designing drawers is not difficult. First you need to calculate the required width. It should be 26 mm less than the width of the cabinet body - its internal opening. There should be about thirteen millimeters left on each side to install the guides.
Next you need to find out the length. It will depend on the depth of the cabinet. This parameter is required when selecting guides. They come in different lengths: from 250 to 800 mm. You need to calculate the length of the products in advance, only then buy guides for it. We measure the depth of the cabinet with a regular tape measure. Don’t forget to leave a few tens of millimeters in reserve, depending on the design features of the furniture. Due to the standard dimensions of the guides, sometimes it is necessary to slightly reduce the length of the drawers.
Now is the time to decide on the height of the sides. The dimensions of the sides depend on the furniture design of the cabinet. In the production of furniture products, the rule is that the height of the drawer should be 40-50 mm less than the height of the facade. There are no reasons to deviate from this rule. The space left will provide an opportunity to correct errors and correctly adjust the operation of the finished product.
Final stage
The guides are attached to the cabinet with an indentation of about 3 mm from the front edge of the side part. On drawers - flush with the front edge. Due to the indentation, you will be able to align the facades and the main part of the cabinet. Attach the facades from the inside using 4x30 self-tapping screws.
The trick to getting the fronts to fit evenly is to first drill holes in it for the handles, then place it in place and screw it from the outside. Pull out the drawer, fasten the façade from the inside as usual, and unscrew the outer “rough” fasteners. Then you drill holes for the handles through the front wall of the drawer and install the last element of the fittings.
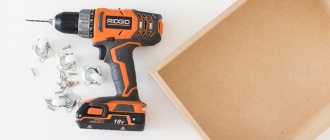
Tools, materials
To assemble drawers, you need to prepare the following list of tools and materials:
- drill (sometimes it can be replaced with a screwdriver, but you need a very powerful screwdriver);
- an electric jigsaw (it will allow you to cut chipboard as efficiently as possible, eliminating damage and chips);
- ruler;
- construction corner;
- rag;
- knife;
- pencil;
- roulette;
- nails, screws, fasteners;
- guides;
- the main material for the manufacture of the structure.
When purchasing slats and structural elements for future drawers, you need to take into account several important criteria. The first is strength, high quality. Materials must withstand loads and not lose their qualities after several years of use. The second criterion is resistance to damage. The peculiarity of such boxes is their frequent use. Pulling out the structure can easily cause minor damage. Durable material must withstand small impacts and collisions with the structure of the cabinet.
Marking the mounting points for the guides
The principle of installing guides is much simpler than it might seem at first glance.
The telescopes (if you pinch the black antennae and pull out one half) can be disassembled into two parts, one of which is attached to the side of the drawer, and the second to the inner side of the chest of drawers.
Our main task is to determine the exact locations of these fastenings, screw each half with three screws and insert the drawer into the chest of drawers, thereby connecting the guide into one whole.
Where can I buy it and how much does it cost?
For such a solution, the most difficult thing is to find suitable fittings. Special mechanisms and guides are available from brands such as Blum, Hettich, ELCO, etc.
You can find them in large construction and furniture hypermarkets and on online shopping sites.
The cost of a 60 cm wide and deep chipboard box will largely depend on the type of fittings. With high-quality German or Austrian mechanisms, its cost will start from 5 thousand rubles. Chinese-made fittings will be 2-3 times cheaper, but the load-carrying capacity of a structure with inexpensive fittings will be lower.
Ikea
Is it possible to make plinth boxes under an IKEA kitchen? If you are designing a kitchen from scratch, then theoretically the project can include the necessary reserve for their installation. Low variants of the Forvara and Maximera series are suitable.
With your own hands
If you want to make a drawer for your headset with your own hands, the following video will help you. In it you will learn what materials are needed and receive step-by-step instructions: