This review analyzes the advantages of existing models of hobs. Methods of their installation and methods of connecting to the electrical network are described. Let's evaluate the advantages of each panel when choosing a product. After receiving installation information, we will select the most convenient way to connect the hob at home, guided by the technical parameters of the kitchen.
There are many types of hobs with different nuances in their connection Source faqindecor.com
What are hobs?
Before we study connecting the hob to the electrical network, let’s get acquainted with its varieties. Built-in hobs are rectangular or hexagonal in shape, their width is 250 – 900 mm, their depth is 600 mm.
A beautiful panel pleases the hostess’s eye Source www.hotelresidencia.com
The manufacturing material is focused on various preferences and financial status of the consumer:
- Aluminum . Such devices require daily monitoring. They are very user friendly. These devices have an affordable price and withstand mechanical and thermal stress. The material is impact resistant but sensitive to scratches.
- Enameled . Their main advantage is their reasonable price. Enameled devices are available in a wide range of colors. They, unlike aluminum ones, do not show fingerprints. The disadvantage is the heaviness of the product, which does not always suit the parameters of the mounting surface.
- Stainless steel . These models are more expensive than enamel and aluminum. Reliable and durable. The downside is that fingerprints and water marks remain visible.
- Built-in glass-ceramic hob . Modern models with touch control. They have a stylish design and are easy to use. This material heats up and cools instantly. The only disadvantage is that glass ceramics is fragile and susceptible to cracks. Cold water sometimes causes chips due to impact on a hot surface.
Types of burners for glass-ceramic electric stoves
I will list the known heating methods that glass ceramics can hide underneath in order of increasing energy efficiency, but this does not mean at all that the latter will be the best. Let's not forget the fundamental purpose of any fireplace, cooking delicious food, and speed in this process is not always needed.
Rapid burners
Now this is the most common type of heating element for glass-ceramic stoves. Heats up in 10-12 seconds. Of course, due to low efficiency and high thermal inertia, these heating elements are far from perfect, but the ability to maintain temperature within the widest range and good maintainability to some extent compensate for the shortcomings.
Tape heating element
High Light Technology. Advantages:
Read also: Features of choosing a respirator
- Heating speed of the working area is 4-7 seconds.
- Utensils made of any material are suitable.
Disadvantages: low efficiency and, as a consequence, high power consumption, rather high thermal inertia.
Halogen plates
Halo Light technology uses halogen lamps as a heating element. The plates are marked with the letter “H” (Halogen). Advantages of this method:
- High efficiency 68%.
- Wide range of adjustable temperatures. Of course, this range is different for different models, but believe me, it is quite wide.
- Quick heating of the working area, 5-7 seconds.
- Any cookware is suitable.
Flaws:
- Cooling fan noise.
- Relatively short service life of halogen lamps (about 2000 hours). This is probably the main disadvantage of this heating method. In addition, finding an analogue to a burnt out lamp will be problematic.
The infrared rays emitted by the lamp will heat up everything that gets in their way. Of course, one-time contact will not be reflected in any way on surrounding objects, but if you cook on such a stove constantly, then over time it will be noticeable that the exposed areas of the skin are noticeably tanned. I don’t know which category to classify this property into, as advantages or disadvantages, but women definitely won’t like it.
The problem of choosing hobs
Choosing a product on the market is difficult due to the lack of suitable types. After all, the type of installation of the hob depends on the parameters of the selected model.
Hob: view after installation Source tehznatok.com
Main product classification:
- Products are gas , electric and induction . As for the electric panel, this is the best option for a house where gas is not installed. If the buyer's first priority is comfort, experts recommend purchasing a gas appliance. The induction hob is characterized by a modern set of advantages.
- Dependent panel . A dependent model is a model produced together with the oven. In this case, the oven is located inside the kitchen unit or is integral with the hob. The combination of oven and hob does not always happen, even if they are manufactured by the same company.
- Independent model . It is not connected to the oven. The main advantage of such units is the arbitrary location of the device in the kitchen. The dependent model is made so that it can be placed exclusively above the oven.
Differences by type of control:
- Mechanical mode of operation requires a rotating mechanism. Most consumers prefer this type.
- Touch models work with a light touch of your hand. This is a truly innovative method. Cleaning the panel is easy because the surface is smooth.
The main rule when choosing is security parameters. Source m.sm-shop24.ru
Locking and Unlocking
@tehnika.expert For the safety of small children or animals that like to roam around furniture, there is a locking mode. As a rule, there is a button on the panel with a lock depicted on it. Pressing it completely blocks the control. If you need to cancel an action, you need to press the “+” and “-” buttons simultaneously.
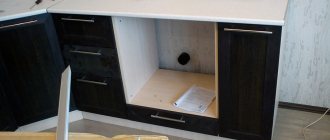
How to install a panel into a countertop
Independent connection of the surface first requires proper installation of the panel into the prepared cutout of the kitchen unit.
Installation is carried out in several stages:
- We determine the future location . Dimensions are determined with a ruler. It is most convenient to use a cardboard blank.
- Draw the shape of the panel on the board. A maximum of 1 mm can be left to allow the product to easily enter the panel.
- Drilling panel borders . Pre-drill in the corners of the marked shape. Diameter 9-10 mm. The drill must be made of wood or metal.
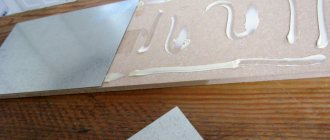
- The next step in installing the hob into the countertop is to cut a hole using a jigsaw. The tool is inserted into the finished hole, pressed firmly against the board, and then begin the cutting process. In this case, the brush should be pressed along the marking lines at low speed.
- Attach it securely to the top of the table using a set of clamps. Then remove the remaining wood.
- The remaining gap must be filled with special silicone sealant .
The process of installing a gas panel Source stroy-podskazka.ru
After installing the device in the set, you can begin the process of connecting it to the electrical network.
See also: Catalog of flat roof house projects
Measurements
Before purchasing a panel, you need to know the width of the tabletop. The dimensions of most panels are standard and do not go beyond 55-57 cm. The documentation for the panel must indicate not only the dimensions of the panel, but also the size of the hole in the countertop for installing the panel.
Panel installation diagram
Related article: Green color in the kitchen interior
Connection Tips
The process itself - how to connect the hob to the mains - is quite simple. You will need the following tools and components:
- An impact drill that is attached to a drill bit of a specific size to drill into a wall.
- Plastic inserts.
- Mounting screws for container.
- Screws for mounting the socket.
- Screwdriver.
- Knife to clean the ends of the crimp wires.
- Insulating tape.
Safe installation of the hob Source my-muzh.ru
In general, the plan for how to install the hob safely and independently should look like this:
- The connectors can be connected directly through the plate terminals. To access them, disconnect the cover on the back surface and remove the safety device.
- We focus on the color marking of the wires and the shade of the connected terminals. A single-phase network requires the use of a red wire with a membrane.
- Using a plug with a grounding terminal requires connecting the green/yellow wire.
A competent and secure connection first requires information about the parameters of the network connected to your home. Based on these technical parameters, the connection algorithm is selected.
Marking
Inserting a hob begins with finding out the dimensions and applying them to the countertop. As a rule, the parameters are indicated in the instructions supplied with the equipment. If the manufacturer did not take care of this, then it is possible to calculate everything independently. In the first option, the panel is turned over, after which it is traced on thick cardboard or even directly on the tabletop. For this you will need a ruler of sufficient length, a pencil and a marker.
You can try to determine the mounting location yourself. First, the boundaries of the interior space of the cabinet, on which the panel itself will be placed, are transferred to the surface with a pencil. By the way, when a pencil does not allow you to apply bright markings, then it is wise to first glue masking tape and then draw. Next, the center of the hole for the housing is determined. To do this, it will be enough to draw the diagonals of the rectangle, which are created by the front and back parts of the tabletop, and the drawn boundaries of the cabinet.
At the point where the diagonals intersect, two lines are drawn to form a cross. This means that one should run parallel to the edge of the tabletop, and the second should be perpendicular to it. The dimensions of the part of the body that should be built-in are marked on the lines that appear. The exact numbers are either determined independently or extracted from the instructions. It is better, by the way, to increase them by a centimeter or two for greater convenience.
If parallel and perpendicular lines are drawn through the resulting marks, a rectangle is formed. Not only will it be exactly in the center, but it will also coincide with the part of the hob that needs to go deeper. If the gap prescribed by the manufacturer remains between the formed lines and other objects, then you can outline the figure with a marker and move on to the next stage.
Algorithm for connecting the panel to single-phase networks
This option is possible if a wire of three cores is embedded in the wall.
Scheme for connecting the panel to single-phase networks Source rolexforum.ru
To install the panel, the following steps are required.
- Use a screwdriver to unscrew the plate located behind the panel.
- Use jumpers to connect the first, second and third terminals. The phase connection is carried out using a brown, black or white wire
- We connect the blue wire to the zeros. These are numbers four and five.
- Cables for hobs are connected to the protective terminal (yellow).
- Tighten the mounting screws.
- It is necessary to check the reliability and tightness of connections and the functioning of the product.
The preliminary stage of connection is to check the technical condition of the sockets. If necessary, replace it.
See also: Catalog of companies that specialize in electrical work
Connection with sleeves
Now you need to connect the wiring in the socket box with the cable going to the panel. Select GML sleeves that correspond to the cross-section of the cores.
If the sections of the cores are different, for example, 6mm2 comes out of the wall, and 4mm2 goes to the panel, then on one side (smaller) the sleeve is sealed with an additional wire.
After which the ends are pressed in with press pliers and insulated with electrical tape or thermal tube.
Now all this can be neatly hidden in the socket box.
How the hob is connected to three-phase networks
Connecting the product to an outlet requires the use of a five-core wire.
Structurally, it consists of:
- three phases;
- grounding intended for protection;
- "zero".
Connection diagram of a panel with three phases Source rolexforum.ru
The process of connecting the hob is as follows:
- We connect a single-phase wire (black or white or shade) to the first terminal, another to number 2, and the rest to the third.
- The fourth and fifth terminals are connected with a jumper, and a blue neutral conductor is connected to them.
- Grounding requires connecting a yellow-green wire.
Installing the hob plug
If the device is equipped with a cable, where the plug is connected, and there is a suitable outlet in the room, then all that remains is to turn on the product.
In another case, it is necessary to carry out a certain algorithm of actions:
- The plug is pre-disassembled and the cable is passed through the prepared hole.
- We connect the brown and blue wires to the plug outputs.
- If o and “N” are present on them, then the brown wire is connected to the terminal with the letter “L”, and accordingly “N” receives a blue cable.
- The yellow-green wire is attached to the central terminal of the plug.
- The plug is assembled together and secured with a bolt.
Connection of wires in a plug Source cable.ru
Connecting the slab directly
If it is necessary to connect the VP without using a plug and socket, a mounting box is used. This option would be appropriate when you need to move the cabinet close to the wall. In this case, the protruding plug simply will not fit, but the junction box will not hurt.
A flexible extension wire from the panel is simply inserted into the box and pressed using sleeves to the monocore cable laid in the groove. For this purpose, you need to use a sleeve corresponding to the required cross-section. It must be designed for heavy load electric stoves. Each sleeve must be insulated. The best way to do this is to use heat shrink tubing.
This installation method will be even cheaper, since a plug and power socket are more expensive than a pair of sleeves. As for the mounting box, it costs almost as much as a socket box.
Connection via junction box
Installation work on a powerful built-in electric stove can take several days, given the need to chisel the walls for cable laying and further finishing. Without an assembled electrical panel in the house, it is better to immediately entrust this work to an electrician, since twisting to the wire from the meter is unacceptable. If connecting the panel consists only of connecting an extension cord and plug to it, then this will take less than an hour.
Gas hob connection diagram
Once a gas stove has been selected, it is not difficult to connect it, provided that a similar unit has been used in this kitchen before. The gas hob must be connected using a flexible hose.
Example of a gas hob Source t10p.ru
The main safety requirement is to turn off the gas tap at the entrance to the apartment before starting the connection.
All modern gas surfaces are equipped with electric ignition.
Algorithm for how to connect a gas hob:
- Black and brown wires are attached in the plug to the terminal responsible for the phase.
- The blue wire is connected to the connector responsible for “zero”.
- The yellow-green colored cable is connected to ground in the central part of the plug.
- We check the functioning of the ignition in the gas hob.
Gas device installation:
- Installation is carried out in the workbench after cutting out a rectangle of the required size using a penetrating saw.
- It is advisable to leave a gap between the panel and the wall of about 5-6 cm for ease of installation of auxiliary communications.
View of the connected gas panel from below Source kuhnyamy.ru
Electrical installation kit
To connect the equipment to the electrical network, you will need to prepare:
- cable for laying the line;
- circuit breaker;
- socket;
- fork;
- flexible wire.
All installation equipment is selected depending on the power of the VP. Having it at your disposal, you can begin direct electrical installation. Additionally, you may need crimp sleeves, solder, electrical tape, heat-shrink tubing and other small items used when working with electrical wiring. Also, depending on the chosen connection method, you will need a socket box or junction box.
Requirements for electrical wiring and its installation
To turn on a built-in electric stove, you need to use a cable coming directly from the electrical panel. That is, it is important that it be laid directly without the use of junction boxes with branches. It is necessary that the cable only powers the hob. The fact is that such equipment is very powerful, so if other equipment operates from the wire, it may overheat, causing a short circuit.
Wire 5 cores for 3-phase network
If the house or apartment has old wiring, and there is no powerful socket with a direct cable from the panel or meter, then you will need to lay a new separate line. From the desired location of the outlet, a vertical groove is made to the ceiling. Next, horizontal grooves are carried out directly to the cable connection point. If you plan to use suspended ceilings in the future, then the wire can be fixed directly to the floor slab, since in the future it will be hidden.
Note! The hob is a reliable, but not timeless piece of kitchen equipment. Perhaps over time it will break and there will be a need to replace it. For this reason, it is advisable to initially lay the electrical cable with a reserve cross-section that can safely power a more powerful built-in electric stove.
Cable in groove
The line for the electric stove is laid using 2 types of cables: VVGng-Ls or NYM . Their throughput is selected based on the power of the built-in equipment.
Table 1. The ratio of the cross-section of the cores and the power of the hob.
| power, kWt | Core cross-section, mm2 | |
| 1-phase network | 3-phase network | |
| 3-5 | 2,5 | 1,5 |
| 5-7,5 | 4 | 2,5 |
| 7,5-10 | 6 | 2,5 |
These types of cable are used to lay lines directly to the outlet. They consist of a monocore, so they have little flexibility. For this reason, flexible wires are used directly from the plug to the hob: KG or PVS . They are often included as standard with the electric stove, so there is no need to purchase them separately.
Flexible extension cord
Selecting an outlet and requirements for its installation
The socket for turning on the panel can be located depending on the characteristics of the countertop, as well as personal preferences. It is important to maintain the convenience of turning the hob on and off. As a standard, it is placed at a height of 90 cm from the floor.
If you want to hide communications, you can fix the socket directly below the bottom of the lower kitchen cabinets. With this placement, access to it is provided through the space created by the height of the legs of the bedside tables. It should be raised above the floor to a height of at least a few centimeters so that in the event of a leak, the electrical contacts do not get wet.
Socket under the cabinet
Connecting the hob through an outlet, rather than directly to the panel, has its advantages. Although you will have to do a more complicated installation, it will be easier to turn it off in the future when you wet clean the stove. If you connect without a socket and plug, you will need to go to the electrical panel, which is not so convenient.
The 2-burner stove can be powered through a regular outlet. More powerful equipment requires special switches. They can be made of ceramic or plastic. Sockets from 10A .
Attention! To connect to a 1-phase 220V , plugs with three contacts are used, and for 380V , with five.
Selecting a circuit breaker
The line for connecting the built-in electric stove must be laid through a circuit breaker. This is a mandatory requirement since the slab can create network overload. At critical loads, the switch will prevent a short circuit. It is very important to choose it correctly, in accordance with the power of the stove. If the cable itself for the panel can be used more powerful, then the circuit breaker must fully comply with it.
You should not save on purchasing it, since cheap devices often do not work or turn off even when the stove is operating in normal mode with a low load.
Prices for automatic machines
Difavtomat
Standard shield machine
Table 2. Correspondence of the current of the machine to the power of the stove.
| Circuit breaker current, A | Circuit power | |
| 220V | 360V | |
| 5 | 1.1 | 2.6 |
| 6 | 1.3 | 3.2 |
| 8 | 1.7 | 5.1 |
| 10 | 2.2 | 5.3 |
| 16 | 3.5 | 8.4 |
| 20 | 4.4 | 10.5 |
| 25 | 5.5 | 13.2 |
| 32 | 7 | 16.8 |
| 40 | 8.8 | 21.1 |
Video - How to choose a hob for your home
Connecting induction panels
Such plates are economical and efficient. Using the induction unit, only the bottom of the pan is heated, while the surface itself remains cold. Surfaces with this type of heating are the most expensive on the market.
Induction hob - a stylish and modern device in the kitchen Source tehnikaportal.ru
To connect an induction hob, you need to go through a certain algorithm of actions.
- There are two types of electrical cords. To connect the stove, you only need to buy the wire that is suitable for the wiring of your home.
- Now you need to open the cover on the back side of the surface. Here you should find a small rectangle. It needs to be dismantled.
- Opening the cover, we find the necessary terminals. We pre-mount the wires into the clamps. They must be securely tightened. This securely holds the cable out of the box.
- The next step is to remove the copper plate. The old style induction cooker has three cores. The modern model boasts 4 cores. The neutral entrance is in the middle. Phase holes are located on the sides. The ground terminal can be found at the bottom.
- It is necessary to establish a reliable connection between the wires and terminals. To install them, unscrew the fasteners and insert the end of the wire into the hole. Grounding is pre-connected. At the next stage, “zero” is added. The final step is to connect the phase holes.
How to connect induction panels Source mekelektro.ru
- The copper element is installed between the phase terminals.
- Be sure to check the strength of all connections.
- After the connection process, we check the operation of the device by turning it on.
When connecting, the electrical factor comes first. The surface heats up in a matter of seconds, so the burners can immediately begin their functions, creating comfortable use
The disadvantages of such panels include large electricity consumption. Consequently, connecting a hob imposes certain safety requirements when carrying out the described work.
Tags
induction cooktop refers to cooktops.hob operationsinduction cooktopinduction cooktopinduction cooktop installationspopularity of induction surfaces.induction cooktop installationsinstall an induction cooktopInduction cooktop installationinduction cooktop installationsInduction hobs and induction coils.install an induction cooktopInduction cooker installation full external cable external cable grounding power cable single power cable cable which cable to choose wires power cable, cable cores on Electrical wiring cable The cable must be carried out independently. The intersection is carried out parallel to the marks, straight lines are carried out. Then sealing is carried out. Sealing is carried out. Three wires are checked. old wiring old wiring is made of aluminum wiring cross-section.