Kitchen decoration is important. After all, a person spends a lot of time here. Therefore, it is more pleasant to see an original design every day than just ordinary white walls. Thanks to a huge selection of finishing materials, it’s easy for us to find one that suits your design ideas and financial capabilities. In recent years, more and more builders are choosing MDF panels or sheets to decorate any part of the house, the kitchen is no exception. MDF, what kind of material is this? Due to good resistance to temperature changes and humidity MDF sheets will be an excellent solution for installing a kitchen apron.
Kitchen apron
A decade ago, it was impossible to use MDF panels for kitchen splashbacks due to the large thickness of the sheets and their unesthetic appearance. But now, thanks to new technological processes in the production of moisture-resistant MDF, the opportunity to implement different design solutions has become real.
If previously the main material used for the apron was tile, now owners have the opportunity to purchase a cheaper and easier-to-install finishing building material, MDF panels.
The kitchen is very capricious in terms of materials used for finishing, especially the area where the apron is located. It is this part that is exposed to external stimuli every day:
- humidity;
- heat.
So you should pay more attention to the characteristics of the finishing material you choose.
Kitchen apron
Those who want to decorate their kitchen do not always have the opportunity, in addition to purchasing all the necessary building materials, to also pay for the services of builders. And let's face it, hired workers often suck. Therefore, more and more people decide to do their own repairs.
This also raises a number of questions:
- how to install a kitchen apron made of MDF sheets?
- what materials are needed for installing MDF?
- What is better and how to attach a kitchen apron made of MDF?
- Is it possible to install a kitchen apron from MDF with your own hands?
- How to install an MDF apron in a kitchen, step-by-step instructions.
You will find answers to each of these questions here.
What you need for self-installation
An apron is an integral part of the kitchen interior. This element can make the design of the room more stylish and practical, but it can also radically change it for the worse.
It is important to treat this part of the wall with maximum attention. How the apron will fit into the interior depends not only on its style and color scheme, but also on the quality of installation.
When installing an apron in the kitchen with your own hands, prepare in advance for this creative and responsible process. Choose a material that suits the color and style, make markings, acquire the necessary tools and study the installation process.
Before proceeding with the points listed above, prepare the wall on which you will install the apron. Its appearance will largely depend on this.
Preparing the wall for installation:
- Remove old trim from the wall. Old tiles, wallpaper and plastic panels under the new finishing material will worsen its appearance and reduce its service life.
- Apply a special primer to the surface. It will increase the quality of adhesion to the wall of subsequent layers. If there was mold and mildew on the old finish, use antifungal compounds.
- If necessary, apply a new layer of plaster composition . The condition for high-quality fastening to the wall of some types of material is a flat base surface.
Only after the surface preparation work has been completed can the apron itself be installed directly. Otherwise, the repairs will soon have to start again.
Advice ! It is better to install the apron before the main wall finishing is completed. This will reduce material costs and provide a neater appearance to the interior.
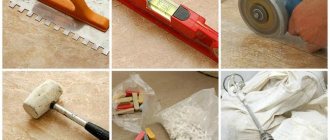
Preparing tools for work
Installing a kitchen apron is impossible without special tools. The list of required items may vary depending on the material chosen and the method of its installation.
| Apron type | Installation method | Materials and tools |
| Sheet plastic | Liquid glue | Glue, for example, “liquid nails”. |
| Self-tapping screws | Decorative plugs, screws, screwdriver, drill. | |
| MDF | Lathing | Wooden slats, at least 2 cm thick, decorative self-adhesive tape, a protective agent for processing slats, a screwdriver, drill, jigsaw or hacksaw. |
| Glue | Decorative self-adhesive tape, liquid nails. | |
| Self-tapping screws | Self-tapping screws with butterfly dowels, decorative plinth, decorative plugs (optional), screwdriver, drill, jigsaw or hacksaw. . | |
| Plastic panels | Lathing | L-profile made of metal or wooden slats, screwdriver, drill, decorative plinth. |
| Self-tapping screws | Self-tapping screws or staples, decorative plugs, screwdriver, drill, decorative plinth. | |
| Glue | Liquid nails, decorative plinth. | |
| Tiles and mosaics | Installation with special glue | Tile cutting tool, tile adhesive, grout, notched trowel, smooth trowel for tile adhesive, rubber grout trowel, glue mixer (optional). |
| Glass | Self-tapping screws | Self-tapping screws with elastic dowels and decorative plugs, screwdriver, hammer drill. |
| Decorative rock | Special glue | Special glue (tiles are suitable), a protective composition for processing the finished apron. Mixer for mixing glue, notched spatula, smooth spatula, grinder. |
Advice ! When choosing a method and material for installing an apron, adequately assess your strengths. If this is your first time doing repair work yourself, choose simpler options. Otherwise, you may not only fail to complete the job, but also ruin expensive material.
We are developing a plan for installing the future apron
Before attaching the kitchen apron to the wall, you need to draw up an installation plan and make markings. To do this, a kitchen interior design is prepared in advance, taking into account the size and installation location of the set.
The marking is carried out taking into account the parameters of the kitchen unit. It is usually done both on the project and on the wall.
What is included in the marking of a kitchen apron:
- The height at which the apron will be located. This size is determined by the height of the working surface. On average it is 85 cm.
- The height of the apron itself. The value of this parameter will be equal to the height of the gap between the work surface and the kitchen cabinets. Standard - 55-65 cm.
- Distance from the working surface to the hood . Whether you need this size depends on whether you will be installing a backsplash over the stove. This is mandatory in cases where the hob is built into the kitchen unit. According to standards, the gap between the countertop and the hood is 75 cm. Often, the part of the finishing under the hood is higher than the rest of the apron.
- Marking for sockets. The location of kitchen appliances is taken into account here.
Important ! All marking lines must be perfectly straight. To make drawing these lines easier, use painter's thread.
Purpose
First of all, it is worth identifying the goal.
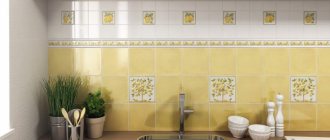
What is a kitchen apron? This is the space between the dining area and the hanging cabinets.
We can say that the apron is the face of the kitchen. Therefore, its color must be combined with the rest of the kitchen design.
It is also necessary to fulfill a number of conditions that the selected finishing material must meet:
- high practicality , especially with regard to the ability to clean the apron from dirt;
- resistance to high temperatures;
- moisture resistance;
- resistance to various chemicals such as detergents;
- long service life.
Since the apron is located in the kitchen work area, you need to provide as many items from the list as possible. By choosing MDF material as a kitchen apron, you will additionally protect the walls from: water, soot, grease and other external irritants. Panels for bathroom furniture also meet all these requirements.
Negative sides of a plastic apron
Like any product, the plastic panel has disadvantages:
- Susceptibility to deformation. If exposed to temperatures for a long time, the product may change shape.
- Mounting to a flat wall. Most often, aprons cannot be installed if there are defects on the surface.
- Fragility. The average service life of panels is 5 years.
- Susceptibility to scratches. The surface is easily damaged during cleaning.
The number of advantages of the material exceeds the number of disadvantages. A plastic apron allows you to refresh your kitchen design without much effort, which is why it is often used.
Advantages and disadvantages
Whatever finishing material you choose, it will always have a number of advantages and disadvantages, so it is important to determine the characteristics before purchasing. Attaching an apron to a kitchen made of MDF will allow you to achieve the following possibilities:
- environmental friendliness in the production of the material. This point is especially important because food is prepared in the kitchen.
- the ability to easily remove dirt from the apron. Even the use of chemical detergents does not harm the color of the panel, and the apron can delight you with its gloss for many years.
- MDF has high resistance to temperature changes. Even the proximity of the gas stove to the apron does not deform the material.
- the material is resistant to sunlight.
- moisture-resistant laminated wall panels can withstand humidity up to 80%. And even exposure to hot steam.
- good impact protection.
- the low weight of the material makes it easy to install in the right place, even if it is large (solid). Uneven walls do not bother him.
- It’s easy to install an MDF apron in the kitchen with your own hands, even if the wall is not completely flat.
- When installing an apron in a kitchen from wall panels, improvised means are used for interior decoration, and there is no need to purchase additional tools.
- a rich color palette, and the ability to apply a variety of photographs on the film surface of MDF sheets, helps you choose the design you need to match the rest of your kitchen decor.
- the low cost of MDF panels makes it easy to change the interior to your taste. Attaching a kitchen apron made of MDF material will help significantly save your construction budget. In this case, there is no need to remove the furniture; the old apron is simply and easily dismantled and a new one is installed in its place.
- this often applies to photographs. The price of installing an apron in an MDF kitchen depends on the size and design of the room.
- long service life of the material. Manufacturers guarantee up to 5-7 years of service life.
All the advantages of MDF panels are achieved through unique production technology.
As for the disadvantages, this building material has few of them:
- MDF is highly flammable, so an open fire falling directly on the panel can even deform the apron for a short time. When an apron burns, toxic substances begin to enter the air, which have a detrimental effect on health.
- There are a number of restrictions on chemical compounds that cannot be used to process MDF aprons. This list includes all substances containing acetone and other solvent reagents. Only household detergents can be used for washing.
- Sometimes, if the slab is not fastened correctly, the apron may move away from the wall , but this defect can be easily corrected by installing it correctly again.
By comparing the positive and negative aspects, you will already decide whether to choose this material for repairs or not.
Methods for installing wall panels:
The article will contain two step-by-step instructions for installing wall panels with your own hands. We will tell you how to correctly install MDF, chipboard and PVC elements in different ways. These materials are most often used in finishing the kitchen area.
They are light, cheap, relative to other designs, but at the same time quite durable, creating sound and heat insulation.
Plastic and wood-fiber boards are moisture-resistant and easy to clean, which is especially important for the apron above the tabletop and the entire room as a whole.
How to install correctly - installation options
How to install an apron in the kitchen from MDF sheets? And although the process of installing an MDF apron is quite simple, there are several issues that a novice installer may encounter. There are many videos on the Internet of installing an apron in a kitchen made from MDF material.
Basically, the nuances relate to the quality of work and if you follow the instructions, the result will leave you satisfied.
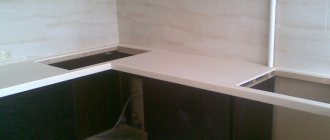
Below is a step-by-step installation of an apron in a kitchen made from MDF panels. Here is a list of preliminary work before installing the MDF apron. Take correct measurements of the work area. Thanks to the ease of processing MDF panels, you can give the desired shape to the apron. Much depends on how long you plan for the apron.
Some owners want the space from the bottom of the cabinets to the floor to be covered with an MDF sheet. In this case, you need to measure the space from the bottom of the wall cabinet to the floor.
And additionally add another 20 centimeters to the value so that the panel extends slightly under the hanging cabinets. This approach will provide additional aesthetics to the design.
This method is effective if the lower part of the kitchen unit is not solid. Otherwise, you will overpay for extra meters of material, which no one will see anyway, but the strength of the structure will be much higher.
Red single brick is the most commonly used among all types of bricks in construction. Here is its size.
It is almost impossible to carry out interior finishing work without putty. Here you will find out how long the putty takes to dry.
Today it is impossible to find a single building in the construction of which sand would not be used. By clicking on the link, you will become familiar with the heat capacity of sand.
Partial fastening method
Another option for attaching a kitchen apron made of MDF is partial. You do not overpay for extra meters and attach only the visible part of the apron between the tabletop and shelves. Fasten the MDF panel with a margin of about 25 cm, this will allow you to additionally fix the apron plate.
Horizontal measurements are also important, especially if there are sockets or switches in the kitchen splashback area. To do this, make a pattern with marked places where the sockets are located.
Take into account protrusions and other nuances that arise during installation. The template you have made will help you cut the MDF sheet exactly to your measurements.
How to install in the kitchen
How to hang an MDF apron in the kitchen? After the preliminary work necessary for correct fastening of the apron, you can install the MDF sheet itself.
Work carried out using a frame structure takes more time, but provides additional reinforcement and a longer service life without defects. How to fix an MDF apron in the kitchen using the frame method? The work area assembled from parts allows you to quickly assemble the apron.
How to install with self-tapping screws
How to attach a kitchen apron made of MDF with self-tapping screws? Here you will also need planks on which the entire structure will be supported. It also needs to be treated with special antiseptics. Then, in the marked places along the perimeter of the planks, MDF sheets are attached to dowels .
It is better to fasten an MDF apron for the kitchen with help to avoid defects. Below is a video on how to attach an MDF apron in the kitchen using self-tapping screws.
For more information about installing a kitchen apron made of MDF, watch the video:
How to attach a wall panel in the kitchen to the sheathing
The workflow is divided into three stages. The starting point is marking.
Marking
Using a building level, a tape measure and a pencil, mark the surface of the wall where the sheathing will be located.
Usually the main frame is screwed around the perimeter, and horizontally or vertically located slats are placed on it.
The distance between the jumpers should be 50-60 cm for MDF, chipboard and 30-40 for PVC elements (this increases the strength of the structure, the plastic will not bend much).
Cutting and assembling the frame
Most often, the frame is made of wood, since it is more economical than plastic or metal profiles.
Wall panels in the kitchen are fastened using slats with a cross-section of at least 20*20 mm, without bends or other defects.
Before installation, they must be treated with an antiseptic and water-repellent impregnation. After the wood has dried (this will take about one day), you can begin to work.
The distance of the lower part from the floor should be 1-2 cm.
- install the base - four planks around the perimeter. If necessary, place bars under it for leveling;
- attach additional guides using self-tapping screws or self-tapping screws. Do not skimp on fasteners to ensure the structure is reliable;
- if thermal insulation was provided, place the material in the resulting cells. MDF can be insulated with polystyrene foam and polystyrene foam.
Installation of wall panels on metal sheathing is considered the most reliable. It is made according to a similar principle, but the process is more complex. This video shows a detailed example of installing such a profile.
With plastic guides, as with wooden ones, everything is quite simple. According to preliminary markings, they are attached to the wall with dowels. The elements must be located perpendicular to the PVC sheets.
Creating the frame is the most labor-intensive stage. When it is finished, you can begin the final part of the work.
Sheathing
The planks can be fixed to the frame horizontally and vertically. Craftsmen advise starting installation from the bottom and from the corner to the window or door. If the top part has to be cut off, it can be hidden behind the wall set.
Step by step instructions
- cut the sheets if necessary;
- attach the corner element with self-tapping screws and close it with a corner;
- a plastic corner strip is inserted into a pre-installed corner and attached to the frame with a stapler;
- insert the second sheet into the groove of the first and attach it to the profile with clamps, screws, glue or staples.
At the final stage, the floor plinth is installed. The video shows a clear principle of installing the frame and PVC planks.
Preparing the work area before hanging the kitchen apron - step by step
Once you have made all the measurements, you can purchase an MDF panel. Now it’s time to prepare the working area and all the materials you need for installation.
Although the panel is attached to an uneven wall surface, it is better to remove strongly protruding defects.
To protect yourself from the growth of various fungi on the wall after installing the apron, it is advisable to first clean the surface of the wall, removing all old materials, such as wallpaper.
Removing old wallpaper
Then treat with special means . But this is at the discretion of the owner.
Wall treatment with special means
To ensure uniform fastening of the apron, it is necessary to install a special strip. For these purposes, you can buy a special one or simply install a rail; it is removed after installing the panel.
What can you attach to?
How to attach an apron for the kitchen from MDF, or rather, what to hang it on? For these purposes you can use:
- adhesive composition ( liquid nails) ;
Liquid Nails
- aluminum frame;
- dowels
Depending on the method you choose, you will need to buy related materials.
Profile mounting
In this case, as in the previous one, there are no holes for fastening on the panels themselves.
Apron installation diagram
To install the apron, you need to use self-tapping screws to secure the mounting profiles designed for fixing the glass to the wall (top and bottom).
After this, the panel can be installed.
- To do this, its lower edge is moved slightly away from the wall, and the upper edge is inserted into the profile.
- The bottom of the glass is brought to the profile and is also inserted into it (you have to press a little on the product).
- If several panels are installed, it is necessary to ensure that the gap between them is as small as possible. A rubber mallet is used for this, but the tool should be used with caution.
How to install and secure MDF panels to the wall with your own hands
How to attach MDF to the wall? To attach the apron to liquid nails, you will need the following materials:
- The liquid glue itself.
- Decorative plinth, which is installed after attaching the apron between the table top and the wall.
This method helps to avoid additional costs for purchasing a frame, for example, and also to carry out all the work cleanly without waste, without even removing the furniture from the kitchen. How to glue MDF to the wall?
Liquid nails should be applied around the perimeter of the entire panel and in the middle at an equal distance of 20 cm.
Fastening with liquid nails
If you did not install the mounting rail, you will have to hold the panel with your hands until the glue is completely dry.
How to attach an MDF kitchen apron to an aluminum profile ? This method will require additional costs for the purchase of materials for installing the frame. The advantage of this method is the additional strength of the apron without the fear that the structure will deform.
Attaching an apron to an aluminum profile
The ability to install an apron even on a slightly defective wall without pre-treatment. Nowadays it’s not difficult to find a video of attaching an apron in an MDF kitchen using a frame structure. You just need a number of additional materials.
How to fix a kitchen apron made of MDF using self-tapping screws? This method is messier and will require purchasing dowels and placing them along the sheathing strips. When cutting MDF planks and sheets, it is better to use a fine-toothed hacksaw, which will ensure a more even cut.
Preparatory stage
Attaching the apron necessarily includes preparatory work. Their nature is to some extent determined by the method of fixation. However, the general recommendations are the same for any type of installation.
- The walls are cleaned of old coating , deep cracks and potholes are sealed with plaster. The surface is well leveled. If installation is planned with glue, then the walls are also covered with putty.
- Treat the surface with a primer. The nature of the latter is also determined by the type of work. When installed on the sheathing, the walls are treated with an antiseptic primer to prevent the appearance of mold. If the material needs to be attached to the wall, the surface is primed with a composition corresponding to the type of facing material.
- Installation of sockets is carried out after installing the apron. However, the area for the device must be properly prepared, and holes for sockets and switches must be made in the finishing material. The number of outlets in the kitchen is determined by the amount of equipment.
Advantages and disadvantages of plastic panels
Compared to tiles and other materials, plastic (with the exception of PVC) has a number of advantages. Here are the main ones:
- reasonable price,
- moisture resistance,
- the ability to withstand elevated temperatures, the negative effects of household chemicals, food acids, fats,
- resistance to mold growth (if installation was carried out correctly),
- light weight of material,
- tight fit to the wall,
- possibility of installation by yourself,
- Possibility of adjusting height and length.
Due to the low price and cost of work in comparison with tiles, which should be installed only if you have experience, a plastic apron can be changed more often - this will not cause a “hole” in the budget. When replacing the apron, you don't even have to move the furniture.
The material also has disadvantages. You should not glue it next to a gas stove - any type of plastic will deform over time, even the most fire-resistant, because exposure to heat will be frequent and prolonged. Plastic should not be scrubbed with hard brushes.
Polycarbonate will not withstand intensive processing either - small scratches will still appear. Only some types of design will smooth out this drawback: if the surface is decorated with relief images, made to look like aged stone or brick, minor flaws will be invisible.
Glue the tiles
The process of attaching tiles to walls is not complicated at all. The adhesive can be applied either to the wall or simply to the back of the tile. For beginners, the first method may be more convenient. In this case, the glue can be applied in strips, focusing on the markings. This will make it much easier to align the tiles in the rows.
When gluing tiles, be sure to use plastic crosses. Their use will allow you to make the most accurate seams. The crosses have the same thickness. Consequently, the gaps between the tiles will be the same.
You can also stick tiles one above the other. But it is better to arrange the tiles in a checkerboard pattern. This way you can create a more reliable and durable coating.
Production and replacement of apron and table
The company operates in the production of custom kitchens. We can complete work of any difficulty perfectly and in the shortest possible time, so you can completely rely on us.
Workers replace tables and aprons that will last for many years. During this period of time, you can improve your own skills and look at the new catalog of finished products.
It is more difficult for a non-professional to choose the right tool, material, and accessories. You also need to know the features of the material and how to work with it. If something is done incorrectly, then such a mistake will cost a pretty penny and, as a result, replacing the countertop will result in a decent amount.
The company will take into account any desire of the client, will accept edits and correct the drawn blanks in a situation of need in a short period of time. We can change the table or apron most accurately and instantly. You should definitely be convinced of our professionalism and integrity. All that remains is to call the written telephone number and then at the same moment each person will receive a discount.
Return to list
Decorating chipboard
To give products the necessary aesthetic properties, the chipboard surface is finished with paper, veneer, polymer film or plastic. Modern methods of applying images make it possible to produce sheets with photo printing, creating high-quality decor.
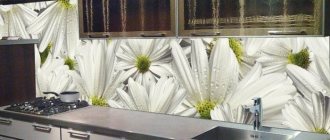
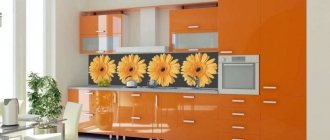
Using slabs with photo printing, you can make a kitchen apron with any pattern or photo - a reproduction of a classic painting; you can also apply photographs from a family archive, a futuristic landscape, a corner of nature, an image of your favorite animal, a bright flower, a beautiful pattern.
Finishing with photo printing involves applying a selected design to a sheet using a UV printer. When decorating with photo printing, a colored layer is formed on the surface of the slab in the form of an image that matches the original down to the smallest detail. To protect the surface with photo printing and make it resistant to various types of physical and chemical influences, a layer of special varnish is applied to it.
An apron with photo printing is an effective and stylish decorative element that can become the main element of kitchen design. It immediately attracts attention, while other interior details or design features of the furniture become less noticeable. In conditions of limited funds, this fact makes it possible to save on other room decoration items.
The traditional way of decorating particle boards is lamination. The resulting laminated chipboards are coated with melamine film or several layers of special varnish. The result is durable materials with increased resistance to chemicals, mechanical damage, abrasion and moisture. These characteristics make it possible to use the material in the process of kitchen renovation.
In addition to high performance parameters, laminated boards, especially those with photo printing, acquire high aesthetic properties. Products are able to imitate the tone and texture of natural materials - rare wood, and can have a patterned, smooth or structured surface.
What to glue
Today there are two types of tile adhesive on the market - paste and dry. Those who have no experience in installing tiles should purchase the first adhesive option. This composition for gluing tiles can be used immediately.
But you can also purchase a dry tile product, which is cheaper. In this case, you will have to make the solution yourself. The dry mixture is diluted with water in accordance with the manufacturer's recommendations. As a result, you should get a mixture that is not too thick, but not liquid either. To check if you have prepared the glue correctly, take a piece of the solution and squeeze it in your hand. The resulting lump should not spread or crumble.
In Soviet times, buckwheat was used to feed seedlings
Leggings and ballet shoes: fashionable outfits this spring that will be in trend for a long time
Spring is attacking: the doctor explained how the change of seasons affects health
Buying tiles
First of all, if you want to replace the apron with your own hands, you need to buy the tile itself. If you do not have experience installing ceramic tiles, it is better to buy not too small rectangular or square tiles.
Such material will be easier to paste in the future. Those who are confident in their abilities can purchase non-standard tiles - for example, in the form of rhombuses, trapezoids, etc.
Kitchen front and countertop
To restore furniture to its former attractiveness, it is not necessary to completely change it. It is possible to replace individual elements using high quality materials.
Most people would like to replace the kitchen facade or other parts in the kitchen interior. This allows you to save money and change the appearance of furniture and the style of the kitchen.
Replacing the kitchen facade has its undeniable advantages:
- Cost-effective - the updated facade will cost much less than a new set.
- Preservation of the usual style - if individual elements are damaged, there is no need to change the style if you like it.
- Saving time - replacing a facade takes little time if it is carried out by specialists. This is much faster than replacing individual parts.
- Change of design - if you want to update the style and design, you can update the kitchen facade without large material costs. Many ideas for creating a new design will make the kitchen updated and original.
The countertop is the center of the kitchen area. Almost all work in the kitchen is performed with its help. Various household appliances are installed on it, and it unites the entire kitchen space. Its color should be harmoniously combined with the furniture, facade and apron. The countertop must have certain qualities :
- High strength.
- Heat resistance.
- Moisture resistant.
- Hygiene.
- Aesthetics.
Considering all the useful qualities of the countertop, it is necessary to choose the right material for its manufacture. The modern building materials market offers different options:
- thick fiberboard sheets;
- artificial and natural stone;
- natural wood;
- metal;
- glass.
Suitable materials
The walls are lined with the following materials:
- PVC.
- Durable glass.
- Natural wood or MDF panels.
- Tile.
Plastic panels are used more often than other materials. PVC is available and produced in different colors.
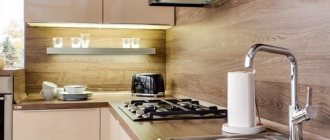
Textures like natural wood or stone
Paintings or photo printing look impressive.
Advantages of plastic:
- Moisture resistance.
- Hygiene.
- Easy to care for.
- Easy to install.
The plastic cover is installed on your own.
MDF panels are affordable and practical. They look beautiful
The kitchen uses cladding covered with laminate on both sides. It protects against mold and moisture. The surfaces are light and durable, and grease does not stick to them. Changes in humidity do not deform the coating.
Tempered glass cladding is the most expensive
The coating can withstand impacts, liquids and mildew. There are no scratches on the front side. Laminated plywood is resistant to liquids. The top of the sheets is covered with plastic. This is a good method for organizing a kitchen. The environmentally friendly product is perfectly protected from moisture. Melts on contact with open flame. Artificial stone is strong, moisture-resistant, and does not melt. The coating will last for decades.
Environmentally friendly coating does not contain aggressive chemicals or acids