The kitchen apron is the part of the wall between the wall cabinets and the surface of the kitchen countertop. No one can say which apron for the kitchen is the best, and what exactly you should choose from the huge variety of building materials. This is purely a choice of your taste and the capabilities of your wallet. But we’ll try to tell you what kind of kitchen aprons there are, what their pros and cons are, as well as how to make such an apron for the kitchen with your own hands, how to install an apron in the kitchen, how to secure it.
History of apron transformation
Devices similar to aprons have been used since ancient times and were originally pieces of leather or fabric that were attached to the belt and were intended to cover nudity. Later, the functions of the apron were transformed; it began to determine the status of its owner and membership in a certain social group.
Having migrated into the wardrobe of artisans, the apron began to be used to protect against splashes and dirt when working on a potter's wheel, in a forge, in a slaughterhouse or on a construction site. An obligatory ritual attribute of the attire of a member of the society of free masons, better known as the Masonic lodge, was an apron.
Women's aprons
Initially, the apron was worn by men. An apron is perhaps the first thing from a man's wardrobe that women borrowed because it is convenient, functional and beautiful. Over the long history of its existence, the apron simultaneously decorated the exquisite clothes of aristocrats and made the dress of servants comfortable.
Village women, as a rule, had a large number of aprons, which they changed depending on their activity and social status.
Kitchen apron
Protecting kitchen walls from dirt and damage using ceramic tiles, glass panels or other material is also called an apron.
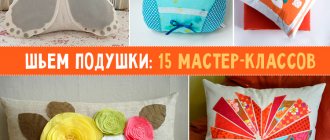
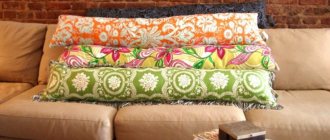
The housewife can easily decorate the interior of the kitchen by sewing curtains, napkins, a tablecloth with her own hands, and an apron for herself from leftover fabric.
For the skirt of such an apron you will need a remainder of fabric measuring about 40 by 60 cm, for the chest of the apron - a rectangular piece of fabric 20 by 30 cm. The size of the pockets is 20 by 20 cm. Taking into account the seam allowances for the pockets, you will need three flaps measuring 24 by 22 cm. For the belt and strap you will need approximately 2.5 meters of braid, 3 cm wide.
From a ready-made cotton scarf and two to three meters of finished braid, you can sew an apron for the kitchen in literally five minutes and without a pattern at all.
Note!
- Knitted raglan - step-by-step instructions, patterns, recommendations. Photo review of the best works and new products from craftswomen
- Knitting a shawl - step-by-step instructions for making a shawl with your own hands. Tips for beginners on knitting + photo reviews
- Amigurumi ring ⭕: features of the amigurumi technique. Step-by-step DIY master class with simple knitting patterns + 180 photos
In one of the corners of a scarf measuring 45 by 45 cm, pierce two holes, stretch the ends of a 120 cm long ribbon through them and tie it into a bow. Sew two pieces of braid 50-60 cm long to the other two opposite corners of the scarf to tie at the back.
What type of oilcloth should I choose for my kitchen?
First of all, like any finish, oilcloth has advantages and disadvantages.
Pros and cons of coverage
The material is not at all afraid of water.
Advantages of oilcloth:
- The material is 100% moisture resistant.
- The coating is moderately heat-resistant. Therefore, it can be used to decorate walls, cover a kitchen apron, or cover a dining table or work table.
- Oilcloth does not absorb grease and dirt. Thanks to this, it can be easily washed with a regular soap solution.
- There is a huge selection of oilcloths in color and pattern. Therefore, this finish can be matched to any kitchen interior.
- The coating protects the base well from mechanical loads.
- This finish is very cheap. At the same time, it can be quickly and easily replaced with a new cladding.
The design of oilcloths is very diverse.
Disadvantages of coverage:
- When using oilcloth for walls, you should take into account that there is a danger of mold growing underneath it, because it is vapor-tight.
- With intense exposure to steam and moisture, the paint layer on the finish wears off quite quickly (2–5 years).
Which coating should you choose?
The best base for covering is a non-woven fabric.
The oilcloth base can be:
- paper web;
- matter;
- non-woven fabric.
A protective layer of polymers or other materials is applied to it. This coating gives the material wear and moisture resistance, resistance to mechanical and chemical influences.
Oilcloth coating on non-woven fabric is the most durable. Because of this, its cost is higher than its analogues on a paper backing.
Based on the material of the front layer, there are the following types of oilcloth:
These polymers give the material a high level of strength and wear resistance.
This coating can be used for any base, even glass tables.
The main disadvantage of finishing made of polyvinyl chloride and polystyrene is that at the beginning of use it can have a strong and unpleasant smell.
They are most often used as tablecloths for kitchen and dining tables.
Teflon gives the coating moisture, wear and heat resistance. When handled with care, this material lasts a very long time.
This material is often transparent or decorated with different patterns.
This coating is dense and wear-resistant. Its aesthetic appearance makes it possible to place it on a glass table.
Transparent oilcloth on the kitchen table is not ideal:
- You can’t cut food on silicone, as it can be damaged;
- the material is not thermally stable enough.
It is made from vegetable oils, most often drying oils. Painting primers are produced from it.
These compositions are applied to an ironed woven base in 4–5 layers. Then they are fixed with a special varnish.
Oil oilcloths are wear-resistant and durable.
Cover design
When choosing oilcloth, you need to take into account the features and interior of the room:
- The texture of the coating can be glossy or matte. The best option for the kitchen is a glossy material; it will be easier to clean.
- Oilcloth in color should not sharply contrast with the rest of the cladding, decoration and furniture in the kitchen. The tones of the decoration should be combined with the design of the room itself.
- When the room is decorated in cool colors (blue, light green, white, etc.), then the oilcloth should be chosen in cool colors.
- For a warm (orange, yellow, red) room, buy light finishes or warming shades.
For the kitchen, decoration with ornaments and patterns in patchwork, rustic, and country styles is ideal. These could be fantasies on the theme of summer, images of kitchen items, fruits, flowers or vegetables. They will symbolize the wealth and abundance of the home.
- Nowadays, holographic 3D drawings are becoming increasingly widespread. A coating with such a front layer will help to recreate the unusual design of the kitchen.
- Soft oilcloth with an embossed texture and bright patterns will add luxury to the coating.
- If the kitchen windows face north, the colors of the cladding should be warm. The southern room should be decorated in cool colors.
Oilcloth design, well suited for the kitchen area.
Apron as part of national clothing
Many peoples use an apron as part of their national costume: Czechs, Poles, Belarusians, Ukrainians. It is impossible to imagine the Munich Oktoberfest without beautiful German women sporting traditional costumes consisting of a white blouse, a lace-up bodice and a flirty apron worn over a wide skirt.
Festive women's national costumes of the Russian provinces included an apron, richly decorated with embroidery and lace. Symbols and figures embroidered on the apron served as a talisman.
Professional aprons
The apron is still professional clothing for cooks, bakers, waiters, maids, butchers, blacksmiths and cleaners. Canvas aprons are used by grinders, masons, acid-resistant aprons by etchers, and galvanizers.
In medicine, protective aprons with lead inserts are used to protect against radiation during radiographic examinations.
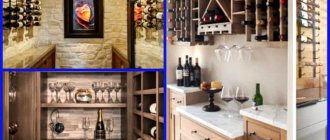
Tile
Create a mosaic backsplash with your own design using small tiles in different colors. For example, in this case, dark brown floor tiles were needed.
You can also create a mosaic pattern by breaking large tiles into smaller pieces before attaching them to the wall. The result is similar to the previous one, but more chaotic, without clear lines.
If you like more formal shapes and colors, then pay attention to this combination of small tiles in white, brown and gray:
When using very small tiles, it seems that the colors transform into each other and shimmer. In the example in the photo, a dark color scheme was chosen, but with such tiles you can experiment with even the brightest colors.
The shape of the tile has a great influence on the result, for example, taking a hexagonal tile instead of a square one immediately achieves an original effect. It is especially good to take hexagonal tiles, which have some color transitions, like here from white to gray:
Using tiles you can achieve a 3D effect. To do this, lay the tiles not side by side at the joint, but overlapping each other, creating volume. For example, like in this case:
Bibs for babies
Bibs and bibs are children's aprons that help the baby stay clean when he is still poorly able to perform independent actions.
Note!
- Knitted braids: simple patterns and the best master class for creating patterns with knitting needles. How to knit braids with your own hands + photo reviews
Knitting booties for newborns: detailed patterns for knitting booties for beginners + 150 photo reviews of the best products
- Mittens - TOP 100 photos of the best creation ideas. Description of the technique + instructions for knitting mitts with your own hands for beginners
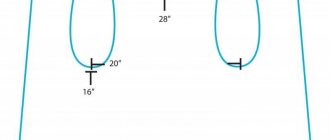
The pattern of a children's apron for babies is made on the basis of a rectangle measuring 16 by 28 cm:
- Set aside 4 cm from the top point, 2 cm to the right. Connect the resulting points.
- Place 4 cm down the midline of the bib and 5 cm from this point to the right and 4 cm down. Connect the resulting points with a smooth semicircular line - this will be the neckline.
- Also draw the outer line of the bib in a smooth semicircle.
When cutting, the fabric is folded in half along the grain, the pattern is pinned, and the bib is cut out without seam allowances. The sections are covered with bias tape or overcast stitches. The bib can be decorated with embroidery or appliqué.
School apron
How romantic girls in school uniforms with aprons look in old photographs: from pre-revolutionary gymnasiums to Soviet times, a white apron was worn on holidays, and a black one was worn on weekdays.
Unfortunately, now in many schools there are no requirements for wearing a school uniform, but at the last bell, modern graduates often wear a traditional snow-white apron.
In Soviet schools, during home economics classes, all girls were taught to sew an apron. This technology is so simple that any graduate can create a pattern and sew an apron with her own hands in one or two evenings.
Tips for choosing a model for sewing a school apron with your own hands
Don't choose too expensive fabric. Guipure and satin fabrics are very elegant, but require experience when processing. It is better for a beginning craftswoman to choose cotton, cambric, linen, and use lace, stitching, ruffles, frills, and folds for decoration.
It is recommended to limit the amount of decor: several rows of flounces on the petticoat can turn a graduate into a doll on a teapot. “Expensive and rich” is not for the last call.
The right choice for a beginning seamstress would be to make an apron of a simple design with a trapezoidal chest and a rectangular bottom. As a trim, you can use frill or cambric lace - stitching.
The length of the apron should be 3-5 cm shorter than the main dress, it can be the same length as the dress, but in no case longer than it.
You can sew a test sample of a school apron with your own hands from cheap fabric, and make the necessary adjustments to the pattern after trying it on. Then the test apron can be used for household work in the kitchen.
General information
The oilcloth for the table is made from laminated protective transparent PVC film. Production - South Korea.
The product has a shiny laminated surface and reliably protects the table from any damage. The oilcloth structure is flexible and durable. It is tear-resistant, practically does not wrinkle and cannot be cut with a knife. Soft glass remains transparent for a long time and retains all its properties.
Thanks to the flexible tablecloth, wear and tear on the tabletop is reduced. Dust on the surface covered with a protective film is practically invisible, any dirt can be easily wiped off without scratching or staining the table material.
Flexible glass is intended for use:
- in any office;
- in the kitchen;
- in the dining room;
- in a restaurant (cafe).
Which table is it suitable for?
Protective film is suitable for all types of tables, but is especially relevant for glass and lacquered ones. The tablecloth protects the kitchen table from cuts, the desk from rubbing, and the dining table from accidental stains.
It can also be any table in shape:
- rectangular;
- square;
- round;
- oval;
- non-standard shape.
Main characteristics
Before purchasing the product, you must select the thickness:
- 1.2 mm is used to protect chests of drawers, window sills, children's and school tables;
- 1.8 mm is well suited for the kitchen (protection of tables and countertops), children's (protection of desks) and office (protection of tables and window sills);
- 2.2 mm is designed to protect large surfaces and helps emphasize the premium quality of the interior.
Liquid glass on the table has the following characteristics:
- Duration of operation - up to 5 years;
- transparency - 98%;
- hardness - 37;
- blue pigment that protects against yellowness;
- resistance to sunlight;
- food standard - the material is allowed for contact with food;
- synthetic smell - absent;
- There are no heavy metal impurities in the composition.
Advantages of flexible glass
Main advantages of the product:
- easy to trim after shrinkage;
- has a comfortable temperature range - from –20 to +80;
- merges with the surface;
- just spread out;
- does not slip, lies well under its own weight;
- greasy stains are not eaten away;
- any dirt is easily removed.
If you want, you can decorate the tablecloth. Any stickers can be easily attached to the silicone surface. You can also paint it with permanent paint, or attach fringe around the perimeter.
Taking measurements for a school apron pattern
To create a pattern for a school apron, you will need to measure the circumference of the chest, waist, hips, the length of the straps, determine the height of the chest part of the apron, and the length of the lower part.
Before taking measurements, it is better to put on the school dress with which you plan to wear an apron and tie a ribbon at the waist.
Measurements are taken with a centimeter tape; it is better if another person does this, since it is difficult to take measurements on your own.
- Measure your waist circumference – FROM and hip circumference – ABOUT.
- Determine the length of the apron from the waist line to the bottom of the dress - DF.
- Measure the length of the straps from the front waistline to the back waistline, placing a centimeter over the shoulder - DB.
- Measure the distance between the protruding points of the chest - CG.
- Measure the distance between the chest line and the waist line - VG.
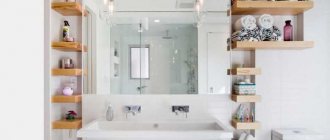
Advantages of oilcloth for the bathroom
This type of bathroom wall decoration has many advantages. The main benefit of finishing with this material is that the cost of repairs is significantly lower than when finishing with other building materials.
Advantages of the material:
- a large assortment, this allows you to choose oilcloth to suit any design;
- modern materials have high water-repellent properties, which will ensure the safety of the walls from dampness and fungus;
- modern manufacturers make oilcloth that has a long service life;
- oilcloth can be used to decorate a small object to match the surrounding interior or an element in the bathroom that is inaccessible or subject to repair;
- the film is suitable for almost any type of base: brick, concrete, wood, drywall;
- the finishing speed is several times higher than when installing tiles or finishing with other materials.
Oilcloth for the bathroom is presented in a large assortment. You can find material for gluing to plywood and even glass.
Building a drawing of a school apron pattern
How to make a pattern for such an apron, which consists of five parts of a simple geometric shape and one complex part - a flounce:
The lower part of the apron, the so-called skirt, is a rectangle with width = OB and length = DF minus 5 cm. If a frill or lace is sewn along the bottom of the hem, then the width of the frill must be subtracted from DF. The difference between the volume of the hips and waist is laid in the folds.
The belt is a rectangular piece 3 cm wide and a length equal to OT plus 50-60 cm.
Straps - two rectangular parts 3-4 cm wide and equal to DB in length.
The breast is a trapezoid with a height equal to the size of the VG plus 5 cm, the width in the upper part is equal to the CG minus 2 cm, and in the lower part - the CG minus 4-5 cm.
It is better to determine the individual dimensions of the bib by applying the pattern to yourself. If the bib is too wide, the straps will constantly slide off the shoulders.
The most complex pattern of this model is the flounce on the apron straps. A master class that will show how easy it is to make a flounce pattern for this model of a school apron:
- On a separate sheet, draw a line equal to DB + 10-20 cm.
- From the middle of this line, restore a perpendicular equal to the desired width of the shuttlecock. You should not make the shuttlecock too wide, more than 12 cm, as this may make the schoolgirl’s figure seem disproportionate.
- Connect the points with a smooth line to create a figure in the form of a circle segment. Cut the segment from the rounded side into 8-10 parts and move their ends apart by 3-5 cm to obtain a shuttlecock drawing.
What kind of glue to glue the oilcloth on?
The base of the oilcloth consists of synthetics, so not every glue is suitable for it.
To glue the film to the wall, as a rule, the following types of glue are used:
- Bustilat. Designed for repair and finishing work, gluing materials to floors and walls: wallpaper, oilcloth, carpets, linoleum, ceramic and polymer tiles to wood, concrete and oil paint. Made from synthetic materials. It is a creamy white mixture. Prevents the growth of fungi and mold due to the presence of biocidal additives. Environmentally friendly, fireproof, non-toxic, when dried it gives a durable and transparent seam, and has high adhesive properties. The cost of a package weighing 1.3 kg: 174 rubles.
- PVA White House. Construction and household adhesive solution intended for gluing decorative oilcloth, cardboard, leather and wood. It is used in laying linoleum, film and various types of wallpaper. When dry, it becomes transparent, so the seams remain invisible. It is a homogeneous mass of white or light yellow color, without lumps. Non-flammable, elastic, does not contain harmful components. The cost of a package weighing 2.4 kg: 105 rubles.
PVA glue recipe
It is not necessary to buy glue in the store to glue oilcloth to the wall.
.
You can prepare an analogue of PVA glue at home. For this you will need flour and water.
What should be done:
- Pour a glass of water into a deep plate;
- Add 2 teaspoons of flour;
- Stir with a whisk until no lumps remain;
- Place the container on medium heat;
- Stir the mixture until thick;
- Stir the paste constantly to prevent the formation of lumps.
Step by step gluing the oilcloth in the bathroom
The bathroom is characterized by high air humidity. Therefore, so that the oilcloth does not lose its original appearance, does not fall off, and the paint on it does not rub off, you need to properly prepare the surface for gluing and follow the procedure for applying the oilcloth strictly according to the instructions.
To do this you will need:
- Cutter;
- Pencil and ruler;
- Scissors;
- Roller;
- Brush;
- Putty knife.
After that, get to work:
- Remove old trim;
- Get rid of uneven surfaces on the wall with a spatula;
- Wash the wall from dirt and dust with a solution, adding 3 tablespoons of soda to 1 liter of water;
- Dry the wall well with a hairdryer;
- Treat it with a primer;
- According to the instructions, prepare Bustilat glue and leave it for some time until it swells;
- As soon as the glue is infused, proceed to cladding the walls;
- Mark the stripes on the film with a pencil and cut them with a cutter;
- Apply glue to the strip using a roller or brush, leaving no gaps, otherwise bubbles will form;
- Apply glue to the desired area of the wall (start work from the corner of the room towards the window);
- Let it dry, then spread another layer;
- Paste the strip of film on the wall in the same way as wallpaper: pressing the canvas from top to bottom, from the center to the edges;
- Smooth the oilcloth with a cloth to expel air from under it;
- Glue the next strip slightly on top of the previous one, matching the pattern;
- To ensure that the joints fit tightly, stick paper strips coated with an adhesive mixture on top of them;
- After the oilcloth has dried, remove the strips after moistening them;
- If the wall was previously whitewashed, work it with glue using a hand brush so that the oilcloth does not fall off after the glue dries.
In the same way, you can glue oilcloth to the wall in the kitchen, since this room is also characterized by high humidity.
How to calculate the amount of film
- Determine the required number of canvases by dividing the perimeter of the room by the width of the roll;
- Calculate how many sheets are in a roll by dividing the length of the roll by the length of one sheet;
- Calculate how many rolls you need by dividing the required number of canvases by the number of canvases in the roll.
Oilcloth finishes are suitable for almost all surfaces: metal, mirrors, plaster, glass and wood. There is even a special film that is fixed on ceramic tiles.
When decorating bathroom walls, you must use special materials.
The reason for this is the high humidity of the room, which will only contribute to the formation of mold, which will ultimately ruin the sophisticated design. Tile is very popular in bathroom decoration.
Although it has its advantages, there is still a more practical alternative, such as oilcloth. It also has good water-repellent properties, and can decorate the bathroom very well.
Option for sewing a school apron
Using the proposed pattern, you can sew an apron using lace instead of a frill; this will greatly facilitate finishing the edges of a frill or flounce, which poses a certain difficulty for beginning seamstresses.
- Perform decorative finishing on the bib and skirt - horizontal small folds.
- Fold up the top of the bib and stitch it.
- Connect the bib to the straps, placing it between the top and bottom of the straps, stitch the seam to the end of the straps, connecting them together.
- Place even folds on the lace and use a sewing machine to sew them to the top part of the straps. Iron the seam.
- Fold the bottom of the straps and hem them to the top, sewing carefully exactly at the edge of the connection with the lace.
- Place folds in the lace and sew them to the hem of the apron.
- Fold and stitch the sides of the apron skirt.
- Place pleats at the waist of the apron skirt, fold it with the bib and belt, and stitch.
- Determine where the straps are attached to the belt from the back. Sew the straps to the waistband.
Photo of an elegant school apron made according to the proposed pattern.
Decoration using the “washing” method
Using a nap roller, apply a darker color of paint to the wall painted in the base tone.
As soon as the new coat of paint has set slightly (but not yet dried), wipe the wall with a damp cloth or large sponge. By washing off some of the dark paint from the most convex parts of the relief, you will expose the background layer on them, and thereby reveal the structure of the plaster.
To fix the paint composition (after it has completely dried), cover the walls with two layers of water-soluble varnish.
Now, knowing the general rules for making homemade decorative plaster, you can decorate the walls of your kitchen with a beautiful, non-flammable, durable and absolutely harmless material at minimal cost.