It is absolutely impossible to imagine an apartment or a house, and even more so an office, without shelves. These are very multifunctional pieces of furniture that are used both for decorating space and arranging various souvenirs, and for convenient storage of various things.
Often they fit so well into the interior that they are able to emphasize its style and individuality . But hanging shelves is sometimes not so easy. Often apartment owners want to secure them so that the fastenings are not visible.
This is done in order to maintain the integrity of a particular style or for a number of other reasons. However, attaching shelves to the wall without visible fasteners is not such a difficult task as it seems at first glance.
Attaching shelves to the wall without visible fasteners
“Flying” shelves are just shelves with hidden fastenings
The hidden shelf is a decorative accent that creates the illusion. The shelf seems to “float” on the wall. By adding such furniture to the interior of your living room, bathroom, kitchen, bedroom, you can solve the problems of storing books, necessary accessories or souvenirs. Such furniture is often required to decorate children's rooms, which have a lot of tiny cars, dolls or other toys. “Floating” shelves are cheap, beautiful, keep everything safe on them, and it takes little time to make such furniture.
Hidden shelves from old drawers
These shelves are made from 2-8 drawers, not necessarily matching in color, shape or size.
- The drawers are cleaned and unnecessary parts are removed. Surfaces are sanded.
- Then the protruding edges of the cladding are cut off so that the entire side of the bottom fits tightly against the wall.
- The inside of the drawers is painted to match the color of the wall. This will create the illusion of floating shelves.
- Next, the boxes are laid out on the floor to find beautiful compositions to determine the places where they will be attached. The composition you like is photographed; this photograph will replace the sketch.
- According to the plan, wooden supports are mounted on the wall. Make sure they are level.
- The boxes are placed on supports and secured with screws (the screws are painted over if they need to be hidden).
Decorative handles or accessories can be added if desired. Another idea is to attach decorative “note paper” to the inside of drawer-turned-shelves.
Rustic Bathroom Shelves
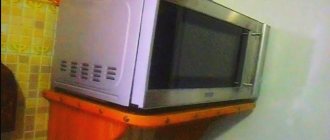
If it's time to modernize your interior, shelves with hidden fastenings in the Provence style are the perfect decor. She creates exclusively her own, unique home comfort. And at the same time it seems to be floating in the air! Its artsy yet simple appearance will brighten up the bathroom and any nook that needs storage space.
This shelf model installs as a floating shelf and is reinforced for added strength, making it a great storage option for collectibles, photos, keepsakes and glassware. The design is inexpensive and requires very few materials.
Advice. You should avoid last-minute shopping trips; it is better to prepare materials in advance.
Homemade options
Searching for the right fasteners in stores does not always give the desired result. Ordering them on online resources is also not always convenient - often the package arrives after a month or more. Therefore, home craftsmen use their own design options for hidden fasteners. They are quite simple, made from standard parts with minimal modification.
To make the fastening you will need:
Anchor with nut (metal, with M6 or M8 thread);
A stud with a thread corresponding to the anchor nut;
Washer, nut for stud.
The method of making the mount is simple. The anchor is disassembled by unscrewing the standard bolt. Tighten the pin until it stops, and cut off a piece from it, the length of which corresponds to the width of the shelf minus 0.5 cm. The second fastening is made in a similar way. On average, two elements are required per shelf, but if the length is long, three or more can be used.
The principle of operation of such fastening is simple - the anchor is inserted into a pre-made socket in the wall. Secure it, ensuring that the metal body is expanded with a wedge nut. After this, all that remains is to put the shelf on the stud and tighten the nut in the mounting recess on the opposite side. After this, the nest is closed with a stopper.
Expert opinion
Vakhrushev Ivan Andreevich
Furniture maker with over 15 years of experience
It should be noted that the load-bearing capacity of such fastening is much higher than that of factory models. The shelf turns out to be tightly screwed to the wall, and it becomes almost impossible to swing it. Visible mounting holes remain on the outside, but they can be covered with a decorative trim.
The disadvantage of such fastenings is the need to drill through the shelf across its entire width.
This is a difficult procedure, which is done in a certain sequence:
- The center of the nests is marked on the front edge.
- Using a feather drill with a diameter of 20-25 mm, make a recess of 10-15 mm (instead of a feather, you can use a Forstner drill).
- Take a long drill and insert it into the chuck of the drilling machine. It will have to be raised on a stand to the maximum height, or use a slotting machine. Some craftsmen fix a regular electric drill on a horizontal stand and adjust its height so that the centers of the drill and the existing socket on the shelf coincide.
- Start the rotation of the drill and carefully drill through the shelf. It is important here not to distort the hole, otherwise the shelf on the wall will end up in an inclined position.
- After this, all that remains is to insert the studs of the fasteners, previously installed in the wall, into the finished holes and tighten the nuts (after putting on the washers).
Expert opinion
Vakhrushev Ivan Andreevich
Furniture maker with over 15 years of experience
The procedure for making a through hole is responsible and complex. If your own skills and experience are not enough, it is better to contact the nearest carpentry workshop - if you have the appropriate equipment, the task can be solved quickly and without problems.
Shelves-tubes for toys
If you want to keep your playroom tidy, you can easily make round shelves from empty paint buckets.
And, voila, the furniture is ready! This DIY shelf is an economical idea for creating storage space for small items.
Sliding shelves - a solution to eternal problems
For wine connoisseurs: how to make the right shelves with your own hands
Source
Mounting for shelves on the wall: corners, hinges and brackets
The functional purpose of shelves in everyday life is to place various objects: large, heavy or decorative, fragile. The choice is made in their favor if the installation of furniture elements is undesirable for design reasons. The use of wall-mounted shelves in the interior allows you to create a feeling of lightness of space and expand its visual perception. Although at the same time they perform a very specific load-bearing function.
Therefore, it is important that each shelf is securely fastened, taking into account the strength of the wall (whether it is a brick wall, concrete wall, plasterboard partition or wooden wall), its material and the planned load. Then the question arises of choosing a fastening method, which is determined depending on several factors:
Attention!
A kitchen designer
has started working on our website . You can get acquainted with it and design the kitchen of your dreams completely free of charge! A wardrobe designer can also be useful.
Let's consider the possible types of fasteners and their choice depending on the style of interior design.
Progress
The design of the shelf consists of two parts: a frame - the shelf holder and a sleeve, which is put on the frame.
First, we make a holder from pine bars 1 by 2 cm thick (thicker is possible). You will need 2 bars 70 cm long (this is the length of the shelf), 2 bars 20 cm each and 5 bars 18 cm each. We connect them all as in the diagram with self-tapping screws.
The sleeve is made from two rectangles of plywood 72.5 by 21 cm, between which there is a “U”-shaped base of bars (see diagram).
When all parts of the shelves are ready, you need to sand them with sandpaper or a sander and paint the sleeves.
Now, using a level, screw the shelf holders to the wall.
Source
FAQ
What type of fastening should be considered the most reliable?
If this is a ready-made (factory) fastening, then the most rigid are the rods that are screwed into sockets in the walls. Homemade fastenings made from studs are even more reliable and can withstand maximum loads.
What shelf thickness is most practical for concealed installation?
Minimum - 30 mm. The maximum is not defined, any values can be used. There is no optimal indicator, since any acceptable values give the same results.
What to do if the installed shelf wobbles?
This means that the mount is not installed firmly enough. It is necessary to remove the shelf and examine the supporting elements. Often it is enough to tighten the screws. If this does not help, you will have to use more rigid types of fastenings.
What depth of anchors are needed for homemade fastenings (from studs)?
For brick or concrete walls, a depth of 40 mm is sufficient. If the walls are made of gas or foam concrete, you need to use chemical anchors from 70 mm.
What type of fastenings should be used on wooden walls?
In this case, only supports on mounting plates or on their own supporting elements with screw fastening can be used.
Attaching shelves to the wall without visible fasteners
It is absolutely impossible to imagine an apartment or a house, and even more so an office, without shelves. These are very multifunctional pieces of furniture that are used both for decorating space and arranging various souvenirs, and for convenient storage of various things.
This is done in order to maintain the integrity of a particular style or for a number of other reasons. However, attaching shelves to the wall without visible fasteners is not such a difficult task as it seems at first glance.
Attaching shelves to the wall without visible fasteners
Shelf design for installation without visible fasteners
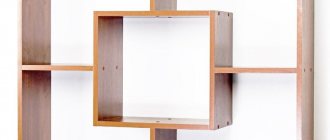
“If the mountain does not come to Magomed, then Magomed goes to the mountain.” In other words, in order to mount a shelf on a wall without visible fasteners, it makes sense to think about the design of the shelf itself. If it is made in the form of a cover that is put on a frame attached to the wall, the issue is resolved by itself.
It is quite possible to make a frame from wooden slats with your own hands. In this case, the cover can be made of plywood and even cardboard (in the case of a decorative shelf). A shelf of this design can be thick, which is interesting from a design point of view. In other words, this idea allows you to realize creative inclinations in interior design.
Shelves in a modern interior
In any house, if a person lives in it, there are always a lot of different jars, bottles, maybe books, souvenirs, photo frames and much more. And in order to keep order in the house, it is recommended to put each thing in its designated place. And often a wall shelf acts as such a place. It usually serves two functions - it is a convenient stand for something decorative or useful, and it can also be the highlight of a certain design.
Wall shelves in the interior
Depending on the room in which the shelf is installed, it can perform a very different role. So, in the kitchen there may be a set of spices on it or some elements of utensils. In the bathroom , a shelf is a must-have for arranging various bottles and bottles. A shelf is also needed in the bedroom , where you can place on it various things you need before going to bed. Of course, these interior elements are also in the living room - books, flowers, and souvenirs can be placed on them. Often they are able to significantly save space, as well as overcome clutter in the room, because from now on everything will be in its place. That is why this piece of furniture is absolutely irreplaceable, despite the fact that there may be many wardrobes or chests of drawers in the house.
Wall in the form of shelves
On a note! The shelf is appropriate and functional in absolutely any interior, regardless of its style. The main thing is to choose the right and suitable option and place it in a place where the shelf will look organic and as part of the interior.
Moreover, it is important to choose not only a shelf that suits the style, but also one that you will like and look aesthetically pleasing when hung. When creating certain styles, it is important that the fastenings on it are invisible. In general, there are several variations of fixing shelves on the wall.
Installation
The procedure for installing hidden fasteners depends on their design. The general installation process consists of the following steps:
Marking. Holes for fasteners are made in the shelf, and the centers of the holes for dowels are marked on them on the wall;
Making nests. A hammer drill with a drill of the appropriate diameter is used;
Dowels are inserted into the sockets and a mounting strip, load-bearing elements or the rods themselves are attached (depending on the design);
Place a shelf on the rods and press it tightly against the wall.
It is necessary to carefully mark using a building level. When making nests, you need to monitor the position of the hammer drill, especially if the nest is made for installing a rod. Such installation can only be carried out on a concrete or brick wall (solid).
For rooms finished with plasterboard, the installation procedure changes radically - first, a nest is carefully cut out in the sheathing, through which a wooden plug is attached to the wall. Load-bearing elements are attached to it and the shelf is installed so that the nest is covered by its edge.
Video installation instructions
How can I mount a shelf on the wall?
Table. Methods of fastening shelves.
Bracket or holders
| Mounting option | Short description |
| This option assumes the presence of visible fastenings for shelves. They can be seen, and they are fixed both below and above the shelf. The brackets can also be hidden. Visible brackets can be simple or decorative. They come in both plastic and metal, ornate and simple, etc. One side is attached to the wall, the other to the shelf itself. However, it is important to understand that this option is not suitable for every interior style. | |
| This is the choice of those who save on mounting costs, but want to install the shelf as quickly and easily as possible. It is suitable for almost every interior. Moreover, this is a fairly reliable fastener, and depending on its size, you can vary the load on the shelves. | |
| Fastenings for glass options | These fasteners are used only for fixing shelves made of glass and characterized by their large mass and fragility. They are usually made of metal and have special gaskets that will allow you to securely fix the shelf itself to the wall, preventing it from falling. There are also suction cup fasteners for glass, but they are not very reliable. As a rule, the suction cup is fixed on the underside of the shelf. Typically, such fasteners are small in size. |
| This option will allow you to install the shelf so that the fasteners themselves will not be visible from any side of the shelf. It will seem like it's just glued to the wall. |
Concealed shelf holder
Fastening glass shelves
Although the method of fastening glass shelves is a type of fastening using brackets, we will consider it as a separate issue. After all, the material used to make such products allows one to achieve interesting decorative effects.
Glass products can be:
- Thin or thick (manufacturers release models on the market with thicknesses from 4 to 12 mm).
- Shelves are made of triplex with fogging between the layers of pattern elements (they have a significant own weight).
- Transparent and matte.
- Made from colored or black glass.
- Their shelves are stained glass.
- Frosted glass with LED lighting (can be an independent decorative element in the interior).
Brackets for glass shelves are offered in design and size:
- Minimum sizes for small and light shelves.
- Large sized brackets, so-called pelicans.
- Brackets with suction cups (bottom only), which makes the upper surface of the shelf open.
Since glass is a fragile material, this is taken into account in the design of the mounting brackets - they use silicone or rubber gaskets that protect the surface of the shelves both above and below
Mounts without visible fasteners
Many people now choose fastenings without visible fasteners, since this option involves completely invisible fixing of the shelf on the wall , without unnecessary elements. It is the reluctance to see additional elements on the walls for one reason or another that drives the owners of shelves and apartments to choose this option.
Brackets for mounting shelves in the wall
There are three options to secure the shelf to the wall so that the fasteners are not visible.
DIY zigzag shelf made of chipboard
Fastening with metal pins
Hidden fastening of shelves to the wall without visible fasteners
The most reliable option for fixing the shelf is with metal pins, as this will provide the ability to seriously load the shelf. Moreover, this is the most inconspicuous option, even in comparison with other methods related to secret ones.
Removing invisible fasteners
It happens that the hidden fastening and the interior element itself are no longer needed, they have to be dismantled. First, the structure itself is removed from the fittings, the metal elements are pulled out with pliers.
Use a screwdriver or screwdriver to unscrew all remaining parts, and seal the holes in the wall. Installing or removing a shelf with invisible fixation is not difficult - it does not require special knowledge or skills. All work can be done in literally half an hour.
How to choose a fixation type?
This is not an easy task, since when choosing a method for attaching shelves, several factors must be taken into account. And they are the ones who will influence the final decision.
Brackets for mounting shelves in the wall
Relationship between shelf depth and load on each mensolo holder
Important! You can choose the right mount only if you know the answers to the questions: “What will stand on the shelf?” and “Which wall will the product be fixed on?”, only then can you make the right choice.
It is also important to estimate the number of fasteners in advance. So, if the shelf is shorter than 1-1.5 m, then a couple of fasteners are enough. If the length is greater than the specified parameters, then it is better to increase the number of fasteners in order to evenly distribute the load on the product and the wall. Moreover, again, the number of fasteners can vary greatly depending on the thickness of the shelf itself and its quality.
The free space above the sofa is organically filled with shelves to match the walls
What influences the choice of fastening
There are different options for hidden fasteners, which differ in price, type, shape and other characteristics. In any case, when using this method of fixing structures, you need to consider the following points:
- Wall thickness. This indicator is especially important when it comes to pin fastening. It can be used only if the thickness of the concrete wall is 10 cm or more, the thickness of the brick wall is from 25 cm. For bases that do not meet these parameters, it is better to choose a different type of invisible fastening or use additional fittings. If you do not strengthen the fasteners, then only the lightest items can be stored on the shelf - a couple of jars of cosmetics, jewelry.
- Shelf thickness. For small loads, it is enough to install a product 3 cm thick; for heavier items, you will have to buy shelves 4.5-6 cm thick. It is important that the structure is strong, solid, with a flat surface.
The number of fittings also needs to be thought out in advance. For shelves shorter than 1 meter, only two fasteners are sufficient.
Important! If the length of the product is longer, you must add fasteners - this will allow you to evenly distribute the load.
Fixing the shelf on the wall using hidden fasteners
Step 1. In order to fix a shelf on the wall using a hidden fastening option, you will need to prepare a hammer drill with a drill of a certain section, 2-3 special titanium pins, a building level, a square, a drill and a bit, the shelf itself, and a pencil for marking. The pin is a metal rod that is threaded on one side and smooth on the other. The threaded part will screw into the wall, and the smooth part will need to be fitted with a shelf. Typically the pin diameter is 10-12 mm. The drill is selected with the same diameter as the purchased titanium.
Special metal pin
Step 2. First of all, you need to apply markings to the shelf itself. By the way, you can make it yourself from any part of other furniture that has served its age, rather than buying new one. Using a ruler, you need to set aside the required distance from the end edge of the shelf. In this case, a distance of 12 cm was chosen.
Step 3. Having chosen the distance, you need, using a square and a pencil, to draw a line perpendicular to the plane of the shelf at the end where the hole for fastening will be drilled.
A perpendicular line is drawn at the end
Step 4. Next you need to find the middle of the end of the board and make a corresponding mark for the drill. It is important to understand that if the shelf consists of two sheets of chipboard glued together, then in this case it is better to drill a hole for fastening not in the middle, but with a slight offset towards one or another board (better - towards the bottom, it will be more reliable).
A mark is placed for the drill
Step 5. Similar markings must be applied on the opposite side of the shelf.
On the other side the same markings are applied
Step 6. Next, to the end of the shelf where the markings are applied, you need to attach a building level and directly on it make marks parallel to those previously applied to the board, as well as marking the edges of the shelf itself. The level cannot be moved while the marking is being transferred. Pencil marks can then be easily erased from the surface of the level, but this technique of transferring markings will make it easy to make markings for drilling holes in the wall.
The level cannot be moved while the marking is being transferred.
Marks are made at the level
Step 7. Then you need to select the approximate location of the shelf on the wall. Having applied it to the surface, you need to mark the boundaries of the product directly on the wallpaper with a pencil.
The shelf is attached to the wall
The boundaries of the shelf are marked
Step 8. Now you need to take a building level with markings and, attaching it to the wall in the selected and marked place, align and transfer the markings from the level to the wall, also using a pencil. In this way, you can easily and quickly make precise markings for the locations for drilling holes for the pins without unnecessary movements.
Transferring markings from level to wall
Step 9. Next, in the end part of the shelf, in the designated places, you need to drill holes for the pins. They should be the same depth as the length of the part of the pin on which the board will be placed.
A hole is drilled in the end
The depth of the hole should correspond to the part of the pin on which the shelf will be placed
Step 10. Now you need to take a hammer drill with a drill of the same diameter as the pin and make holes in the wall in accordance with the previously made marks. To prevent dust from concrete from falling onto the floor, it can be removed immediately using a switched on vacuum cleaner, the hose from which will be held by an assistant.
Holes are made in the wall
Step 11. Both titanium pins need to be installed in place, that is, inserted into the holes in the wall. If they are difficult to enter, you can carefully knock them out with a hammer or screw them into the wall using a key.
The pins are inserted into the holes
Step 12. All that remains is to put the shelf on the pins in the wall, aligning the holes with the metal fasteners. The shelf is installed. By the way, for better fixation, you can add a little glue to the holes of the shelf - then the connection will be even more reliable. This mounting option will allow you to achieve an effect where it seems as if the shelf is supported on the wall by itself.
The shelf fits onto the pins in the wall
Finished shelf without visible fasteners
Video - How to install a shelf with invisible fasteners
Creation algorithm
- To make hidden shelves with your own hands, first draw a sketch; this will help you understand the design and find out what type and size of wood is needed. The step also includes measuring the width of the space from wall to wall.
- The next step is to create a special frame. You can use liquid nails to glue the frame together first, and then use screws and angle iron to hold all the pieces together.
- Next, the boards are painted or painted, which will then be fixed to the frame. You can use the same paint or varnish that has already been used on other furniture. It's nice that today there are varnishes available that will make wood look old in a matter of minutes and highlight its texture, such a finish is great for a rustic style.
- The desired height of future shelves is measured and the support frames are attached to the wall. Before drilling, the wall is checked using a detector for the presence of wires and pipes.
- Next, you need to make sure that the invisible shelf is level. After all, it is quite difficult to find beautiful boards that are quite straight. If it turns out that the boards are uneven, proceed to step 6.
- Spacers are added to level the shelf. This step is repeated for the top and bottom boards.
- Then the top board is glued to the frame using liquid nails.
- The bottom board is much more difficult to fix with liquid nails, so it is better to secure it with screws.
- The front part of the shelf is glued last.
Attention! The walls of the room are painted before attaching the shelves. Instead of boards, you can use MDF.
Fixation on drywall
Many people now prefer to line the walls with sheets of plasterboard or make room partitions from this material. And it is clear that attaching shelves to it using pins is not the best option. Drywall is a fairly thin and fragile material, not designed for heavy loads . So the option of hanging shelves on the partition is completely eliminated.
Types of fasteners for drywall
But if the walls were leveled with plasterboard and it was already known where the shelf would hang, then you can use a trick and still use invisible fasteners. To do this, it is enough to install a reliable wooden block between the wall and the sheet of drywall in the place where the shelf will be attached. Next, you will need to fix the shelf itself so that the pins pass immediately through the drywall, through the block, and through the concrete wall. However, it is important to understand that such a piece of furniture should not be heavy in itself, and you should not place massive or significant objects on it. Also, special fasteners for drywall can be used to fix lightweight shelves.
That, in fact, is all that could be said about invisible options for attaching shelves to walls. Everything is quite simple and should not cause any difficulties even for a beginner in this matter. The main thing is to purchase everything you need in advance, and the work can be completed within 30-40 minutes. A shelf will appear on the wall that will stand “by itself.”
Source
Types of fastenings
The inconspicuous fastening that supports the shelf has a wide range of varieties:
- Alcoves and niches are a convenient place to mount shelves because they can easily be mounted on three walls at once.
- The hidden bracket with two slots is convenient because it can be used anywhere.
- Invisible fasteners made of durable metal with alloy steel connecting screws create tension between the posts. This gives them impressive support ability. If a longer shelf is needed, additional supports are added. Invisible fasteners can be used to create heavy-duty floating shelves.
Attaching shelves to the wall without visible fasteners
With all the variety of existing methods of interior design and modern design, it is almost impossible to imagine a modern room in which shelves would not be used.
Decorative and easy to store various small items, massive for books - shelves can not only be an additional useful surface, but they can also act as a decorative decoration for any room or office.
There are two main ways to attach shelves:
The traditional method of fastening using various types of brackets, metal or wooden racks is popular only when the fasteners, correctly selected in color, texture and material, also add their own “zest” to the artistic image of the room.
But often, the presence of additional decorative and technological elements is not always consistent with the overall design of the designer and the target orientation of the structures. In this case, it would be better to use the second fastening method.
The development of modern design craft and the construction industry makes it possible not only to quickly cope with the task of hanging shelves, but also to successfully use the fastening of shelves to the wall without visible fasteners, thereby creating the illusion of floating in space.
Invisible fastening of shelves to the wall
Let's consider the main stages of properly attaching a shelf to the wall, while hiding all fastening elements:
With a brick partition thickness of 250 mm or more, concrete partitions with a thickness of 100 mm or more can be safely used for hanging shelves without additional load-bearing structures.
Scheme of invisible shelf fastening.
1 – bracket for fastening the shelf; 2 – mounting holes; 3 – steel axle; 4 – suspension; 5 – shelf.
With thinner bricks, cinder block and plasterboard walls up to 100 mm, it is possible to use invisible fastening of shelves to the wall, but such shelves are suitable only for decorative purposes.
Since they simply will not withstand additional loads.
Then you need to determine the thickness of the shelf itself.
It can be determined by placing a load of expected weight on it. The absence of visual deflection and deflection to the touch indicates sufficient thickness of the board.
An exception may be cases when the choice of a thicker board is dictated by the general concept of the interior.
However, it is also necessary to take into account the fastening features, due to which the thickness of the board, as a rule, cannot be less than 30 mm. The thickness of the shelf must be selected depending on the load, for example, for books - boards with a thickness of 45 to 60 mm are suitable.
The board must be dry and processed in accordance with its purpose.
Types of fastening shelves to the wall
After this, the types of fastening the shelves to the wall are selected, depending on its purpose and the thickness of the board.
There are a huge number of fastening materials that can be expertly hidden from prying eyes; let’s look at some of them:
Fastening technology using hinges:
For accurate hanging, you need to accurately measure the distance between the centers of the loops. This distance will determine the markings on the wall for the mounting holes. To ensure that the shelf hangs evenly and does not warp, it is better to use a building level, which will ensure an accurate horizontal line for the shelf. After the holes in the wall are drilled in accordance with the markings, they are filled with a plug into which screws are screwed. The screw should be screwed in deep enough, but the distance between its head and the wall should allow the shelf hinges to be put on.
The shelves come complete with special fasteners designed for invisible installation. A shelf installed in this way will be securely fastened. This will create a visual impression that it is literally hanging in the air.
Method of installing shelves using special furniture fittings
Let's look at the step-by-step implementation of this installation.
It starts with purchasing a modern shelf in a furniture supermarket or online store.
Step 1. Measure the distance between the centers of the mounting holes directly on the product.
Step 2. After this, mark the location of the shelf on the wall. Using a building level, we draw a horizontal axis on which we mark the position of the mounting holes, taking into account the center-to-center distance between them.
Step 3. Next, we attach the bracket to the resulting axis in the center of the shelf holes and mark the places for its future attachment to the wall. They must be located strictly along the horizontal axis.
Step 4. The next step is to drill a hole for attaching the brackets. They must be made strictly perpendicular to the wall, this will ensure that the shelf angle is 90 degrees relative to the wall. To simplify drilling, it is advisable to use a square.
Step 5. Next, remove the remaining drilling products from the holes and hammer in wood plugs or plastic dowels.
Step 7. Now we carry out the direct installation of the shelf. To do this, we put it on the steel axles of the brackets, alternately tapping it with a rubber hammer on the left and right sides in the front part. The shelf will be evenly installed on the fastening elements, eliminating distortions.
Step 8. The final stage will be to check the play and reliability of the fastening. After this, we remove the remaining debris and install a flowerpot with an orchid. The installation process is complete.
Types of fastenings
Hidden
The choice of hidden shelves is usually determined by the style of the room. Since this method is quite labor-intensive, preference is given only in cases of urgent need. This type of installation creates a feeling of lightness of the structure, expanding the space of the room. It is often used as an interior element in minimalist, ethnic Asian (Japanese, Chinese, Thai), modern, and high-tech styles.
Hidden hinges
They can be used for wooden shelves, laminated chipboard, plywood. The hinges are attached to the back of the shelf with self-tapping screws according to the markings. If this is a home-made product, then it is better to make indentations (cuts) in the places where the hinges are attached, according to the size and thickness of the fastening fittings, so that the hinges are flush with the edge of the product and tightly adjacent to the wall. Now you can hang it on the wall using screws screwed into it in advance.
Cantilever mount
In this section, we need to consider several types of mounting parts:
Metal rods
Now there is a large selection of console mounts on the market; ready-made shelves of various sizes can be selected with them. The design includes a hidden shelf holder for a wooden shelf and a bracket for attaching the shelf holder to the wall.
This method provides for the presence of holes in the shelf into which metal rods of furniture fittings will be inserted, and the rod should be 2-5 cm shorter than the product itself.
At home, you can construct such a cantilever mount yourself, using pieces of reinforcement and threaded rods complete with drive-in anchors as metal rods. And in the shelf itself, you need to drill holes in the size corresponding to the rods, observing the rule that they should be at least 2-5 cm shorter than the width of the product. In this case, the thickness of the rods ranges from 10 to 18 mm, depending on the weight of the future filling.
Wooden blocks
This method of fastening involves installing a frame made of wooden blocks, most often of square or rectangular cross-section, on the wall, and then stringing a shelf on them, which is a hollow structure (box). For reliability, the parts are secured with self-tapping screws; additional elements can be attached with glue.
Brackets, fasteners, corners
When choosing fastening with brackets, you must keep in mind that the fastening elements will always be visible. And this method may well become a decorative element in the interior.
After all, there is a wide variety of shapes, styles, and materials for making brackets. And therefore, shelves on brackets are used in interiors of classic, rustic, modern, modern, shabby chic, loft and other styles.
The choice in favor of such fasteners can be made not only because of their decorative appeal, they can provide reliability under significant loads - up to 30-50 kg.
Models and designs of brackets, materials for their manufacture and materials for shelves for which they can be used are quite diverse. Therefore, it will not be possible to give general recommendations on how to attach them.
But recommendations for installing shelves on brackets on the wall will be given below.
How to Attach Shelf Mounts to the Wall: Step-by-Step Guide
The standard method of attaching wall shelves is using brackets. The procedure for installing them:
- Mark the mounting locations for the brackets on the underside of the shelf. Check with a ruler (level) that the markings are correct.
- Screw the horizontal parts of the brackets to the shelf with self-tapping screws. At first, do not insert the screws all the way - you need to check the correctness of their position. After making sure that the fasteners are installed level, screw in the screws until they stop.
- Attach the shelf with brackets to the wall.
- Drill the first hole with a drill. Select the drill to match the wall material, the diameter to match the size of the dowels or anchors.
- Insert the dowel.
- Place the shelf and screw in the first screw not all the way.
- Mark the remaining holes. Check the markings with a level.
- Move the shelf, secured with one screw, to the side. Drill holes according to the markings and insert dowels.
- Do not screw in the remaining screws completely.
- Check that the shelf is positioned correctly. If the fasteners are installed level, then tighten the screws completely.
Small shelves (not made of glass) may not be attached to the holders, but simply placed on their horizontal parts.
How to attach a holder without visible fastening
When installing hidden fasteners, the accuracy of marking is of particular importance. Features of various methods of hidden installation:
- On the rods. The mounting plate located at the end of the rod is screwed horizontally to the wall using self-tapping screws and dowels. The shelf is “put on” on the protruding parts of the rods fixed in the wall.
- On the plates. They are screwed with self-tapping screws to the back of the shelf. To do this, recesses are made with a milling cutter or the back wall is installed so that it is “recessed” relative to the sidewalls by a few millimeters. Then there will be no gap between the product and the wall after installation.
- On hidden hinges. For them, grooves are cut out at the end of the shelf using a router so that the loop is flush with the edge. The fasteners are screwed in with self-tapping screws and the finished product is hung on screws in dowels pre-installed in the wall.
Do-it-yourself glass shelf fastening: features
When hanging glass shelves, pelicans and mensolo holders of a similar design are installed in the usual way using self-tapping screws.
The mounting holes on these fasteners are located on parts covered with decorative overlays. Before installation, these pads are removed and the holders are not fully drilled into the wall. After making sure that the position is correct, tighten the screws and put on the covers.
Fasteners for hanging shelves on a plasterboard wall
The best option for reliable fastening of shelves to gypsum plasterboard walls is to install additional horizontal profiles or embedded wooden blocks at their level during the installation of the frame. In this case, the self-tapping screws will be screwed into metal or wood, which will create a durable structure. If the wall is already covered with plasterboard and there is no way to make changes, then the way out is to use special dowels: umbrella, butterfly, Molly, Driva, Legs, Knauf Hartmut.
Step-by-step instructions for attaching a shelf to hinges
A traditional and reliable method of hanging shelves, it can be used on all types of walls, but with the above-mentioned weight restrictions.
Step 1. Determine the exact location of the shelf on the wall. For clarity, it is better to apply it and move it to different places, so you can choose the optimal placement.
Select the optimal shelf position
Step 2. Carefully mark the selected location on the wall. Do this with a thin ordinary pencil; using felt-tip pens is not recommended.
Mark the attachment points with a pencil
Practical advice. Place the marks so that they are not visible after attaching the shelf.
There are two ways to hide them:
- draw on the bottom or on the closed sides;
- during precise marking, raise the position of the shelf a few millimeters above the line, the horizontal elements of the product will cover it.
Step 3. Place the shelf on the table and accurately measure the distance between the hinge holes. This is a very important operation, make no mistake, measure only along the axis of symmetry of the element.
Measure the exact distance between the holes of the fastening loops
Step 4: Use a bubble level to mark the wall. Check all dimensions again.
Check the location of the level marks
Step 5: Start drilling holes. This must be done with a drill in hammer drill mode with a drill bit tipped. The diameter of the drill must match the diameter of the plastic part of the dowel.
Carefully drill holes in the wall
Practical advice. To reduce the amount of dust, it is recommended to secure a paper bag with tape near the hole. Place it as close to the drill as possible, due to this all the dust will fall into the bag and not onto the floor.
The depth of the hole should be 1–2 cm greater than the length of the dowel. The fact is that it is impossible to completely remove construction dust from it; it will not allow the plastic element of the dowel to be completely installed. Hammering it with great force is not recommended for two reasons. Firstly, with a high degree of probability he will still not sit down. Secondly, it is very difficult to get a deformed plastic element later. You have to increase the diameter of the hole, and then take special measures to reduce it.
The depth of the hole in the wall should always be slightly greater than the length of the dowel
Step 6. Insert the plastic parts of the dowels into the wall and screw the screws into them. Leave a gap between the cap of approximately 5 mm, it is necessary for the passage of the hinged loop.
Insert the dowel and screw in the self-tapping screw
All that remains is to hang the shelf in place and the work is completed. As mentioned above, this method is used for all types of shelves except glass.
Installation of shelves on corners
Types of fasteners
The classification is made taking into account the location of fastening devices on the shelf.
Shelf fasteners differ not only in appearance, but also in location
Hidden
Due to hidden fixation, it is possible to save free space on the wall and fill it with other necessary elements. The hidden fastener is completely invisible, it is mounted on the back of the shelves, and can be installed on vertical or horizontal parts. There are hidden elements located inside the shelf frame; before installing them, it is necessary to carry out special preparatory work.
- Suspensions (hanging loops). Traditional fastening, used for shelves made of natural wood, OSB boards, plywood, chipboard, etc. Not suitable for glass, plastic and metal products. The hinges are fixed into specially made recesses, their dimensions do not protrude beyond the perimeter of the shelf, and after fastening they become invisible.
Concealed hangers - Consoles (rods). A more modern type of shelf fixation, used for the same materials as hinged hinges. Secret holes are drilled in the shelf frame into which rods (consoles) are inserted. The fasteners are metal, the outer surfaces are covered with plastic, and in terms of strength and reliability it falls into the middle category. The fact is that as a result of drilling a hole, the thickness of the load-bearing element is reduced by two or more times, and this has a negative impact on mechanical stability. Concealed fastener made of metal plate and rods
Concealed fastening with timber
Open
These elements are always noticeable; thanks to original engineering solutions, it is possible to redistribute the loads and increase the stability of the shelves. If in the above listed options for hidden fasteners, the loads act only on the dowel or console, and they are pulled out of the wall due to the moment of rotation, then the corners and brackets do not work that way. They remove most of the load from the dowels and transfer it to the wall due to the curved stop. The original design of the brackets becomes a real decoration of the interior; such fasteners can be used for all shelves without exception, including glass ones.
The brackets also perform a decorative function.