Without shelves, which can not only serve as a storage system, but also decorate the interior, it is very difficult to imagine any room. They can have different appearances, all kinds of designs and will allow you to place not only necessary everyday items, but also decorative ones - souvenirs, flowers, flowerpots and much more.
This way the room can be made cozy and beautiful. The most commonly used options are wall shelves; they are not difficult to make with your own hands and at the same time you can not only save a lot of money, but also create a truly exclusive and interesting product.
DIY wall shelves
Functionality of wall shelves
Interior design is not an easy job, the goal of which, first of all, is the beautiful and cozy appearance of the room. Everything inside it should be in harmony with each other, not only in color, but also in style, and many, many more factors must also be taken into account. It is very important to choose the right furniture, which will not only be functional, but also suit the interior in all respects.
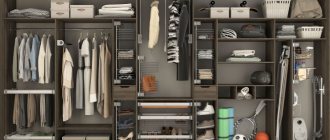
Wall shelves in the interior
The seemingly most banal interior items – wall shelves – deserve special attention. For an unassuming owner, they may be just ordinary storage systems for a variety of things, but in fact, shelves perform not only this function - they are quite capable of becoming decorative elements in themselves, as well as being a place where other items that decorate the room will be located. That is why it is important to choose a shelf wisely.
Original wall shelf
The functionality of the shelves is as follows:
- ensuring storage of various items;
- the ability to install any decorative element in the plane of the wall;
- decorating the walls of the room;
- acting as a stand for flowers and souvenirs;
- storage of books, etc.
If you wish, you can identify quite a few purposes for using shelves, but these are the main ones. Many shelves can combine several functions at once, and this will depend on the wishes of the owner, as well as on what shape and type of shelf is used.
Shoe shelf made from pallets
Important! When choosing the type of shelf, you should focus on the purpose of its use, the purpose of the room and the general style of the room. Only then will it be possible to buy or make the very product that will fit perfectly into the interior.
Types of shelves
Shelves can be divided into several types depending on the purpose of their use. So, you can select shelves:
- for the corridor, which are used for storing hats and scarves;
- for the kitchen, where there can be various jars and packages of spices;
- for souvenirs;
- flower shelves;
- bookshelves;
- for the office;
- for toys;
- for personal care products, etc.
A corner shelf in the hallway will create its own atmosphere
On a note! There are also specialized shelves designed to store a specific item. For example, a shelf for a musical instrument.
The shelves can also be divided into:
- closed and open . The latter are a plane that has neither side nor back walls. Closed ones are a kind of hanging cabinets, but small in size;
- straight - the simplest shelves having a horizontal plane;
- corner – shelves that are designed for hanging in the corners of rooms;
Beautiful corner shelf
- multi-level - have not one, but several horizontal planes for arranging objects;
- racks , which can be classified as multi-level shelves. But they must have reliable, dense support;
- hanging ones , which have various belts, ropes, etc. as fasteners, can be mounted not on the wall, but on the ceiling, hanging along the wall;
- shelves with a back wall and without walls ;
- round, square, rectangular depending on the shape . Asymmetrical shelves do not have an axis of symmetry, but they can be quite functional.
You can make shelves for walls with your own hands from available materials
. In the table below we will take a closer look at the main and most popular types of shelves for walls according to the most common classification.
Table. The most common types of shelves.
| Type | Description |
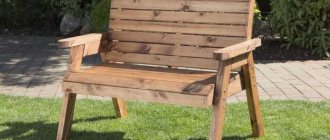
| Wall mounted | These shelves can be fixed either on the wall or even rest on the floor or other furniture. They are usually very durable and can support quite a lot of weight. Often used for storing heavy, bulky items. They take up very little space. |
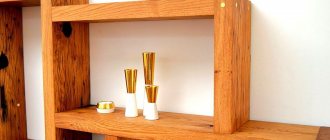
| Classic | These are ordinary rectangular shelves that are mounted only on the wall. They may not have a back shelf; they allow you to place objects both inside and on top. Very functional, often used to store items and create coziness at the same time. |
| Multi-tiered | These shelves have several tiers at once and look very original. They can be asymmetrical and have storage areas of various sizes. Sometimes this is quite convenient, especially if you need to create books of different parameters - large and small. Often such products fit surprisingly easily into certain interior styles and become their direct complement or even their embodiment. |
| Corner | Such shelves allow you to save a lot of space, as they occupy the remaining free corners in the room and do not interfere with anyone. They can be placed in absolutely any room, but most often they can be seen in the bathroom or kitchen. |
Making shelves on the wall with your own hands
Buy or make it yourself?
Buying ready-made shelves for walls is not a problem. Nowadays you can find all kinds of products in stores, among which you can almost always choose the one that will fit perfectly into the interior and will be in perfect harmony with the environment, but at the same time remain comfortable and functional.
Wall shelves for kitchen
But often shelves are made with your own hands. Why? It's simple. The fact is that not all cities have such a variety of furniture stores that will allow you to find exactly that dream shelf. Also, some variations of furniture products can cost incredible amounts of money, especially when it comes to designer products. In addition, making a shelf yourself is quite simple - sometimes it turns out to be even easier than finding an option that is ideal for the room. So the creation and further use of a homemade product is completely justified. Plus, it saves money. And with due desire and effort, a handmade shelf can practically become a work of art.
On a note! In some apartments, the size of the product may play a decisive role. And a homemade shelf in this case is an ideal option. It can be adjusted to the parameters that are necessary.
Corner shelf on the wall
How to make a corner shelf?
To save space in the house, corner shelves are often used. They look more modern and practical. And note, you can embed them anywhere.
The manufacturing process, in essence, does not differ from that described above, but there are some peculiarities. One of them is that the upper and lower parts are made up of two elements with the ends cut at the desired angle.
Then the process is carried out like this: first, the two parts of the top are glued together and clamped for a while. Do the same with the bottom beam. Polish, cover with a primer mixture and fasten according to the algorithm written above.
Hallways 2022: TOP-200 photos of the best new products and modern design. Options for the ideal combination of color and style of furniture in the hallway- DIY stool: manufacturing methods and instructions for creating simple and stylish models (90 photo ideas)
- Do-it-yourself door finishing: 115 photos of the best options for entrance and interior doors
That's it - the work is almost the same, but a new, convenient, practical product is already appearing.
Materials for creating shelves
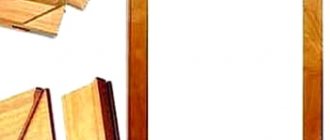
If we talk about materials that can be used to create homemade shelves, then it is worth noting the limitlessness of human imagination. In theory, you can use anything. But the most popular homemade options are, of course, created from wood and its derivatives.
Wood and its derivatives are a very easy material to process at home. To work with it, you don’t need to buy special tools - sometimes it’s enough to buy some screws, a hacksaw, and metal corners. Already this modest set is enough to make the simplest shelf.
In addition, wood is durable, it does not fade in the sun and is a fairly durable material that will not break even under the heavy weight of objects placed on it. Of course, in the latter case, much will depend on the thickness of the material.
On a note! Natural wood can darken and lose its appearance over time if it is not coated with varnish or other protective compound.
Do-it-yourself shoe rack
Self-made shelves can also be made of plastic, mirrors or glass and even metal. Some types of materials are perfectly combined with each other and allow you to create interesting and unusual products. It is not easy to work with metal and glass, but if desired, these materials are also within the power of the home craftsman.
If we talk about mirrors and glass, then these materials will fit into almost any interior, but they are fragile, although they can support a lot of weight if they are thick enough. If treated with care they can last for many years.
Plastic is the lightest material, but not particularly durable. It is quite fragile and easy to damage. Also, such shelves look cheap. However, due to the fact that plastic is not afraid of water, such shelves are the best option for the bathroom.
Metal is a durable material, but without certain treatment it is afraid of rust. It is the most difficult to work with at home without special tools. But products made from it, with the right approach, can turn out to be very durable and will last for decades.
You can attach shelves to the wall in various ways. The main thing is that the fixation is reliable. After all, if a shelf falls, it will not only damage itself, but also put the items on it at risk of being damaged.
A shelf with straps is the simplest design.
In general, to create shelves you can use not only the above materials, but also others. Some of them may act as additional elements. Let's look at a few simple options for creating wall shelves.
What are the shelves made of?
Perhaps, to implement the task of creating shelves on your own, almost any material will be suitable, of course, within reason. It is hardly appropriate to attach bulky brick structures, as this will additionally hide the free space. However, any of the relatively other materials is quite suitable:
- Wood is a classic option, since the vast majority of users choose it. It is very easy to work with such material due to its low weight (with small dimensions of the product) and it will last a long time if you use the wooden shelf under optimal conditions, that is, at normal humidity levels in the room.
- Glass - these shelves look very modern and will never go out of style. True, to create products from this material you need to have a special tool for cutting glass.
- Plastic is an affordable material. Easy to handle and not susceptible to mold, as is the case with wood. Especially if the shelves are built to be placed on a loggia or balcony.
- Metal - to work with this material you need a welding machine if you plan to have a completely metal shelf. For combined products, it is enough to use a standard set of fasteners, and it is better if these areas are not visible to the eye.
- Chipboard or an alternative option - laminated chipboard . The second of these materials is more wear-resistant due to its increased resistance to indoor humidity, temperature changes and mechanical deformation, such as abrasion.
- Drywall - most often used when a shelf is part of the room's design, that is, this material forms a niche in the wall.
The choice of option should be determined not only by the financial capabilities of the owner of the premises, but also by his skills in the construction field. Otherwise, the material will be irretrievably damaged, and the final product will be sloppy and generally unsuitable for use, especially in a visible place.
Simple shelf with rope fastenings
Let's see how to make a simple shelf attached to the wall with ropes. This is an ideal decorative item for a room in a country style, loft, etc.
Step 1. The first step is to purchase all the necessary materials. To create one such shelf you will need a wooden board about 2.5 cm thick, rope rope (8 mm in diameter), a drill, hooks and dowels. You also need to take or buy a puncher, a tape measure, and to apply markings you will need a pencil.
What you need for work
Step 2. You need to make 4 holes in the corners of one board, one in each corner. The fastening ropes will be threaded through them. It is better to apply the markings first with a pencil, and then drill 4 holes at the marked points using a drill. You should not make holes at the very edge; it is better to retreat 2-3 cm from the edge of the board.
Drilling holes
Step 3. After this, the board needs to be sanded and coated with a primer and then paint, or you can get by with varnish or stain. You can continue to work with it only after the paint and varnish composition has dried. If a primer was applied, it is important to dry the primer thoroughly before applying a coat of paint.
Sanding the board Applying the primer mixture
Step 4. You need to make holes on the wall for the hooks on which the shelf will be hung. First you need to apply level markings (the points should be located at a distance equal to the distance between two holes located along the length of the shelf). Next, you need to drill holes in the wall, insert dowels into them and secure the hooks to the wall.
Next, holes for the hooks are drilled
Step 5. The piece of rope needs to be cut into 4 pieces of the same length, it is important to tie one of the ends of each piece with a nice neat knot, and then thread the ropes through the holes so that the knots are at the bottom of the shelf.
Beautiful knots are tied at the ends
Step 6. Now you need to tie the free ends of the ropes in pairs on each side and hang the shelf on the hooks in the wall.
The shelf is hung on hooks
This is what the finished shelf looks like
Such a shelf can be made very quickly, and it will look quite nice. It is suitable for arranging souvenirs or flower pots.
Book shelf
On the Internet you can find a huge number of photographs of book shelves. But the execution algorithm is more or less the same for everyone, it only differs in the addition of new modules.
Take, for example, the type of labyrinth. We take standard tools. The marking is done exactly as described earlier. Trimming headers is a bit more complicated. All boards are cut at a 90 or 45 degree angle, whichever you prefer.
If you decide to do the second option, then be sure to use a miter box to make symmetrical cuts, otherwise you will not achieve the desired result.
The product is easy to assemble - glue the sections together, secure each corner with special slotted furniture screws (two for each corner). Then attach it to the wall.
Chipboard shelf
You can make a more complex shelf using chipboard. Here you will have to work longer, but the result will be beyond praise.
Step 1. In this case, you need to purchase the following tools and materials. This is a jigsaw, iron, screwdriver, grinder, screwdriver, drills, hex key, pencil, tape measure, square. You will also need chipboard, edging tape of the required width and color, screws, confirmations, plugs for them, and hinges.
Tools for work
Step 2. Next you need to make a sketch and drawing of the future shelf. It is important to immediately put all the parameters on the diagram - this will make life much easier. It’s easier to do something based on a specific diagram, rather than by eye.
This is what the shelf will look like Drawing of the future design Drawing of the future design (part 2)
Step 3. Now you need to make the side parts of the shelf. To begin with, you should draw the outlines of the blanks on the chipboard sheets.
The contours of the workpiece are drawn
Step 4. Next, the shelf parts need to be cut along the contour using a jigsaw.
Parts are cut out with a jigsaw
Step 5. The edge will most likely not be perfect. So the edges of the workpieces need to be sanded using a special machine.
The edges were far from perfect
Sanding the edges
Sanded edges
Step 6. Now the edges need to be covered with edge tape. It can be glued using an iron. You need to iron the edge through the fabric to prevent it from sticking to the iron.
Gluing edge tape
Step 7. Excess edging tape can be easily and simply cut off with a sharp knife. And then it is better to sand the edges with fine sandpaper so that they become completely smooth. The side parts and racks are ready.
Trimming the edge tape
Result of work
Step 8. According to the drawing, you also need to make shelves and an internal crossbar. Having marked the future holes, you can immediately drill them. The drawing will help you find the necessary points for marking.
Shelves made
Step 9. On one of the internal racks you need to make cutouts for shelves. Adding such a stand to the design will give it originality. This move will also make the shelf more reliable.
Cutout for a shelf This will make the shelf more secure
Step 10. Racks and shelves need to be secured with confirmations. The holes for them must be drilled at a distance of 8 mm from the edge. The holes should be such that when the confirmat is screwed in from above, its cap will be recessed into the wood, that is, two-level.
Fastening parts
Confirmations are used for fastening
Step 11. The shelf parts need to be connected with confirmations, screwing them all the way and placing plugs to close the holes.
Confirmats are screwed all the way
Another photo of the process
Then the holes will be closed Closing the holes
Step 12. Now you need to fasten the metal corners on the back of the shelf that will hold it on the wall, and hang the product on the wall. The shelf is ready.
Finished shelf
Video – Simple shelf
Video - Original shelf
Video - The fastest and most reliable way to make a hidden shelf
How to choose the right shelf?
There are no rules for placing wall shelves as such. They can be placed on any wall, the main thing is that they are convenient to use and the owner likes them. But it’s still worth considering the purpose of the room.
So, in the office it is better to hang shelves directly above the table or close to it if necessary documents or books will be stored on them. This will prevent you from constantly jumping off the chair if you need to take something. It is better to adhere to a similar principle for the kitchen. That is, shelves with seasonings or some constantly needed items should be located close to the work area.
In the children's room, you can choose any place to place shelves. But best of all, they will look close to the bed and fill the free space.
As for the appearance of the shelves, it is important to simply choose the option that perfectly matches the style of the interior and also has a suitable color. The combination of furniture shades with everything else can sometimes play a very big role in the overall perception of the room.
When choosing the shape of a homemade shelf, it is worth considering its future functions. It can be used as an accessory and then be not so much convenient as beautiful or unusual. But if we are talking about a shelf that will perform a specific task, then it is important to pay attention to its functionality. However, if we talk about homemade wooden shelves, then you can implement any option, if you wish.
How to make a simple wooden shelf?
If you add different numbers of modules you need to the base, you can easily give it a completely new look. Please note that you need to look at the condition of your materials - they should not be crooked, cracked or covered with fungus. And if everything is ready, you can start creating the shelf.
Step one. Marking. For example, let's take a rectangular shape. We take a pre-prepared drawing of the structure and transfer the measurements to the boards. When we have completed this stage of work, we proceed to the next one.
Step two. Sawing. A jigsaw is best suited for this, but other tools are not excluded. Make sure that the cuts correspond to the markings. The result should be two short and two long boards.
Step three. Treatment. The prepared blanks must be processed. Sand each element, cover it with stain and varnish. Then the design will serve you longer.
Step four. Assembly. Place the bottom horizontally. We mark eight millimeters from the edges and then draw lines. Please note that they must be parallel to the cuts.
Next, on the drawn strips we mark the places where the holes for the screws will be made. Same with the top. After this, side boards secured with self-tapping screws are attached to the lower part of the product. Place the top board on top and secure it.
This is the simplest version of a wooden wall shelf that you can make. And you can build on it when constructing new products.