Product Features
Regardless of the location of the bench, it must meet a number of basic requirements:
- be stable and have a strong construction;
- a comfortable bench should fit organically into the surrounding landscape.
A homemade bench may have a non-standard appearance. At the same time, it should be safe and comfortable for relaxation.
For this reason, experts recommend a responsible approach to the choice of material, processing of parts and providing products with a backrest. To place a garden bench, it is wise to choose a quiet and shady corner next to a beautiful flower garden or a cozy gazebo.
Model options
| Option | Description |
| Bench made of edged boards | The simplest and most inexpensive option. It is also available for manufacturing to those who have never even tried to make furniture before. The main thing in the work is to accurately measure the dimensions and accurately cut the boards, tighten the fasteners tightly. And finally, all surfaces should be thoroughly sanded, antisepticized and varnished. |
| Another budget option. The difficulty of assembly lies in the fact that it is necessary to adjust the bends of the ends well to each other so that there are not too large gaps in the seat and back. Advice! An unedged board harmonizes perfectly with rough, unhewn stumps, which can be used as thick, stable legs. |
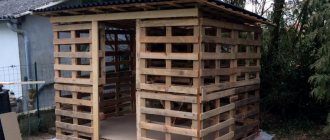
| Pallet bench | Wooden pallets can be purchased for about 60-200 rubles apiece. But it is advisable to choose clean pallets, without oil stains, large stains, and that have not been in use for too long. For a bench you will need 2-3 pallets. And the shape and size of the finished product will depend entirely on your imagination. |
| Bench made of branches | Snags, stumps, winding thick branches... All this can be useful in construction. The more ornate branches you find, the more curvaceous and interesting the back of the bench will be. But it is still better to make the seat from a board, because it is more comfortable to sit on a flat and smooth surface. |
| Wicker bench | Light openwork benches are comfortable and practical. They are not difficult to move from place to place; they can be supplemented with soft pillows for relaxation on a hot summer day. Wicker furniture is suitable for both outdoor and indoor use. Furniture is woven from artificial rattan or willow wicker. This is not the fastest activity; it requires skill and perseverance. It is advisable for beginners to first practice on simple small-sized items before starting to weave a whole bench. |
| Bench made of logs and saw cuts | Such bulky products can become a decoration of the garden; they will find a place near the pond or next to your workshop. The bench can be made from a whole large-diameter log by selecting a quarter and placing it on stands with semicircular grooves. Or use a log sawn in two as a seat, and make the back from edged or unedged boards and bars. Remember that making such a bench alone can be very difficult due to the large weight of the logs. |
DIY pallet bench
Blueprints
When planning the manufacture of a garden bench, you need to think about the appearance of the product and draw a detailed drawing. Drawings for making benches are easy to find in finished form.
A detailed drawing will allow you to correctly calculate the consumption of materials and think through the technology of work.
The size of the product is calculated based on the need for seating. It is not advisable to make a small bench for a summer cottage where a large family is relaxing.
For work, you can use the standard overall dimensions of a garden bench.
To comfortably accommodate three adults, the seats are 150 cm long. The width of the seat is usually 40 cm. The height of the bench is 45 cm from the ground, while the height of the back is 90 cm.
The bench should be installed at an angle of about 20 degrees, this will make using it more convenient.
At the planning stage, you need to think about ways to attach the backrest.
Note!
- Do-it-yourself wardrobe: a review of ways and methods on how to build a stylish and original wardrobe (video and 145 photos)
Do-it-yourself furniture restoration - removing chips and scratches, restoring surfaces. Instructions with photos and video tips
- DIY ottoman: how to make it at home. The best ideas, master classes. Photo + video review of beautiful ottomans
Practical tips for creating a garden bench
Making a garden bench with your own hands is also not difficult, because it has a fairly simple design. This bench is placed on four legs, which are all connected together. This ensures strength and secures the back well.
To create a classic garden bench, first of all, make a frame. To do this you need to prepare the following type of boards:
Note!
- How to make a shoe rack with your own hands - simple and complex options. Step-by-step instructions with photos and descriptions
- How to make a fence with your own hands: detailed instructions, diagrams, drawings. Description of the process from A to Z!
- How to make a barbecue with your own hands from metal - the best manufacturing options with drawings and step-by-step instructions (100 photo ideas)
- 1.5 m boards (5 pieces);
- boards 0.36 m each (2 pieces);
- boards 0.52 m each (2 pieces). They are cut lengthwise into 4 bars, which are then used to fasten the seat and legs;
- boards 0.72 m each (2 pieces). In the future they will hold the back and legs together.
Having prepared the boards of the required size, they must be sanded and all defects and burrs on them must be eliminated.
Next comes the assembly of the frame itself. To begin, connect the legs together using self-tapping screws. Then a seat and back are attached to them. And so that the fasteners are not visible, they are placed on the reverse side. At the last stage of creating a garden bench, a lower bar is installed to secure the legs with the main structure.
When the entire bench is assembled, it is painted to protect it from temperature fluctuations and possible moisture. For painting, yacht varnish or special impregnation is recommended. But it is worth remembering that after using the varnish, such a bench will always be cold.
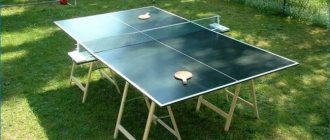
Pallet bench
A good starting material for the manufacture of country furniture are transport pallets made from durable boards of good quality.
Using them, it is easy to make garden benches of different designs.
Before starting work, the pallets must be cleaned of dust and dismantled if necessary.
To work you need to prepare:
- saw;
- sanding machine or sandpaper;
- drill;
- self-tapping screws;
- bars for fastening elements;
- brush;
- primer;
- paint or varnish.
Operating procedure.
- The pallet needs to be sawn lengthwise so that you get two parts. The narrow one will serve as a backrest, and the wide one will serve as a seat.
- Treat the surface with a grinding machine.
- Mount the structure using self-tapping screws. To add strength, you can use bars and metal corners.
- The legs for the bench are also attached using corners.
- Cover the product with paint or varnish.
For ease of use, it is recommended to sew seat cushions.
Requirements for creating a bench
In order to make a correct, strong, durable bench, it is necessary to take into account the following features of this work and follow certain principles:
- each bench should have comfort and convenience;
- its design should be so thoughtful and logical that it does not require unnecessary materials and tools for work;
- the size of the bench must fully satisfy those resting on it;
- to create a bench, you need to use materials available for work that can be easily found and brought;
- the selected material for a new bench must be of high quality, moisture resistant, and have high protection against temperature changes;
- Before making a bench, you should first familiarize yourself in detail with the information useful for this, and, if necessary, study the detailed drawings of the bench.
Bench made of chairs
Often, old but durable furniture is used to make a garden bench. A comfortable bench for a country veranda or gazebo can be quickly made from a couple of old chairs.
In addition to chairs, you will need:
- board 30-40 mm thick;
- bars with a cross section of 40 X 40 mm;
- self-tapping screws;
- drill;
- saw;
- varnish or paint.
Operating procedure.
- Remove the upholstery from the chairs, inspect the product, and sand the surfaces.
- Remove the seat frames and adjust the height of the legs if necessary.
- Make a frame from the timber and attach the boards to it.
- Install a bench. If desired, the seat can be made soft by laying a layer of foam rubber and covering it with material.
- Paint the product.
Instead of boards, plywood is often used. You can complement the bench with decorative pillows.
Cutting strips
Once you have finally decided on the size of the future shop, you need to start cutting strips of plywood. We decided to use a circular saw, but most people are unlikely to have one in the garage, so you can use any other tool. The main thing is that the stripes end up smooth and without defects. In the photo we showed the resulting stripes.
Cutting strips
Return to content
Log bench
If you have a log of a suitable size at your dacha, it is easy to use it to make a garden bench.
- At the first stage, two supports-legs of the same size are sawed off from the log.
- The log needs to be cut lengthwise in the middle or with a slight offset.
- A beam is required to connect the seat to the backrest.
- Recesses should be made in the support legs for a reliable connection to the seat.
- The product is assembled and the structure is further strengthened using self-tapping screws and pieces of timber.
- The sections must be covered with stain and varnish.
How to make a bench with a back
To create a bench with a backrest with your own hands, the craftsman will need the following tools:
- mitral and circular saw;
- pencil;
- tape measure;
- drill with an optimal set of drills.
The following is a list of necessary materials for the future bench (all boards should be 2.5 m long):
- boards measuring 2x3 (7 pieces);
- 2x4 boards (1 piece);
- boards measuring 2x6 (1 piece);
- bars measuring 2x2 (2 pieces);
- glue for woodworking;
- sanding material;
- a set of screws of 5 cm and 8 cm.
To begin assembling a bench with a backrest, start from the back legs. But first you need to make sure that all the necessary boards are labeled and numbered. This will prevent confusion and corrections during assembly. Next, the front legs are added to the rear legs along with a seat, support for the armrests with lower stretchers. All fastening elements must be level and fix each other.
Before starting assembly, it is advisable to lay out all the boards in the desired order and shape to make sure that everything matches and fits. Only then are the fasteners connected to the structural elements.
One of the last stages of creating a bench with a back will be fixing the lower slats to the base of the frame. The seat and the backrest are attached to them from above. To hide the fastening materials (screws), they are drilled from the bottom and back of the planks.
Useful tips
To make garden benches, you should use high-quality material. The service life of the product will be extended by treating wooden and metal elements with special primers, paint and varnish.
The surfaces of the parts should not have irregularities, burrs, or protruding sharp parts of fasteners.
To install the bench, you need a flat area without stumps, holes and stones.
It is recommended to make the back and seat from separate parts, leaving gaps between them for ventilation.
The bench should not be placed under fruit trees. Falling fruit will quickly ruin its appearance.
Metal
This material attracts with such quality characteristics as durability, practicality, simplicity and resistance to the external environment.
You can make the product entirely from metal, or combine it with wood. The last option is used most often. A design with interesting openwork patterns will highlight the beauty of your garden.
A mandatory attribute of a suburban area is a bench. In addition to fulfilling its functional task, it can decorate the appearance of the garden and area in general.
There are no financial costs required for this; most of the proposed ideas can be implemented independently.
It is important to choose the option that is closest to you and at the same time will not stand out from the overall stylistic picture.
- Clinker brick
- Barrel sauna and its features
Apartment renovation
Original ideas
By being creative, you can create unique landscape elements. As a material, it is easy to use old pieces of furniture, boxes or pallets, logs and branches, timber and boards.
Skills in working with metal will allow you to make original benches with a metal base.
It’s easy to add flower beds to the benches as decorative elements.
The bench surrounding the trunk of a large tree looks unusual.
As a basis for the product, you can use an old chest, the frame of a sofa, chairs or armchairs.
You can get ideas by studying photos of a do-it-yourself bench on the Internet.
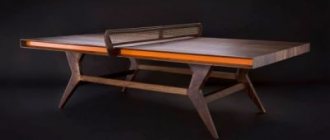
Benches made of metal and wood
As a rule, no one decided to build a bench out of metal. In the summer, they can heat up to such temperatures that it makes no sense to talk about rest at all. In case of cold weather, the picture is the same. The bench becomes so cold that it is impossible to sit on it. But benches using a combination of metal and wood are the most in demand. As a rule, the frame is made of metal, which ensures high reliability of the structure, and the seat and back are made of wood, which provides a certain comfort.
Bench made of profile pipe
If the design is improved and soft armrests, soft seats and backs are made, as in the photo, then such a design can compete with the most modern options for rest benches. To make the seats, armrests and backrests soft, it is enough to cover furniture foam rubber with a suitable material. In this style it is possible to build a tabletop.
On a note! When using wood, it is advisable to leave gaps of up to 5 mm between individual elements. This is due to the fact that when the ambient humidity changes, the dimensions of the elements also change.
Stylish benches made of metal and wood
In the process of creating a seating area, care should be taken to ensure that there are no sharp corners, especially in metal structures. This is very important if you have children. All elements of the ensemble, such as benches, tables, garden chairs, are made from round and square pipes, bending them so as to create smooth transitions.
Table and bench made of pipes and boards
The presence of metal allows you to bend structures of any shape, although this cannot be done so easily and you need a special device. The presence of such capabilities allows you to bend structures in one go, without using other tools, such as a grinder and a welding machine. The main thing is to think through the design down to the smallest detail. If wood is used, then only well-processed wood. Wooden elements should not be allowed to have burrs or chips.
Photos of do-it-yourself benches
Manufacturing process
To make this bench, 9 sheets of plywood measuring 2440mm x 1220mm and 18mm thick were needed. It is best to use moisture-resistant plywood as it is stronger and less likely to delaminate.
Manually transferring an image from a piece of paper to plywood, and then cutting out all the elements with a jigsaw, is truly a heroic feat (considering so many elements). Therefore, you shouldn’t strain yourself, it’s better to find a chipboard cutting company (which has a CNC machine for curved cutting) and get ready-made elements. But, in order not to get another puzzle about which layer is which, when cutting, you should indicate that the parts from each sheet are placed in different piles.
We glue the layers together with wood glue.
To prevent the layers from moving during the process, we fasten them with nails.
Then we compress the layers with clamps and leave them to dry for a day.
There is no need to rush and assemble the entire structure in one day; in this case, we risk getting poor-quality gluing of parts, which will later make itself felt in the form of delamination.
Placement secrets: where to put garden benches and benches
The choice of location for the product depends on the variation of the model. You can let your imagination run wild, but don’t forget about the correct composition.
Retro-style models are ideal for placement near hedges. The result is an extraordinary ensemble of style and beauty of nature’s gifts.
A shaped bench for a summer house can take its place along paths or under trees. Such products combine well with other decorative items on the site.
Miniature furniture looks great near the club and gazebos. We also recommend placing such a bench near a decorative pond. Then you will have a cozy place where you can retire at any time and admire the surrounding landscape.
It is better to install sofa benches on a terrace or veranda. For stability you will need a flat surface - soil will not give a similar effect.
Purpose
A bench is a structure traditionally consisting of several elements: a shelf for sitting, a backrest, and armrests. Intended for relaxation in a sitting position, it can have smooth or sharper outlines. They are located in crowded places, as well as parks and squares; they are widely used in gardening plots and summer cottages.
This device has gained its popularity due to its practicality. The bench is easy to manufacture, there are no requirements for the shape, size and quality of materials, it is suitable for various placements and does not require special skill in manufacturing, just a little experience in handling power tools.