Lighting in the kitchen under the cabinets is a desirable element of the lighting system. Ceiling light sources are not enough. After all, during work a shadow is formed from the human body, and this can lead to injuries. Additional lighting installed under cabinets not only increases safety and creates more comfortable conditions for working with cutting objects. With proper planning, the design of the room itself is emphasized.
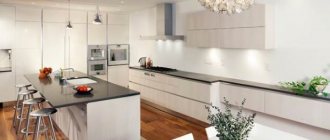
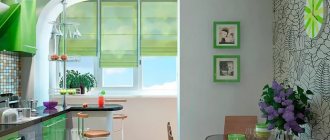
Lighting can make interior design more sophisticated
Backlight planning
Before buying any lighting fixture, determine its location and layout. There are several ways to place lamps: near the wall, closer to the doors, in the middle. It is best, according to designers, to install lamps as indicated in the last two options . Then fewer shadows are formed, which increases the safety of working with cutting and stabbing tools.
Ways to illuminate the work area in the kitchen
However, the last two options have disadvantages: often such placement is not very aesthetically pleasing. In addition, if there is a dining table or sofa opposite, the light disturbs the people there. In this case there is also a solution. A decorative strip is placed on the edge of the wall cabinet so that it covers the lighting fixture. The additional element also softens the light. The height of the bar is determined depending on the type of lamp used and its location.
Useful idea. If you don’t like the idea of a protective screen board, but there is no other choice, then you can use this element to your advantage. For example, turn it into a shelf for various small things.
In order for the backlight to cope with the tasks assigned to it, it is necessary to follow the rules for its installation.
It is recommended to install spotlights at a distance of about 40 cm, from the wall - 20 cm . One device is enough to illuminate 1.5 square meters. m.
Leave a distance of 30–40 cm between lamps
Important! If you place point light sources at too great a distance, a contrasting light “zebra” will form. To eliminate this, install additional lamps.
How to organize it correctly?
To be comfortable in the kitchen, you need multi-level lighting:
- Each functional area (place for cooking, eating and relaxing) should be equipped with separate lamps.
- It is advisable that the switches are located in convenient places: at the entrance to the kitchen and, if the room is large, in the dining area.
- In our country there is not enough natural sunlight, so designers and apartment owners traditionally choose lamps with a warm tone, which create additional coziness.
Lighting a small kitchen cannot be limited to one chandelier. A room with a low ceiling and a modest area should be equipped with several light sources: in the center, above the worktop, above the dining table.
Spotlights
Spotlights can be overhead or recessed. For the kitchen, built-in models are usually used. One of the disadvantages of these models is their large height, which in some cases reaches 10 cm. Since the distance between the edge of the pencil case and the working surface is small - about 60 cm, it is very likely that the lighting device may interfere with work.
Spotlights are often installed above the work area
In spot models, different types of lamps are installed - incandescent, halogen, fluorescent, LED . Incandescent lamps are the least convenient. They are cheap, but they consume a lot of energy and are quite large. Another disadvantage is the strong heating of the furniture surface and low efficiency. Halogen lamps also take up a lot of space.
To save space, lamps are hidden in a cabinet. To do this, make an additional shelf inside, at a distance of approximately 5 cm from the bottom.
Spot lighting looks neat. Another advantage is that the light does not “hit” the eyes.
Find out how to make floating ceilings with lighting in our specialized article.
Basic rules and requirements
Electricity in the kitchen poses a particular danger due to its close proximity to water, gas supply and heating systems. Therefore, when planning lighting in the kitchen, it is important to follow a number of rules that will make work and pastime not only comfortable, but also safe.
Next, we will discuss the most current requirements when modeling light in a kitchen:
- Lighting fixtures should be selected in accordance with the interior design and the dimensions of the room - it would be inappropriate to install a contrasting fixture that would stand out sharply against the background of the kitchen furniture. There is also no point in installing a small chandelier in a large room.
- When developing several levels of lighting, each of them should not cast a shadow on the dining area, cooking area and other functional locations.
- Brightness, design and location must be selected in such a way that the light flux does not blind a person’s eyes.
- In the case of simultaneous use of several types of lighting in the kitchen space, it is necessary to correlate them in such a way that they complement each other and do not disrupt the harmony of the lighting design.
- When choosing the power of lighting fixtures for the kitchen, it is necessary to take into account the degree of light reflection of the walls. The lighter the material, the greater the percentage of luminous flux it will return, approximately the value is 80% for a light coating and 12% of light for a black one.
- For each working surface it is necessary to calculate the amount of illumination. Indicated in Lux on the lamp box or passport.
- The distance from water supply sources to live parts must be at least 60 cm.
- According to the requirements of clause 7.1.46 of the PUE, lighting devices with incandescent or fluorescent lamps must be equipped with devices that prevent the lamp elements from falling out when it is destroyed.
- According to clause 7.1.50, current-carrying elements are prohibited from being brought closer than 0.5 m to the gas pipeline and gas equipment.
The model and characteristics of lighting equipment for the kitchen are selected in accordance with the type of lighting. There are several main categories, which we will consider in more detail.
Rotary lamps
A convenient way to illuminate a work area is rotating lamps . They come in both built-in and wall-mounted types. One of their advantages is the ability to direct the light beam in the desired direction.
Devices with a rotating mechanism can be built-in or mounted. Built-in devices are usually point-type, and are implanted into the bottom panel of wall cabinets.
The lampshade of mounted analogues is often mounted on a bracket. These devices can be quite compact. But given the limited space, this is not the best choice. Designers also believe that such lighting creates a cluttered effect, especially in small kitchens, and makes cabinets visually heavier.
Lamps on brackets are not the best lighting
Application of light beams
Light beams are elongated LED lamps consisting of elements arranged in a row.
In some places they resemble the well-known fluorescent lamp, both in appearance and in the method of application.
Media file
The LED beam without a lampshade is placed in a special niche. In versions with a lampshade, the placement will be arbitrary.
Table setting for February 14th - the best ideas and ways to decorate to create a romantic atmosphereDIY Easter flower arrangements: master class (photo), original ideas
- How to decorate the Easter table - ideas, tips for decorating the Easter table, photos
The cost of such a device varies significantly, but in many cases the purchase of an expensive product is justified by design considerations.
LED beams have a number of important advantages:
- It is easy to provide the required light intensity.
- Without much effort, you can provide light to even a large work area.
- The work area can be divided into separate sections, each of which is illuminated by its own LED beam.
- The design of LED beams allows you to create sequential systems, that is, connect one device to another, resulting in a complex design with one switch.
The main type of fastening of beams is self-tapping screws, which are screwed to wall cabinets.
Linear backlight
This method is convenient because it provides almost uniform illumination of the work area. For this, three types of equipment .
LED Strip Light
This is a flexible printed circuit board on which LEDs and resistors are glued. The tape is produced in widths from 8 to 20 mm . The device is sold in rolls of 1-30 m . LED strips are available in one color or three colors. But the latter are used quite rarely to illuminate the kitchen area.
The lighting operates on DC power and is connected to a DC voltage of 5-24 V. Therefore, an additional converting power supply will be required. The ribbons can be used to control brightness. If the device contains diodes of three colors, then adjustment can be made for each of them. A control panel is often included with the tapes.
One of the advantages of strip lighting is that the light source does not take up much space. It is attached to furniture or a wall using the back adhesive side.
Attention! Quite often there are reviews that the tape attached in this way quickly lags behind. To prevent this from happening, experienced craftsmen recommend using additional double-sided mounting tape or stapler clips.
It must be taken into account that most products are limited in the length of the sections connected in series. So, the recommended footage is no more than 5 m . If a longer length of tape is used, then a parallel connection scheme is used. The cross-section of the wire also matters. The further from the block to the tape, the greater this indicator should be.
LED strip wound on a reel
Prices for LED strips
LED Strip Light
The advantages of this lighting method include:
- affordable price;
- low cost of operation;
- reliability;
- longer service life compared to fluorescent lighting devices;
- does not overheat;
- no moisture protection required;
- electrical safety.
Disadvantages include high cost compared to conventional light sources and incompatibility with old fixtures.
Step-by-step instructions: how to make lighting with LED strip in the kitchen with your own hands
To implement the project you will need the following items and materials:
- tape with power supply (adapter) - along the length of the cabinets on the wall above the work area;
- connecting cord (0.6 mm2);
- wire with plug;
- double-sided adhesive tape;
- insulating tape.
This is what the LED strip looks like on kitchen cabinets
Installation of work area lighting is carried out in the following order:
Step 1. The surface of the cabinets must be cleaned of dirt and then degreased. This must be done so that the tape adheres well and does not fall off during operation.
Wiping the surface from grease
Degreaser prices
Construction degreaser
Step 2. Next, you need to cut the tape according to the length of the cabinets.
Cutting the tape
Step 3. After cutting has been done, the tape must be connected to the power supply, and a cord with a plug must be connected to the power supply.
Complete structure
Step 4. At the last step, the tape must be placed on the bottom surface of the kitchen pencil cases and pressed well.
Result of work
Attention! The LED strip is cut only in areas where there are special marks. If you make a cut in other areas, the lighting device will fail and stop working.
Contact areas on the LED strip that are allowed to be used for cutting
The power supply is hidden , but in such a way that it can be taken out in the event of a breakdown. An infrared switch can be used in the circuit between the block and the plug, making it easier to control the device.
Video – LED lighting for the kitchen work area
Lamps-bars
They can be based on a fluorescent or LED lamp. The advantage of this lamp is its oblong shape. Thanks to this, one device can illuminate a fairly large area of the tabletop.
Typically, such devices are quite lightweight and easy to install. To attach LED analogues, double-sided tape is sufficient . The advantage of lighting with slats is that there is no need to damage the furniture. In addition, they are easy to move to a new location.
Lighting options
Before carrying out repairs, you should think in advance about the location of lamps, switches and other equipment, since finishing work is carried out only after laying all current-carrying cables.
General lighting
First of all, it is worth providing the kitchen with one central or several light sources built into the ceiling. They are necessary for convenience when entering the kitchen, as well as when receiving guests and cleaning.
The photo shows a spacious kitchen-living room with ceiling lighting in the form of spotlights.
Lighting of functional areas of the kitchen
It is difficult to imagine a comfortable cooking work area immersed in twilight. It is also difficult to enjoy food or have intimate conversations at a table where it is difficult to see the plate or your interlocutor. It is for the comfort of household members and guests that every corner needs to be additionally illuminated.
Light for the kitchen in the work area
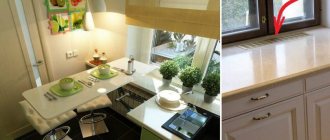
It is recommended to place lamps above the tabletop just below eye level. To wash dishes efficiently, it is desirable that light shines on the sink. It is not necessary to highlight the sink separately if it is installed in the center of the work surface.
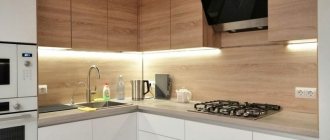
The photo shows a kitchen where lamps are built under the cabinets and illuminate the work area.
There are situations that require constant standing at the stove. Then a small addition as a lamp above the stove will come in handy. Often this function is performed by a hood with a built-in light bulb.
Dining area lighting
Perhaps the most important detail, which instantly helps to make the atmosphere more comfortable, is the lighting of the kitchen table. It is the central piece of the kitchen-dining room, around which guests or family gather. It is important that the surface of the table or island is in a halo of light: in addition to creating comfort, this sets the mood for an open, friendly conversation.
The photo shows a blue kitchen, the dining area of which is also a working area. It is lit by two pendant lamps.
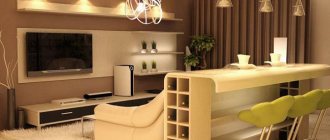
Light sources are also needed above the bar counter: their purpose is not only to illuminate, but also to zone the kitchen space. If the kitchen is connected to the living room, then the lamps should be located not only above the dining group of table and chairs, but also next to the seating area - armchairs or sofa.
Interior lighting for kitchen cabinets
The lighting of closed cabinets is purely utilitarian in nature: it does not in any way affect the perception of the kitchen as a whole, unlike the internal lighting of a set with transparent facades. You can equip cabinets or lower cabinets with lighting either at the stage of ordering furniture or independently using economical LED strips.
In the photo, the illuminated apron echoes the decorative lighting of cabinets with glass doors.
Decorative
Additional light can solve the most unexpected and interesting problems. Decorative lighting is aimed at creating a special mood, as well as to highlight the features of the interior.
In the photo there is a lamp with a phrase, converted especially for the kitchen from the anti-war slogan “Make love, not war.”
Decorative LED lighting can be located under the ceiling, on the border of the podium, or linearly on the wall as an accent. The set, illuminated from below, visually expands the space of a long narrow kitchen.
If the kitchen contains house plants that require additional lighting, it is also considered decorative.
The photo shows a non-standard decoration for the kitchen - a magnificent vertical garden.
Surface-mounted lamps
Surface-mounted lamps are also a fairly wide group of lighting devices, which are widely used to illuminate the work area in the kitchen. The type of lamp here can be very different. The convenience of overhead devices is that damage to furniture will be minimal. However, then you need to take care of how to hide the wires. Therefore, the wiring is hidden in the wall, when placed vertically, or under the bottom panel of the kitchen cabinet.
Aprons with internal lighting can turn the kitchen work area into the wall of an aquarium
How are overhead lamps attached?
There are several ways to mount the device on the surface of a wall or kitchen unit .
In the first case, screws are used. Some devices have an adhesive backing. In this case, it is enough to remove the protective layer and attach the device with the adhesive side to the base on which the lamp will be held.
Useful tips and tricks
Before you start designing and installing lighting in the kitchen, it will be useful for you to familiarize yourself with the following recommendations:
- choose the lampshade material for pendant lamps based on practical considerations - they should be easy to clean from grease;
- It is better to select the color of the lamp for lighting in the kitchen to match the tone of the surface on which it is installed, so that it externally merges with the base;
- For a dining table, it is important to use a chandelier with an adjustable hanging height - this will allow you to create various lighting effects;
- if you don't always need lighting at full power, install dimmers or switches with a divider;
- installation of rotating lamp models will allow you to enhance lighting in different locations as needed;
- If the room is small, try to choose a comparable lamp so that it does not look bulky;
- Kitchen lighting in particularly dangerous areas is best done from 12V;
- When purchasing lighting devices and components for them, do not take the cheapest products, they may fail even before use.
Lighting for glass splashbacks
Illuminated glass aprons look incredibly impressive. Then the lighting fixture is not visible. It seems that the wall itself is glowing. Quite often they use glass with landscapes of the city and nature. Then you get the impression that there is a large panoramic window under the cabinet.
Halogen lighting fixtures are often used for this purpose. However, experts say: these lamps are not suitable because they create glare on a glossy surface. Most often, fluorescent lamps that provide uniform light and LED lamps are installed.
In addition to the traditional method of placement under the cabinet, lamps are also placed behind the panel . This not only makes the picture unusually realistic, especially in the dark. This lighting design is also practical: all the wires can be hidden behind the glass.
There are two more conveniences in such lighting:
- lighting fixtures are protected from moisture, soot and dust do not settle on them;
- Tempered glass, which is mainly used for finishing the work area, does not burn or melt.
Step-by-step instructions for making a skinali with backlight
The luminous apron is installed after the repair has been completely completed and the pencil cases have been installed. Before installing the system, measurements are taken. If there are old sockets or other objects on the wall, they are dismantled. Apply insulating tape to exposed wires.
Installation of the panel is carried out in the following sequence:
1. Make a canvas with LED strips, which is attached directly to the wall. It consists of foil (foil, paper base, polyethylene). An LED strip is glued on top of the foil in a horizontal direction, leaving a step of 5-10 cm between the rows. The wider the step, the dimmer the emitted light will be.
2. Attach the backlit foil to the wall. To do this, use an adhesive that is suitable for this surface. Where the sockets should be, holes are made through which the wiring is routed.
Foil with tapes is attached to the wall with glue or using double-sided tape
3. Install a frame made of wooden slats. The wood is pre-treated with antifungal and insecticidal drugs. Where the lath comes into contact with the wall, sealant is applied. Particular attention is paid to the area next to the sink.
4. Route the wiring of the backlight itself to the side where the control units will be located.
5. Install skins. If the working area is L-shaped, first install the corner profile. Then the lower holders are secured.
6. Insert the glass panel and, holding it at an angle of 45°, put the top profile on top of it. Secure the slats.
Systems for fastening skinnels with seals
Wireless kitchen lights
This is one of the most convenient lighting options for the kitchen. Such devices operate on batteries or adapters . They don't need a power source. They are often part of a smart home system, so they are often equipped with motion sensors, which saves power consumption. Their main advantage is independence from the location of the outlet. You also don’t have to look for where to hide the wires.
Battery-powered lamps are convenient because they do not depend on the location of the outlet
But these lamps also have a drawback - you will have to constantly change the batteries or recharge the batteries .
Prices for wireless LED lamps
Wireless LED light
How to choose the color of lighting for the kitchen
When choosing a lamp, it is important to consider the color rendering index. On the packaging it is designated by the abbreviations Ra or CRI . This determines how correctly the color of the products will be displayed. The color is not distorted if Ra corresponds to 80...100 .
Apple color at different color rendering index values
Color temperature is also important for correct color rendering. This indicator is measured in Kelvin (K).
Table 1. Shades and color temperature values.
| Hue | Color temperature, K |
| Warm | 2700-3000 |
| White (neutral) | 4100 |
| Cold | 6500 |
A cool shade will help you concentrate on work. Warm shades relax and create a feeling of comfort. Neutral does not distort colors.
Reference. When choosing a shade, designers advise taking into account not only the influence of the color shade on the psyche, but also the color of the furniture. So, for wooden sets they advise giving preference to the warm zone of the spectrum, for high-tech style - cold ones.
Main lighting in the kitchen: chandelier or spotlight
It is known that a chandelier plays a big role in the interior. It practically does not perform its main function. It is replaced in a modern kitchen by spotlights. They allow you to concentrate the light beam not only on the functional area, but also make it brighter.
Combination of spotlights and chandelier in the kitchen Source happymodern.ru
A chandelier will be an interesting addition to the design. Will help diversify the space. Often, a central single lighting structure becomes a good decorative element. Therefore, from the point of view of benefit and practicality, it is better to give preference to spotlights and spotlights of a point design.
Kitchen with chandeliers for an individual area Source zelenograd24.ru
Chandelier and “dots” for complete lighting Source stroymasterok.com
Beautiful oversized chandelier for the kitchen Source ukrsmeta.ua
Installing an outlet on a kitchen apron
If wired lighting devices are used for lighting, then you should consider the location of the outlet. There are no safety requirements. However, when choosing a place to place it, pay attention to the following points:
- The outlet should not be placed directly above the countertop. The nests will become clogged and moisture may enter. Therefore, the distance to the surface of the tabletop should be at least 10 cm.
- To visually hide this unit, you can place it closer to the edge of the wall cabinet. Another additional plus is greater comfort of use.
As for choosing a horizontal location, it all depends on what devices will be used. If they are concentrated on one side, then the socket must be installed there too.
If you want the outlet to be hidden, then you can choose corner outlets. The back side of these devices is attached to the wall, the top side is attached to the bottom surface of the cabinet . Thanks to this design, they are unnoticeable and do not spoil the appearance of the apron.
Corner socket models are mounted under the kitchen cabinet, which makes them invisible
Prices for various socket models
Corner socket models
You can also use socket models built into furniture. Sometimes they are built directly into the countertop. This further increases the risks compared to placing the device low on the wall, even if a protective cover is used for the tabletop model. In addition, according to the Electrical Installation Rules, contact of electrical installation products with flammable surfaces, such as wood furniture, is limited. To reduce risks, steel embedded boxes are used.
One of the latest developments is a hidden socket . This is a type of hidden socket, but in this case, thanks to a special mechanism, the block extends above the tabletop. Disadvantage: low power. Such sockets are not suitable for devices with a power of 1.5 kW and above. However, lighting devices do not reach these indicators.
The range of lighting fixtures and options for illuminating the work area is quite large. Therefore, choosing the right option for yourself will not be so difficult.