The bar counter is a functional and attention-grabbing element of the interior. We are used to seeing such designs in cafes and entertainment venues, but in residential areas, bar counters look no less interesting. This article contains complete information about ready-made bar counters, describes the advantages of installing this piece of furniture, and options for arranging the room. We’ll also look at how to make a bar counter with your own hands.
How to make a bar counter with your own hands?
Advantages of a bar countertop
In the interior of some rooms, the bar countertop plays the role of a table, or is combined with other pieces of furniture into a single composition.
A bar table has a number of advantages.
Advantage No. 1. Visual division of space into zones
In the kitchen, the bar can serve as a food preparation area and be separated from the dining area. In a studio apartment, it will become an alternative to a partition between rooms.
Bar as a way to highlight zones in space
An additional advantage is that the presence of a bar area will add a touch of chic and exclusivity to the interior. Replacing the partition with a bar table will visually expand the room.
Advantage No. 2. Alternative to a table
If 1-2 people are dining at a table indoors, you can abandon the traditional dining area in favor of a bar. The kitchen will become more original and visually more spacious.
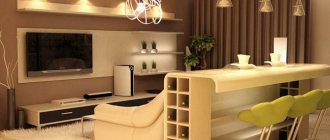
You can add functionality to the bar counter using a transforming table top. Lighting devices also play a role. A great idea is to place spotlights above the guest gathering area.
The bar counter can continue the work area, combining it with the table.
Advantage No. 3. The work area increases
If the bar is an extension of the countertop, it adds space to the kitchen corner.
The work area is one of the functions of the bar counter
The bar can be an additional kitchen work surface
Advantage #4. Rational use of the window sill
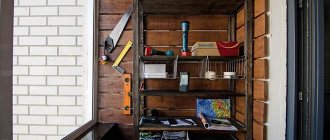
The bar counter, being a logical continuation of the window sill, solves the problem of small kitchens and allows for efficient use of space.
Window sill as a support for installing a bar structure
Advantage #5. Bar is a separate element
Having a bar in a house or apartment makes it possible to allocate space for preparing food and drinks, but at the same time maintain commonality with the rest of the interior.
The bar counter can focus the attention of guests
Advantage #6. Territory of order
The design of the bar counter can include drawers, shelves, and sections for storing cutlery, spices, sauces, and strong drinks.
The bar counter may have storage compartments
Purpose and types
If the kitchen area allows, a bar counter is placed in the kitchen for its intended purpose: to sit down for a cup of coffee or something stronger, or to have a snack. Then its “equipment” is appropriate: holders for glasses, wine glasses, glasses, next to it is a shelf/holder for juices, bottles, etc. They place it with one edge resting on a wall or the edge of a kitchen unit, sometimes they place it in the form of a frame - in the middle of a free zone.
Bar counter in a large kitchen
In small kitchens it is often multifunctional. It can also be used as a divider into zones - dining room and kitchen; in very small areas it is often used as a dining table. Moreover, it can be located non-standardly - against the wall.
Bar counter along the wall
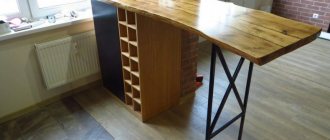
In medium-sized kitchens - 10-12 meters - it is often made in the form of a peninsula - a small protrusion on the side. In order to make more efficient use of space, the space under the countertop is used for shelves or a cabinet. This design is very simple - the bar top is often supported by several pieces of straight or inclined pipes fixed to the cabinet table.
Bar counter in the kitchen - peninsula
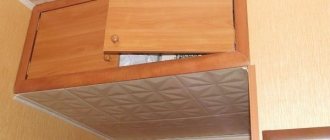
Such multi-stage kitchens have recently become popular: it is more convenient to perform different operations in the kitchen on surfaces with different heights.
Two surfaces one above the other The surface of the stand is slightly shifted relative to the table
But, nevertheless, more often a bar counter for the kitchen is present in studio apartments to delimit two zones: the kitchen from the living room or from the hallway - who has what is combined. Moreover, it is often a continuation of the desktop island or peninsula.
Bar counter for the kitchen as a continuation of the island table
They also make it in the form of a partition. In this case, the base is most often made of plasterboard, and a surface is “attached” to it - from above or to the side.
Bar counter-partition made of plasterboard
This option is easy to do
In general, there are many options, variations and different types. You adapt the idea that you like to your conditions, and you can begin to implement it.
Bar dimensions
There are various options for arranging the bar area. A number of recommendations are common to them:
Table 2. Dimensions requirements
| Name | Description |
| Typically, the height of this element is from 110 to 120 cm. Much depends on the purpose of the bar and the nature of its use. It is allowed to increase it to 130 centimeters, which is relevant in the zoning format. If the stand is related to a specific headset, then the height indicators are determined by its dimensions. For the smallest rooms, you can purchase a model with a height of 75 cm. This can be attached to a window or wall. The low counter plays the role of a working tabletop and does not require the placement of chairs (they can be equipped as desired). An additional common factor that influences the height of a bar table is the height of those who intend to use it. |
| Bar drain width | Like height, width can vary, and this indicator is even more variable. The desired minimum tabletop width is 30 centimeters. For a comfortable lunch at a bar table, it should have a width of about 80 cm. In practice, 50-60 cm counters are often purchased or made to order. |
| Tabletop length | The length is calculated based on the average number of people who will be at the bar table - one of them accounts for 60 centimeters of space. |
The shape of the table, the number and shape of legs are chosen at the discretion of the owners. In general, a trend is emerging to make the most efficient use of bar counter space, so the classic option with a floor-to-ceiling pipe is not so relevant now. Instead of the popular options that were in the recent past, they choose more functional designs, which necessarily have storage compartments and other additional elements.
Materials for the bar table
Furniture should create an atmosphere of harmony in the interior, so the bar counter in the apartment is a logical continuation of the set, or serves as a separate element, while fully corresponding to the style of the space.
Materials are selected based on other interior elements
Very often, the design of the tabletop matches the decor of kitchen furniture or furniture in the living room. But interesting combinations are also possible - stone, for example, looks great with wood.
Table 3. Which material to choose for the countertop
| Type of material | Features of application |
| In order for a tabletop made of natural wood to serve for a long time, it must be treated with special compounds against mold, fire and humidity. |
| The use of a stone countertop in arranging a bar is justified from the standpoint of durability. We are talking mainly about granite and basalt. The disadvantage of the material is its high cost. In addition, a stone table is heavy and requires special care. |
| Different technologies are provided in this group of materials, but the common feature is the similarity with the natural base. Stone chips in the artificial slab provide resistance to mechanical stress. The advantage of such a stone is the variety of shapes and patterns. The downside is the need for specific care. |
| Moisture-resistant chipboard | A budget option made from a board with a protective film. Can serve as an alternative to wood and stone. There are many designs available. The material does not require complex care. The downside is that the resistance to moisture of this material is quite conditional. |
| This material is more durable and environmentally friendly compared to chipboard. MDF makes it possible to create bar tables of any configuration. The decor of the slabs is also varied. |
| Glass | To obtain visually light and airy bars, glass is used. They require special attention and therefore are mainly used for arranging stands for snacks and coffee breaks. |
| Tile | The need to lay tiles on the base of the countertop and grout the joints is compensated by moisture resistance, reliability of the coating, and ease of maintenance. |
Photo design ideas
Separate corner
Desktop - as a basis Photo of a bar counter in a small kitchen
Zoning option
Interesting lighting As a base for a coffee table
In the spacious kitchen))
Bar counter made of brick or stone - stylish Non-standard appearance and color
Bar counter in a studio apartment
You can also have lunch Two sketches for implementation Bar counter for a small kitchen
Video on the topic
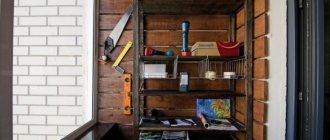
If you want to place a bar counter in an open summer kitchen, you can borrow the idea from this video. The guy built an interesting stand using driftwood and a thick board found in the forest.
Most often questions arise about how to make a countertop for a bar counter. You can decorate it with mosaics. And how - look in the video. In general, the technology for laying mosaics is simple: use a special white glue, followed by grouting the seams between the tiles. It can be difficult to form an uneven edge. Here's how to do it - watch the video.
Tabletop glued from bars
Base materials
The previous section describes the table materials. The bar counter also has a base for which you can use:
- Chipboard and MDF boards - these materials are used if they are present in the furniture set. The advantage of the material is the ability to complement the base of the bar with drawers, shelves and other attributes;
- plasterboard - the use of the material allows you to experiment with sizes, shapes, it is characterized by high speed of operation, convenience and ease of use, you can assemble a plasterboard structure yourself using a frame; decoration of drywall is carried out using painting, applying artistic plaster, artificial stone;
- brick elements - massive brick counters successfully complement modern styles in the interior;
- wood – the base of the bar made of wood is suitable for a classic interior;
- metal - the bar counter pipe is standard and universal;
- remains of a partition between rooms.
Brick base of the bar area
Materials used to make your own stand
Once we have decided on the style, we move on to an important factor – materials. Again, you should select them based on the materials already used in the kitchen. The following are considered common and accessible:
- Drywall is a budget option that allows you to create a structure of any shape - from classic to loft. It can be painted, decorated with artificial stone, mirror tiles, or come up with any other original option.
Bar counter made of moisture-resistant plasterboard
- Plastic is a cheap material that is easy to work with. The disadvantage is its fragility and not as many decorative options as plasterboard.
- Laminated chipboard - this material is not as cheap as the previous ones, but it is harder to work with. But chipboard is more durable and is produced in a different color palette; you can find material simulating noble wood or cold marble.
Chipboard bar counter
- Natural wood is the most expensive option, but such a stand will look much more solid. True, without the simplest skills of a carpenter you will not be able to make it yourself.
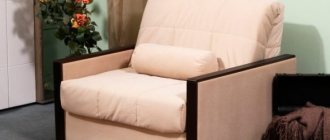
Bar chairs
Regardless of whether the bar is purchased ready-made or made independently or to order, the choice of chairs to place at the table is relevant. A number of the following requirements are recommended.
1. If the bar counter is low, up to 90 centimeters, then it is enough to purchase or make standard chairs for it.
2. If the counters are higher, bar stools from 75 to 85 cm are suitable:
- for bars with a height of 130 cm, a chair measuring 85 cm is suitable - it is difficult to find chairs of a higher height;
- for bar counters with a height of 120 cm, choose chairs from 75 to 85 cm;
- if the room is equipped with a stand with a height of 1.1 meters and 90 centimeters, then a chair that is located above the floor at a height of 75 cm is sufficient;
- for structures with a height of 88 to 86 cm, you should choose chairs from 62 to 75 centimeters.
3. If the height of the bar structure does not exceed 75 cm, 45 cm chairs will be a good addition.
Bar chairs can be decorated in the general style of the kitchen set
For harmony in the interior, the chairs must match the counter in color and style and not contradict other elements of the furniture. If you have a small apartment, you can use high stools instead of bar stools, which can be put away under the counter as needed. This saves space and maintains spaciousness in the room.
In the case where people regularly dine at the bar counter, you need to opt for chairs with a backrest.
A comfortable bar stool is an important part of the decor.
Small kitchens can also accommodate small plastic chairs - they come in different shapes, styles and are easy to clean. A person's weight should not exceed 90 kg. Otherwise, it is unsafe to sit on such a seat. For tall and overweight people weighing more than 90 kg. You should select chairs that have wooden and steel legs. It is most comfortable to sit on a chair with soft upholstery. If there is no upholstery, soft pillows are suitable for comfort - they will become an additional decoration for the kitchen or living room.
A high bar stool should always be supported by a footrest. Moreover, it has several supports - we are talking about 1, 2, 3 or more. The most reliable bar seats are the ones with four legs.
Adjustable bar stools are also available. Families whose members are of different heights need to remember this.
Island design with bar stools as a separate element
Making a bar stool with your own hands is not as difficult as it seems, because almost any product can be made independently - for this you need to have all the materials and tools on hand, as well as a ready-made project. We will look at step-by-step manufacturing instructions in a special article.
Popular questions and answers
How to remove warping of a slab?
Manufacturers try to prevent the slab from warping. But in any case, it’s good if this happened before the slab was used in the product. First we need to find out the reasons why this happened. To level the formation, it is exposed to heat, moisture or steam, and a plane is used.
How to avoid end-cut cracks?
Radial cracks filled with resin are an interesting decorative option. But some people consider this a flaw and try to avoid them. To do this, it is better to cut down the tree in winter, making cuts after six months, when it dries to such an extent that the humidity inside and closer to the bark will not differ much. I would also recommend making thicker cuts.
What is the thickness of the slab?
The thickness varies from 10 to 20 cm.
What cut table design suits the loft style?
The simplicity and restraint of the loft style involves tabletops made from sections of a more regular shape, preferably on geometrically correct metal legs.
How to care for such furniture?
Care is the same as for natural wood furniture - use polish, furniture wax and crayons to remove scratches and chips.
How durable is the epoxy resin that holds the cuts in the products together?
Epoxy resin can be sensitive to sunlight and high temperatures. If such conditions exist, then over time, in 20 years, it will begin to fade a little. In addition, polyester resins are now used, which are more reliable and resistant to ultraviolet radiation.
Color accents
You can arrange the bar counter as follows:
- in the classic version , the color of the kitchen set and furniture in the living room combined with the kitchen are the same;
- a contrasting option - the counter can also stand out sharply in color from the rest, which is combined with modern room decor and current high-tech, loft and modern styles.
To focus attention on the bar area, you can highlight it with lighting fixtures. The imagination and skill of the designer will allow it to be used both for space design and for zoning. Color solutions play an important role in this.
Lighting and accessories
Well-thought-out lighting can also become a kind of accessory, placing the necessary accents and creating a special atmosphere.
- Alternatively, several chandeliers can be installed under the ceiling above the bar counter, which looks very stylish from the outside.
- In addition, you can specially make a suspended ceiling into which to mount several light bulbs.
- You can play with their color and lighting power. A dimer is perfect for this, as it allows you to change the light intensity.
Standard accessories for a bar counter include coasters with dishes, multi-tiered fruit stands, baskets with sweets and cookies, and so on.
Your imagination shouldn’t be limited to this list; don’t be afraid to experiment and come up with something of your own.
Do-it-yourself bar - options and methods of work
A classic bar counter is a tabletop placed near a wall or furniture (one edge is attached to a vertical plane). The second edge of the bar table rests on a metal pipe.
For the table you may need:
- a wide board, and it is desirable that it is not coniferous, since the latter is too soft for work and further use of the product;
- thick plywood - this material allows you to apply any decor after manufacturing, including tiled elements, plastic or mosaic.
Drawing of a simple bar counter
The material can be taken from the same company where the custom-made furniture was made (if it was made according to sketches). If there is factory furniture in the room, you need to take a photo with you and compare it with the samples offered in stores and workshops.
It is better to purchase furniture fittings in specialized stores. The choice is wide, and the prices also vary. In particular, pipes can differ in price by three times, and this is due to the quality of the items offered.
Accessories for the bar counter
Chinese fittings can lose their appearance quite quickly, while German ones have a long warranty, up to a lifetime, which, of course, affects the price of the product. Polish products are in the middle between these groups and are therefore quite universal.
Thick board stand
If the choice of base fell on a thick board, and the pipe was already purchased at the store, you need to decide on the fasteners. You can use a stop attachment for these purposes - it is placed under the table top on the pipe, and then this place is covered with a decorative part in the form of a ring. There are other elements that you can take advantage of. When the tabletop is fixed to the wall, corners are taken, including reinforced ones. The color of the corner should match the pattern and shade of the table. At the same time, you need to install the fastening part so that it is invisible. To do this, remove a few centimeters from the edge.
The base of the tabletop can be placed on supports of any thickness
Elements that hold the shelves in weight can be placed under the solid table. If the bar is located along the plane of the wall, decorative brackets are used for fastening. A few pieces are enough for a standard countertop. The following is a brief description of the process of assembling such a structure.
One large corner or several small ones act as fasteners.
Brief job description
First, the base of the table is prepared, the edges are rounded, then it is sanded, tinted and varnished at the final stage. In addition, before starting work you will need:
- bar support;
- fixing part;
- holders.
Sanding the tabletop
First, the tabletop is placed on a support, then the corners are attached to the edge of the base. Then reinforcement with flat self-tapping screws is used. At the first stage, the work takes about seven minutes.
Attaching the table top to the wall
After the base of the rack is ready, you need to place it against the plane of the wall and mark the places where the dowels will be located. The location of the fasteners is marked on the floor. Next, a support is built according to the marks. Dowels are also placed in the wall.
The stand is placed in the selected location and secured with screws. The bar table is ready for use.
Simple bar counter
Types of construction
First, let's decide which type of bar counter is suitable for your apartment. In general, all designs are divided into varieties according to the following parameters:
- location;
- type of base.
The rest of the differences are in the little things: shape, color, etc. These parameters depend solely on your taste and the style of the room, so we won’t dwell on them. But let's look at the items from the list in more detail.
Let's start with the location. The stand can be:
- insular. This is a free-standing element of the interior that can be approached from all sides. Thus, you can set up a full-fledged bar. It looks very stylish, but is only suitable for large rooms, because this type of placement requires a lot of space;
- adjacent to the kitchen unit. In this case, the counter can be placed in two ways: either to serve as a continuation of the kitchen unit, or to be located at an angle to it (usually perpendicular). The first approach is good because it does not require a lot of free space. And with the help of a corner stand you can perfectly zone a room;
- adjacent to the wall. Most often, the long side of the rack is used for fastening. This interior element is good for its increased stability due to its fixation to the wall. In addition, the wall rack can be folded - this is an excellent method of saving space if necessary.
As for the reasons, there are two options:
- open. The base is represented by either a support pipe or legs. The space under the countertop remains open;
- closed. The tabletop is located on the body, inside of which there may be cabinets with shelves, niches for built-in appliances, etc.
The first option makes the stand visually light and airy. And the second makes it possible to save space by arranging an area inside the base for storing various things or for installing equipment.
Video - Bar counter. Installation
Rack with frame base
The tabletop can be made with mounting on a cabinet. When working on such models, you may need both standard and inclined fasteners.
Manufacturing - brief description
The main thing in this matter is to prepare the frame. It is made of wood or metal - for this you will need thin slats. Drywall is often chosen as the material for the base of a bar table. This material is inexpensive, reliable and guarantees good results.
Step 1. The work is carried out starting with the assembly of the frame. You can use profiles or wood, as in the picture. The main principle during assembly is strict adherence to verticals and horizontals. To ensure that the angles between the base and the frame are exactly 90 degrees, the quality of the work is checked by a level. After the final work on assembling the frame, the structure is sheathed with plasterboard or gypsum fiber sheets.
Assembling the frame for the bar
Making the frame stable Fastening the sheathing material
Step 2. At this stage, when the sheets of drywall have already been installed, all that remains is to apply putty, eliminating traces of the screws, as well as corner spaces. Next comes the painting stage. They use different types of paint and varnish compositions, including textured ones. Some can be directly applied to sheets, others require pre-treatment.
If necessary, the frame can be coated with paints and varnishes.
Step 3. The tabletop is attached to the counter. The design and color are selected so that there is no conflict between the final product and other furnishings in the apartment or residential building.
Tabletop fasteners
Leveling the tabletop
Finished design
Let's stock up on the necessary materials and tools
So, to start constructing the bar counter, we need to collect the following property:
- - wooden blocks with a width of at least 5 cm,
- - edged board with a width of at least 2.5 cm,
- - plasterboard sheet or fibreboard,
- -decorative ceiling modding,
- -full baseboards,
- -fasteners: nails and screws,
- -putties for working on wooden surfaces,
- -paints and sealants,
- - elements of decorative finishing.