The rustic style is very popular in private houses and cottages. This interior is as close to nature as possible, very effective and attractive, and fills the home with comfort. Lighting in a wooden house is part of the overall design, and therefore should fit harmoniously into it.
In addition, the lighting of the house outside and inside is installed in compliance with strict safety standards - this will help to avoid serious problems when operating lighting fixtures and wiring.
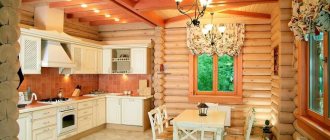
Lighting design in a wooden house
The organization of the electrical network and lighting system in the house plays an important role. Before installing lamps in rooms, on the terrace and in the yard, the wiring, power cables and grounding must be installed correctly. Only then can you pay attention to the choice of lamps, chandeliers, sconces, and other light sources that will match the overall style.
Built-in (spot) lamps, ceramic and fabric lampshades are excellent for arranging light in a log house. Wood tends to absorb rays, so their flow should be bright. The correct location of the lamps is no less important - otherwise some areas in the room will be twilight and cold, which will deprive them of comfort. Even if there are large windows in a house made of timber, you need to take care of lighting in the evening, which will require many light sources.
Modern lighting inside the building
When selecting a lamp, you need to take into account the features of a particular room - dimensions, ceiling height, wall color, number of windows. High demands on brightness are placed in the kitchen, especially when arranging a work area. It’s good if the light is close to natural, yellowish - it will not irritate the eyes.
Lighting devices should be placed not only on the ceiling, but also in the space of the sink and countertop, otherwise cooking will be inconvenient. The ceiling light is mounted at a distance of 60-70 cm from the walls; in a large kitchen there must be a central chandelier. But in the dining area, the lighting may be less bright; it is better to dim it.
In the bedroom it is worth equipping a traditional chandelier, complementing it with a floor lamp or sconce. The latter help direct the flow of light, which is important during reading and other activities. As for the central chandelier, the light from it should be diffused so as not to interfere with rest and relaxation. The lighting in the nursery is done in a similar way: in addition to the main light source, they purchase table lamps, sconces for studying and playing.
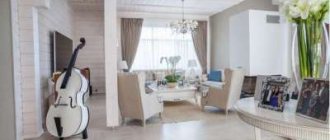
In the living room, lighting is organized depending on the needs of the household. So, for reading, you should install a floor lamp near the coffee table; for holidays, it is important to have a central light source with adjustable power. Spot lights on the ceiling will help supplement the brightness of the light flux. In a room with low ceilings, it is allowed to use only local lighting - lamps and sconces.
The hallway and stairs should also be well lit. In addition to standard ceiling lighting, you need to highlight the mirror area. The lighting design in the area of paintings and vases looks good. On the stairs, bright, but not blinding light will be the key to safety, especially if there are children in the house.
Lighting of the cottage area
A log house always has a yard, even a small one, and at night the area also requires lighting. It performs two functions – decorative and security. But you shouldn’t install overly powerful lamps, because thanks to them everything that happens in the yard will be clearly visible from the street. It will be impossible to see what is going on outside the perimeter.
Street lights, lamps, and LED strip will highlight the beauty of a log house, highlight design ideas and hide flaws. The lighting can be turned on and off in the standard way - manually, but you can also use motion sensors that are automatically triggered when you enter the yard. Having mounted them, you can highlight the perimeter, gates, paths, and recreation areas when required.
Lighting of the local area
Having a house or cottage often involves adding a veranda, attic, or terrace. During the day there is a lot of light, and in the evening you can create beautiful illumination that will decorate both the house and the territory. On the open veranda, devices with increased protection from moisture and dust are used - lanterns, sconces, which are mounted on beams and columns. Also, the surrounding area can be illuminated with solar-powered LEDs and radio-controlled lamps. The stairs from the veranda to the street are illuminated with spot lighting, and elements powered by the sun will be the most advantageous.
In the attic and other adjacent areas the following types of lighting can be used:
- flood – looks good on the facade of the building, emphasizing its beauty and uniqueness;
- accented – used to highlight individual elements, fragments;
- contour – emphasizes balconies, railings, roofing;
- hidden - highlights protruding parts or recesses of the facade, landscape.
Tip 4. Taste the white color
White is the most popular and trendy color in the interior at the moment. And for good reason, because it is universal, visually expands the room, and goes well with other shades.
Moreover, white will never go out of style. But, despite all the advantages, this color must be treated with caution so as not to overdo it.
Here are some examples:
- You can use contrast in countertops or appliances by choosing black models. To smooth out such a strong contrast, gray tones are suitable.
- Light wooden facades + white trim + black metal lampshades - a bold combination that will amaze with its originality.
- If the kitchen is large, then red brickwork will dilute the white background. At the same time, this will emphasize the naturalness of the wood. To make the interior balanced, it is better to make the ceiling and walls also white.
- You can leave only the finishing white, and choose the facades themselves, for example, a deep gray color. In this case, it is better to choose an apron with some interesting and bright ornament.
- If you have already purchased a set of chic brown shades, but you are afraid of getting a room that is too dark, then you just need to paint the walls white. To reduce the level of contrast, it is better to use fresh colors in the apron - light blue, mint, turquoise.
Wiring Requirements
Wood, unlike plastic and metal, is a highly flammable material. Floors and walls made of wood can catch fire from a short circuit in the electrical circuit cables, so when installing wiring you need to minimize the likelihood of such problems. Here are the basic requirements for wiring in a wooden house:
- use modern copper cables, always with a reliable sheath and grounding;
- insulate hidden wiring in non-flammable material (preferably in a metal pipe), do not use plastic corrugation;
- If possible, install open wiring;
- do not allow the load on the cable to exceed that for which it is designed;
- have a residual current device in the house;
- do not buy devices, cables, lamps, other devices and materials of low quality and questionable production.
Beauty must be wise!
Garden hanging chandeliers on a wooden base photo
Wooden chandeliers and lamps can be produced in small productions, the owners of which are often somehow involved in the design themselves. Or they can be made to order by a craftsman. Handmade will, of course, cost more, but you will get one hundred percent exclusive, created taking into account your tastes and wishes.
Wooden chandelier Omnilux OML-52003-08 from rags
DIY outdoor wooden chandeliers
What if you try to make a wooden chandelier yourself? A model that isn't too complicated might just be something you can do! And there are so many benefits: money is saved, the interior is completed, the creative impulse is realized, and the other half does not hide his admiration for you... However, any wooden model of a chandelier is worthy of living in your interior. Be trendsetters, not followers of fashionable interior design!
Lamps and chandeliers made of natural wood are no longer a novelty today. The popularity of this exquisite piece of furniture is growing every year. Of course, because wooden chandeliers will help you easily create a cozy atmosphere in a cafe or restaurant, museum, country house and even in an apartment.
“Dream House” will tell you about the types of wooden chandeliers and lamps, their use in various interior styles, the advantages and disadvantages of natural materials and the features of choosing such chandeliers in this publication.
Wiring options in the house
According to standards that electricians know very well, wooden houses have open wiring - cables are placed on the outside of the walls. However, due to the poor combination with a beautiful interior, home owners prefer to install hidden wiring (cables are in the wall), although its installation is much more difficult.
A cable routing diagram should be drawn up at the stage of building a house, otherwise you will have to dismantle the walls and then carry out repairs to the room. Possible cable placement options are discussed in detail below.
Hidden wiring
It will be necessary to lay hidden cables if the walls are lined with clapboard, plasterboard, or other finishing materials from the inside. There are many risks when installing hidden wiring cables, so you should not do the work yourself. The cables are placed between the wall and the cladding; leaving them unprotected is strictly prohibited! The wiring is hidden in metal pipes, which provide the most reliable protection against short circuits. The ideal option is to use copper pipes, but they are very expensive.
The following requirements apply to pipes for insulating wiring cables:
- the presence of an internal anti-corrosion layer;
- installation at an angle for free drainage of condensate;
- connection to the grounding circuit;
- the presence of plastic bushings at joints and sharp cuts;
- absolute tightness of joints.
All other methods of installing hidden cables violate fire safety standards. Thus, metal hoses and PVC pipes cannot be used to insulate wiring. If there is a short circuit in the cable, a fire may occur, which will lead to a fire, because dust accumulates in the voids of the wood. You should not rely on high quality wires - microcracks can form over time in any cables. Also, in private homes there are often mice and rats, which can damage corrugation, plastic boxes and expose wires.
Open wiring
The open method of laying cables has many advantages. Since they are always accessible, any malfunction can be eliminated without much expense or the need for major repairs. The only downside is that hanging cables are unaesthetic, so they are covered or secured with special devices:
- boxes, or cable channels - match the color of the walls, there are even models with patterns of different types of wood;
- electrical skirting boards - have core clamps, are very convenient to use, but are expensive;
- insulating rollers - ceramic elements that hold wiring, suitable for retro, vintage style interiors, for houses made of rounded timber;
- staples are the cheapest option for fastening cables, but they are more suitable for cottages or outbuildings.
Radiobus
Wireless technologies allow you to reduce the number of cables. For wooden houses, modern radio bus systems are often used, which can be installed even after the renovation is completed. These systems are also called “smart home”; they involve transmitting signals via radio channels.
There is practically no need for cables. Switches are placed on walls and can be easily moved to other places. All other electrical equipment will be placed under a special shield. The disadvantage is the very high installation price - several hundred thousand rubles.
Advantages and disadvantages
The undeniable advantages of wooden lamps: • environmentally friendly raw materials, the product is absolutely hypoallergenic; • ease of processing and installation; • presentable colorful design; • high strength. Among the disadvantages: the flammability of the material, the need for certain temperature conditions and humidity parameters, and the possibility of damage by insects.
To avoid the effects of negative factors, the product is coated with a special composition. Impregnated with the necessary substances, the tree is not subject to delamination, ignition, deformation and damage by insects.
Tip: it is better to use LED or energy-saving lamps, as they heat up less during operation.
The best option for a wooden lamp in the interior is a living room or bedroom. In rooms with high humidity (kitchen or bathroom), it is still better to use appliances made of other materials. Wooden products in a damp room require more careful care, but still lose their former luster over time. When exposed to moisture, the material may shrink or swell.
Preparation of a power supply project
At the stage of repairing or even building a house, you should prepare a project for its electrification. For this purpose, the owner is obliged to write an application to the regional office of Gorset, which will be reviewed by specialists. Then they will draw up a contract and technical conditions. Next, you can prepare a project that takes into account a number of standards. Main parameters reflected in the project:
- power of network cables - calculated taking into account the availability of electrical appliances, 30% is added to the figure for reserve;
- wiring cross-section – for all groups the type and cross-section of conductors is indicated;
- a specific layout of electrical points - it reflects sockets, panels, distribution box, entry point of the main cable and other data;
- distance of electrical points from the floor, ceiling, doors and windows.
It should be remembered that wiring can only be laid vertically or horizontally, and the angle of rotation of the cables must be 90 degrees. Access to sockets and other points must be free. Recommendations for calculating the number and installation of electrical points are as follows:
- switch height – 80-150 cm from the floor;
- height of sockets – 50-80 cm from the floor;
- number of ceiling lamps – one per 10-15 sq. m;
- number of sockets – one per 4-6 sq. m;
- power of the main distribution board - from 15 kW, presence of an RCD;
- the minimum distance of the cable from the openings is 10 cm;
- cable distance from metal elements – 15-30 cm.
Stages of work when laying cables
To correctly install wiring in a log house, you need to carefully read the information or invite a specialist.
Selecting Cables and Devices
To create a local network, cable types such as NYM and VVGng are used. The first is a power cable made according to European standards. It is allowed to be used for networks with voltages up to 660 V. The second type of wiring is a bare power cable that has durable vinyl insulation. It can operate in networks with voltages up to 1 kW.
You should also decide on the cable cross-section. The required markings can be seen on its braid. The first number means the number of wires, the second is the cross-sectional area of the conductor in square millimeters (for example, 3 x 1.5). To calculate the minimum cross-section of the power cable, you need to clarify the information in special tables (available on the Internet). Typically, 2.5-4 mm three-core copper cables are used for sockets. For lamps, a cross section of 1.5-2.5 mm is sufficient. You should not buy aluminum wiring; it heats up more than copper wiring, so it is not suitable for wooden walls.
In addition to wiring, you should purchase an RCD - a residual current device, as well as circuit breakers in accordance with the future voltage in the network. Sockets are purchased taking into account the power of the devices. As a rule, grounded outlets that can withstand a current of 16 A are sufficient.
Selection of input cable and automation
Before purchasing a cable, you should also calculate the total power of electrical appliances in the house. This will allow you to identify the expected load on the network. When purchasing, you need to make a reserve of at least 25-30%, otherwise the house may be de-energized at maximum load. The machines are selected taking into account the current strength in the network.
Single-phase power network
Most often, single-phase electrical networks are used in wooden houses. The voltage in them is 220 V, the frequency is 50 Hz. Cables for such networks must be three-core (with grounding) or two-wire (without grounding). In this case, the power cable is supplied from the local substation to the distribution panel.
Selection of lighting devices
The selection of lamps, lamps and other lighting devices is carried out on an individual basis. Usually chandeliers are hung in rooms, which are complemented by spotlights, sconces, floor lamps, and LED strip. In small rooms, the absence of a central lamp is allowed.
When purchasing, you need to be guided by the required level of illumination - for every 5 square meters. m should have 100 W of light power (we are talking about ordinary incandescent lamps). Instead of the cheapest light bulbs, you can use fluorescent ones, but LEDs are more profitable. Despite the high price for one product, they are economical, as they last for many years and consume a minimum of electricity.
Installation of switches
One of the basic rules in installing any type of switch, lighting or automatic, is that it is always placed on a phase wire. It would seem that what a difference it makes - after all, if you install a switch on the neutral conductor, the circuit will still be open and the light will go out.
There is a difference. Let's say the switch is installed on the neutral conductor. The light bulb in the lamp burned out and needed to be replaced. Your first step is to flip the switch, disconnecting the circuit, and calmly unscrew the faulty light bulb in full confidence that there is no current in the circuit (the light bulb is not lit). However, if the circuit is broken at zero, the voltage in the phase wire does not go away. Having accidentally touched the phase contact in the cartridge, a person instantly becomes a freshly baked zero, that is, he gets an electric shock. If the TPG contacts the lamp body as a result of a breakdown, then touching such a device may be the last.
For an analogy, we can give an example with a water pipe: having turned off the tap, the would-be plumber begins to drill the pipe before the tap, and not after. As a result, a fountain of water will come out of the pipe, although not a drop will flow out of the tap.
Connecting wires inside a distribution box, when the power for sockets and lighting comes from one common cable
There is always one wire going to the switch, which opens and closes inside the switch. From the outside it looks like there are two wires. This is easy to explain - the phase conductor forms a loop that goes down or up to the switch. At the top, the loop is cut and the ends of the disconnected wire are connected to the switch contacts. Now, by clicking a key, you can connect and disconnect the circuit. The wire becomes 3 if the switch is two-key. Current flows in through one conductor, and out through two. One key breaks one line, while the second one works. Accordingly, a three-key switch will have 4 wires - 1 for input and 3 for output.
As an example, you can show how wires are installed in a chandelier with several light bulbs. Let's say there are 5 light bulbs in a lamp. It is required to install a two-key switch so that when you press one key, 3 light bulbs light up, and when you press the second, 2. Almost every chandelier has a block in the bowl through which the wires are connected. A phase wire is inserted into this block on one side, and a cable on the other end, which branches into 3 - according to the number of connected cartridges. The second phase conductor is connected in the same way, only it branches into 2 wires. Neutral wire 1, and it, joining the second contact of the cartridge, is combined into an outgoing conductor. In order not to remove individual wires from the outer shell, a regular two-core wire is used to supply and drain current to the switch, a three-core wire to the two-button switch, etc.
Wiring diagram for a chandelier with 5 bulbs and a two-key switch: 0 - zero; ph—phase; 1 - chandelier; 2 — connection box; 3 - two-key switch; 4 - connecting terminals
If you install a dimmer as a switch, then the first thing you should pay attention to is what power it is designed for. If the dimmer says 300 W, it means it is designed for a chandelier of 5 bulbs of 60 W each
There are devices for home use with a power of 1000 W. With the help of such a dimmer, you can change the lighting level in several rooms at once. The dimmer is installed in the same way as a regular switch. The only difference is that on the contacts of the dimmer there is a designation indicating which wire to connect to which contact. The correctness of its operation depends on this. The contact for the incoming wire is designated by the Latin letter “L”.
Example of using pass-through switches (switches)
DIY cable installation - instructions
The technology for installing wiring cables includes several stages. For work you will need screwdrivers (simple, Phillips), drill or screwdriver, indicator screwdriver, rubberized gloves.
Installation of distribution panel
A distribution board is needed for installing the power cable and further distributing energy through the wiring. The panel is responsible for accounting, normal operation and safety of the entire electrical system. The device is sold ready-made; externally it is a box with a door, inside it has a DIN rail and a grounding bus.
The shield is mounted vertically 1.2-1.5 m from the floor, preferably on a very strong wall. Markings are applied to the base, holes are drilled along it, and the shield is attached to the screws. Then a residual current device, a counter, and machines connected to each other by jumpers are placed on the DIN rail. The necessary cables are supplied along each line.
Cable entry into the room
The cable is brought into the house underground or by air. It is better to use the first method, placing the wire 40 cm underground. 20 cm of sand is placed in a trench 80 cm deep, then a protective corrugation is installed through which a special cable is laid. Afterwards, another 20 cm layer of sand is made and the trench is covered with earth. If you decide to run the power cable over the air, you need to install supports at every 20 m distance. A non-flammable sleeve is placed in the wall at the cable entry point.
Installation of overhead switches and sockets
Before installation, you need to remove the switch key and the front panel and remove the mechanism. Place the back of the device against the wall and make a level mark. Drill holes with a drill and secure the body with dowels. Strip and connect the cables - phase to phase, zero to zero, ground to ground. After fixing the terminals, you can return the front panel to its place, completing the assembly of the device. Sockets are attached in the same way.
Connecting cables and contacts
The use of twists when installing wiring is not allowed - in wooden walls this can cause a fire. It is best to use whole pieces of cables. If this is not possible, cut off the cables with a margin of 20 cm, and use high-quality terminal blocks (terminal blocks) for connection. They have pressure plates or screws, the former being considered more suitable. The cables are inserted into the terminals, pre-stripped, after which they can be laid in the wall.