The need to make your own sofa for the kitchen with your own hands arises when there are no suitable models on the market or the dimensions of your furniture are non-standard. If you are ready for large financial expenses, then call a specialist. But if you spend a minimum, it’s better to make it yourself.
Interior of a modern kitchen with a red sofa.
First of all, you need to choose a design:
- Straight sofa - has a simple structure of a solid frame, partially or fully upholstered. Variations are possible with or without armrests, niches and additional shelves. Folding upholstered furniture will allow you to get additional seats at any time.
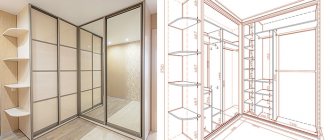
- Corner sofa - it is used in most cases. Since it can be installed in hard-to-reach places, it saves space. You can use legs made of wood or metal, or you can remove the legs and get a niche under the seat. A sofa with soft inserts will be cheaper, but a fully upholstered one will look more comfortable and richer.
Design of a straight sofa for the kitchen.
Peculiarities
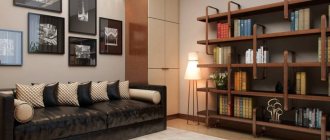
Modern layouts provide kitchens with a fairly large area, but even here the sofa will fit well into the interior. This can be a sofa with storage space for kitchen utensils or a full-fledged sofa with an extra bed. The assortment of furniture stores includes sofas for every taste and in different price categories.
But, despite this, it is not always possible to choose something that will harmoniously fit into the interior of the kitchen and suit you in terms of quality and price. A solution in this situation could be a homemade sofa. You can make with your own hands exactly what fits perfectly with the existing design.
This task seems difficult only at first glance. To make this type of furniture, no special equipment is required. By following the instructions, you can easily cope with this matter.
A homemade sofa for the kitchen will allow you to:
- save your budget;
- select quality materials;
- choose the best functionality that meets your needs.
What's so good about a homemade sofa?
It should be noted right away that making a corner sofa is not a very complicated process. Anyone with a minimum level of training in the furniture manufacturing industry can handle it well. In addition, this task does not require the use of overly complex professional tools. A sofa in the living room, made independently, will even surpass in quality some of the proposals found in the modern furniture industry.
What are the advantages of making it yourself?
- Significant money savings. A product made by yourself will cost you at least three times less than a ready-made analogue from a furniture showroom.
- By making a corner sofa with your own hands, you guarantee the strictest quality control.
- You are absolutely free to choose the design, shape, size and color of future furniture.
- The manufacturing process itself is very exciting - so it will bring you a lot of moral pleasure.
Deciding on design and construction
Before you make a sofa for the kitchen with your own hands, you need to decide on the design:
- A straight sofa is a simple piece of furniture with a solid frame and partial or full upholstery of the body. It can be with or without armrests, include niches under the seat and additional shelves. Straight folding upholstered furniture is popular, allowing you to organize additional sleeping places at any time.
More often they use a kitchen sofa with a corner design. It saves space, as it involves installation in the most unclaimed places in the room.
The choice of sofa design for the kitchen is based on the interior of the room and the tastes of the owners. You can create a bench with ready-made purchased legs made of wood or metal or include them in the drawing of the side faces, or you can exclude the legs and thereby get a deeper niche under the seat.
The upholstery methods themselves also differ in design. A sofa with soft inserts will cost less. Fully upholstered furniture looks much cozier and richer.
Sofa with sleeper
Kitchen sofas are primarily designed for sitting. The depth of such a product does not exceed 50 cm. This is not enough to lie down. To solve this problem, manufacturers equip straight and corner kitchen sofas with a transformation function or hide the sleeping area inside the furniture.
The main distinguishing characteristic is the transformation mechanism:
- Roll-out is the simplest. Allows you to roll out the lower block of the sofa and expand the soft area.
- The book is the most common mechanism with a lowering sofa back.
- Dolphin - a sleeping place is created by pulling out the lower sofa block.
- Accordion is the most compact sofa. Does not require additional space behind the back. Folding out consists of two stages: pulling out the seat and placing it in the resulting niche of the backrest.
- Click-klyak is an improved book. Allows you to further lower the side parts, so the finished product can be much smaller than the standard.
When choosing the design of a corner sofa for a kitchen with a sleeping place, special attention should be paid to the quality of the sliding mechanisms, the strength of the fastenings, and the absence of visible defects, otherwise the furniture will not last long.
If creating a kitchen sofa requires the presence of a sleeping place, the best option would be a folding bed built inside (meralat folding mechanism).
Kitchen sofa of non-standard sizes
A radical redevelopment of the apartment can lead to the fact that the dining nook offered by the manufacturers does not fit into the kitchen. In such cases, it is advisable to order custom sizes, but such a purchase can hit the family budget hard.
In order to reduce expenses on an additional piece of furniture, the owners decide to make a kitchen corner with their own hands. If you approach the matter wisely and patiently, creating an original sofa will not take much time and effort.
With storage box
When making a corner sofa with your own hands, you should not neglect the opportunity to provide it with additional storage space for rarely used kitchen utensils.
For this purpose, a special cavity is allocated in the body of the future corner, into which a retractable mechanism is built in and a spacious drawer is attached.
Fastening the seat to wide curtains makes it possible to lift it and access the internal spaces of the sofa parts.
A variety of ideas for home crafts
There are a large number of technological techniques for home crafts that can make the interior not only more decorative, but also functional.
By connecting the ends of thick branches together, you get a hot stand. Such a product can even be made from paper folded in several layers. The resulting strips are glued together in a spiral or formed into products in the shape of a square, rhombus, or rectangle.
Even photocopying techniques are available for home crafts, allowing you to transfer designs onto fabric. The design is attached to the fabric requiring renewal with the front side. On the reverse side it is pressed with an ironing press or iron until the image is completely transferred. All that remains is to dry and iron the product.
- Unusual vases are made from an ordinary beautifully shaped glass bottle. To do this, the outer surface of the bottle, in a spiral, needs to be tightly wrapped with decorative rope, fixing it with glue.
If you don’t want to bother with rope and glue, you can paint the bottles in bright colors, decorate them using the decoupage technique, or make an interesting painting on them.
- Concrete, plaster and clay certainly provide room for creativity. These materials are used to make unique stucco elements for interior decoration. They are also used to create beautiful garden lamps, original vases, fancy candlesticks, exclusive figurines and other decor.
- Such handicrafts can not only become an excellent decoration for your home interior, but also be useful in everyday life. For example, for safe movement around the local area at night, garden lights can be placed along paths and paths.
Homemade crafts are a fun activity. From the variety of ideas, it is easy to choose an option suitable for a specific interior in order to add a touch of individuality to it in the form of an original home-made product.
Try, experiment and you will definitely succeed.
Coziness and comfort in an apartment largely depends on the quality of the furniture. Exclusive furniture made independently has undeniable advantages. Therefore, the question of how to make a beautiful, high-quality and reliable corner sofa with your own hands is relevant for many.
Drawings and diagrams
The work begins with the creation (after having familiarized yourself with the kitchen corners presented by the manufacturers) of a furniture project in a single copy; you need to analyze what the end will look like, parts with upholstery, and the shape of the finished product.
The most important part of designing a kitchen sofa:
- correctly determine the location;
- take measurements;
- Based on the data received, create drawings and assembly diagrams.
The proposed ready-made options differ from the required dimensions, so the drawing will have to be drawn from start to finish, using the existing ones as a basis:
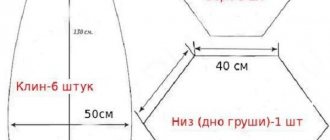
- The width of the walls near which the corner will stand (the width of both parts minus 40-50 cm is taken as a basis, depending on the depth of the seat). Calculations are needed to compensate for the dimensions of the connecting part.
- The height of the seat and backrest is determined if it is necessary to deviate from the standard dimensions.
- The front lower part of the body is attached at an angle for a comfortable position of the legs. It will be slightly larger than the back panel. This also needs to be taken into account.
- Depending on the thickness of the material used, the width of the main parts of the corner is reduced.
- Based on the data obtained, the size of each individual piece and the amount of required material and fittings are calculated. An exact drawing of each individual element is drawn.
The diagram will later help you figure out how to make a sofa for the kitchen with your own hands, tell you the position of the parts, fastening points, and determine the procedure.
Preparatory stage
First you need to think about the design and functionality of the future sofa. If you haven’t had to make furniture yourself from scratch before, you shouldn’t immediately come up with a complex design with many elements. We give preference to the standard and convenient model.
An ordinary sofa necessarily has a frame or frame - this is its skeleton, which gives shape and rigidity. You can use legs or a roller mechanism as a support; there is a wide choice in furniture fittings stores. If additional storage space is needed, we plan folding seats and drawers underneath them. We also decide for ourselves how soft or hard the sofa should be.
It is important to decide on the size at the planning stage so as not to overload the space. And decide which shape of the sofa is suitable, taking into account the location and dimensions of the kitchen: straight or corner.
The direct version is a classic, suitable for small spaces and has a simpler design. The corner model has a large number of seating areas and allows for efficient use of space.
The direct purpose of a kitchen sofa is a place to sit. In order to more fully use the space, especially when it is in short supply, we will add additional options to the furniture:
- storage niches under folding seats or drawers;
- a sleeping place for guests if you make a folding sofa (this is a more complex mechanism);
- additional shelves or tabletop in the corner section: here you can place magazines with recipes, household appliances or flowers.
Upholstered furniture production technology
Let's analyze the production technology of upholstered furniture based on the most popular product - a sofa with a mechanism for transforming into a bed. It consists of the following parts:
- the frame is the main structural element to which other parts are mounted. It is subject to increased operational requirements, since it bears the main load and is the basis of the entire product.
- soft elements. The function of soft parts can be performed by spring mechanisms or elastic fillers.
- accessories for transformation into a sleeping place.
- textile upholstery.
Technological stages of production of a folding sofa:
- In the carpentry department, wooden materials (mostly plywood is used) are cut into blanks using mock-ups. The cross-cutting machine performs cutting operations along the length, and the plywood is cut widthwise using circular saw equipment. Next, the part undergoes a grinding process on a four-sided grinding machine. The grooves are cut using tenoning equipment.
- At the assembly site, individual parts are assembled into a three-dimensional structure. The transformation mechanism is installed.
- In the upholstery shop, the frame is covered with rolled materials. First of all, the plywood base is compacted with a special non-woven fabric - darnit. This is an important operation that will help avoid the appearance of squeaks during operation of the product. Next, the sofa is covered with thick foam rubber and covered with upholstery fabric.
- If necessary, spring blocks are installed to give the product orthopedic properties. The perimeter of the product is treated with foam rubber to prevent contact with the rigid frame.
- To protect the upholstery from the effects of the spring block, dense lining materials are used.
Usually this is coconut bark, spangon, less often foam rubber. It is cheaper to use foam rubber or spargon. These are re-foaming materials, they are less durable, and over time the sofa may sag. Coconut bark is used in higher-level products; such a sofa will last much longer. - Afterwards, a layer of 40 mm foam rubber is laid on the layer of lining material. To allow the structure to breathe, a layer of synthetic padding is placed between the upholstery and foam rubber.
- In the sewing area, upholstery fabrics are cut. To do this, use specialized sewing equipment for working with dense fabrics.
- The sewn individual elements are placed on glue and shot to the base with a pneumatic gun.
- For ease of transportation, the product is packaged in plastic film and delivered to the finished product warehouse or directly to the customer.
Materials used
The kitchen places special demands on the quality of furniture. There is high humidity and splashes of fat during cooking. Therefore, you need to consciously approach the choice of materials.
Frame
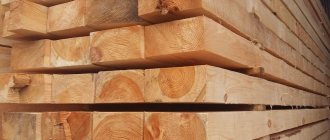
There are no special requirements for the frame material. It is better, of course, to use natural wood, which will increase the service life of the product, but will also significantly increase its cost. Budget options use bars and plywood. Decorative parts can be made of chipboard. You can match these elements to the color of the kitchen set to complete the composition.
The legs and back should be more durable; bars measuring 60x60 mm are suitable for them. It is better to use moisture-resistant plywood with a thickness of at least 12 mm. Angles and screws are used to assemble the frame. The only requirement for them is increased strength, since the finished product is subjected to constant loads.
Upholstery
It is very unpleasant if, after a fish dinner, the sofa exudes the corresponding aroma for a long time, so the upholstery material should not absorb moisture and odors. Besides the smell, another enemy of the kitchen sofa is grease. The upholstery material should be easy to wash and not be afraid of cleaning agents. The upholstery should be made of dense material so that it does not tear or deform during use.
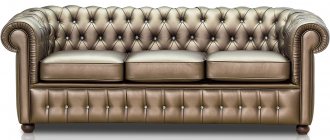
Artificial materials meet these requirements. For additional protection, you can sew a cover that is always easy to remove and wash. And changing the cover is easier and cheaper than restoring a sofa and reupholstering it. Leather also meets the necessary requirements. Such a sofa looks noble and elegant, however, it will cost more.
Budget upholstery options:
- cotton is a natural dense material;
- flock is a practical, durable material that does not require special care, animal hair does not stick to it, and holes from their claws are invisible on it;
- jacquard - dense material, wear-resistant, does not fade in the sun;
- velor is an inexpensive, beautiful fabric, but it wears out quickly, easily absorbs moisture, dirt and grease, and loses its appearance due to frequent cleaning;
- artificial leather does not fade, is easy to clean and is not afraid of sunlight.
Luxury materials:
- microfiber is a very durable material with Teflon impregnation, due to which water is repelled, the fabric is resistant to abrasion and contamination;
- tapestry is a natural fabric that is highly wear-resistant;
- chenille - the threads of this material are fluffy, which creates a special texture; the fabric does not require complex care;
- genuine leather is an expensive material, but it will last a long time, does not require special care, but you should not rub it too much, otherwise the area may become lighter.
Filling
Many materials are used as filling: padding polyester, foam rubber, batting, holofiber, felt. We select the thickness of the material based on the requirements for softness. A semi-hard sofa has a filler thickness of 5 cm, so if you want something softer, you should do more. If the requirements for the rigidity of the sofa in the family differ, you can make the thickness of the filling minimal and additionally sew pillows.
Unprotected wooden parts need to be painted or varnished. You can also cover the sofa with fabric where possible. Laying the filler in layers allows you to create an orthopedic effect.
Mechanism
If you are planning a folding sofa, then you need to select the appropriate mechanism.
- The accordion is suitable for limited space. In this version, the seat moves forward and the backrest falls into its place.
- The book is a frequently encountered mechanism; such a sofa unfolds like an open book. It is compact and easy to assemble.
- Click-clack – this mechanism is similar to the “book” option. Convenient to use in small spaces. The mechanism allows for the possibility of lifting both parts.
- A roll-out mechanism is the simplest option. When using it, the lower part of the sofa rolls out and the sleeping place rises out of it. It is quite possible to make such a design yourself.
- Dolphin - the mechanism involves pulling out the lower block. One of the simplest folding options.
Get to work!
Which corner of your kitchen is best suited is up to you. And here we will see what difficulties you will encounter when making it at home without experience, and how to cope with them. The analysis will be based on the example of a design known in RuNet, the drawings of which are given below; The main materials are laminated and simple sanded chipboard with a thickness of 16 mm.
Drawings of a kitchen corner made of laminated chipboard
Specification for kitchen corner drawings
On the one hand, this corner requires minimal materials and labor and can be made much more convenient, see below. On the other hand, the prototype is oriented towards industrial technology, its design is rational and well-developed, but we need to get a product no worse than that, assembling it at home on the knee and in weight. This particular sample was also chosen because it is capable of acquiring all the best qualities of a corner with a beveled corner, plus the ability to serve as a sleeping place, but technologically it is not much more complicated than a right corner. In addition, there is a generally correct specification for it with statements of material and fittings, see fig. on right.
Note: if you check/refer to other sources with descriptions of this sample, keep in mind that in some of them, and quite a few, in the drawings of the parts the dimensions are given mixed for sofas with a length of 100 and 60 cm. Assemble the blanks cut out from them into the product, of course, impossible.
For example, in the top row of Fig. Assembly diagrams are provided with the drawings, clear as day to a factory technologist. But what to do with them if you don’t have production equipment? The sample under consideration is a panel box-shaped structure, similar to the power circuit with load-bearing skin in the aircraft industry. Box-panel structures save material and labor as much as possible, resulting in very durable products, but their manufacturing technology is subject to a number of specific requirements. There are a lot of invisible tricks here, but we can deal with them, and we will do it. First for the sofas, in this order:
- Selection of fasteners;
- Adjusting dimensions for a specific room;
- Cutting laminated chipboard and chipboard into blanks, marking and drilling holes;
- Trimming the edges of beveled parts and edging;
- Covering the parts for which it is required with soft covering;
- Assembly.
Next, let's see how we can simplify the manufacture of a corner section (corner) and make it more convenient. The original design is modular, but in our apartment the corners of the walls do not change places by themselves. Knowing exactly where the corner will go, whether it will be right or left, the corner can be made hanging (see below), and this will make the work much easier and cheaper.
Fasteners
The main fastening elements of this kitchen corner that absorb operational loads are confirmed furniture screws and steel corner connectors; dowels play a supporting role, keeping the parts from moving. The specification above contains a list of accessories for assembly in an industrial environment, but for home use, some things will have to be changed in it.
Note: in products made from laminated chipboard and chipboard, it is possible to replace confirmats with wood screws to connect parts through the face into the edge occasionally. In this product - under no circumstances is it possible, because... the boards are very thin, 16 mm. The connecting corners are attached to the parts using wood screws, see below.
Confirmations
The standard size of confirmats 7x50 specified in the specification is the maximum permissible for a given chipboard/laminated chipboard thickness. This makes it possible to transport the corner modules in assembled form and reduce its cost somewhat, because there is no need for on-site assembly, and any of the modules is carried into the apartment by hand by a person with the physical development of an office type. But marking and drilling for the thickest possible fasteners also requires production precision (see below), which cannot be achieved by working at home with your hands. For example, can you, when working with a hand-held electric drill, feed the drill perpendicularly or parallel to the face of the board with a deviation to the side of no more than 0.1 mm? The question is rhetorical. Therefore, for manual work, provided that the product will not be transported over long distances with shaking and jolts, the size of the confirmats should be reduced to 6x50 or even 5x60. Otherwise, i.e. If you take fasteners according to industrial specifications, some of the parts may delaminate during drilling or assembly. If the chipboard/chipboard is taken from eco-friendly brands E0 or E1, then it will definitely delaminate, so the chipboard/chipboard should be taken from the household brand E2, and if you want E0/E1, then the thickness of the boards needs to be increased to 24/20 mm, adjusting accordingly. dimensions, see below.
Fasteners and connecting elements for the kitchen corner
The height of the screw neck H is important for the strength of the confirmed connection, see pos. 1 in Fig. H must be exactly equal to the thickness of the overlay board, on the right in pos. 1. Sometimes H is indicated by the 3rd digit in the name of the screw size, i.e. you will need confirmations 6x50x16 or 5x60x16 for the original structure or 6x50x24/6x50x20 or 5x60x24/5x60x20 in the case of using boards of greater thickness.
The confirmation drill must be taken exactly for the given screw size. The height of its skirt should be equal to H (in the center in position 1), the diameter should be equal to the diameter of the screw body without thread, and the length of the spiral part of the drill L (without cutting tip) should be equal to the full length of the threaded part of the screw. If the heel of the screw rests on the residual conical hole in the hole, then hidden delamination in thin boards is guaranteed, and it is only a matter of time before it spreads outward. Small.
Dowels
In all sources on the topic of the kitchen corner in question, photos of wooden dowels are given as illustrations with enviable consistency, but without proper understanding. This is a gross mistake in this case. Wooden dowels are designed for connecting wooden parts: they dry out along with the base material, and the connection remains strong for many years. Or centuries, if the furniture was made by an outstanding master.
Chipboard/chipboard do not dry out and are therefore connected with plastic dowels. If you take slightly more expensive propylene ones, then there is no need for rather labor-intensive and careful gluing of joints. For the reasons stated above, the diameter of dowels for manual production must be reduced to 6 mm, leaving their length the same. In the edges of the boards, holes for dowels are drilled only along the jig (item 4 in the figure); diameter - 5.3 mm, drilling depth 22 mm in the edges and 12 mm in the faces.
The seats (see below) can be made not folding, but removable, by placing them on dowels with round heads for detachable connections (above, position 2). This will allow you to avoid the rather complex installation of piano hinges, the costs of them and fasteners for them. And if they decide to rearrange the corner in a hurry, then the likelihood of damage to it is reduced: they grabbed the seat without thinking, it remained in their hands, and the sofa did not jump or hit anything. Getting something out of the chest under the seat on piano hinges is no more convenient, because... The seat cover reclines less than 90 degrees. It’s easier to remove it and lean it against the back than to rummage through the chest while holding the lid with your hand. But in the design under consideration this, unfortunately, is impossible, see below.
It is better to take other dowels for our kitchen corner with faceplates, at the bottom at pos. 2. Washer thickness 0.5-0.7 mm; At first such gaps will not be visible. After some time, the washers will be pressed into the chipboard (the parts are tightly tightened with confirmats), the gaps will converge, and the entire product will acquire additional strength. Another advantage of dowels of this type is different corrugations on the long and short parts, which provides even higher strength of the connection without the danger of delamination of the boards. You just need to select dowels of the required size: with a 20 mm long part and a 10 mm short part (for 16 mm boards). For boards 20/24 mm, the long part needs 30 mm, and the short part 12/16 mm.
Corners
For the design in question, you will need steel isosceles corner connectors 30x20x2 (for fastening obliquely) or 30x15x2 for fastening in a row. The first number indicates the length of the corner shelves, the second their width, the third – the thickness of the material. During assembly, the corners will have to be partially bent to install inclined parts, so you need to take them white or gray from viscous “raw” or moderately annealed steel. The presence of stiffness stamping on the bend for bent corners is unacceptable, pos. 4 in Fig. The internal and external folds of the corners should be smooth, without tears or wrinkles. The corners of burnt steel, yellowish with spots of tarnish, even if they bend, will then crack. Black phosphated corners from the so-called. Overdried steel is very strong, but when bent, it breaks immediately.
Note: just so you know, plastic furniture corners can be bent by thoroughly heating them with a household hairdryer at full power. But plastic corners last no more than 3-5 years, and then they dry out and crack.
Dimensions
Let's look again at Fig. with drawings (duplicated on the right). The dimensions have been corrected: the length of a sofa 1 m long is shown in black; red and blue next to the “black” ones for a small sofa 60 cm long. The green marks will come in handy later when we get to the corner seat.
The “red” dimensions are basic: you need to add to them the missing amount of 600 mm for longer sofas. For example, for a sofa 1.3 m long, you need to add 700 mm to the “red” dimensions. The longest possible length of a sofa of this design is 1.5 m. “Blue” dimensions are relevant for sofas up to 750 mm long. If the sofa is longer, you need to take “black” sizes instead of “blue” ones.
6th position
There is no 6th part in the drawings. This is a seat blank, a simple board without any holes. Its length is equal to the length of the lengths of the sofa (968/568 mm in the drawings) minus the double thickness of the upholstery fabric, it is kept within 1-3 mm. The thickness of the optimal flock and microfiber in the kitchen is approx. 1.5 mm taking into account folds, so in this version the seat length will be 965 mm for a large sofa and 565 mm for a small one. Minimum seat width 297 mm, including fabric upholstery and installation on piano hinges, see below. If the dimensions of the kitchen allow, the width of the seat can be increased, then an overhang will form in front. With the corner seat option discussed below, the maximum width of the sofa seats is 444 mm; then the seat bevel of the corner section is reduced. In this case, the width of the bed can be up to 900 mm.
Cutting and Sawing
Sawing chipboard/laminated chipboard sheets into parts is done using a jigsaw along the contour. The contour is drawn according to the template, so the jigsaw file must be guided along the inner edge of its line. The upper and lower edges of parts 2 (chest front) and 8 (back base) in Fig. with the drawings you need to cut it obliquely, for which you need a jigsaw with a tilting shoe or you will need to buy a shoe for the existing one. The angle of inclination of the front of the chest is 10 degrees, and the back is 5 degrees. Some shoe scales are graduated in units of relative inclination; for an angle of 5 degrees it is 0.085, and for 10 degrees it is 0.177. Not 0.175, as it might seem, since the relative slope is nothing more than the tangent resp. corner.
The jigsaw file for trimming is beveled inward from the edge to be trimmed. For children 2 (facade), the upper edge is cut from the face so that the upper outer corner remains intact, and the lower edge, on the contrary, from the underside (wrong side), so as not to cut off the inner lower corner. The edges of the backrest, because it is tilted back to the facade, cut in the reverse order: the top one from the back, and the bottom one from the front.
Edging
The free edges of the kitchen corner parts need to be covered with something that matches the overall tone. Edging PVC kitchen furniture with a T-shaped edge is undesirable, not because the groove for the edge needs to be selected with a milling machine, but because dirt will accumulate in the gaps of the edge. By the way, for the same reason, it is advisable to make a kitchen table under a ready-made postforming tabletop: it does not require edging at all and is equipped with a drip tray.
The visible and touchable edges of kitchen furniture are covered with a tape made of complex ABS plastic (ABS, acrylonitrite butadiene styrene) up to 2 mm thick, and the back ones and those above the floor are covered with crepe paper tape. ABS is absolutely safe, hygienic and environmentally friendly; medical equipment is also made from it. ABS and paper edges are produced dry and self-adhesive. The first ones are intended for industrial use with a separate supply of glue, so you need to get self-adhesive ones. Edging a kitchen corner with self-adhesive edges is done as follows:
- The edge strip is cut from the roll to the required length plus 2-3 cm. It is convenient to measure the lengths of curved edges with a tailor's meter.
- Peel off 2-4 cm of protective film from the end of the segment without touching the adhesive layer with your fingers.
- Place the end of the tape on the edge exactly lengthwise and press.
- Holding the tape with your hand, with the other hand you pull out the protective film from under it by the original “tail”. The tape should lie on the edge itself.
- When the tape is all on the edge, it is rolled with a rubber roller.
In general, the procedure is the same as for high-quality self-adhesive gluing. By the way, this is a good finishing option if you decide to make the entire kitchen corner from inexpensive sanded chipboard: there are few visible parts in it, and the textured self-adhesive under acrylic varnish from natural wood will not be immediately distinguishable even by an experienced carpenter. Self-adhesive gluing is done after sawing and trimming the edges before edging. In this case, the inside of the chest can simply be varnished.
Marking and drilling
The accuracy of marking parts of box-panel structures made of chipboard/laminated chipboard is required to be no worse than +/-0.5 mm, but how can it be maintained on edges and sanded chipboard if the size of the material fibers is of the same order? There are no problems with this at the factory; there are no markings as such - they cut and drill using automatic machines. In handicraft production, they use templates, but in order to check each one, you have to ruin up to 2-3 blanks. For piece production at home, this is unacceptable, if only because you need a lot of templates and so much time is required to make them that it is easier to buy a ready-made corner. Moreover, the quality of the product made from parts marked according to templates turns out to be 3+ at best.
Marking calipers
Firstly, the marking of holes on the parts of the kitchen corner made of chipboard/laminated chipboard should be done so-called. a marking caliper with sharp jaws for measuring external dimensions and a vernier for precise installation of the carriage (on the left in the figure). Experienced mechanics sometimes make a marking caliper from a regular one, sharply and very carefully sharpening the tightly knit outer jaws on fine sandpaper, but manually align the tool carriage exactly according to Vernier is difficult.
Note: electronic booms, incl. The marking ones (on the right in the figure) are actually not so convenient to use, and the marking accuracy is worse. Here electronics have not yet caught up with good old mechanics.
Next, marking the holes on all parts is done from the bottom. When marking asymmetrical sidewalls, keep this in mind so that it does not turn out to be a mirror image. The right and left sidewalls are, of course, mirror marked.
Then, between the centers of the outer holes for fastening the mating part, axial lines are drawn into the edge with confirmations and beaten from them to the sides along half the width of the attached board. The extension of the attached part is marked along the center line and is also marked to form the contour of its edge. On the bottom of each board, you need to mark the contours of all attached edges in this way, this is necessary for accurate assembly. The accuracy of beating edges is required +/-0.5 mm, which in this case is ensured by a fitter's angle with millimeter divisions and a steel fitter's ruler.
Sverlovka
Drilling of blind holes for dowels is carried out immediately along the required diameter to the required depth, as described above. But for now we drill holes for confirmations only through the faces of the boards and only with the spiral part of the drill, i.e. not to full diameter. We will drill it completely later, in the order of assembly, so the entire kitchen corner will turn out without distortions and cracks.
Making a sofa for the kitchen with your own hands
The main thing is not to exaggerate the complexity of the assembly. Before you make a sofa for the kitchen with your own hands, you need to study all the rules and recommendations. There are many options, including long-term use and wear threshold. The main advantage of making your own is the reasonable price of the finished product, which fully meets your special desires.
Preparatory stage
First, we choose the design and functionality of the sofa under construction. If you have never made furniture yourself from the beginning before, then you should not immediately make a complex model that includes many elements. Preference should be given to comfortable and standard furniture.
An essential component of a sofa is a frame or frame. This is the internal skeleton that gives shape and rigidity to the entire structure.
For support, use legs or a retractable mechanism; all this can be purchased at furniture hardware stores. If you need a new storage space, then we make folding seats and drawers below. It is also necessary to decide how soft or hard the future sofa will be.
At the planning stage, it is important to decide on the size issue, otherwise you can overload the space. And also choose the shape of the sofa depending on the location and size of the kitchen: straight or corner.
Deciding on design and construction
First, we decide on the design of the sofa: stationary or sliding. The first one is easier to install and is perfect for beginners. The sliding design is expensive to manufacture, but very presentable. Using diagrams and recommendations, it is quite possible to make it yourself. If your dining table is wooden, then make the base and corner rails from a similar material. Original upholstery will create a unique, interesting item.
The cushioning material is selected from artificial leather or microfiber. Properly selected filling will give the seats maximum softness.
Drawings and diagrams
We begin work by creating a project. We analyze the shape of the end, the finished product, and parts with upholstery.
We use the following instructions:
- determine the location of the future corner;
- take measurements;
- We draw up a drawing and assembly diagram.
We take the following rules as a basis:
- The size of the width of the walls (the width of both walls is added minus 50 cm - this is the depth of the seat). Calculations will be needed to select the size of the connecting part.
- Choose the size of the back and seat.
- The lower part of the body is set at an angle for the best position of the legs. The front will be slightly larger than the back.
- The width of the main parts of the corner will be smaller due to the thickness of the material used.
- According to all the data, the size of all parts, the amount of material and fittings are calculated. A drawing is drawn for each individual element.
Materials used
We choose the material depending on the model, finances and type of finished product. Wooden sofas will cost more, and wood processing requires certain skills. For a more budget-friendly option, we choose the following materials:
- Sheets of plywood or chipboard.
- For the frame and lintels there is a wooden beam.
- Upholstery.
- For soft parts, filler (sintepon, foam rubber).
- Moving mechanisms and accessories.
Frame
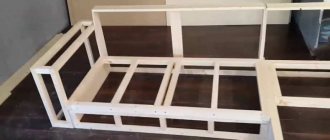
Using patterns, the side parts are made; in accordance with the drawing, the timber is cut into pieces. In the designated places, bars are attached between the armrests: 2 in the lower part - this is the base of the frame and the bottom of the drawer, 1 - in the upper part of the back. The frame is strengthened with inserts located in the middle. Everything is tightened with self-tapping screws.
Upholstery
Main characteristics: high degree of wear resistance, does not absorb moisture and odor, easy to clean.
Leather will be a luxurious material, but the price is very high. Let's consider budget options:
- Velor is beautiful.
- Cotton is natural.
- Microfiber is durable.
- Jacquard is dense.
- The tapestry is natural.
- Chenille - easy to clean.
Filling
The work is done in several stages.
- The blanks are cut out and fixed with special glue.
- The fabric is placed face down.
- A piece of furniture is placed on top.
- The upholstery is pressed and stretched and secured with staples using a furniture stapler.
- To hide the uneven edges of the fabric, a fiberboard panel is placed on top.
Required tools:
- Wood saw or jigsaw.
- Ruler, pencil, scissors, tape measure.
- Electric drill or screwdriver.
- Sander or sandpaper.
- Furniture stapler.
Manufacturing process:
- The frame is made.
- Screw the plywood blanks.
- A sheet of fiberboard is secured to the bottom of the box.
- Screw the back.
- Install the seat.
- Use soft ingredients.
Decoration:
- Replacement of the sofa area. You can change some of the wallpaper, for example, photo wallpaper with strong color contrast or with pronounced textures.
- We use prints and ornaments. These can be pillows; the easiest way to use them is with prints. You can also lay them out symmetrically in the form of a composition.
- We update the pillows. You can choose the color scheme of pillows to match other objects in the room.
- We create a cozy texture. We vary the structure: we use material made of matting or linen, plush or silk.
- We use a blanket. It will give the sofa a cozy touch.
- We replace the cover. This is the best option. This change really transforms the sofa.
- Ready-made covers can be bought in stores. You can choose different colors and modifications. If you purchase a universal cover, you can put it on any sofa using ties. Covers should be made from fabric with water-repellent properties, or better yet, ones that won’t withstand the claws of your pets.
Manufacturing instructions
Before you make blankets for the sofa with your own hands using the patchwork technique, you need to take care of a sufficient number of scraps of different colors, which, by the way, any housewife always has enough of.
- We cut 288 square pieces, the size of which should be 8x8 cm.
- We sew two squares together in the desired sequence with a seam allowance of 5 mm. All seams are pressed in one direction. We assemble the blocks, selecting colors in pairs according to tone according to the chosen color scheme. The result should be 72 squares.
- We assemble all the blocks into a single canvas, periodically smoothing the seams to the right and left.
- The result is a solid canvas made in the chosen color scheme.
Connecting all the elements of the bedspread
- Carefully iron the lining and batting and place it on a flat and clean surface. We lay the lining face down, put a layer of batting on top, and cover it with a cloth of shreds, thus creating a kind of “sandwich” of different types of materials.
- Starting from the middle and moving to the edges, we pin three layers with pins, in increments of 15-20 cm, carefully smoothing out unevenness and wrinkles.
Bedspread tie
- Tying the bedspread with mercerized thread carries both an aesthetic and functional load, so you should not rush when performing this work.
- You need to start from the central square. In the corner of the square, using a sewing needle with a large eye, we pull the thread through all three layers of the “sandwich”, making two stitches.
- We tie the ends of the mercerized thread with a straight knot and carefully trim them.
- We perform a similar operation over the entire area of the bedspread, in the corners of all squares, thereby resulting in a tightly tightened canvas.
Sewing pillows and sofa decor
When the sofa for the kitchen is ready, you can give it a little originality and decorate it with exclusive decor, which you also make yourself. How to decorate a soft corner:
- Covers will be a successful design and practical element. They will not only emphasize the style of the room, but will also serve as good protection for the main upholstery.
- You can add texture with a fleecy blanket. In combination with knitted or fur pillows you can create coziness and warmth.
- Pillows and bolsters will serve as excellent decoration and are comfortable for relaxation.
Where to put the sofa
When choosing a sofa model, it is important that after its installation there is enough space for free movement. Ideally, it should not occupy more than 20% of the total space. It is better to install a corner sofa in a kitchen that is at least 14 square meters. meters. Otherwise, you should limit yourself to a small straight sofa or completely abandon this idea.
You can install the sofa:
- Along the wall. Installation opposite the kitchen unit is a classic location for a standard kitchen.
- Along one wall with a set, it is practical to place a sofa in a long and narrow room.
- Near the window. They install small structures or a bay window sofa.
Making a sofa for the kitchen is not difficult, you just need to follow the instructions, or watch the video for clarity. You should not be afraid of difficulties - the creative process will bring pleasure, and the result will delight you with a comfortably equipped area.
How to make an original corner sofa from pallets
Instead of enamel, it is best to use stain for coating. The stain does not create an unnecessary film effect on the surface of the wood, but, on the contrary, preserves its structure. The color can vary from light to dark red. The stain has the peculiarity of raising the wood pile during the painting process, so after drying it is necessary to sand the surface again.
Like stain, varnish should be applied in several layers. To speed up the process, you can use a water-soluble varnish, the drying time of which is no more than 30 minutes.
Frame assembly
Before using glue to fix the ends of all structural elements, it is recommended to assemble it “dry”. It is necessary to ensure that all frame parts fit without gaps.
If everything fits perfectly, you can start assembling the frame using glue. For reinforcement, you can use 4x4 metal corners that are attached to the inside corners.
The bottom of the boxes can be made of plywood or a sheet of chipboard. The selected material only needs to be placed on the furniture corners attached to the frame below.
Master class on making a chair from plastic bottles with step-by-step photos
To create furniture from old plastic containers, you will need a large amount of it. It all depends on the size chosen for the manufacture of furniture.
You may be interested in: How to make a chair for a doll from plastic bottles: a detailed guide with step-by-step photographs
To create furniture from old plastic containers, you will need a large amount of it. It all depends on the size chosen for the manufacture of furniture.
You may be interested in: How to make a chair for a doll from plastic bottles: a detailed guide with step-by-step photographs
The manufacturing process itself:
- Take the bottle and cut it in half.
- We turn the top part over and insert it into the bottom part.
- Next, we insert a whole bottle into the resulting cone and cover it with the bottom part of another bottle. The result was a kind of small log.
- When the required number of such logs has been collected, you can begin assembling the chair.
- The back of the chair and the sides are built up to the required length using exactly the same modules from logs. We fasten them to each other using cling film or tape.
- The back of the chair and the sides are built up to the required length using exactly the same modules from logs. We fasten them to each other using cling film or tape.
- We sew a cover for our chair from the desired fabric and fit the resulting frame.
- For comfortable use of the resulting chair, soft material such as foam rubber is placed under the seats.
Seat installation
From the same sheet of plywood or chipboard from which the bottom for the drawers was cut, you can make a base for the seat according to the dimensions indicated in the drawing. Progress:
Step 1. Take the foam rubber and cut out a piece from it, which should be 2-3 cm larger than the base on all sides.
Step 2. Glue the foam rubber to the chipboard.
Step 3. Cut out the batting along the contour and glue it to the seat with the same glue.
Step 4. Using a staple gun, attach the upholstery fabric.
The result is an excellent corner sofa that can decorate any kitchen.
Manufacturing process
Before you begin manufacturing, you need to determine what its design will be and where you plan to place it.
To make even the simplest option for a room or kitchen, the drawings must be as accurate and detailed as possible.
The creation process consists of several stages, which include:
- production of armrests;
- assembly of the left and right parts;
- filling frames with foam rubber;
- fabric upholstery.