Owners of small apartments often opt for cabinets installed in the corner, but before ordering such furniture, you need to have a drawing of a corner cabinet with dimensions on hand. After all, such structures must stand clearly on the wall, without deviating even a degree from the angle.
Corner cabinet drawing with dimensions
Corner cabinets are popular because they are quite ergonomic and allow you to save space in a small room. In addition, you can make a cabinet with your own hands using a drawing and detailed instructions. We will talk about this below.
Designing a corner cabinet according to the drawing
Types of corner cabinets
In order to create a unique, functional design, furniture makers are experimenting with different shapes of cabinets. There are the most popular product configurations that should be studied before drawing.
Table No. 1. Types of corner cabinets.
| Illustration | Description |
| Such structures are installed in the corners of small rooms. In this case, most often they are fixed directly to the wall - this shape allows you to properly smooth out the corners. The cabinet does not have full side walls, so its shelves are triangular. | |
| In this design, there is a wall on one side. Therefore, such a cabinet is considered more practical than the previous option. There is more free space inside. | |
| One of the most popular forms of cabinets. The design consists of two parts that connect at the corner. Such products are distinguished by their spaciousness. | |
| A special feature of the design is the presence of small but functional side walls. Due to this, additional modules can be placed inside the cabinet. |
The most difficult design for self-production is a triangular or trapezoidal cabinet - due to the fact that the product involves the presence of diagonal elements, which it is advisable to prepare in the presence of a professional.
Table No. 2. Types of corner cabinets according to installation method.
| Installation method | Description |
| Hull | Such cabinets require a back wall; they are not tied to just one place. If necessary, they can be quickly transferred. |
| Built-in | The cabinet is assembled and secured directly in the place where it is planned to be installed. It is quite difficult to move such a structure to another place. |
| Modular | The design consists of several sections that are assembled into one cabinet. Such products can be dismantled and rearranged quite quickly (if necessary). |
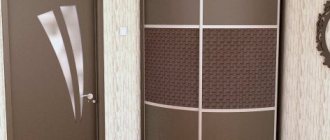
The designs differ from each other and in the type of doors. They can be hinged or sliding (compartment). In the first case, door leaves should not be made larger than 45 centimeters, otherwise the load on the hinges will be too strong. In the second case, the doors can be quite massive, even more than 45 centimeters wide.
Drawing of a wardrobe with hangers for clothes
It’s a good idea to use the corner closet space completely for clothes on hangers.
This option is quite appropriate in a spacious hallway if the shelves are placed in a separate cabinet. A shoe rack, an open hanger for seasonal clothes, a chest of drawers for accessories and other small items will help expand the functionality of a furniture set for the hallway. Still, it’s more convenient to store all your outerwear in a separate place where there is simply nothing else (well, maybe a couple of shelves for shoes, in a section designed for long clothes).
Material selection
Table No. 3. The most common materials for making cabinets.
| View | Description |
| Natural wood | This is the most environmentally friendly and expensive option for making furniture. Cabinets of this type are distinguished by their strength, durability, and at the same time they have an impressive weight. In addition, wood products have an unusual decorative appearance, they have a unique texture. It is recommended to choose the most durable wood options - oak, pine. It should be taken into account that such material is deformed when exposed to high temperatures and humidity. In addition, it is exposed to pests. |
| MDF | This material is a mixture of wood chips, various fibers and resin. The main advantage of the material is its affordable cost. Thanks to proper processing, MDF boards are durable and quite easy to process. In addition, they do not deform over time and have a very fine texture that does not stand out. Another obvious advantage is the large size of the slabs. |
| Plywood | This is a fairly strong material that is suitable for creating a cabinet frame. It is recommended to use only multi-layer plywood for such purposes. Like natural wood, this material can become deformed as a result of exposure to moisture. |
| Drywall | This material is often used to cover the frame of corner cabinets. It is lightweight, so installation will not seem difficult even for a beginner. In addition, some types of drywall have good resistance to humidity and temperature changes. |
Selecting a location and marking
It is advisable to determine the installation location of the cabinet in advance, since the structure itself is made according to the existing parameters of a given angle. It is usually installed in the living room, but can be intended for a bedroom or children's room. The filling and dimensions depend on the number of things that will be stored in the furniture.
After determining the installation location, markings begin, which allows you to determine where the main elements of the cabinet will be located. Since the product will be created from plasterboard, all frame elements will have to be attached to the wall, so fastening areas are outlined. You will have to navigate by them during fastening and creating the frame.
Surface preparation and marking
Creating a Project
Before you start creating a drawing of the future structure, it is important to determine the place where it will be installed. At this stage, the following points should be taken into account: the number of shelves, drawers (if required). All this will allow us to develop the most detailed project.
It is important to observe the following nuances:
- Not all apartments have standard, smooth walls and ceilings. This is why measurements should be taken from all sides, especially when designing a built-in wardrobe.
- The depth of the finished cabinet should be at least 60 centimeters. Otherwise, such shelves will not be spacious.
- Measurements should be immediately transferred to the drawing in order to correctly calculate the amount of materials.
- If necessary, you should first level the floor in the place where you plan to install the cabinet.
- To apply markings, you must use a building level, a square and a tape measure.
Sample drawing with dimensions
The diagram of a corner cabinet is drawn starting from the sides, because they are load-bearing and represent the appearance of whole boards. Then you should determine the height of the structure (usually from 2.2 meters).
Only then do you need to calculate the dimensions of the horizontal parts and the rods (if it is a wardrobe). Most often, large shelves are installed at the top of the cabinet, and a bar directly in the corner. The last step is to add additional designations to the diagram where mirrors, lighting and other elements will be located.
Finishing
Finishing involves the following steps:
- all surfaces outside and inside are covered with a high-quality primer;
- joints are filled with gypsum plaster;
- then the serpyanka is glued;
- Painting corners are mounted at the corners;
- putty is applied, which is sanded after hardening;
- It is advisable to make two layers of putty;
- then the primer is applied again;
- then final finishing materials are applied, which can be represented by decorative panels, tiles or other materials.
It is advisable to use a mirror during finishing to increase the comfort of using the structure.
Perforated angle for processing corners
Cabinet Finish
Corner cabinet made of wood or MDF
To manufacture and assemble the cabinet you will need the following materials and tools:
- processed wood or MDF sheets;
- euroscrews, dowels;
- glue;
- corners or ties;
- accessories;
- drill;
- screwdriver;
- measuring tape;
- level;
- a circular saw;
- hammer.
Construction fasteners
Video - How to assemble a corner wardrobe
Manufacturing of elements
Experts do not recommend cutting the material at home, because there is a high probability of getting crooked parts. It is advisable to contact a furniture shop with your cutting diagram, where specialized equipment is available.
At the same time, some craftsmen prefer to prepare parts for the cabinet themselves. In this case, you must have at least minimal experience in furniture making.
MDF cutting process
Step-by-step instruction.
Step 1. We cut out the parts of the walls, shelves, doors, drawers from the sheet. For such purposes, a circular saw or hacksaw is usually used. In this case, the second option is chosen very rarely, because damage may remain on the parts.
Sawing out wall parts
Step 2. It is necessary to process the edge of each part using polymer tape. It is applied to the edge and then fixed with an iron or hot air.
Edge processing
Step 3. The edge tape will need to be carefully smoothed using a cloth. After that, the remaining pieces of tape must be carefully cut off with a sharp blade.
Smoothing the tape with fabric
Assembly of the structure
When all the parts and tools are ready, you can begin the process of assembling the structure.
Table No. 4. Assembling corner cabinet parts.
| Illustration | Description |
| Measurements | You need to double check that the dimensions are correct. Therefore, before starting work, it is necessary to measure the walls. |
| Installing the feet | Next, you should install the legs on the bottom of the corner structure. They are fixed using self-tapping screws. Moreover, some models require the presence of a special base at a distance of 5 to 10 centimeters from the floor. In any case, the doors should not touch the floor, so installation of a support is required. |
| The bottom with support must be placed in the corner. It must be stable, so it should be installed level. To do this, use a building level, which can be used to raise and lower the legs. |
| Installation of the walls of the structure. They are secured with special ties or metal corners. In most cases, the first option is used, because such fasteners securely fix the parts and remain invisible. |
| Fastening the subsequent lower segment of the structure. The legs are installed on it, and then it is fixed to the main body. To do this, it should be installed flush against the corner structure of the cabinet and leveled using a building level. |
| Installing the sidewall. It is fixed at the junction of the lower parts. In this case, it is better to install it even before fixing the parts of the bottom. |
| Connecting base elements using furniture ties. To do this, pre-drill holes. |
| Installing the next side wall. At this stage it is necessary to install the top panel of the frame. This will give it more stability. Otherwise it may become loose. |
| Sidewall fixation. Before securing it with furniture ties, you need to adjust the position according to the level. |
| Other panels of the structure are installed in the same sequence. Their number will depend on the size of the cabinet. It is worth noting that it is much easier to assemble a cabinet with such small fragments. |
| It is necessary to complete the assembly of the frame and then check its stability. |
Installation of internal parts and doors
Table No. 5. Stages of installation of internal elements and fastening of doors.
| Illustration | Description |
| Installation of vertical elements | Installation of vertical elements and drawers. There are two ways to install shelves. In the first case, they are fixed using metal corners and euroscrews, but then they will be motionless. In the second case, you can install special holders on which shelves are installed on top. Drawers are mounted on guides, thanks to which they will slide out quickly and smoothly. |
| Securing the rod | Fastening the figured rod to the brackets. Install it on a shelf, which is then connected to the structure. |
| Installing a shelf with a rod. It should be secured inside the corner structure. In the same way, you need to fix another shelf in another corner. |
| Door installation. This process consists of the following stages: 1. Parts of hinges (furniture) are attached to the walls of the frame. 2. After which another part of the hinges is installed on the doors themselves. 3. Then the hinges must be connected and secured with screws. After which you will need to adjust the position of the valves. |
| Next, you need to eliminate the hole between the ceiling and the structure. |
| The lower hole is covered with a chipboard panel or plinth of the appropriate size. |
| Upon completion of work, it is necessary to check the stability of the cabinet again. If there are no flaws, then the design can be used. |
Ideas for interior cabinet filling
The level of functionality largely depends on the capacity of the structure.
To increase the capacity of the cabinet, you need to take care of the variety of its internal contents. Every manufacturer is well aware of this. Therefore, buyers are advised to pay attention to whether the closet is equipped with a rod, shelves, drawers and niches for storing shoes. The catalog of corner cabinets will allow you to do this as quickly as possible. Because you can immediately select the desired content.
The diverse content not only provides increased capacity, but also allows you to sort things easily and simply. This is important if all clothes are stored in the closet, including outerwear, as well as bed linen, bedspreads and towels. After all, you can’t store all these things in one section. Because this will make it much more difficult to sort and find what you need.
We recommend reading:
- Wenge-colored wardrobe in a modern interior: 100 photos of beautiful design and proper placement
- Pull-out cabinet: description of all types according to method of use. Examples of placement in a modern interior (120 photos)
Black wardrobe: a review of bold decisions on choosing and combining dark furniture in a modern interior (95 photos)
Corner cabinet made of plasterboard
Before manufacturing and assembling a plasterboard cabinet, you must prepare the following materials and tools:
- sheets of drywall of the required size;
- metal profiles (racks and guides);
- accessories;
- measuring tape;
- scissors for metal and drywall;
- corners for fixing protrusions;
- self-tapping screws (for drywall);
- set of dowels;
- building level;
- screwdriver;
- putty;
- putty knife;
- sandpaper;
- jigsaw (for cutting sheets);
- additional elements;
- hammer drill (for holes for screws);
- decorative plaster for finishing cladding.
If you have the above materials and tools, you can begin the process of manufacturing the structure.
Video - How to make a built-in wardrobe from plasterboard
Frame installation
Step-by-step instruction.
Step 1. It is necessary to apply markings to the walls. At this stage, you should mark the installation locations of the structure to the wall using a pencil. For greater reliability, it is recommended to double-check these values several times.
Marking the walls
Step 2. You need to start attaching metal profiles (guides) to the wall using self-tapping screws. At this stage, accuracy is especially important, so do not rush. Each element must be securely fixed, because the metal frame will carry the entire load. The screws are screwed in increments of no more than 100 millimeters, thanks to which the entire structure will be stable.
Each element must be recorded
Step 3. It is necessary to install the rack profiles into the guides. To do this, use self-tapping screws or Euroscrews. Since this is a corner cabinet, the profiles will need to be given the necessary bend so that they fit into the structure without any obstacles. To do this, a notch is made on the beams with metal scissors. Such actions will allow you to quickly bend any profile.
Installing profiles
Step 4. If you plan to install a large cabinet, then it is recommended to further strengthen the structure of the profiles. This can be done using the remaining profiles from which the jumpers are formed.
Strengthening the structure
Step 5. Before starting the process of covering the structure with sheets of plasterboard, it is necessary to secure the corners. They are made from fragments of the remaining profiles, but if desired, they can be purchased at any hardware store.
Securing corners
Important point! Instead of metal profiles, wooden blocks are sometimes used to make the frame, but this is not the best solution. After all, wood tends to shrink, which means the plasterboard structure can become deformed, causing cracks to appear in the plaster.
Sheathing of the structure
When the frame is completely ready, you can begin the sheathing process. This is quite easy to do if you follow the instructions.
Step-by-step instruction.
Step 1. It is necessary to fix the plasterboard sheet in the inside of the cabinet structure using self-tapping screws. After which, you should completely cover this part with sheets. It is important to remember that the pitch between the screws should be more than 150 millimeters. At the same time, they are deepened into the sheet by 1.5 millimeters so that the fasteners do not show through from the outside. You can read more about how to make fasteners for shelves with your own hands in our article.
Fixing the sheet
Step 2. Then you need to finish the outside of the structure with plasterboard. Such actions should be performed especially carefully to avoid mistakes.
Finishing the outside of the structure
Exterior finishing
When the plasterboard frame is ready, you should begin finishing its exterior using putty.
Large putty manufacturers
Step-by-step instruction.
Step 1. First, you need to apply a fairly thick layer of putty to hide the drywall seams and uneven areas. The structure must be left in this form for some time until the putty hardens.
Applying putty
Step 2. You will need to carefully sand the dry surface. This is done in order to remove sagging.
It is necessary to remove sagging with sandpaper
Step 3. The last layer is the final one, so it should be applied especially carefully.
Need to work carefully
Step 4. When the surface has dried, you need to go over it again with sandpaper in order to prepare for decoration.
Preparing for decoration
Step 5. The last stage is decorating the cabinet. Finishing can be done using decorative plaster and various moisture-resistant paints.
Cabinet decoration
Frame installation
How to make a corner cabinet with your own hands using drywall? To do this, you first need to start installing and fastening the frame. The whole process is divided into stages:
- if it is planned to have lamps in the cabinet, then the areas where they will be fixed are marked, after which electrical wiring is supplied to this place;
- shock-absorbing rubber insulation is glued to the guide profile, and it is important to place it on the part that will be laid further on the base of the furniture;
- All guides are fixed along the lines of previously applied markings, and dowels and nails are used to secure them;
- then direct hangers are fixed on the wall, and for this you need to constantly focus on the markings;
- fasteners for securing the hangers depend on what material was used to create the base, since if it is concrete or brick, then it is advisable to use dowels with nails, and if the base is wooden, aerated concrete or expanded clay concrete, then strong screws or even nails are suitable, and it is also allowed use special dowels equipped with spacer whiskers and notches;
- racks located vertically are inserted into the fixed guides, after which they are secured with suspensions, and for this it is advisable to use short self-tapping screws equipped with a press washer;
- Strong and reliable stiffeners are installed between the rack profiles, and the more of these elements are used, the more stable the structure will be, and there should be especially many of them in areas where it is planned to store heavy objects.
It is allowed to use not only metal profiles, but also wooden slats to create a frame, but this solution is used extremely rarely, since wood can absorb moisture or dry out, so the dimensions of the cabinet will change, which will lead to distortions or increased fragility.
Pasting profiles with damper tape
Metal profile is easy to cut
Ready frame
Structural additions for corner cabinets
In order to create a complete look, open modules are installed in the side parts of the corner structure. They are a type of various shelves that are attached to the cabinet or installed end-to-end without fastenings. Thanks to this solution, you can make any large-sized product more interesting. In addition, such shelves are functional elements; they are often made of glass or plastic.
Additional shelves
Quite often LED lamps are built into cabinets. It is important to consider the total number of lighting fixtures in the room. Otherwise, this is a good addition, thanks to which the contents of the cabinet will be clearly visible, especially in five-wall structures.
Lamps in the corner cabinet
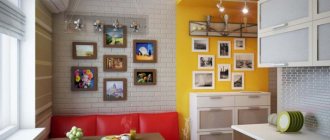
Accommodation options
In the bedrooms. with a traditional interior The ideal appearance is for furniture made of MDF or cardboard, covered with film, plastic layer or veneer. Using a mirror sheet you can not only enlarge the room, but also correct some vision problems. Many designers love to use high-strength glass, which allows them to show their imagination and implement the most daring projects.
Country style Helps you feel calm and at ease, freeing you from the burden of problems that constantly torment you. Keep it simple - avoid bright colors and designs, the less elaborate the wood looks, the more precise the style canon.
As for the installation location, most experts believe that the best solution is where the walls touch each other. If desired, you can cover one of the walls and leave the other unfurnished.
One of the placement options is the kitchen. The kitchen has its own unique arrangement of cabinets in any room, but even against this background, the kitchen stands out from the rest. Each room has its own specific cabinet layout, but even against this background, the kitchen stands out. There is always a shortage of space, so any way to improve the efficiency of using space, even just a little, is beneficial. Remember that measuring surfaces and ordering pieces only makes sense when leveling the floor, walls and ceiling - otherwise the cabinet may not fit in the given space.
To properly design a corner kitchen cabinet, you need to use only two types of connections (at a right angle you need to connect to the countertop, and at an angle of 45 degrees to the sink). Unlike the direct option, it is necessary to provide additional inserts (they perform two functions at once - mechanically connecting the drawers and replacing the front part). The cornice is made at the top and bottom.
It is impossible to correctly calculate the structure and estimate the material consumption for it without taking into account the fact that the upper and lower elements are located in the space separating the side blades, otherwise it will not be possible to correctly design the front part. The tabletop must have an identical geometric shape.
Universal recommendations for making furniture
Making furniture is always more difficult for beginners, so experienced craftsmen recommend listening to the following recommendations:
- If natural wood is used in the manufacture of the cabinet, it should be pre-treated and dried (humidity no more than 15%).
- There is no need to save money on accessories. In the case of swing doors, it is advisable to purchase European-made hinges, despite the fact that they have a higher cost. Otherwise, low-quality products can quickly fail.
- When making a built-in wardrobe from wood or plasterboard, you will need to carefully level the floor. It should be borne in mind that even due to the slightest deviations, the design will be crooked.
- For beginners, it is better to first experiment with the manufacture and assembly of smaller structures. For example, it could be a small cabinet. Then you will have at least the slightest experience in making furniture.
- In a hurry, you can easily confuse different panels and install them incorrectly. Therefore, there is no need to rush; it is better to assemble the structure gradually. It is recommended to roughly divide the work into several stages in order to have a clear plan. Before starting the manufacture or assembly of any structure, it is better to consult a professional
It is also worth noting that the assembly of large-sized structures should not be done by one person. Therefore, it is better to take care of this in advance and involve another person in this matter.
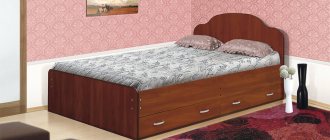
Types of bedroom wardrobes
Volumetric interior items – cabinets – help to maintain order in the house. Clean, beautifully arranged things in their places in the closet are well preserved, look great, they are not exposed to dust or sunlight, they do not litter the room, they are easy to find.
Currently, you can choose models made from various materials, in almost any color or style.
- There are narrow shallow cabinets 40-45 cm,
- Deep – 60 cm;
- Small single door,
- Bivalve,
- Popular three-door,
- Long,
- Roomy five- and six-door,
- Corner and modular.
Select the required model depending on the room. Often, for the most economical and functional planning of a room, cabinets are made to order. Most furniture manufacturers and sellers provide this opportunity.
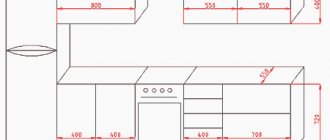
Furniture dimensions
What size closet should you plan?
There are recommended dimensions that you can rely on when planning:
- height is 2-3 cm less than the height of the room;
- depth 60 cm for standard cabinets and 45 cm for narrow ones;
- the length of the sides located along the walls is 100 cm, in the case of an L-shaped structure no more than 120 cm for the longest side.
If there is not enough free space for the specified dimensions, you can always calculate an individual option. It is very important to consider the reliability of the structure and its weight.
Standard sizes of kitchen cabinet fronts
It is always cheaper to buy facades of standard sizes than to order non-standard ones. It's also faster: custom ones will have to wait for them to be made, while standard ones can be purchased in stock. Therefore, when designing a kitchen, we start from a table of standard sizes of facades. The result will be significant savings. With the right approach, non-standard facades will only be needed for end modules. Which, however, can be made in the form of open shelves.
The layout of standard sizes of facades on kitchen cabinets can be more clearly represented in the drawing.
It is also recommended to take a tabular form from the manufacturer in advance - for example, Ikea’s standards differ significantly from the generally accepted ones. And already design the kitchen based on what you have.
By the way, kitchen facades can be equipped with almost any furniture in the house: good options can be selected for making children’s rooms, wall slides in the living room and other low cabinet furniture.