Today, the hood has become an indispensable device in the kitchen, especially in modern apartments where there are no partitions or walls separating this room from the living rooms. It helps to trap fat particles, removes cooking steam and unpleasant odors, but that’s not all. Today, hoods have also become a decorative element - some people hide them in furniture, while others emphasize their beauty by mounting them in a special box, or selecting a model to match the style of the room and leaving it completely visible. Today we will talk in detail about these devices and find out how to install a built-in hood in the kitchen.
Installing a built-in hood in the kitchen
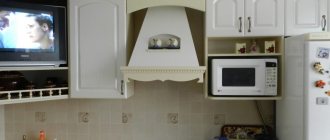
Features of built-in models
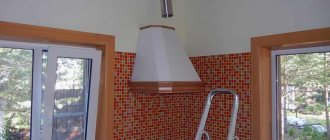
It is the built-in models of hoods that are most widespread in our country, since they are most suitable for compact kitchens, do not take up much space, and not everyone risks combining the style of the appliance with the rest of the interior. It’s much easier to hide the whole thing in a closet, which will allow you to arrange additional shelves for all sorts of small things.
- Built-in hoods are invisible to the eye and do not stand out against the general background, as is the case with dome or island models.
- There is a large selection of sizes of such devices on the market, which allows you to combine them with all kinds of furniture. The width of the hood is also selected based on the suction area - it is advisable that it be no smaller than the hob so that vapors are removed more efficiently. The most common sizes are 45.60 and 80 cm. There are also average values, so choose the option specifically for your kitchen.
- If we talk about the efficiency of built-in hoods, then it is at a fairly high level. Their design allows them to be equipped with additional retractable sections, which help cover a larger area, although this parameter is, of course, decisively influenced by the number of fans and their power.
The island hood is suspended from the ceiling and can even be located in the center of the room
Advice! If you decide to buy a hood, then first take care of purchasing furniture so that you can accurately navigate the dimensions. If the cabinets are already installed, and you cannot find the same model, then for the hood you can order a separate box from the furniture manufacturer, which will optimally combine with the rest of the facade. You can also look for a dome model.
When choosing a hood, you need to focus on the distance of its installation location from the stove, the power of the engines and the area of the gas stove. If the hood must draw air over a large area, then it is better to buy an option with two or more fans, but keep in mind that their operation will create a lot of noise - you will have to put up with something.
The hood is hidden in the closet
Installation of the exhaust duct
An exhaust duct is inserted into the drilled hole. It is best to use a galvanized pipe for arranging an exhaust duct, which must be well insulated with moisture-resistant heat-insulating material.
You can also make a ventilation duct using plastic pipe (PVC, polypropylene, polyethene and polyurethane), which is easy to cut and install. After installing the pipe from the kitchen side, a grille with a pipe for attaching the air duct is installed on the ventilation hole.
Grille with a pipe for fastening the air duct
On the outside, the ventilation duct is closed with a decorative grille with a protective visor and a check valve to prevent reverse air movement when the fan is turned off and rainwater from entering the pipe.
Grille with visor and check valve
Types of built-in hoods according to air purification method
Built-in hoods, and others too, may differ in the method of purifying air from combustion products and steam. In particular, there are two types.
Flow hood
Flow hood - it is connected by ventilation pipes to a chimney or channel leading through the walls to the street. There are blower fans installed inside them, which draw in air, moving it through the system forcibly. Contaminated air is discharged outside the premises along a specified path. It is replaced with a fresh one, which means that in order for the device to operate effectively, a high-quality supply ventilation system must be provided.
Duct hood
Grease traps are installed in front of the fans at the entrance to the device - metal mesh, which become clogged over time and require cleaning or replacement with new parts.
Why are grease traps needed?
Such devices are very effective if all installation conditions are met. They ventilate the room, constantly drawing fresh air into it.
Circulation type hood
Recirculating hoods - outwardly, these devices will not differ from their flow-through counterpart, but they work on a different principle. Such devices do not need to be connected to the ventilation system. Their task is to drive polluted air through a system of filters located inside their housing. The first to be installed at the entrance is a grease trap. Next come fans with electric motors, and then everything else. The air returns to the room and circulates in it again. That is why this type received the appropriate name.
Circulation type hood
There is only one convenience in using such a hood - it is compact and there is no need to stretch pipes through the entire kitchen. There are more disadvantages. Firstly, filters filled with absorbent substances (mainly activated carbon) wear out their service life over time and need to be replaced, so those who wanted to purchase such equipment, prepare for additional expenses. Secondly, a one-time pass through filters cannot clean the air completely. Thirdly, the system does not create a pressure difference, which means that fresh air will flow into the room worse.
Interesting to know! Very often, such hoods have an island design. They are placed in the center of the kitchen, where they are more important in aesthetic terms than in sanitary ones. If it is possible to carry pipes to the installation site, give preference to flow-through models.
Designer island hood
Control
The fume hood can be controlled either mechanically or electronically, depending on how the hood is designed. In the first option, changing operating modes and switching lighting occurs using mechanical buttons; in the other, using an electronic control system, often equipped with an indicator displaying the specified operating mode.
The main advantage of electronic control (in addition to aesthetic qualities) is the presence of a timer function for turning the fume hood on and off. More advanced modifications are capable of automatically switching operation in accordance with the degree of pollution of the air flow, and some copies provide remote control using an appropriate remote control or a special application for a smartphone. The need for the presence or absence of such functionality remains at the discretion of the specific client and the requirements for how the electric hood works.
Optional modes include the intensive version of the device, in which the fume hood operates at maximum performance for a specified period of time, after which it switches to the standard version. And a periodic type of operation, in which the hood is activated from time to time for a duration set by the user.
Separately, it is necessary to note kitchen hoods designed to work together with stoves. Compatibility in this case is maintained at the level of the manufacturer: it must be absolutely identical. Such systems of hoods are controlled directly by the hob: depending on the use of its resources, it decides which of the possible operating modes will be optimal at one time or another, depending on how the hood works in the kitchen.
Types of built-in hoods by configuration
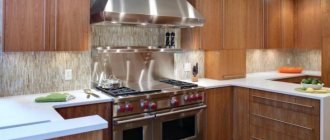
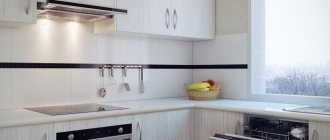
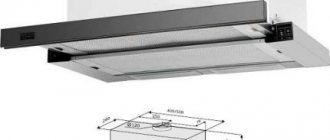
According to the configuration, hoods can be horizontal or vertical - this means the location relative to the hob. Horizontal appliances are the most common; they are located directly above the stove, which allows them to effectively capture rising steam. An example of such a classic solution is shown in the photo below.
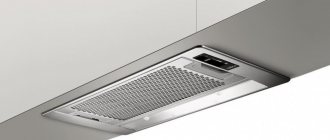
Hood with retractable panel and built-in lighting
If you don’t need a cabinet above the hob, you can install a vertical hood. They can also be built-in, but not into furniture, but into the wall. The option is difficult to execute, so we can often see them open. The suction panel of such a hood is inclined at an obtuse angle relative to the stove. The lid, which in the open position becomes something like a catcher, helps to draw in steam better. There are also models designed differently.
Vertical hood
This design is not entirely convenient due to the fact that dirt and grease will actively accumulate on the internal surfaces, and washing them is not so easy.
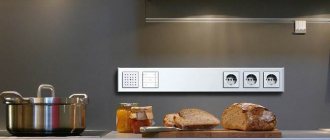
Electrical components
Almost every kitchen hood includes at least two lines:
- Lighting for which the use of LEDs is not recommended, since a rather complex circuit is formed, leading to flickering, which has a detrimental effect on human health. Basically, either an ordinary incandescent lamp or energy-saving components located on the inside of the hood are used.
- The second basic element is the hood motor, which has a number of safety mechanisms. It consists of fuses and capacitors to eliminate sparking in electric motors with a commutator operating principle. In order to protect against the occurrence of a spark discharge, the engine circuit provides for the installation of varistors, the resistance of which varies during voltage surges. This element must be installed in pairs. When a spark occurs, voltage is supplied to the body compartment of the hood and distributed along the entire perimeter of the system, protecting the household electrical network from excessive load, and the electric motor winding from burnout.
A built-in hood can be equipped with a commutator motor that is not afraid of excessive heating, but manufacturing companies equip them with thermal fuses in addition to the standard equipment. As a result, the level of noise exposure will exceed the permissible standard: for a fume hood, this parameter is directly determined by the type of built-in electric motor. Accordingly, it will be cheaper and more efficient to operate an asynchronous motor with a squirrel-cage rotor if its connection is provided for in the electrical circuit of the kitchen hood.
In conclusion, a few more lines about lighting elements - many users do not attach proper importance to them, and in vain. It is more correct to use halogen lamps, because they are economical, are not afraid of repeated switching, and emit diffused light, which does not strain the eyes.
The structure of a conventional horizontal hood
From the technical side, the structure of a kitchen hood is extremely simple. Essentially, this is a box with a built-in electric motor, but let's dig deeper to know exactly all the important components of the device. This information may be useful to many during DIY repairs.
Table 1. Structure of the hood
| Detail, photo | Description |
| The heart of the hood is an electric motor, which is connected in series through a shaft to the blowing mechanism. It can be designed like a regular impeller or a turbine, as shown in the photo. With compact sizes, turbines draw air more efficiently, but they create more noise, which must be taken into account when selecting a model. The power of electric motors is small, but you don’t need much to spin the blades that move the air - for household appliances it is 100-400 W. Advice! Many, especially Chinese manufacturers, write huge numbers that exceed even the characteristics of products from famous brands, but in fact they do not measure up at all. Of course, manufacturers are being cunning and deliberately inflating the figures. Also, the design of their products is imperfect; it does not allow creating a sufficient air pressure difference to start moving it effectively. In general, be careful. |
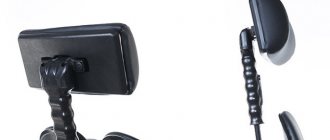
| The hood is controlled using a control panel, which can be implemented in the form of a set of mechanical switches and buttons, or a sensor, being stuffed with electronics. Such models belong to the “premiere” segment; they are more expensive, but much more difficult to maintain and repair. Some hoods are equipped with remote control panels or special sensors that start the device automatically when steam and elevated temperature are captured. There are also models with displays that display the active mode, room temperature or time. When choosing, focus on your taste preferences and ease of control. |
| When buying a hood, do not forget that the power consumption of the device also includes the light bulbs used to illuminate the work area. Usually halogen or LED lamps are used, installed in a housing with a diffuser, flush with the bottom panel of the hood. There are many other solutions, but these are the ones that are most common in the budget segment. The backlight turns on automatically when the front panel is pulled into the working position, although there is also a separate toggle switch that can turn off the lighting if it is not currently required. |
| The front panel is a passive part of the structure, which, in addition to the suction unit, is a switch, or rather one of them. The system is designed in such a way that it has contacts that close when the panel is pulled out almost all the way. At the same time, there is also a toggle switch, which can also break the power supply. The panel is also equipped with a grease mesh, which can be easily removed if necessary. It moves on metal runners on balls, so the move is smooth and precise. |
| Aluminum meshes in a plastic frame are grease traps. Air passes through them calmly, but the bulk of the fat is retained in the cells. The filters are held in place by spring latches, making them easy to remove for washing. If necessary, they can be replaced with new ones of suitable size. |
| At the top of the hood body you can see the outlet nozzle through which the air drawn in from below is blown out. This part is connected to the ventilation pipes if the hood is flow-through or covered with a decorative trim if it is a circulation hood. Some models of hoods are equipped with false linings so that everything can be neatly hidden. For embedded equipment, such additions are useless. |
| Circulating hoods are additionally equipped with carbon filters, in which dust, grease, gas combustion products, etc., settle during operation. The element is replaceable, so designs usually provide easy access to them. |
| Do not forget that the hood is an electrical appliance. It needs to be powered, which means that at the installation site it is worth providing a separate socket or laying a route from it with extensions, which is not very nice when the device is open, but for a hidden hood this does not matter. |
You can disassemble the hood into parts in a matter of minutes; in fact, everything is hidden right behind the grease traps, so repairing them is quite simple, considering that today’s repair is a simple replacement of a faulty part with a new one.
Transforming the middle part of the cabinet
You will have to cut holes in the cabinet shelves to allow the air duct to pass through.
Most often, the hood is attached to the middle shelf. Therefore, you also need to make a cutout for the air duct. We mark the cut location with a pencil; if it is round, we drill a hole with a diameter of 10 mm for the saw to enter and cut along the mark.
Then you need to mark the places where the device is attached to the middle part. Attach the shelf to the body of the device, make a notch with a sharp object in the location of the future location of the screws.
Example of mounting a hood to a wall
To secure the shelf to the sides, use plastic corners. First, we attach the four corners to the shelf, adjust its position by placing the box on the floor.
Exiting the power cord above the hood, as well as organizing a hole for a corrugated pipe
What indicators to pay attention to when choosing a hood
We have already written about the fact that unscrupulous manufacturers incorrectly indicate the characteristics of their products. In fact, this is a huge problem that makes it difficult to properly navigate the technology when choosing it. What to do in such a situation? Of course, we can’t check anything ourselves, but there is one simple way - find consumer reviews on the Internet about the product you like. Among them there are craftsmen who happily disassemble everything into parts and share their discoveries with others. We will also advise you to beware of frankly cheap hoods - they definitely won’t do anything, but will only create noise in your kitchen.
The hood fits perfectly into the modern interior
But let’s forget about marketers for a moment and talk about the real operating parameters of such equipment.
- We start by selecting the power, which on a good device will be 200-300 watts. Large values are already typical for expensive and very powerful installations designed for large rooms. Also pay attention to whether the lighting equipment is not taken into account in the power consumption indicator - also a small trick of the manufacturers.
- Next we look at type of injection mechanism. If you want a more powerful option, then look away turbine models, and if it is quieter, then you will need impeller big size. At the same time, be sure to look at how many electric motors are in the device - there may be two or more of them. With the same power ratings, it is advisable to choose a model with one more powerful engine than with two weak ones. Some people argue that if one motor breaks down, the hood will be able to continue working. Yes, she can, but how will she pull it off? That’s right, it’s twice as weak, and the fact that it’s still making noise won’t do any good.
Disassembled hood with a powerful turbine - Another important parameter is the noise level that the hood creates. It is measured in decibels. Under no circumstances should this indicator produce noise of more than 70 dB, otherwise it will be possible to hear a person’s speech in the room only from a distance of 1 m. This is unacceptable for a household appliance. Please note that the hood can operate at several speeds. The specified parameter corresponds to the maximum power.
- It is also important to know what air volume The hood model was calculated. High-quality equipment will pass through 0.5-1.2 cubes in an hour. Again, it all depends on the size and power of the electric motor. The more air the hood can draw into itself, the more effectively it will remove foreign odors and gas combustion products from the kitchen. You can calculate this parameter yourself. Sanitary standards require that the forced ventilation system be able to pass through the entire volume of kitchen air in an hour, increased by 10 times. Let's imagine a kitchen measuring 4 by 5 m, with a ceiling height of 3 m for ease of calculation. Find the volume of the room: 4*5*3=60 m³. Multiply by 10 and get a productivity of 600 m³/h. We buy a model with a small margin.
Backlight and operating mode control buttons - If you have decided on the basic operating parameters, then you can consider additional functions. For example, automatic installation and switching of modes - the hood can independently start at a given time interval so that there is no stagnation of air in the room. Or a warning system about problems with filter elements - the device itself understands that it cannot draw the required volume of air. A movement sensor that automatically detects that you have approached the stove and turns on the backlight, or there may be a fully automated device that independently starts and stops the engine at the desired speed.
- And of course, don’t forget about selecting the size of the device - you must be absolutely sure that it will fit into your closet, otherwise there will be problems with returning the equipment or redoing the furniture. Both can be avoided.
Hoods will draw in vapors and odors well only if they are installed correctly
Kitchen hood performance calculator
Go to calculations
Calculator for calculating the optimal hood width
Go to calculations
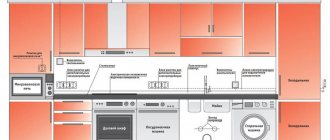
How to calculate power
To calculate the required power of a built-in hood, you need to determine the volume of the kitchen and multiply it by the minimum air exchange rate per hour - 12 times. Then the resulting volume must be multiplied by a correction factor of 1.3.
Let's look at the calculation of the required power of a built-in kitchen hood using an example. Kitchen parameters: length 5 m, width 4 m, ceiling height 2.5 m. Based on the available data, we make the correct calculation: (5 × 4 × 2.5) × 12) × 1.3 = 780 m³/h. Accordingly, for effective kitchen ventilation you need a hood with a capacity of 780 m³/h.
Formula for calculation with already calculated table
Installation of a built-in hood
Let's move on to the theoretical and practical part of our article. Here we will watch in step-by-step photographs how the master installs the exhaust equipment in the cabinet. We will provide detailed comments for each image for a better understanding of the issue. In our work we will need a simple set of tools.
Table 1. Required tools
| Tool, photo | Description |
| If you can screw in several self-tapping screws to secure the device by hand, using a screwdriver, then to cut neat holes for the route in the shelves and lid, you cannot do without a screwdriver or similar electric tool. For these purposes, you will additionally need a wood core drill of the required diameter. |
| All cutting work can be done with an electric jigsaw. Of course, the edges of the cuts will not be so neat, but they will not be visible during operation. At the same time, you can cut chipboard as you need, make holes of any shape. For example, for rectangular ventilation ducts. |
| In order for everything to fall into place and look beautiful, you need to accurately mark the parts before cutting. For this we use a classic set - pencil, tape measure, square. The position of the cabinet is checked using a building level. |
Tools for running electrical wires and installing sockets may also come in handy. We will not go into these details.
Out of the box, the hood is already ready for use - you just need to take out the package with documents, which is located under the filters, so the main work falls on the furniture cabinet.
Table 3. Step-by-step instructions for installing the hood
| Steps, photo | Description |
| We take the hood out of the packaging and remove the grease traps one by one so that they do not interfere with work. |
| The cabinet in our case will be the most ordinary one, made of chipboard. You can order it from production. The parts are tightened together using Euroscrews, which are tightened with a hexagon. This cabinet will consist of the following parts: Two sides, a top lid, a shelf and a back wall made of fiberboard. It does not have a bottom, since the hood will be installed there. First of all, we connect the two side panels with the lid - nothing complicated, just tighten 4 screws. |
| We install the hood to accurately determine its boundary. We place a shelf on top to accurately mark the places of fastenings under it - draw lines along the upper edge of the shelf. Attention! If there is a pipe coming out of the hood that prevents it from being aligned with the shelf, first cut a hole in it for it. |
| The gearbox for transition to the ventilation pipe must be cut in a circle corresponding to the diameter of the hood pipe. For this we use a grinder or a hacksaw. |
| Now you need to transfer the dimensions of the pipe to the shelf. How to do it? We need to coat its edges with something that gets dirty. In our example, the master used white silicone, but you can also use lipstick - the result will be the same. Then we precisely apply the shelf and press it a little. We do this directly in the cabinet body to avoid inaccuracies. |
| Next, take a jigsaw or a crown and make a hole in the shelf. When working with a core drill, first make a through hole in the center so that you can drill from both sides, which will avoid untidy chips along the edges. |
| According to the markings on each sidewall, we drill holes for Euro screws. Here we fix the element. |
| A wire will go up from the hood so that it can be laid, we cut a small groove in the back wall using any convenient tool. |
| We nail the back wall of the cabinet with nails. We tie it to the sides and shelf, skipping the cover for now, since we will still need to remove it to cut a neat hole for the air duct pipe. If you work with a jigsaw and not a crown, then everything can be done after assembly. |
| The hood is held on by 4 self-tapping screws, the holes for which are located inside the device. Since we removed the nets, access to them is now open. |
| Finally, insert the air duct pipe cut to height. |
Now the cabinet along with the hood can be hung on the wall. A ventilation duct is laid up to the ventilation shaft, the device is plugged in and you can start using it.
Unfortunately, it is not always possible to connect an exhaust device to the general house ventilation system. In this case, there are two options - a hood without venting into the ventilation, or installation with venting of collected fumes directly to the street through the wall. A special publication will provide information about the types and designs of hoods available for sale, as well as their installation diagrams. In this case, special attention will be paid to options that will help to do without connecting to the general building ventilation system.
Video - Installing a built-in hood
Working with the bottom shelf of the cabinet
Preparing a kitchen cabinet for installation of a built-in hood
When installing a built-in hood in a cabinet, you can go in several ways.
- Order a kitchen cabinet without a bottom. To bring out the air duct, you will need to make appropriate holes for it in the middle shelf and the top.
- Make a cabinet for the hood with your own hands, based on the dimensions.
- Remodel an existing piece of furniture, first remove the bottom or cut a hole according to the existing dimensions.
There is no need to disassemble the cabinet. You need to remove it from the wall and disconnect the doors. It will be more convenient to perform your actions on the floor. “Unstitch” the back wall, unscrew the side fastenings, then the bottom shelf will easily come off on its own.
When you cut out a place for a hood, you need to do it so that the body of the device fits tightly to the front wall, and not vice versa. Mark the place where you will cut with a marker, drill holes in the corners of the mark, and then cut.
Some practical tips
If you have no financial restrictions, opt for a kitchen hood that can function in two ways - to divert the air flow outside the room and in automatic recirculation mode.
About the engine. To avoid negative effects on the hearing organs, it is recommended to use two low-power motors instead of one high-performance motor. We also offer the most silent models of exhaust systems with a noise level not exceeding 40 dB.
There are a huge number of models in special retail outlets, and sometimes it can be quite difficult to decide and understand how to properly make a kitchen hood. Taking into account the recommendations set out in the material, you can make the right choice in favor of a reliable home assistant that can make daily culinary work easier and make it safer for the health of all family members.