Manufacturers of modern household appliances for the home, and in particular the kitchen, devote all their efforts to creating comfortable-to-use, economical and, most importantly, compact models of dishwashers, refrigerators, ovens and even microwave ovens. It is the latter representative that we will talk about today, telling you how to correctly install a built-in microwave oven and connect to the network with your own hands. The instructions are simple and will not take you more than 5 minutes, so we recommend that you read them carefully!
What type of microwave oven to choose
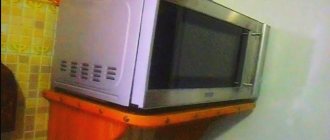
Microwaves are much smaller than refrigerators, but they always lack space.
When it comes to placement, it turns out that there is a shortage of free space in the kitchen. If you place the stove on the countertop, a portion of the working surface will be lost, which is unjustified in a cramped kitchen. There are also miniature models, but their capabilities are limited. If you want a microwave with different functions and auto modes, think in advance where to install it. If you have space in your kitchen cabinetry, it may be best to ditch the freestanding model in favor of a built-in one. This is a rational option that allows you to save space and fit your household appliance beautifully.
The installation method and location will depend on the type and dimensions of the equipment. If you buy a small model, it can be locked in a closet on any shelf.
All microwave ovens can be divided into:
- ordinary;
- small;
- built-in
Pros and cons of building in a microwave
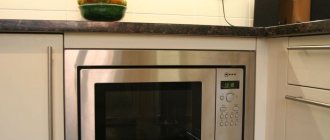
The main advantage of built-in household appliances is saving space in the kitchen. A compact microwave oven is installed in a closet, pencil case, niche, occupying the entire space, leaving no useless idle areas. Other advantages of such ovens:
- Large volume. Despite their compactness, built-in microwaves are not inferior to conventional ones in internal dimensions. This allows you to heat food on large plates or place several dishes inside at once.
- Quality and functionality. Built-in models are produced for long-term use, which is why they have an extended service life and additional protection against overheating, moisture, and power failures. Since such microwaves are made only by popular brands for the high price segment, they are almost always equipped with a grill, convection, automatic doors, an improved display and other additional functions.
- Hygiene. The microwave completely occupies its niche, which eliminates the accumulation of dust and debris in the cabinet. Installation inside the cabinet will protect the internal gaps, cracks, and buttons of the stove itself from contamination, reducing the likelihood of breakdowns. All that is required from the owner is to periodically wipe the door frame of the device.
- Aesthetics. The integrated microwave merges with the facade of the kitchen, eliminates voids and cracks, does not spoil the appearance with wires, and therefore looks better in the interior. This stove fits especially well with a country or classic style design, where openly standing modern appliances look out of place.
Disadvantages of built-in microwaves:
- Difficulty of repair. If the stove fails, you will have to dismantle it to transport the device to a service center. The same problem will arise when moving or rearranging the interior - the need to remove and reinstall the microwave will waste extra time and effort.
- High price. With equal quality and functionality, built-in models are 20% more expensive than regular ones.
- Difficult to install. To install the stove, you will have to take your own measurements, buy fasteners, carry out ventilation, and ensure the connection of the device to the electrical network. For safety, it is recommended that two people work together. The alternative is to pay professionals for installation, but this will result in additional costs.
- Impossibility of replacement. Built-in stoves are unique in size, so it is impossible to install another model in the same niche. Due to the rapid change of lines, it will also be difficult to buy the same microwave. If the appliance malfunctions, you will have to change the interior of the kitchen or be content with a free-standing stove.
Problems with built-in microwaves arise from the inability to move them. If the appliance is placed poorly, this can create difficulties with cleaning, maintenance, and heating food, so you need to choose carefully.
Rules for placing a microwave oven
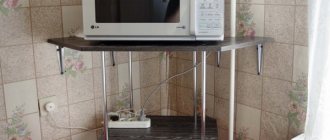
To begin with, it is worth noting that there are a huge number of options for how to place a microwave oven in the kitchen. But even if you leave this device on the table or kitchen cabinet, you will have to take care of some installation nuances.
So, a few rules for placing a microwave:
- The first thing to consider is the height of the device. All family members (except small children) should be able to easily reach the microwave;
- The device should not be located close to the wall or the walls of cabinets, refrigerators, etc. It is necessary to leave at least a couple of centimeters of free space to allow air access to the ventilation holes;
- A microwave above the refrigerator is not the best option, even if the latter is short in height. The heating surface of the oven can lead to malfunctions of the freezer;
- To prevent washing your microwave oven from becoming a regular activity, you should not place it near the stove. In addition, being located next to a sink can cause a short circuit;
- A window sill can be an excellent place for a microwave, but a problem can arise in winter due to the temperature difference between the device and the cold window - condensation easily forms on it;
- Another important condition is that the microwave oven should be placed at a distance of at least two meters from electronically controlled appliances;
- If you have indoor plants in a certain place in the kitchen, the oven should be placed away from them to avoid the influence of harmful, in this case, microwave radiation.
Placement options
In general, you need to choose a location for the microwave in which all family members will have free access to it, and at the same time the device will not interfere with the opening and closing of the unit doors, passage and use of other devices.
Planning the space
1. First the kitchen, then the appliances!
One of the biggest mistakes buyers make is to take all the appliances first and only then order a kitchen plan. Thus, you become dependent on the dimensions of the purchased devices and can no longer experiment with the layout of the headset.
If you have never encountered built-in appliances before, preliminary consultation with furniture makers or appliance sellers is required! The fact is that different sizes of cabinets and pencil cases require different equipment. And if you take a 60-centimeter oven under a 60-centimeter cabinet, it simply will not fit there.
This is especially true for such specialized appliances with floating sizes, such as a washing machine, coffee makers, microwave ovens, and so on. You can choose appliances, but it’s better to buy them after creating the kitchen design.
2. You shouldn’t buy appliances from a kitchen showroom.
In many furniture stores, customers are offered to immediately select appliances when ordering a kitchen set. But it often turns out to be much more expensive than if you go to a specialized hardware store. In addition, there is a chance that they will sell you what is profitable for the sellers, or only those brands that they have and which they understand. In hardware stores, there is usually more choice, and the consultants themselves are more qualified, since they specialize only in technology.
Among other things, it is not always clear how a furniture showroom will provide warranty service if necessary. Do they have established partnerships with suppliers, connections with service centers and the ability to provide you with timely and quality assistance?
3. We move the sockets to the side
In general, it is best to have a kitchen showroom help you with the electrical layout before it is carried out. But if this is impossible for one reason or another, remember the basic rule: sockets cannot be located immediately behind the technical device. Otherwise, you will have to move the entire kitchen unit forward. Neither ovens, nor refrigerators or other appliances have enough space to accommodate a socket and ensure the correct and safe position of the plug.
Ideally, sockets are placed under cabinets at a distance of about 10 centimeters from the floor (under the kitchen plinth) or away from the appliance.
4. Built-in appliances are easier to update
Firstly, you do not depend on the manufacturer when choosing. No one will forbid you to take an oven from one brand and a hob from another. In addition, you don’t have to make compromises when, for example, you are completely satisfied with some parameters in a solid stove, but would like a larger oven. It is easier to change and repair built-in equipment, because everything goes separately.
Accommodation options
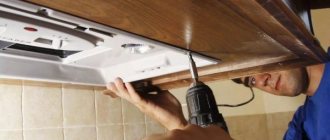
The most common way to place a built-in microwave is under an overhead cabinet. This method saves space and is suitable for mounting a stove of any model and size. For installation, you will need skills in working with boards and construction beams and a set of carpentry tools. Procedure:
- Prepare the microwave. Wash, clean and dry the device well. Make sure there are no cracks, scratches or damage on the case. Make sure that the door closes tightly, check the operation of the rotating element, grill, and internal rollers. Remove all foreign parts from the oven and any openings on it.
- Mark the installation location. To do this, you will need to find a frame beam in the wall - this can be done using a special detector or by tapping with a hammer (the sound will be dull at the right place). The point is marked with a marker, after which the sketch is completed, taking into account the width and height of the device.
- Prepare the closet. All decorations are cut off and irregularities are smoothed out to create a smooth surface. Then the wall is marked using a special stencil that comes with the stove. In the designated places, holes are drilled for fasteners, wires, and ventilation systems.
- Install the mounting plate. It is attached to the wall using load-bearing screws on a vertical beam. The strength of the fastening is ensured by special “wings” that are screwed in and pulled towards themselves.
- Hang a shelf. The side walls of the future case are attached simultaneously to the mounting plate and the cabinet, providing additional strength. The bottom of the structure is made of reinforced boards with additional protection from moisture and heat.
- Install a microwave. The first step is to install wires and communications. Then recheck the operation of the device, make sure that the doors open freely. After this, the mounting screws are tightened to the maximum, completing the installation.
Installation Features
Such placement will free up additional space in the kitchen.
When deciding how to hang a microwave in the kitchen, you should take into account that it has quite a significant weight for hanging on the wall; it ranges from 10 to 30 kg. Therefore, to hang it, you cannot use stands for TVs and radio equipment, shelves for books and other home accessories.
Particular attention should be paid to the wall - it must be made of solid, durable materials (concrete, brick). It is also advisable to avoid installing a microwave next to a refrigerator (the oven emits heat during operation), a hob, or a kitchen sink.
For a small kitchen, the best option is to hang the microwave on the wall opposite the work area above the dining table. This is quite convenient from the point of view of cooking and heating food - plates and cups do not need to be carried a long distance to another place in the kitchen, they are immediately lowered onto the table.
There are many options for where to hang a microwave, but the most optimal place for a small kitchen is above the table; hot food and plates do not need to be carried far to another part of the room.
Choosing hanging brackets
Before installing a microwave oven, you should first decide on the fasteners. A standard microwave hanger consists of two metal corners with a powder coating. On one side there are holes for mounting on the wall, the second serves as a stand for the microwave. The length of the fastener under the microwave can be standard or adjustable by extending it forward.
A bracket with two slots may not support the weight of a heavy microwave oven.
Each bracket is equipped with anti-slip pads or special clamps to prevent falls. The main colors of brackets produced are the most common white, black, gray, and gold. There are no significant differences between designs from different manufacturers; they mainly differ in design and color.
When purchasing a bracket, pay attention to the rubberized gaskets; they will securely secure the microwave
Before purchasing, you need to measure the depth of the oven and select fasteners of the appropriate size and color. There is no point in worrying about strength - each bracket can withstand the weight of a microwave oven with a margin of 2-3 times.
Preparation
The first thing you need to do before installing the microwave on the bracket is to prepare the place where it will be mounted.
Attention! Since the bracket and the device placed on it have significant weight, it is worth making sure that the wall on which the structure will be attached is strong. It is preferable that the wall be concrete or brick - drywall does not always guarantee complete safety of the fastenings.
The second thing you need to do is measure the dimensions of the device, select suitable brackets for them, calculate the distance between the holes for fastenings, and check the building level.
In order not to make a mistake with the location of the wall-mounted microwave oven, it is worth consulting several times with all family members on this issue. Moving the bracket will be problematic, and there will be traces of the fastenings on the wall, so it’s better to immediately think about all the possible nuances.
Step-by-step installation instructions
Before hanging the microwave on the microwave oven bracket, you need to prepare the necessary tools and fasteners. You will need a drill with a perforation function or a construction hammer, a tape measure, a pencil, a level, a concrete drill and screws with dowels.
- First, the required distance between the corners is measured - it should correspond to the distance between the legs of the stove. On the wall, at the location of the stove, two vertical lines are drawn with a pencil, corresponding to the measured value.
- One of the corners is applied to the line and holes for fastening are marked on it. Next, using a hammer drill, the necessary recesses are made and dowels are driven in. The corner is placed against the wall and screwed into place.
Where to put a microwave in the kitchen - 25 successful solutions
To place the necessary attributes - a refrigerator, sink and stove, we have already come up with the rule of the working triangle, which allows you to rationally organize the kitchen space. A microwave in the kitchen has become an equally important item in any modern family. But there are no specific recommendations for its placement.
Where to place the microwave in the kitchen so that it is convenient to use? Choose the option that suits you from the recommendations below.
You can get a lot of ideas from this video:
Built-in or conventional microwave, which is better?
A built-in microwave is a controversial solution, the advantages of which cannot always compensate for the disadvantages. This technique is definitely not suitable for budget kitchens, since the device itself, its installation, ventilation and wiring will be very expensive. A standard (free-standing) microwave on a shelf or cabinet of approximately the right size will do the job better.
The built-in microwave is suitable for small kitchens. Practicality, style, and extended service life compensate for the overpayment and complexity of repairs. It is best to choose models with increased functionality - the steamer, grill, convection, and deep fryer modes will eliminate the need for other household appliances.
In medium and large kitchens, a built-in microwave is more of an extravagance than a necessity. You can buy it if the interior is made in high-tech style with integrated appliances. Otherwise, it is better to purchase a separate model and disguise it behind the cabinet door. This will eliminate the hassle of repairing and moving the built-in microwave, preserving beauty, convenience, and economical use of space.
Additional options
The comfort of using technology depends not only on the main functions, but also on the little things. Everything from the door opening to the interior materials matters.
The maximum timer time is important if you plan to use the microwave for cooking. Varies mainly from 30 minutes to several hours. If you like recipes with long simmering times, choose 90 minutes or more so that you don’t have to manually start the process again.
Delayed start is not present in all models, but it can be useful if you clearly plan your time and do not like to be distracted by household chores. You can, for example, marinate meat in the morning by programming the microwave to turn on for the evening - a delicious, hot dinner is ready for your arrival.
Mute the sound. All microwave ovens indicate the end of the cooking cycle with a sound signal. But this can become a hindrance if there is a small child with a light sleep in the house or you do not live alone in a studio apartment. Although this is not the most important option, it is sometimes very pleasant.
Design
Built-in microwaves have an attractive facade and a “rough” body that is completely hidden in the furniture. The front part of the device can be made in a variety of styles - from strict steel high-tech to vanilla Provence with bronze handles. Selecting a model to match the overall style of the kitchen and other appliances will not be difficult.
If we talk about design features, it is worth mentioning that not all modern microwave ovens have a traditional door opening. Nowadays there are many models with a door that hinges from top to bottom in the style of an oven. The choice depends solely on your convenience. However, it is worth considering the height of the microwave - if it is installed too high, the hinged door can create significant inconvenience.
The diameter of the tray will dictate how you can use a particular dish. Usually it is from 24 to 32, less often 36 cm in a microwave oven. There are trays that are larger, but this is already rare. Pay attention to this detail if you not only plan to cook with it, but also in large quantities. Due to the fact that the tray rotates during operation of the microwave, it is strictly not recommended to use dishes that are significantly larger than the tray.
By the way, modern microwave ovens are often equipped not only with a rotating tray, but also with baking trays at different levels.
The inside of microwave ovens is usually lined with either stainless steel or enamel .
Enamel is more affordable, easy to clean, and looks nice (if it’s important for you to admire the inside of the device). It cannot be cleaned with powders or hard brushes. Over time, it can gradually chip and provoke rust in the cracks.
Stainless steel is much more practical. It is much easier to wash away greasy deposits or soup that accidentally spills from a plate. Over the years, nothing happens to her. If you clean too hard with abrasives, it may get slightly scratched, but this will not affect performance in any way. It is worth noting that most models of built-in microwave ovens are made of stainless steel.
Child lock needs no introduction. Of course, microwaves automatically turn off when the door is opened. But in order to avoid unwanted children's experiments and other unforeseen circumstances, the blocking function is still a necessary and useful thing.
Source: club.dns-shop.ru
Rating of built-in microwave ovens
Popular models of built-in microwave ovens:
| Title and photo | Characteristics | Price |
| Bosch BFL554MW0 | Budget model with electronic control. 38x59x37 cm - dimensions, 25 l - volume, 31.5 cm - tray. Maximum power is 900 W. The feature of the model is 7 installed operating programs that help not only to heat and defrost food, but also to prepare original dishes. The inner surface of the oven is covered with a layer of stainless steel, which reliably protects against damage and overheating. White color | RUB 21,650 |
| Tesler MEB-2070X | One of the smallest microwaves with dimensions of 32x46x34 cm and a volume of 20 liters. Heats food in 5 power modes with a maximum of 800 W. Equipped with a grill mode, automatic defrosting and 8 cooking programs, including a crisp setting. The body color is silver, the internal coating is enamel. The door frame design is made in a high-tech style | 9990 rub. |
| Gorenje BM6240SY2B | Microwave with a hinged door and a system of protection against accidental opening by children. Dimensions - 59.5x39x39 cm with a volume of 23 l and a tray diameter of 27 cm. Power - 900 W. Model with quartz grill (grid included), defrosting, automatic cooking. The inside of the oven is covered with enamel. The black case with a minimalist timer design and touch buttons gives the microwave a modern, stylish look | RUB 26,370 |
| Weissgauff HMT 203, 404315 | A small oven with dimensions 39x59x29 cm and a volume of 20 liters. The reduced depth allows the model to be easily integrated into standard upper kitchen cabinets. Maximum power - 700 W with 5 different modes and the ability to smoothly change when cooking. Additionally, an auto-defrost function is built-in depending on the type and weight of the product. Ecological bio-enamel as a coating and a child protection system make the model one of the safest, and the stylish beige body with discreet buttons will allow it to fit into classic kitchens | 12490 rub. |
| Bosch BFL 520 MS0 | A model specially designed for installation in an upper cabinet with a depth of 30 cm. Dimensions - 38.2x59.4x31.7 cm, volume - 20 l, tray - 25.5 cm. Convenient control of two rotary switches. Power modes - 90, 180, 360, 600, 800 W with defrosting and automatic cooking functions. The inner lining of the camera is made of stainless steel, the body is black | 21990 rub. |
The popularity rating among Russian users includes mainly small-sized budget models. Fans of wide functionality should pay attention to microwave ovens from Samsung, Hansa, Siemens, Kuppersberg, Ariston.
Futuristic model from Samsung
A microwave oven without a turntable from a well-known brand has a stylish design. The inner chamber has rounded shapes. According to user reviews, the special coating makes the surface easy to clean. Thanks to the company's developers, food preparation occurs in an accelerated time. According to housewives, the heating efficiency has been increased compared to conventional models.
For convenience and comfortable use, automatic programs based on world recipes are provided. Despite the efficiency and speed of cooking, the level of energy consumption is significantly reduced. The microwave oven is equipped with a technological innovation - a quartz grill. Unlike heating element, it heats the dish more evenly and works more efficiently.
The company's developers use i-Wave technology to produce microwave ovens without a turntable. The design features of the chamber allow the microwaves to be evenly distributed inside the chamber. They penetrate not only into the center of the product, but also act along the edges.
Advice from professionals
As you can see from the instructions, fixing the bracket to the wall with your own hands is not so difficult. To ensure a high-quality result, you should pay attention to the advice of professionals:
- Before starting work, be sure to check the strength of the wall;
- use only a high-quality tape measure or a centimeter with clear divisions;
- check the building level more often;
- use only durable materials of certified quality - this applies to both the suspension itself and the fastening elements;
- It’s better to check the mark several times and screw the bracket one by one rather than re-drill the holes several times;
- Be sure to follow safety precautions when choosing a place to place a hanging microwave.
This arrangement of the microwave oven will significantly save space, help fit this piece of equipment into any interior and add a stylish twist to your kitchen.
Sources
- https://cosmo-frost.ru/svch/ustanovka-svch/kak-pravilno-i-bezopasno-ustanovit-mikrovolnovku/
- https://homeasking.com/kak-povesit-mikrovolnovku-na-stenu/
- https://tehnikoved.ru/kuhnya/mikrovolnovka/ustanovka-mikrovolnovki-na-kronshtejne.html
- https://made-box.ru/shifoner/inbuilt/mikrovolnovka-vstraivaemaya-v-verhniy-shkaf.html
- https://vashakuhnya.com/tehnika/kuda-postavit-mikrovolnovku
- https://kuhnier.ru/tehnika/kunonnaya/kak-povesit-mikrovolnovku-na-kuhne-svoimi-rukami.html