Without shelves, which can not only serve as a storage system, but also decorate the interior, it is very difficult to imagine any room. They can have different appearances, all kinds of designs and will allow you to place not only necessary everyday items, but also decorative ones - souvenirs, flowers, flowerpots and much more.
This way the room can be made cozy and beautiful. The most commonly used options are wall shelves; they are not difficult to make with your own hands and at the same time you can not only save a lot of money, but also create a truly exclusive and interesting product.
DIY wall shelves
Types of shelves in the house
Depending on the installation location, shelves can be wall-mounted, floor-mounted or hanging. If the floor shelf has a large height - from a meter and above, it is often called a rack. A few words about hanging ones: usually these are decorative structures that hang on a pipe or a specially driven bracket. This option is popular in rooms where heating pipes run under the ceiling: they just beg to have something hung on them. Shelves are hung on the pipe in the kitchen and bathroom: it’s convenient there.
These hanging kitchen shelves are convenient and functional. You can use the same pipe to make a story made by yourself.
They are made of wood, plywood, laminated chipboard, fiberboard, and there are glass shelves. The same materials are used as stands, but they are also made from metal, plastic and other absolutely incredible things - for example, pipes or bottles.
In living rooms, it is not so important what material the shelf is made of. It is important that its design is in the same style as the interior. Even functionality is not always important: some play a purely decorative role. If they have anything on them, it’s only one or two items. Their role is to give the interior of the home a special style and flavor.
The intimate atmosphere of this room is emphasized by cozy pillows and shelves made of dark wood. The laconic style of the apartment’s decoration and the same laconic shelves in a contrasting color. In this interior, they are the main element. The free space above the sofa is organically filled with shelves to match the walls. The shelf can serve as a divider for zones in the room. Light interior in light colors and the same shelves. The shape and color of the shelves follows the shape and color of the table drawers.
If we talk about shelves in technical rooms - the kitchen and bathroom, in particular, then in addition to aesthetic considerations, practicality requirements are almost universally added. Even decorative shelves in the kitchen should be washed well. For bathroom shelves, the requirements are generally high: periodically there is very high humidity and materials are required that can withstand it without any harm. There aren't many of them. These are plastic and stainless steel. They also make bathroom shelves from MDF, but they can be used normally if there is good ventilation in the bathroom.
Collecting the necessary tools
Regardless of what material you need to make the shelf, you should collect the tools that will be needed in the manufacture and installation of the finished structure. For installation you will need either a hammer drill, a drill or even a screwdriver, depending on the material of the walls of the room.
Everything you need for a good owner
You also need to prepare:
- screwdriver or drill
- jigsaw
- hacksaw for metal (wood)
- brackets (regular or decorated)
- screws (nails) or anchors
- paint (varnish) for wood (metal)
- sandpaper
- level (water or laser)
- roulette
Depending on the material of the shelves, the tool can be supplemented with the listed range depending on the requirements for the final result. If the issue becomes controversial, we return to the point of expediency.
When choosing paints, you should take into account their composition and drying time. Oil paints may be a cheaper material, but take a long time to dry, which can lead to some inconvenience while waiting for the final result. Also, wooden, chipboard and MDF boards should be kept in a warm, dry room for some time after purchase in order to evaporate moisture.
If the manufacture of a wall shelf takes place in an apartment, you need to think about the working hours and days of the week so as not to inconvenience your neighbors. This is especially true for the final stage of work - installation, during which you have to use a hammer drill and drill the walls or ceiling of the room.
Shelves on the wall
In any room there are places on the wall where you just need to hang something. After all, most modern furniture occupies only the lower part - sofas, tables, couches. The upper part remains empty and dissonance arises: the lower part of the room is overloaded and the upper part is half empty or completely empty. These voids on the walls are organically filled with shelves.
The whole system, and the most “dead” space is used - the corner
Structurally, most shelves consist of the actual shelves and lintels. But these components are combined into so many options that it is impossible to count. A simple design is good: you can make any shelves with your own hands. Moreover, these products may be the first self-made things. It's really simple.
How and what to attach it to
It’s not for nothing that we start with fasteners. The design of a wall shelf largely depends on the type of mounting. Or maybe it’s the other way around. It depends on what to dance from...
Traditional hinges
Traditional hinges for hanging shelves
There is a traditional way - on hinges. It is suitable for wood and fiberboard, any other material that is thick enough to attach. Screwed onto the sides with self-tapping screws. Then the distance between the centers of the loop holes is measured and marked on the wall (make sure it is horizontal). At the marked points, holes are drilled for the dowel, the dowel is inserted and a dowel-nail with a small head is screwed into it, which fits into a loop or bracket (a pin slightly bent upward). Then a shelf is hung on them.
Not all materials can be drilled. For example, glass shelves. You definitely can't screw anything into them. Fastenings for glass shelves are special: they consist of two parts, between which glass is inserted. Often elastic pads are installed between the holders. The bottom mount usually has a small clamping screw to secure it in place.
Fasteners for glass shelves
The most popular mount for glass shelves is called “pelican” - for its unique shape. It looks good on its own and is available in different colors. The thickness of glass that it can hold is from 8 to 34 mm. You can insert not only glass into it, but also any other material of such thickness. It just looks stylish with glass.
It’s easy to make glass shelves on the wall with it: you buy a mount, order pieces of glass with processed edges of the required size and shape from a glass workshop (or cut them yourself, if you know how). All that remains is the assembly itself:
- Attach the pelicans to the wall. Two dowels each. The case is collapsible - the decorative trim is removed, and there are two holes in the mounting plate. One is higher in the body, the second is lower. We secured it and put the decorative trim in place.
- Glass was installed.
- Tightened the screw. All.
Holder for a glass shelf on the wall
There are other forms of similar fasteners. The photo below shows a few of them.
Some mounting options for glass (and not only) shelves
Decorative brackets
Another type of fastening is brackets. They are reliable, some are decorative, so much so that they themselves are decorations.
Wall shelf brackets
Concealed installation - shelves without support
And the most amazing device for hidden installation. It makes it possible to hide the fasteners. A seat for the pin and the holder body is cut out at the end, and the shelf is simply put on it.
Hidden fasteners for shelves
As you can see, even a simple board or piece of glass on such mounts is not bad. But there is still a sea of all sorts of ideas.
Read about how you can update old furniture here.
Diagonal option
This type of wine placement is practiced everywhere. Any person can do it. To do this, it is enough to have some kind of wooden box or knock it down yourself.
When making it yourself you need:
- Cut four identical pieces of wood that are equal in width to the height of the bottle (or slightly less). Ideally, when assembling them, you should get a square.
- Measure the diagonals and cut 2 more pieces according to the resulting dimensions. These are the main elements.
- In the middle of each of them (up to half) a groove is cut with a width equal to the thickness of the wood.
- Insert elements into each other. You should get a design that resembles the letter “X” or a cross. It is placed in a square and secured with self-tapping screws. The bottles are placed in the resulting compartments.
Bookshelves
There are strength requirements for bookshelves: they can hold significant weight. Therefore, the fastening, materials and design must be reliable. Traditionally, bookshelves are made of wood, laminated or veneered fiberboard. And then fiberboard with a long span (more than 90 cm) sag over the years.
When planning shelves for books on the walls according to your own dimensions, keep in mind that the distance between the supports should not be more than 90 cm. Then even when fully loaded it will not bend. There are two types and varieties of shelves: wall-mounted and floor-mounted. Both of them can be angular.
In the simplest case, it is a board secured in one of the following ways. Some options, especially when presented correctly, look very good.
The simplest design of a shelf at the bottom of a wall for books (a secret fastening is used)
And with imagination, several planks turn into a very interesting thing, which can even be the main element of decor. Ideas for DIY are collected in the photo gallery.
And this is a serious way to expand the space due to the corners between two windows. A very interesting idea of using corners for small shelves. Corner wall shelf for books. Attached to pelicans)) Due to the contrasting color, this shelf is the center of attention Nothing complicated: it’s easy to assemble such a bookshelf with your own hands, and the look is non-standard Non-linearity - they are always interesting, and books of different heights can be placed on such a shelf Small system with jumpers made of pipes
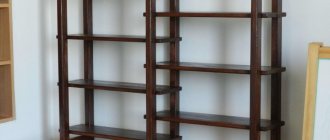
Floor bookshelves can be loaded more seriously. Here the forms are different: there are racks to which shelves are attached. The highlight can be a broken or unusual line of shelves, as well as interesting racks.
Simple design benefits from color and lintels
Unusual racks adorn this floor-standing bookshelf
This is more like a bookcase or even a cabinet, but the essence does not change - the original color and interesting small shelves in the central part and the structure looks interesting. Easy to make, and original. Very interesting idea - non-linear shelves and lintels made of thick glass
It's more of a shelving system
Read about the manufacture of fountains (both small indoor ones and more substantial ones for a country house, personal garden or garden plot) here.
Wine rack
The main component of a wine library is not just a set of shelves or a cabinet where bottles are stored.
This is special furniture that should provide the best conditions for the preservation and maturation of alcoholic beverages. Tools and materials:
- boards, plywood, bars, slats;
- wire;
- metal rods;
- self-tapping screws, nails, screws;
- saw, jigsaw;
- drill with simple drills and cylindrical;
- screwdriver, hammer.
Vertical option
A regular shelving can be made using different methods. It consists of compartments, each of which holds one bottle. Many people make a cabinet-style structure using boards for vertical racks and horizontal shelves.
This option can be done differently. This significantly reduces costs.
How to do:
- Stair-like structures are prepared from long and short square (4×4-6×6) beams. Their height can be any, even up to the ceiling. The width should be equal to the length of the bottle, and the distance between the two horizontal bars should be 5 mm less than the diameter of the vessel. On the two extreme structures, the horizontals are strengthened on one side, and on the rest - on both.
- All made ladders are fastened at the top and bottom with 4 beams.
Their minimum size is calculated as follows. The distance between each two verticals (ladders) should be equal to the diameter of the bottle plus 5 cm. This value is multiplied by the number of openings. To the resulting figures add the product of the number of verticals and the width of the beam.
Example:
The selected beam is 5x5 cm, the number of racks is 15, the number of openings is 14, the distance between them is 10 cm.
Then we get: 5×15+10×14=75+140=215 cm.
Horizontal option
Another type of rack is made of boards and beams. It is in many ways similar to the vertical version.
The racks are made of boards. They are connected by horizontal structures resembling stairs. Each such element is made of two longitudinal bars on which transverse slats are mounted, the distance between which is slightly less than the diameter of a regular vessel with alcohol.
This option is more universal, since bottles of different sizes can be freely placed even on one tier. Increasing the width of the transverse slats and the distance between the shelves will allow you to stack larger vessels.
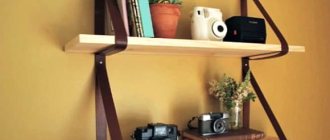
Hanging
Not very numerous, but an original type. The most important thing is that it can be done easily: a few planks, four ropes or two belts and you can get to work.
Old leather straps can also become the basis for a suspension system
This is a complex system of blocks...and the shelves can be located at any level. Two planks, four ropes and half an hour of time are all that is needed to make this shelf. How to make a hanging shelf - graphic step-by-step instructions
Unusual ideas
Simple bedside tables may be too simple and banal a solution for extravagant and stylish individuals. There are a million DIY bedside table ideas!
Therefore, here is a selection of ideas for non-standard variations:
- An old suitcase – a restored suitcase with attached legs – is a stylish retro idea. You can hide things inside, and put your essentials on top and set an alarm clock.
- Fruit boxes are a light loft story that is easy to transform, and you don’t mind saying goodbye to it in a couple of years.
- Cutting down a tree;
- Small former stepladder.
To the nursery
While the child is very small, I want functional shelves, but with children's drawings. But where can you get these? Do it yourself. Any shelf of the configuration you like can be covered with non-woven wallpaper or thick wrapping paper (glued with PVA). After drying, coat twice with water-based varnish. Such shelves can be washed, but what’s most interesting is that the shelf can change with the child. You tear off the old decor, glue on the new one. The idea is simple, it works perfectly.
Here's what can happen
For children, the shelves are not very different in design. If we talk about floor or shelving, then they must be strong, taking into account the fact that older children will definitely want to climb on them. Therefore, often even those shelves that stand on the floor are additionally attached to the wall: so that they do not collapse and crush young climbers. Based on these considerations, they are not made tall: even if they fall, it’s not scary.
The shelves in the children's room also differ in color - they are brighter, can be made in the form of letters, and boxes for toys can be installed in them: this makes it easier to keep them in order. In general, functionality and security must be combined.
System with drawers - cleaning will be quick
Children grow, design and colors change Combination of open and closed shelves - convenient for preschoolers Fairytale town will appeal to both boys and girls
Read about developing a children's room design here.
Material for work
Before starting work, be sure to check the quality of the material. The boards must be smooth, without knots, cracks, dry and without traces of mold. Before work, treat them with an antiseptic primer.
If you use tree branches for a shelf, then sand the trunk well so that during the work there are no surprises in the form of a rotten knot or traces of mold under the bark. You can also use chipboard and laminated chipboard for work.
Shelves and shelves for the kitchen
Say what you like, but in the kitchen the main thing is functionality. There is not much free space even on the walls: the cabinets take up a large area. Therefore, one of the tasks is to make the most of free space. There are interesting ideas for small or even very small gaps between the wall and the refrigerator or other household appliances. Strictly in size, you can make a pokka on wheels, which can be pulled out and completely hidden there. It is wide and narrow (see photo).
It’s easy to make such a retractable shelf-rack on wheels for different jars. Everything you need is at hand and out of the way
There are also interesting ideas for saving space. If the sink or station is located near the window, you can take the sides. There is an interesting hanging option - a grid on chains to which all sorts of utensils are attached. But such a shelf is possible if the desktop is not against the wall. Another option for saving space is if the kitchen-dining room is zoned with a counter, you can also make a shelf above it, which will be partially hanging. One part of it rests on the wall, the second on the counter or “hangs” on the ceiling.
We take up all the free space Shelves near the window in a different style Hanging shelf for small items There is also unused space above the counter
Read about ways to arrange kitchen furniture here.
Covering the entire wall above your desk with cabinets is not the best solution. They look heavy. The problem can be solved by using glass doors, but not everyone likes this. The solution is to make open shelves between the cabinets. They will add more lightness to the interior and the work area will not put so much pressure on the rest of the space.
Glass and open shelves will “lighten” the interior
Stylish accessories won't hurt There's room for glasses too Different style - same idea
Closed and open shelves in one system - convenient and non-standard
What are nightstands used for?
Nightstands have a number of functions in any apartment:
- shoe cabinet in the hallway;
- bedside table;
- a bedside table in the laundry room or bathroom for storing household chemicals;
- a nightstand in the kitchen, which is also an additional table for storing small items and serving dinners.
Decorative and original
Often, shelves on the wall play a purely decorative role. They are designed to attract attention and this goal is achieved by an unusual shape, contrasting with the walls and color. You can’t bet much on it: one or two things, but how interesting they are.
There are only three rectangles, but due to the color and binding they look very stylish. Another option from different rectangles and squares, and even painted in bright contrasting colors. You can’t pass by. A very interesting idea of using corners for small shelves. The theme is the same, the mood is different. And only due to the fact that the contrast between the color of the wall and the color of the shelf is not so bright
Another option for “square” shelves. Two identical sets arranged differently
If traditional square shelves are decorated around the edges with curly frames, the style turns out to be completely different.
Another interesting topic is glass shelves. Just one glass is not very interesting. Its combination with wood and steel is more attractive. The effects are sometimes unexpected. Glass is assembled on guides: the material is fragile and heavy, and it needs to be held. Steel can do this.
An interesting glass option. You can arbitrarily change the height between tiers
In fact, these systems are intended for creating store interiors, but they also look stylish in an apartment in a modern or loft style.
Also suitable for vintage style
What are shelves made of? Even from pipes. Metal and plastic. Do you have any samples left from the renovation? Put it to work and get a designer item, interestingly, assembled from trash.
This is a floor-standing option
Plastic pipes do not need to be painted
Water pipes, corners, everything is painted with bronze paint Large diameter plastic pipes installed in a frame. Here's an unusual shelf for you
This is an interesting variation of a bookshelf made of pipes
There are examples that simply amaze you. Well, how could you come up with this?
A combination of open and closed shelves. Non-standard shape - rounded corners and a completely new look Forged base looks noble Non-standard corner shelf Can be an interesting partition between zones
Something similar can be made from polycarbonate. They come in different colors and bend well. A wild flight of imagination from the author. An idea for those who have a lot of books. Interesting design
For lovers of cut flowers
Cardiogram shelf...
History of the bedside table
They say that the first bedside tables appeared in the eighteenth century. Their place of origin is France. The first copies had the most understandable function - they hid a chamber pot.
Other historical sources claim that the first bedside tables appeared in Italy, and only then migrated to France and gained enormous popularity and became known throughout the world.
The French participle for a piece of furniture can also be read in the name. Tumba in Russian echoes its French counterparts, meaning column or stall.
Shelf drawings
Basically, the designs are simple: you look at it and have a rough idea of how it should be done. For those who want to make shelves with their own hands, here are a few drawings. Having them on hand, you can easily make the required changes in size. Just remember that from fiberboard with a thickness of 16-18 mm, the span between the supports should be no more than a meter, or better yet, 90 cm. Otherwise, there will be a deflection. The situation is approximately the same with plywood.
The only thing that may be unclear is how to assemble some nodes. Let us explain with one diagram; the rest of the assembly is similar. All connections are made at the corners. To make the structure reliable, the shelves are cut out intact, and jumpers are attached to them at the corners.
All these connections are made at the corners
The corners are installed from below, two for each connection on the right and left. They are made from metal or plastic. If the load is planned to be significant, install metal; if the shelves are decorative, you can use furniture made of plastic.
Some types of corners
Now you can make your favorite wall shelves with your own hands (and floor ones too).
Drawing question
We make a drawing. Taking inspiration from selections on renovation websites and beautiful pictures on the Internet, we determine the style of the future bedside table and its design features. Select the required number of shelves. We understand whether closed shelves are needed or open ones will suffice.
Tip: practical housewives will always opt for cabinets with locking doors. This is a good way to avoid visual noise in the apartment and hide all the necessary and important miscellaneous things behind the door.
Note!
- How to make a backlit mirror with your own hands: necessary materials, tools. Tips for choosing lamps and LED strips
- A simple and beautiful DIY bathroom shelf made of MDF, glass, plasterboard: straight and corner options. Photo instructions, tips, video master class
- How to make a computer desk with your own hands from wood or chipboard. Photo/video master class + description of models
In such an interior it is easier to clean, there is less dust and more rest for the eyes, which are not distracted by the abundance of various types of household noise.
What is a folding table?
When assembled, the folding table is a thin strip that not only fits neatly along the wall, but practically merges with it. When the structure unfolds, it turns into a full-fledged tabletop, which can accommodate a whole family or company. The table is fixed on special triangular or U-shaped supports.
Folding table - functional furniture for a small room
Such furniture has a number of advantages:
- Compact dimensions. A folding table can be placed in any, even the smallest room, without cluttering up the space at all. You are free to choose any area of the room, because you do not need to adapt to the configuration of the model.
- Functionality. Despite its modest size, the furniture is absolutely practical and fulfills all its direct tasks.
- Stylish design. The laconic transforming table will harmoniously fit into the interior, gracefully complementing its design ensemble.
- Ease of installation. Since folding tables are sold ready-made, anyone can install the furniture: attach the piece to the wall, adjust its position, check how the support and tabletop function, and then attach it to the wall using ordinary hinges and self-tapping screws. To perform such work, you do not need any special tools or special knowledge.
If you don’t want to spend money on a ready-made model, assemble it yourself:
- prepare a tabletop of the required size and decorate it to your liking;
- Buy support strips from a hardware store and secure them with hinges at the bottom of the tabletop. And then it’s just a matter of small things – installation to the wall.
Models
Furniture manufacturers offer a wide range of tables, which differ in tabletop shapes, design types, sizes, fastening features, the presence or absence of certain components (for example, legs), and materials. In addition, the models differ in design: color and texture of the countertop surface. There are expensive options made from natural materials (solid wood or glass) and more budget ones that imitate natural stone or valuable wood species (most often plastic or veneered surfaces). Some tables are complemented by decorative inserts from other materials, carvings, inlays, and furniture fittings.
Forms
Folding tables are available with four tabletop shapes:
- Square. Ideal for a small family of three.
- Rectangular. The tabletop of the model is more spacious and can be used even for modest feasts with guests. Such folding tables are fixed both across the wall and along it.
- Semicircular. Tabletops of this shape have a small capacity and are therefore rarely used. Although the option looks original and suits classic interiors and Art Nouveau furnishings.
- Round and oval. The rarest variations. It looks stylish and unusual, but is rarely used due to its small capacity. The option is optimal as a dressing table in the bedroom or a workspace for one person.
In rooms with complex configurations, tables of non-standard shapes can be used. They are usually made to order.
Construction type
By type of design, folding tables are classified into the following types:
- Transformers. They can be wall-mounted or wall-mounted. The main distinguishing feature of the design is its versatility. If desired, it can turn into a compact workplace, replacing a desk, or into a full-fledged dining area.
- Folding table. A simplified version of the transformer, which does not have additional features. When folded, the tabletop assumes a vertical position, but at the same time a static “piece” remains against the wall, so the model is not completely assembled. Can be wall-mounted or wall-mounted. A striking example of the second option is a book-table. It became the first prototype of a folding table, which was familiar to every person from Soviet childhood. It was a tall “coffin” with two tabletops on either side of a narrow board in the middle. The “wings” are usually in a lowered state. When you need to set the table for a holiday, they are raised and fixed in a horizontal position. This piece of furniture really saved large feasts, since its area when unfolded increased several times. At a time when the model did not fold out, its narrow static tabletop was used as a shelf. When assembled, the “book” takes up very little space, but is still inferior to folding tables built into the wall.
- Folding. The simplest and most popular model. The table can be mounted on any vertical surface, be it a wall or the front of a cabinet. In addition to the tabletop, such models are usually equipped with a number of shelves. If the table is located in the kitchen, then they are filled with dishes. When the model is used for work, books and writing materials are stored in the shelves. The design is designed for heavy loads. As a rule, it has no legs, so the fastening to the wall must be reliable so that the table does not collapse at the feet of the owners. The tabletop does not rise, but folds down. This is its main difference from the folding model.
- Mobile folding table. The model is in many ways similar to the previous one, but differs in mobility. The tabletop moves along a guide mounted into the wall. This folding table is convenient for small apartments with a non-standard layout.
- Hanging. Tables without legs. They are compact, as they are not designed for heavy loads.
- Folding bar counter. It features a narrow, elongated tabletop. Ideal for small kitchens. Fixed high, like a classic bar counter. Often complemented by the same high chairs.
Although transformers and folding tables belong to the folding category, in classic models the tabletops are lowered during folding, and not raised, as happens in the two cases described above.
Is it possible to save money somehow?
Any repair work is, first of all, a blow to the seed budget. Yes, it is at least impractical to save on building materials, but the situation can be saved by making furniture with your own hands - by the way, even a non-professional can easily cope with this, having detailed step-by-step instructions. Undoubtedly, this applies mainly to simple subjects. A bedside table, for example, can be made quickly and inexpensively with your own hands.
Homemade bedside table from old drawers
On a note! You cannot skimp on materials for DIY production. After all, everyone knows that the stingy has to pay more than once. If you use low-quality consumables, the work may have to be redone.
Yellow bedside table