A lot in his life and everyday life depends on how a child’s room is arranged. It is important that the organization of space in the nursery is aimed at creating the most favorable conditions for the growth, development and comfortable existence of the baby. Usually his room is a mess, things and toys are scattered throughout its entire area, but if you install a functional, spacious closet there, in which there is a place for all the children's property, then the problem will be partly solved. And if you make it yourself, you can generally get a lot of benefits.
What is needed for this
The market is filled with all sorts of materials, so the question of how to make a cabinet and get the necessary components is not as difficult as it seems.
Some of them will be:
Multilayer plywood is very durable and wear-resistant; it does not contain chemical compounds harmful to humans. Treat environmentally friendly design components.
Wood chip boards are the most popular today. The price makes them accessible to many people, but the quality does not suffer.
Wooden boards can be cut from different species, sizes are adjusted to an exclusive order.
Cabinet plans often include: pine, birch or oak. Such types are characterized by high strength and resistance to temperature changes, and water resistance.
If the furniture is made for more than one year, then the choice must be approached with special care.
Types of designs
The children's room should be divided into three functional areas: a sleeping area, a play area, a creative area and a learning area. Based on this, different types of furniture are used:
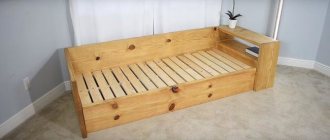
- Soft designs. They are installed for sleeping and relaxing, giving the interior a special coziness. To save space in the room, you can choose sofas with additional accessories: shelves, drawers, cabinets. The functionality of such furniture also lies in the fact that at night it is used as a place to sleep, and during the day - for games or reading.
- Play furniture. Often the space in the room is equipped with such items as a do-it-yourself children's kitchen, a puppet theater, a hair salon with a dressing table and various shelves for combs, a hospital complex with medical supplies. It can also be furniture that imitates cars, trains, carriages. Sports complexes, consisting of horizontal bars, swings, and slides, will develop the physical abilities of children.
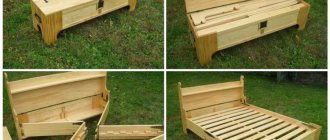
- Cabinet furniture. It consists of closed structures: pencil cases, cabinets, wardrobes, beds with drawers for bed linen, chests of drawers, tables (computer or bedside). Such DIY products for a children's room should be functional and spacious.
Ready-made sets, consisting of several items, allow you to decorate the room in the same style
Soft Article on the topic: DIY tool cabinet drawings
Gaming
A cabinet
room for a child can be equipped with the following set of furniture with your own hands:
- a bed or sofa for sleeping and relaxing;
- desk, study chair;
- a wardrobe for books, writing instruments and a wardrobe for clothes;
- shelves for various things;
- special furniture for toys, for example, a children's kitchen set is in demand;
- sports corner.
Step-by-step tips on how to make furniture for dolls with your own hands Soft ottomans will ideally complement the interior of the room and add coziness. They are safe, and you can easily sew them with your own hands using patterns. Frame products are also easy to manufacture. Wardrobes, beds, bedside tables, shelves - you can do all this yourself.
Tool
The selected material option must be purchased and transported instead of assembly; a do-it-yourself cabinet diagram is drawn up taking into account the available equipment.
To complete the work you will need:
- Saw on wood.
- Surface grinding machine.
- Square.
- Tape measure or other measuring device.
- Fastening systems.
- Metal corners.
- Carpenter's saw.
- Sealing mastics.
Note!
- Dark sofa: advantages and disadvantages of dark sofas. Features of choosing dark shades of a sofa for different styles (photo + video)
- Chest of drawers for the bedroom: TOP-170 photos and videos of chest of drawers for the bedroom. Choosing the shape, size, color and material of the chest of drawers
- Light sofa: TOP-130 photos and videos of light sofa options for different rooms. Varieties of upholstery materials and colors
To make the cabinet look perfect in the interior, you need to choose a shade; it can be applied using water-based acrylic paint.
Decoration
The resulting doll cabinet most often looks ugly and therefore needs to be decorated. It is covered with old wallpaper, napkins, colored paper or fabric on top. You can use the decoupage technique, cover the product with acrylic paints, or come up with a different design, showing your own imagination.
Rhinestones, sequins, sparkles, and foil are used for decoration. Beads will look good as decoration for pens. Girls love to decorate their toys with lace, elegant braid, and flowers.
The cardboard base can get wet from paint or a large amount of glue, as a result of which the structure is deformed.
It is better to cover the internal surfaces with paper in advance before assembling the finished product. The hanger holder, which is made from a stick or long skewer, should be coated with acrylic paint. Hangers can be made from paper clips, and if the doll is large, then from wire. You need to add a mirror to one door, which would look ideal as a piece of foil.
Handles are attached at the last moment. They are usually made from wire, which is bent to the required shape, covered with paper or wrapped with braid. For handles, you can also use large beads, buttons, lotto barrels, and small chess pawns.
Making a beautiful wardrobe item for dolls is not difficult. The simplest version of a locker can be created in literally half an hour. It will also be useful to involve your child in work - this will help develop his imagination and teach him to be neat.
Hull view
Many design ideas are beneficial because the owners themselves complement the design with various elements. This option is no exception; you need to take into account that the parts must be combined with each other and with the body, respectively.
Assembly involves making the roof, bottom, rear and side walls. It wouldn’t hurt to think through and implement a retractable wardrobe for seasonal shoes into the furniture.
Built-in model
For work of this kind, you can use improvised materials; this is very convenient if you suddenly run out of boards, and the nearest store is an hour away.
In addition, rational use of existing funds will help preserve the family budget.
The built-in closet cannot be moved or moved; when deciding on this assembly option, the owner must understand this.
Note!
- Small sofas: TOP-140 photos of small sofa models. Pros and cons of small sofas, choice of shape and upholstery
Sofas from IKEA: features of models from the manufacturer. Varieties of sizes, shapes and designs. 120 photos + video reviews
- U-shaped sofa: TOP-160 photos and videos of design ideas with a U-shaped sofa. Pros and cons of the design, choice of upholstery and color of the sofa
Swinging doors
This is a fairly popular type of construction; the location of the sashes will depend on the presence of sections inside.
Loops are made in the following varieties:
- Detachable fasteners are installed on the inside.
- Universal ones are used regardless of the sides of the furniture; they are attached to the doors and the product at the same time.
The screwing order is as follows: first of all, the system is fixed to the frame, and then the doors are hung on it.
How to choose material?
The safest materials for a child's room are presented in the following list.
- Wood massif
- Fine particle board
- Premium plywood
- Fabrics and fillers must be natural, confirmed by quality certificates
Do not use paints and varnishes with a strong odor, as they are very toxic. It is better to choose a fabric that is easy to clean from stains and is as wear-resistant as possible.
Coupe
In this option, during opening, one sash overlaps the other, creating a sliding structure. To install this type of installation you need to have certain knowledge or experience.
Note!
- Gray sofa - TOP 180 photos and video designs with a gray sofa. Advantages and disadvantages of furniture in gray tones. Gray sofa upholstery options
Bookcase - the need to use a bookcase. Varieties of designs, sizes and shapes. Bookcase materials (photo + video)
- Leather sofas: advantages and disadvantages of leather sofas. Color options in leather upholstery. Combination of a sofa in the interior (photo + video)
The accessories are sold as a set and include:
- Wheels for the box.
- Guide structure for the web.
- Special installation cassettes.
- To facilitate opening, locks and a closer are provided.
The cabinet structure should have a threshold; this is the most suitable option for such furniture.
What to pay attention to
Before starting all work, it is necessary to take measurements of the room and draw up a drawing of the future structure. These steps will help reduce assembly time and avoid possible errors in the process.
The width and height are calculated using a tape measure; special attention should be paid to the distance to the baseboard, window sill and sockets.
Well-thought-out nuances will help to avoid problems with the accessibility and convenience of most things during operation or opening doors.
Preparation
You can draw a drawing for the product yourself or create it in a CAD program. The computer system is very efficient but difficult to use.
For the first option, you need to purchase a sheet of paper and stationery in advance. It is important not to forget about the thickness of the material used and mark the door fasteners.
The side view is compiled taking into account the depth of the furniture, the fastening of doors and the rounding of shelves.
To ensure that the shelves do not create problems during installation, they should be placed at a distance of 10-15 cm from the front wall. The drawing must also include the dimensions of all filling elements of the structure.
Build process
Start installing the wardrobe by cutting the material according to the cut sheet. Strictly follow the cutting plan. Consider the loss of size due to cutting the material with a jigsaw. The size of the loss is equal to the thickness of the saw blade of the power tool.
Correct cutting of material is one of the main components of successful work.
Installation begins with the installation of support bars, side frames, lower and upper horizontal crossbars.
First, the supporting structure is installed.
After assembling the main frame, intermediate shelves and hanger strips are installed.
The shelves are installed after the frame is installed.
At the final stage, the sections are fastened with screws, door hinges, handles, closers and other fittings are installed. At the very end, the installation of swing doors, lockers, sliding compartments, and lighting fixtures is carried out.
The final stage is the installation of handles and other fittings.
By following the sequence of steps, you will get a unique, one-of-a-kind wardrobe.
Details
After the preparatory work, you can begin manufacturing the components of the cabinet. The dimensions must be transferred to a wooden base using a pencil and a meter ruler
The next stage is sawing and direct assembly.
Drawings and diagrams
A correctly drawn up drawing is the key to successful work. It is important at this stage to take into account all the nuances and determine the size of the shelves and partitions. All gaps and allowances for processing the material are taken into account. After the main drawing of the internal arrangement of the compartments is ready, you need to draw a plan for cutting chipboard/MDF sheets.
Drawing up a drawing is a necessary stage of preparation for the manufacture of a cabinet.
The drawing takes into account all significant distances, such as length, height, width. The internal arrangement of the shelves is drawn according to all parameters to represent future dimensions. Don't forget to take into account the thickness of the sheets or wood. Since the minimum size of any material starts from 16 mm, this will play an important role.
A cutting plan is a diagram according to which sheets, bars, and facades will be cut. With such a scheme, material consumption will be minimal.
A sketch of the future design also takes place. Experts in the field of design craftsmanship advise using the method of converging points. Select one or two points on the sheet to which all horizontal lines will tend. The vertical ones in this case will be perpendicular to the horizontal ones. In this way, you will be able to imagine the future design of the cabinet with your own hands as believably as possible.