how to make flowers from napkins
It's amazing how many interesting things you can make from napkins. The ideas are endless! If you're looking for inexpensive yet gorgeous party decorations, check out 25 great DIY napkin flowers that will make your party bright and cheerful.
Here you will find different options - simple flowers from napkins , large and small, flowers from colored napkins and Kleenex napkins. There are even several lessons on how to make flowers from coffee filters, essentially the same as napkins. There are step-by-step photos for each example, and for more detailed information you can use the links to the source under each gallery.
Yellow roses
Execution sequence:
- The paper napkin is cut in half.
- One of the resulting parts is screwed quite tightly onto a pencil, leaving a few centimeters at the end.
- The rolled napkin is moved to the edge of the pencil, forming an accordion.
- The resulting part is completely removed from the pencil.
- Several more similar rolls are created, the splendor of the flower depends on their number.
- To form a bud, the rolls are rolled together, twisting at the bottom, the part is fixed with a colored satin ribbon.
- The resulting bud is fixed on the stem or used as an ornament or special decoration.
Delightful yellow roses from napkins are ready!
Daisy
Although the daisy has thin petals, it is made from a napkin in a different way. This flower has curled petals and a terry center. The center of the flower is almost always yellow, so you need to prepare napkins in 3 colors: yellow, green and the chosen color for the petals. To add additional volume, it is better to use multi-layer napkins.
- A strip 4 cm wide and 15 cm long is cut out of a yellow napkin.
- The strip along the entire length of the upper edge is cut into thin stamens 2-3 cm wide. You do not need to cut deeply, leaving 2 cm of the strip intact.
- Cut the wire to the required length.
- Using a glue stick, attach one end of the yellow strip with the cut side up to the wire.
- Wind the strip tightly onto the wire evenly.
- The end of the strip is secured with glue and the workpiece is put aside.
- From a napkin of the selected color, cut out 2 strips 6 cm wide and 21 cm long.
- Each strip must be cut into petals 5-6 mm wide.
- One strip of petals is glued onto the blank and wrapped evenly around the yellow base.
- The end of the strip is sealed with glue.
- The second strip is also glued and wound.
- The bottom of the flower must be wrapped tightly with wire to secure all the layers.
- Cut a strip 1 cm wide and 20 cm long from a green napkin.
- One side of the strip is fixed at the bottom of the bud with glue and the base of the flower and stem are wrapped with a green napkin.
- Cut a circle with a diameter of 3-4 cm from a green napkin.
- Small teeth are cut around the circumference of the circle.
- Make a hole in the center of the circle and insert the stem into it.
- Then you need to apply glue to the circle and glue it in the form of sepals at the bottom of the bud.
- All petals of the flower bend away from the center. If possible, the napkins are divided into all layers.
- The middle of the flower also needs to be fluffed.
- Then you need to glue several leaves cut from a green napkin onto the stem and the flower is ready.
Tulip
To make beautiful tulips from napkins, in addition to the main material, you will need plastic spoons (4 pieces for each flower) and green napkins for forming leaves.
The napkin needs to be divided into four parts, then each of them should be wrapped around a spoon, as shown in the photo. First, we fold two spoons with their front sides facing each other and wrap them with tape. We also attach the remaining two spoons to the composition and fix it.
Now you need to cut out several large leaves from a green napkin and wrap the workpiece with them. Make a lot of these tulips and make a bouquet, tie it with a decorative ribbon.
Gorgeous lotus
Execution sequence:
- A multi-layer white or colored napkin is prepared, then the material is completely unfolded.
- The corners are bent towards the center, the napkin is turned over to the other side.
- Actions with corners are repeated identically.
- The center is pressed firmly, and the corners are pulled out very carefully.
- The workpiece is turned over, the corners are also carefully pulled out. As a result, the flower will turn out to be very voluminous and lush.
A gorgeous lotus made from napkins is ready!
Carnations from napkins
Carnations are very beautiful and magnificent flowers that impress the viewer with their mystery. However, there are no particular difficulties in creating crafts; the main thing is desire, skill and sleight of hand! You will need multi-layer soft napkins.
Execution sequence:
- The prepared napkin is folded in half several times. The result is a voluminous, puffy circle that needs to be carefully adjusted and straightened.
- Several flowers are made using this technique.
- The resulting blanks are attached to wire stems.
The original napkin carnations, delightful in their appearance, are ready!
Peonies
This step-by-step guide will help you quickly and easily make flowers from napkins to decorate gift wrapping or create a decorative element in the interior.
To make a bright, voluminous peony, you will need 2-3 plain napkins; the greater the number, the more magnificent the finished flower will look. We unfold the napkins and fold them on top of each other, form an accordion out of them and tie it tightly with thread in the middle.
Using scissors, we cut the ends of the workpiece to give them a rounded shape. And to complete the work, we lift each layer up in turn - first on one side, and then on the other, until a voluminous bud is formed.
Simple flowers
For beginners in this field, the easiest way to start is by creating simple flowers using easy techniques. You will need 12 napkins measuring 50 by 65 centimeters. You can also use colored satin ribbons to decorate the finished product.
Execution sequence:
- Three napkins are placed on a flat, clean surface.
- The bottom edge is folded up about two to three centimeters.
- This way the paper is folded to the very end. The result will be an accordion.
- The resulting blank is folded in half and fixed in the center with chenille wire.
- Two pieces of chenille wire are attached to the product on both sides, the napkins are twisted, resulting in a multi-color combination of napkins.
- The paper is cut into three parts, and the edges are rounded using scissors.
- The workpiece is unfolded, the top layer is carefully pulled out and wrapped around the flower.
- The remaining layers are separated from each other, and the product is turned over.
- The flowers are getting better and regulated. If desired, the finished craft is decorated with ribbon.
Pea flowers
Execution sequence:
- Flower stems are formed from thin and thick wire, then they are beautifully bent to give an original and natural shape.
- Two short green ribbons are connected, a leaf is depicted on them, then it is cut along the contour using sharp scissors.
- The wire stem is wrapped with green tape for a beautiful and natural appearance.
- On a white or pink napkin, using a simple pencil or pen, draw the outline of a pea flower and also cut it out along the outline. One of the flowers is made in a larger size and in the shape of a heart.
- The resulting petals are painted or tinted using watercolor or acrylic paint.
- A beautiful, beautiful plant bud is formed from the dried petals.
- The leaves open and fluff out to add volume and attractiveness.
- The resulting part is fixed on a green stem.
The pea flower made from a napkin is ready!
Flowers are a very pleasant and valuable gift and sign of attention that any person will be happy about. You can make a flower from napkins with your own hands. The main thing is to have great desire and aspiration!
Decorating the room
The floral theme is relevant for the production of panels and paintings. On an autumn or winter day, such crafts will take you back to spring or warm summer.
Bright dandelion
A yellow dandelion created with your own hands will definitely cheer you up and bring good luck for the whole day! To make it you will need fairly thick three-layer napkins, a stapler, and scissors.
Execution sequence:
- The yellow napkin is folded in half a couple of times and cut into square pieces.
- The resulting square blanks are stacked and fixed in the center using a stapler.
- Protruding sharp corners are carefully cut off using sharp scissors so as not to damage or pull the napkins. The result will be a small circle of napkins.
- A fringe is created along the edges; the dandelion petals folded together fluff up and rise to the top. You will get a beautiful, voluminous and lush flower that can be used as decoration for crafts, gifts, and decorations.
Bright, spring dandelion is ready!
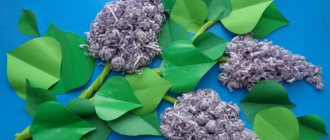
Mimosa branches
Mimosa is a lovely, delicate flower that is used to decorate bouquets on the eve of spring festivities. Each of us can contemplate such beauty all year round if we make a paper mimosa sprig in the form of a wall panel and an artificial three-dimensional plant for a vase in the living room.
The painstaking work begins with the formation of a large number of flowers, each of them is made from a narrow strip of napkin, cut like “grass”. After this, cut the green napkin into leaves with fluffy edges.
The applique does not require a stem, but a wire is required to create a bouquet. We wrap the wire with a green napkin, attach leaves, and cover it with many flowers.
The basis
- cut the sleeve on one side and bend it so that a small platform is formed;
- dilute the plaster to the consistency of thick sour cream and immerse the trunk there with the uncut end, and lay the surface with small pebbles, lightly pressing into the gypsum mass;
- when the solution hardens, place the ball on the platform using hot glue;
- drape the stem coated with glue with a satin ribbon.
Note!
- What can be made from a box at home for kindergarten: the best craft ideas + video master class
How to make flowers from corrugated paper with your own hands: step-by-step instructions for creating voluminous bouquets
How to make paper flowers for interior decoration: 122 photo ideas with a master class on creating decorations for children and adults
History of napkin etiquette
People first thought about hygiene at the table and began using napkins 3,500 years ago.
Initially, napkins looked like fig leaves - this is how slaves wiped the faces and hands of their masters.
Alabaster napkins were used in Ancient Rome and only by rich people.
The same napkins were used by the Greeks and the rulers of eastern states.
Later in Rome they began to use linen napkins with embroidery and it was considered good form to always carry them with you - this is where the fashion of embroidering your initials on napkins came from.
In Japan and China, rice paper napkins were used. Before use, they were kneaded well, and then simply thrown away.
In Rus', napkins began to be used in 1729, and before that, clothing sleeves or tablecloths were usually used instead.
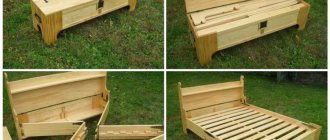
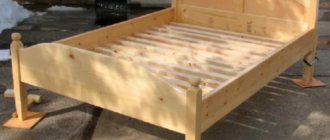
Tree of happiness
The idea of artificial dwarf trees with a spherical crown - topiaries - came to us from Europe. "Topiary" translated from Greek means "tree of happiness." Therefore, roses will be very appropriate in the decor of this installation.
For the craft you will need a foam ball (it can be replaced with a newspaper blank), pink or red, white or lemon-colored napkins, a paper towel roll for the barrel, a flower pot, and plaster for pouring. Satin ribbons and beads - to decorate the composition.
Little flowers
These flowers, which are associated with pear flowers, have a very cute and attractive appearance. You will need soft napkins, a real or wire twig, and scissors.
Execution sequence:
- Squares measuring six and a half centimeters are prepared from napkins.
- The blanks are folded in half to form a triangle.
- When folded to the right, only two petals are depicted.
- Five small squares about three centimeters in size are cut out of green paper, which are stacked in layers.
- A circle is drawn and cut out on the blank. Next, one is folded in half.
- The green paper is unrolled, pinched in the middle and pulled upward to form “antennae”, placed in the center of the white paper.
- The workpiece is held from below and wrapped.
- Light green napkins are cut into strips about four centimeters wide and folded in the form of a neat accordion, cut out in the shape of a leaf. The edges must be fixed.
- The resulting blanks are attached to the stem and securely fixed.
Small and very neat flowers are ready!
Sunny summer
For a bright panel of dandelions and cornflowers, choose blue, yellow or lemon colored substrates. Leaves can be made from corrugated paper. It models well and holds its shape.
Look at the step-by-step master class in the photo with comments.