It is always difficult to choose gifts for older people, because many of them are conservatives and are wary of newfangled achievements of scientific and technological progress. A win-win option in this case would be a pendulum chair - the original product can be purchased in a factory version or made independently at home, using inexpensive materials at hand. Handmade furniture will be a very valuable gift, filled with home comfort and warmth. In addition, with a responsible approach to the task, it can look no worse than a factory one, and serve its owners much longer.
How to design correctly
There are several types of rocking chairs that suit different needs and habits of users. The first models that appeared in everyday life were equipped with simple arches and skis. You can make rocking chairs with your own hands according to a ready-made drawing. But you need to know that these drawings were created for an individual person and may not be suitable for others. First of all, the product must be comfortable and meet your own needs.
What you need to know when designing a product:
- When making a chair, it is necessary to take into account that the center of gravity of the rocker must be correctly located in relation to the center of the circle of the rocker. Then the product will be comfortable and stable.
- A rocking chair made of wood will not move if these two points converge into one.
- The product will become unstable if the center of gravity moves higher relative to the center of the circle.
Facts from history
Today, there is almost no information left about from which country and approximately at what time the world saw the first rocking chair. One can only make guesses on this score and refer to one’s own associations, which for some reason are closely connected with England.
Historians offer two versions of where this chair could have come from. The first one talks about a certain furniture maker from Venice who lived in the 19th century. His name was associated with wood of an unusual type - round and curved.
- However, turning to English dictionaries and the history of the origin of words, one can see several inconsistencies with this theory.
- The first, perhaps, tells us that the word “rocking chair” itself appeared two centuries earlier, and at the beginning of the 19th century, chairs of this configuration began to be mass-produced by English manufacturers.
- Only people from the upper class and creative people could afford such an outlandish piece of furniture.
The second version talks about a certain Benjamin Franklin. The years of his life almost coincide with the Venetian furniture maker, however, most historians believe that he was the first person to buy such a chair.
The history of the rocking chair most likely began in the 18th century. More specific information has not yet been found.
DIY rocking chairs
Making this piece of furniture is not an entirely simple task, but it can be done even by those who have never done anything like this before. There are many designs, options and manufacturing methods. Let's look at the most interesting and simple ones.
The simplest chair from an ordinary children's highchair
The best option is to use an ordinary wooden chair. For manufacturing you will need the following materials and tools:
- chair with back and armrests;
- high-quality plywood 15 mm thick;
- wood varnish;
- jigsaw;
- milling cutter;
- Sander;
- dowels
Stages of work:
- We cut out radial runners from plywood according to the diagram using a jigsaw.
- We sand them with a machine or sandpaper on a lath.
- We make cuts from the bottom of the chair legs and select grooves for the runners.
- We insert the runners into the grooves of the chair legs, fix them with glue and dowels.
- We cover the surface of the rocking chair with varnish.
Video: making a high chair
Vanka-stanka: step-by-step instructions, photos, drawings
It will also be easy to make such a rocking chair from plywood yourself, if you know the drawing. There are many options on the Internet, we will present one that does not have the risk of capsizing.
Materials and tools for assembly:
- sheets of plywood measuring 1520x800 mm, 15 mm thick (for sidewalls, racks and supports), 10 mm thick (for back and seat slats);
- jigsaw;
- glue;
- screws.
Chair assembly steps:
- We are preparing a drawing of the future product.
- We transfer the drawing onto sheets of plywood.
- We cut out the necessary elements using a jigsaw.
- We drill holes for the screws.
- We sand, prime and paint all the elements.
- We assemble the frame.
- We form the seat and back from the planks and glue the elements.
- We fix all the elements with self-tapping screws.
Video: simple plywood rocking chair
Is it possible to assemble a pendulum mechanism for a sliding chair on your own?
The pendulum design moves the upper part of the chair relative to its base. To do it yourself you need a detailed diagram. It's not an easy job. But the principle of operation of the mechanism is always the same. For the simplest design you will need:
- 4 bars of the same length and two of a larger length (sizes are chosen depending on the design scheme);
- 8 bearing nuts and washers.
Instructions:
- Assemble the bars and drill one hole in them at each end for the bearings.
- Make an end beam (it holds the weight of the entire sliding structure):
- Attach each end part to two bars. This will be a simple pendulum mechanism. Next, it is connected to the base of the chair and the seat. An example of the finished design is below.
Rocking chair made of plastic (polypropylene) pipes: diagram and operating procedure
The chair can also be made from profiled metal or simple water pipes. To work you will need:
- plastic pipes with a diameter of 25 mm (for sidewalls) and 20 mm (for transverse elements);
- drill and pipe welding machine;
- fittings with a cross-section of 15 mm (inserted into pipes to enhance the stability of the chair);
- fittings for corner connections (2 pcs. - for 90° and 6 pcs. - for 45°);
- pipe plugs;
- pencil, ruler.
Instructions:
To make the chair comfortable, you need to attach a 50 mm thick foam mattress to the frame. To do this, you will need a cover with ties, which is easy to sew yourself (by machine or even by hand).
Desire and basic skills in working with tools are all you need to independently build a comfortable and beautiful rocking chair for your home or cottage. The described instructions will help you do this correctly and quickly.
Where can it be used?
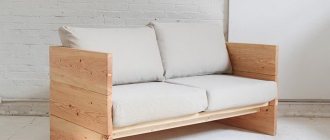
A rocking chair in general can be installed anywhere, be it a room or a veranda in the garden. But most often it can be seen in a spacious living room in a private house or in the garden. In the latter case, rocking chairs are often made of either metal or rattan. The products are characterized by increased strength; when properly processed, they are not afraid of water, are durable and can really not only decorate the garden, but also create a real relaxation area in it. Moreover, the rocking chair will feel great both on the veranda and on the lawn or garden path, where it will not disturb anyone.
Rattan rocking chair
On a note! In the garden you can put not just a rocking chair for one person, but also a real rocking sofa or a bench that can accommodate several people at once.
Also, rocking chairs fit perfectly into the interior of large and spacious rooms, especially those made in a certain style. Of course, with modern design solutions, you should abandon the traditional rocking chair, but a stylized chair will fit even into a high-tech room.
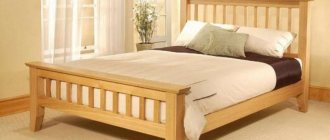
Rocking chair made of boards and plywood
How to restore
If you have an old, shabby rocking chair, you don’t have to throw it away. With the exception of the most “severe” cases, any structure can be repaired with your own hands. The repair itself consists of assessing the general condition of the item, replacing completely worn parts with similar but new ones, replacing the padding, and reupholstering with a suitable fabric.
Metal rockers break much less often, due to their inherently high strength. But if necessary, welding of individual parts is done if they suddenly break off from each other, replacement of wooden, soft surfaces for sitting. Items made of plastic cannot be restored, but in those woven from wicker it is easy to replace part of the braid.
Necessary materials, tools
Since rocking chairs are usually made from a variety of lumber, you will need some woodworking tools. These include a jigsaw, drill, screwdriver, hammer, ruler, tape measure, screwdriver, brushes for varnishes and paints, a grinder or sandpaper of various grain sizes, and spatulas. The materials you will need are stains, transparent varnish, pieces of plywood, timber, boards, screws, PVA or other furniture glue, foam rubber (sintepon, other materials for padding), thick fabric (velor, tapestry, chenille, jacquard, leather, etc.)
Procedure
First, an external inspection of the item is carried out to see whether it can be repaired at all. If the chair has not yet crumbled into dust, rotted or been eaten by beetles, then everything will work out. Most often, the armrests require repair, and the seat, runners, and backrest require complete replacement. The chair is completely disassembled using a screwdriver. If there are completely “incompetent” parts, instead of them, others are cut out with a jigsaw, indistinguishable in shape from the old ones.
When the frame is completely intact, the runners are not worn out, only the coating needs to be renewed. To begin with, the structure, using special attachments on a drill, is removed from old paint and varnish coatings, and places where there are cracks and chips are puttied. The parts sanded down to the wood are covered with stain, dried for four to six hours, and one or two layers of furniture varnish are applied. Each layer of the latter is dried for at least 20 hours.
Replacing seats and backrests
The method of replacing seat parts depends on their design and material of manufacture. Wooden parts are unscrewed, partially replaced, tinted, varnished. With soft seats and backs it is a little more difficult - the covering is completely removed from them by removing all the nails and staples, while trying not to damage the frame. If the frame or plywood to which the “filling” and the textile covering it is attached is cracked, they are also replaced with new ones.
When the packing is still “in order”, it is left, otherwise it is completely replaced with a new one. Suitable parts are cut to size from foam rubber, the corners of which are carefully cut off to make it more beautiful. The padding is secured along the edge with staples from a construction stapler. Next, you need to cut the fabric - usually a rectangle is cut out of it, the corners of which, falling on the corresponding corners of the furniture, are neatly folded, secured with a thread and a needle. All edges must be turned in at least one cm so that they do not fray, and secured with a stapler on the wrong side of the product.
Assembly Tips
The elements of the future rocking chair are connected, as a rule, using wood glue and fasteners. Since the load on the structure will be considerable, glue alone will not work. Nails will help secure the parts.
It is necessary to cover the parts with glue in those places where they come into contact with each other, and then secure the work done using nails. They are driven in all the way.
In places where excess glue appears, a rag is used to remove it. This must be done immediately after applying the material to the surface, otherwise, after it has completely dried, it will be impossible to remove it. The chair should stand untouched for about a day for the glue to completely harden.
What is undesirable
Simple homemade chairs are enough; as you can see, there are many. But there are structures that it is better not to tackle, no matter how much desire or skill you have. This is, firstly, an office chair. The requirements for its ergonomics are radically different from those for a home for relaxation: it should create comfort that is not relaxing, but maintains performance for a long time. Technologically, this is achieved by using complex-shaped parts made from high-quality materials. And their production, in turn, requires industrial conditions with equipment for pressing and stamping, for plastic casting, TIG/MIG welding, etc. In addition, a gas lift, when purchased individually at retail, can be more expensive than a finished chair; Gas lifts are already made by machine-building enterprises with equipment for precision metalworking.
Secondly, the chairs are made of cardboard. Packaging cardboard with internal corrugation is a wonderful material in many respects and finds the widest application. But not for chairs. In principle, building a chair from cardboard is not so difficult, see figure, and its overall strength will be very high. But - alas! – even cardboard reinforced in any way easily crumples at the end and the seat of the chair will sag very soon. And a push with anything hard, even a vacuum cleaner, will leave an irremovable dent.
Stages of making a chair from cardboard
How to choose material and design
Modern models of rocking chairs are made from various materials, each of which has its own characteristics:
- Wood. Furniture made from various types of wood looks stylish, it is durable and reliable. The surface must be treated with a finishing protective compound.
- Sheets of plywood. The material is easy and comfortable to work with, it can take any shape, and is also suitable for the manufacture of small elements. However, it is better not to place such rocking chairs outside.
- Profile pipes. It is better to make individual parts from them, rather than the entire structure. The material is durable and easy to work with.
- Plastic pipes. A practical, budget-friendly and reliable option, the material is lightweight and easy to process.
- Rattan and wicker. The result is beautiful designer products, but the weaving technology is quite complex, and high-quality material for manufacturing is not easy to find.
- Metal. Processing parts will require skills and experience from the master. Metal chairs are durable and resistant to external influences.
Tips from the experts:
- Coniferous woods are the most comfortable when assembling furniture yourself, as they are easily amenable to any type of processing. However, they quickly react to humidity and swell, so rockers made of spruce, pine or alder must be treated with special protective solutions.
- Furniture can also be made from expensive and denser species, for example, oak, beech or ash. In this case, you can be sure of the strength and durability of the structure, since these types of trees do not have large pores.
- To create swinging products, it is better to use well-dried first grade wood blanks. If the chair is assembled from damp material, the entire structure may become deformed and deteriorate over time.
- The choice of material is often determined by the location where the rocking chair will be located. An outdoor structure (for a dacha or veranda) must have additional protection in the form of treating all surfaces with antiseptic agents that can minimize the effects of snow, rain and frost.
- Summer cottage products should not be covered with textiles and covers should not be placed on the body, otherwise the fabric may become damp and rot. In this case, it is better to use removable pillows and blankets.
- Wood can be combined with metal to create an even more durable structure. In this case, the frame should be metal, and the seat itself should be wooden.
- It is better to choose plywood sheets with good ductility for manufacturing; they are more convenient to process.
Photos of pendulum glider chairs
<
>
The glider rocking chair will give you a lot of pleasant impressions. This is an opportunity to have quality rest and calm your nerves. The swinging process will have a positive effect on the heart, psyche and quality of sleep.
Pros and cons
The glider design chair has the following advantages:
- It is easy to use.
- Does not pose a danger to humans or pets.
- Thanks to the high-quality pendulum mechanism, the likelihood of damaging the floor covering is minimized.
- Does not make noise during operation.
- Suitable for a wide variety of settings and design trends.
- It can be equipped with a wide range of additional features that help increase the level of comfort.
- Promotes complete relaxation.
- There is no need for systematic maintenance.
- Can be used to feed babies.
The disadvantages include such points as:
- High price.
- Big sizes. The product requires a significant amount of space to be allocated for it.
- Models with mechanical control are less convenient to use.
- Furniture with fabric upholstery is difficult to protect from dirt.
“>”>”>”>”>”>”>
Mechanisms of transformation
The mechanism can be mechanical, sensory or electrical. There are also several of the most popular models of chairs, which differ not only in the materials used, but also in their parameters. These include:
- standard glider model with a footrest, in which the bench can be pulled out in different ways;
- a folding bed in which the footrest is a direct extension of the seat;
- advertiser equipped with built-in support;
- massage chairs.
Each model has its own characteristics and is also available in numerous colors and sizes.
With footrest Massage Folding
Most popular options
Before you take on the chair project and make it yourself, you need to study the existing types. There are several product concepts depending on consumer needs:
- With radius runners. The first version of the rocking chair that appeared in everyday life. It gained popularity due to its simplicity of design and technology. In most cases, it has a low landing due to unstable balance when swinging. At large amplitudes, capsizing is possible. To avoid this, the runners are made with a closing horizontal arc.
- With runners of variable curvature. Their main advantage is the inability to tip over. Suitable for creating rocking cradles, as they guarantee safety and comfort.
- Armchair nirvana. There are two types: spring and elliptical. Rolling is smooth in both cases. However, there is a big difference in production and use. Spring models require special materials: high-quality wood or spring steel. In addition, they are unsafe and inconvenient to use. The gap between the skid and the spring becomes clogged with dirt and your fingers can get caught in it. Options on ellipses do not guarantee tipping over, but have a very light and pleasant rocking motion. The problem can be solved by installing bumpers. Elliptical rockers with an awning never tip over.
- Rocking chair 3 in 1. The name speaks for itself. The chair includes a rocking chair, an armchair, and a lounger. The main advantage is versatility. The disadvantage is the large dimensions, which are not always possible in an apartment. In addition, the transition from one mode to another may be accompanied by unpleasant shocks.
- Pendulum on bearings. An improved version of the classic chair. The difference lies in the fixed base and completely silent operation. Just like rocking chairs with runners of variable curvature, they are suitable for rocking small children.
The materials for making rocking chairs are varied and sometimes surprising:
Product selection rules
Choosing a quality glider is not difficult, since most models are of high quality. It is only important to know in advance why exactly the structure is being purchased, as well as who will be the regular user. Factors for the right choice are:
- the cost of the product, which depends on the existing mechanism, upholstery material and other parameters;
- the material of manufacture is an important parameter, since it is important that all components are made exclusively from safe, hypoallergenic components;
- fame and reliability of the manufacturer is an indispensable condition;
- it is important that the chair is wide enough so that you can sit comfortably in it;
- It is advisable to choose a high backrest so that you can lean your elbows completely on it, as a result of which it will follow the curves of the back;
- Models in which the backrest tilt is adjustable are considered an excellent choice;
- swinging and transformation should be carried out silently and smoothly;
- Before purchasing, be sure to study quality certificates and other documents from the manufacturer.
Thus, glider chairs are modern varieties of standard rocking chairs, which are distinguished by high comfort, attractiveness, and the presence of numerous pleasant functions. It is important to wisely choose a product that is suitable for the user, and also made from high-quality, durable materials.
Comfortable holiday in the country
Required tools and materials
To make a comfortable recreational device with your own hands, you will need:
- Disc sander with attachments of various grain sizes.
- Fraser.
- Jigsaw with wood saws.
- Screwdriver.
- Set of bits for a screwdriver.
- Set of wood drills.
- Clamps.
- Hammer.
- Brushes.
- Drying oil.
- Wood putty.
- Waterproof varnish for wood.
- Antiseptic for wood.
- Roulette.
- Measuring ruler with right angle.
- A simple pencil.
In order for a rocking chair made by yourself to be of high quality and last a long time, you need not only to try, but also to use materials with good characteristics. Buy:
- 12 confirmations 5x120 mm.
- 140 screws for wood 4x45 mm.
- Sheets of plywood 30 mm thick for the side parts and drawers (800x120 mm).
- Bar 50x25 mm.
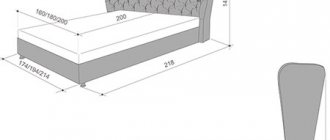
Before you start work, prepare the necessary preparations with your own hands. This is painstaking but easy work. Please study the drawing below carefully. Part of the side base is depicted on a grid, one step of which corresponds to 100 mm.
Cut out 3 drawers 800x120 mm from plywood. These slats will fasten the 2 sides of the rocking chair together. Use the drawing as accurately as possible to transfer the sidewall markings to the plywood. Cut it out with an electric jigsaw
The main thing is that both sides are identical. Therefore, it is better to make the second one using the first one as a pattern. Cut the prepared timber into pieces, the length of which is about 1200 mm. To effectively use the material when assembling a rocking chair with your own hands, calculate the exact length of the parts. There are 35 of them to be made in total.
Description of work
Carefully process the prepared timber and plywood blanks. To do this, use a grinder to make chamfers (round the corners and edges of the parts)
Sand all surfaces of the workpieces. Approximately, focusing on the drawing, we mark the places where the drawers are attached. One should be installed at the head, the second in the middle of the sides, and the third at the feet. To ensure that the holes on identical parts match completely, mark only one, then place one on top of the other. After fixing their position with clamps, drill through holes.
- You need to make holes: through holes in the side arcs - use an 8 mm drill, for the ends of the drawers - a drill with a diameter of 5 mm.
- Connect the drawers and side panels using confirmations.
- You can begin to prepare holes for fastenings on the bars, from which a place for lying or sitting will be made. To make the task easier and to apply the correct markings on both ends of the 35 parts, use a homemade stencil. Take a piece of timber, use a 30x3.5 drill with a countersink, drill a sample in it - two holes, the diameters of a pencil. Then simply apply the finished stencil to the parts and make marks.
- Drill holes on the bars.
- When attaching the bars to the ends of the base with 4x45 screws, use the same strips, which will allow you to maintain the same distances (about 15 mm) between the installed bars. First, drill a hole through the block at the end of the sidewall with a 3 mm drill, only then make the connection with self-tapping screws.
- Start decorating the rocking chair. First, you should cover all the recesses with screw heads with putty. This will make the seat smoother, more comfortable, and will also protect the metal parts of the fastenings from moisture. After the putty has dried, sand the surface with a sander.
- Treat the product with a special antiseptic composition. Afterwards, cover its surface with three layers of waterproof varnish, taking breaks to allow complete drying. This will increase the service life.
This piece of garden furniture, which you made with your own hands, is not only original and useful, but also beautiful. Sew or purchase a thin mattress and several pillows for him. And if you slightly reduce the original dimensions, you can build a similar fashionable rocking chair for your home with your own hands.
Creating a design
A wicker chair should be durable, the basis of which will be proper manufacturing. The procedure for forming the skeleton of the structure is as follows:
- Assembly begins with a wooden base. The frame often looks like a single element that includes the seat and back of the rocking chair. The support legs are attached to it with self-tapping screws.
- To strengthen the structure, cross strips are mounted between the front and rear legs.
- Armrests and other elements are installed on the chair body using self-tapping screws, according to the drawing.
- After the frame components are securely fixed, the temporary fastening is removed.
Braid construction
This fascinating process begins when the frame is completely assembled. The braiding procedure includes the following steps:
- Gives softness to tires. To do this, use a cylindrical shape, over which they throw the vine, pull it a little and pull it several times in different directions.
- Coating the braid with two-component glue or PVA. After this, the body of the chair is woven.
- Winding the frame in three rods. This will strengthen the fastening of the structure and also facilitate the process of internal weaving, which is performed in different ways: single, openwork or combined.
- Braiding the body using several techniques: braid, checkerboard, simple linear method, etc.
When the braid is ready, support skis and supports are attached.
Installation of runners
To increase the service life of the rocking chair, it is recommended to install runners that are wear-resistant. The procedure is as follows:
- Turn the structure upside down.
- Heat the skis with a hairdryer, place them on the runners one by one and wrap them along the entire length with cotton tape.
- After the pads have cooled and taken the desired shape, glue them to the runners, first removing the fabric. For high-quality fastening, secure the ends of the planks with nails.
- Allow the glue to harden for 48 hours, after which remove the nails and replace them with self-tapping screws. Cover the installation areas with a mixture of glue and sawdust.
Final Steps
The finished structure is treated with an antifungal agent and liquid that will prevent the appearance of wood pests.
To increase moisture resistance, special varnishes with water-repellent characteristics are used. Before coating with a protective agent, the product is given the required shade. To do this, use stain or paint.
The finished rocking chair will bring beauty, comfort to your home and will become a favorite relaxation spot for every family member.