Furniture made from environmentally friendly materials will never lose its popularity, however, in search of new forms and design solutions, interior design specialists are increasingly turning to plywood rather than natural wood. This material is ideal, as it allows you to produce not only durable and environmentally friendly furniture, but also experiment with shapes and product lines - plywood is easy to cut.
Despite the apparent simplicity of appearance, this material creates a special atmosphere in modern minimalist interiors. Making furniture from plywood is a fascinating process that even a beginner can handle. Today’s article is about the properties of materials and the features of working with them.
Making furniture from plywood
Features of the material
Before you start working with plywood, it is advisable to have an idea of the features of this unique material - this will allow you to properly make furniture that will last for many years. The advantage of plywood is that it is easy to work with; it does not require the use of expensive special tools for processing.
The main features of plywood include the following:
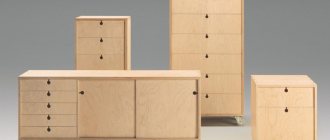
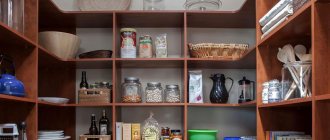
- Low cost, which allows you to independently produce functional, practical and aesthetically attractive furnishings for little money: children's furniture, shelving and cabinets, cabinets and chests of drawers, kitchen furniture, decorative screens and partitions.
- To make unique furniture from plywood you do not need to have any special skills.
- Plywood is an ideal material for making children's furniture, as it is environmentally friendly and safe.
- Plywood can be decorated in various ways, which significantly expands the range of products.
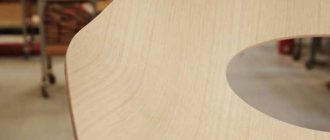
Natural pattern on the surface of plywood furniture - The performance characteristics of the material indicate its resistance to mechanical stress and moisture, high strength and durability.
- When treated with modern means, plywood becomes more resistant to fire.
Plywood has different thicknesses, which allows you to choose the required material depending on the purpose of the part
General information
Of course, it is much easier to place an order and receive ready-made plywood furniture, but there are also plenty of reasons to make it yourself. We are one hundred percent sure that no store can offer you such budget and original interior items! Moreover, in order to make furniture, put your soul into this process and show creativity, it is not at all necessary to turn into a carpenter or joiner.
Advantages and features of plywood
Before you start making furniture parts, you should familiarize yourself with some of the features and properties of plywood sheets:
- + special expensive tools are not required for plywood processing
- + its price is so attractive that absolutely everyone can afford such a plywood table, chair or even a kitchen set
- + plywood board belongs to the category of environmentally friendly materials, therefore it is allowed for use in children's rooms
- + it takes paints, enamels and stains well, which allows you to fit furniture into an interior decorated in any style
- + finished products are durable and resistant to moisture
- + it bends easily, which allows you to implement the most daring design solutions based on it
- + plywood is ideal for creating pieces of furniture at home, since its processing does not require highly specialized knowledge
What are plywood sheets made of?
The structure of the material is a multi-layer “pie” of the thinnest layers of wood, bonded together with an adhesive composition. During its production, each layer of veneer is laid perpendicular to the previous one and sent under a press, thanks to this trick the plywood is quite strong.
The manufacturer cuts the finished plywood board into sheets of different sizes.
Which plywood to buy for homemade furniture?
Before choosing material for plywood furniture, you need to familiarize yourself with the markings and designations that divide plywood into types.
Plywood grade
This parameter indicates the level of moisture resistance of the sheet and possible areas of its application. To make furniture, you need to choose the FK, FKM or FOF marking.
Plywood grade
The breakdown into grades according to GOST is carried out in accordance with the appearance of the sheet surface. On the label it is indicated by Roman numerals from I to IV (each layer is sorted separately).
Top layer processing quality
On the label it is indicated as follows: Ш1 - sanding only on one side of the sheet, Ш2 - sanding the sheet on both sides. The combination of letters ШН means that this sheet was not processed with a sander.
Degree of environmental friendliness
It is indicated on the label as the letter E with a number from 1 to 3. Indicates the level of formaldehyde contained in the material.
Sheet thickness
Another indicator is the thickness of the sheet. When choosing, focus on what function the part being created will perform. For example, to make a rigid frame or shelves, plywood no thinner than 1.8 cm is suitable. It is recommended to make plywood facades no more than 1.2 cm thick. Cabinet doors, reinforced with stiffening ribs, can be made of 6 mm material.
When purchasing plywood at a hardware store, examine the sheets from all sides, evaluate the quality of gluing the layers, and check all the markings. Each piece has a unique wood pattern that can be played well in the interior. When purchasing, it is better to choose plywood made in Russian factories. Many years of production experience only affects the quality of products for the better.
What to look for when choosing plywood
Veneer made from coniferous or birch wood is used to make plywood. Coniferous plywood is characterized by a more attractive appearance and strength. Veneer sheets are glued together at high temperature and pressure, forming a monolithic slab of a given thickness. In this case, each layer is laid perpendicular to the previous one - this makes the plywood resistant to deformation.
Birch plywood
Plywood can be sanded or unsanded, and, depending on its performance properties, is divided into several categories.
Table 1. Plywood categories
| Appearance of material and markings | Description |
| The front layer of this moisture-resistant laminated plywood has a special coating in the form of PVC film, which provides additional protection against moisture. |
| FSF | Formaldehyde resins are used for gluing sheets, so this material is not desirable for making furniture, despite the fact that plywood of this brand is highly moisture- and wear-resistant. |
| This type of material has a wide range of applications. FC plywood is durable, moisture-resistant and environmentally friendly, therefore it is widely used for interior design and furniture manufacturing. |
| When making bakelite plywood, a varnish composition of the same name is used, with which each sheet of veneer is impregnated, and then all layers of the slab are glued together using it. The material is characterized by unique performance qualities: strength, durability, resistance to deformation, and aggressive substances. This type of plywood is environmentally friendly, so it can be used for making children's furniture. |
| To glue veneer in the production of this type of plywood, natural albumin-casein glue is used, making the material environmentally friendly and safe. However, the moisture resistance of FBA plywood is low. |
Note! The safest is plywood made in accordance with safety certificates E1 and E0.
The thickness of plywood sheets varies from 1.6 to 76 mm; sheets with a thickness from 6.4 to 19 mm are more often used.
Adviсe
Don't rush and don't be upset if the result is a little disappointing the first time. To do everything beautifully and quickly you will have to learn. Of course, this is not a matter of one day, but when you already have enough experience, you will be able to make any interior elements from almost any materials.
The most important thing is to just take your time and carefully consider your every action. And of course, you shouldn’t forget about safety rules, since carpentry work is always associated with some risk. But don’t be afraid, if you are attentive and careful, accidents can be avoided. Start with simple ones and gradually move on to more complex tasks. Then you can become a real craftsman for whom decorating your interior will not be a problem.
Methods for processing plywood
Regardless of your skill in working with wood and materials made from it, it is necessary to study in advance how to cut plywood, since making furniture from it involves cutting parts in accordance with the drawing. The nuance is that the sheet of plywood must be cut without tearing. You can use different tools for this, but most often parts are cut out of plywood using a jigsaw, which is the cheapest available device. A high-quality result largely depends on a correctly selected file.
To reduce the formation of wood dust when cutting material, connect the jigsaw to a vacuum cleaner
To avoid chipping at the cutting site, you can do it in two ways: first cut the line with a stationery knife or stick tape on both sides of the marking and make the cut with a jigsaw.
Method of cutting through tape and the result
If the equipment is equipped with a pendulum stroke, it must be turned off.
The pendulum stroke regulator is set to the value “0” Cutting results with the pendulum stroke turned on and off
Some jigsaws are equipped with an anti-splinter insert. To install it, the jigsaw is unplugged!
Operating principle of an anti-splinter insert for a jigsaw
The design of this attachment is such that the jigsaw file moves inside the limiting slot.
Blade movement when using a stopper
The result of cutting plywood with a jigsaw with an anti-splinter insert
Table 2. Reasons why it is not possible to make a straight cut
| Image | Description |
| Reason 1 | The jigsaw sole is not perpendicular. |
| Reason 2 | The material is thick, and the jigsaw is not powerful enough to cut. |
| Initially, the position of the file in an inexpensive jigsaw is crooked. |
| Excessive pressure on the jigsaw during cutting. |
| Reason 5 | Dull saw blade. |
Operating rules
When using plywood interior items, you should remember the following.
- It is necessary to exclude exposure to moisture. Otherwise, the plywood will begin to delaminate and the furniture will become unusable.
- If the piece of furniture is made of thin material, you cannot place heavy things on it. This will lead to deflection of the loaded element, which in the future is almost impossible to straighten. And if the plywood is not of very high quality, it may even break.
- Place things on plywood products with the utmost care. Veneer is a sensitive material, so careless handling can cause dents. Of course, they can be sealed with wood putty, but it will not look nice.
Preparation for the manufacture of plywood furniture
You can start making furniture from plywood after you have acquired all the necessary tools and materials. During the work you will need the following:
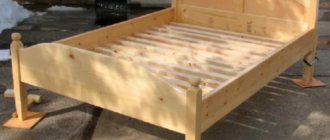
- Plywood sheets. The thickness of the plywood sheets used depends on the upcoming load on the part and its purpose. To make a durable frame and shelves, 18 mm thick material is used. For a façade, a thickness of no more than 12 mm is sufficient. The doors of wall cabinets, which are fixed using stiffening ribs, can be made of plywood 6 mm thick.
- Fasteners To ensure reliable and effective fastening of individual structural parts to each other, special fasteners are used - visible and hidden. Screws are used to fasten individual parts. Using glue or silicone sealant, you can additionally secure individual structural elements.
- An important element of furniture is fittings, which are used to ensure the functionality of the structure and form its decorative appearance. These include: handles, canopies, closers, wheels, limiters.
- Materials for decorative finishing: varnish, stain, film, putty.
- Tools you will need: jigsaw, measuring tools (tape measure, square), clamp and cross clamp, sandpaper, screwdriver.
Tools
Tool used
The manufacture and installation of interior partitions from plywood is carried out using a regular set of finishing tools:
- electric drill;
- perforator;
- jigsaw;
- angle grinder (aka “grinder”, “fortune”);
- hammer;
- carpenter's knife;
- set of chisels.
A hand router and a vibrating sander will be useful in this work. Of all the grinding devices used today, it is the one that allows you to do the job most accurately.
Step-by-step instructions for making simple furniture items from plywood
It is recommended to start making plywood furniture with the simplest designs, gradually acquiring and improving the skill of working with this material.
Rocking chair
Making your own rocking chair will be an excellent option to try your hand at carpentry. And you shouldn’t be afraid that the furniture will have some flaws - imperfections can be hidden with the help of painting or decorative textiles.
Table 3. Making a rocking chair
| Illustration | Description |
| Plywood | To make such a chair you will need plywood sheets with a thickness of 15, 10 and 4 mm. |
| Stage 2: making a sketch. | First you need to make patterns for cutting out parts. The pattern drawing is made on thick paper or cardboard on a scale of 1:1. |
| Stage 3: cutting out parts | The patterns are cut out and with their help the contours of the part are transferred to plywood sheets, trying to fit them as economically as possible. |
| Stage 4: preparation for assembly | The parts are cut out using a jigsaw. Holes for fastening are immediately made in the required places. Before you begin assembling the product, all parts must be thoroughly sanded. You will immediately need to prime and paint the parts. |
| Stage 5: making the seat and backrest | To make the back and seat, plywood strips are used, which are fixed with glue on thin sheets of plywood 4 mm thick. |
| Stage 6: frame assembly | First, the frame of the product is assembled. |
| Stage 7: Assembling the seat and backrest | After this, the back and seats are fixed. The attachment points are masked with strips. |
Finished rocking chair
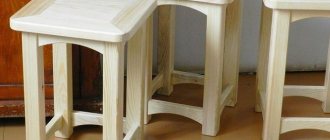
Plywood stool
A stool is an easy-to-make and versatile piece of furniture. To make it from plywood you will need the following.
Table 4. Making a stool
| Illustration | Description |
| On plywood 20 mm thick, 200 mm wide and 430 mm long, mark the leg of the stool. It is recommended to think through the shape of the legs in advance by completing a sketch drawing. The part is cut out using a jigsaw. It is used as a template for making three more of the same parts. |
| The part is cut out using a jigsaw. It is used as a template for making three more of the same parts. |
| Step 3: Sanding | The cut parts are polished. |
| Step 4: making the seat | The seat measures 320 x 320 mm. Having cut out a square, use a jigsaw to make the corners rounded. |
| Step 5: Sanding the Seat | The seat is sanded on top and at the ends. |
| All parts are processed with a semicircular cutter, which can be replaced with sandpaper. |
| The cutter is also used to process the legs of the future stool. |
| Step 8: Preparing for Assembly | Make holes for self-tapping screws. |
| Step 9: preparing holes for screws | Then, using a drill of a larger diameter, the holes are countersunk so that the fastener heads are recessed when screwed in. |
| Start assembling the product. To prevent delamination of the plywood, the parts are drilled with a No. 3 drill and the screws are tightened. |
| Step 11: Fixing the Legs | Fastening the legs crosswise is very strong due to the fact that each leg will be held on by 4 screws. |
| The legs are installed on the lid and markings are applied so that a hole for a self-tapping screw is located in the center of each leg. |
| Holes are drilled in the lid according to the markings. The holes are countersunk. |
| The product is assembled using self-tapping screws. |
| After the product is assembled, the holes are puttied and varnished. |
Nightstand
A bedside table is considered easy to make. You can do it yourself as follows.
Table 5. Making a bedside table
| Illustration | Description |
| The cutting of the material is carried out according to the drawing and the selected dimensions of the parts. To prevent the plywood from cracking when cutting, you can place a couple of sheets of polystyrene foam underneath it. |
| For edging the parts, strips cut from 4 mm plywood are used. The protruding excess is removed with a milling cutter. |
| Then the edges are sanded. |
| To assemble the bedside table, birch furniture dowels 8 x 40 are used. Holes are drilled for them. |
| Step 5 | Dowels are driven into the holes. |
| Step 6 | Assemble the frame of the cabinet by inserting dowels into the holes, pre-lubricating them with glue. |
| When assembling boxes, a tenon joint is used. |
| Step 8 | To do this, the workpiece is marked for a tenon joint. |
| The holes are cut according to the markings using a jigsaw. |
| Step 10 | And then gouge it out using a chisel. To avoid the formation of chips, the inner side is lightly pounded, and the front side is completely knocked out. |
| Step 11 | In the place where the bottom is attached from six-millimeter plywood, the part is milled. |
| When assembling the box, the grooves are lubricated with glue. |
| The façade is secured with self-tapping screws. |
| Step 14 | Guides are fixed inside the cabinet and on the sides of the drawer. |
Table 6. Making the base of the cabinet
| Illustration | Description |
| Step 1 | To make the base, use 4 parts with edges beveled at 45 degrees. |
| Step 2 | The frame parts are fixed with dowels and glued together. |
| The end of the part and the dowel inserted into the previously prepared hole are lubricated with glue. |
| The structure is pulled together and left to dry. |
| Step 5 | The legs are glued and fixed to the base. |
| Step 6 | Edges are glued to the ends of the base. |
| The edge is smoothed with a router. |
| A chamfer is removed along the perimeter of the base. |
| The base is sanded. |
Table 7. Product assembly and painting
| Illustration | Description |
| Step 1 | The boxes are coated with colorless parquet varnish. |
| Step 2 | The frame is assembled using dowels and PVA glue. |
| Painting is carried out in two times - the first layer is applied with a brush, the second with a spray. |
| Step 4 | At the final stage, the product is coated with oil and hard wax. |
Video - DIY plywood bedside table
How to make a cabinet
Nowadays, homemade cabinets made from sheets of plywood are very popular among modern designers and property owners. You can make such furniture using the following materials and tools:
- sheet plywood;
- screwdriver and screws;
- four blanks for legs. You can prepare it yourself from wooden blocks;
- special glue for fixing wood.
To create the base of the bedside table, you will need to take four pieces of plywood of the required size. Furniture plywood blanks should be 15 by 45 centimeters for the side components, and 45 by 45 cm for the lower and upper bases. All elements are produced in duplicate.
A bedside table is considered easy to make. You can do it yourself in a short time.
The side panels are fixed to the bottom base using wood glue. The upper part of the cabinet with the prepared frame is fastened in the same way. The legs are connected to the base with self-tapping screws.
If desired, you can coat the finished furniture with varnish or paint.
Methods for decorating a plywood surface
Once the product is assembled, you can begin decorating it. In some cases, it is enough to coat the plywood with a protective matte transparent varnish - this will preserve its shade and pattern. In other cases, surface finishing methods are used that change the original shade of the product - oil treatment, painting.
Bright colors highlight the original shape of children's furniture
Bright, rich shades are used when dyeing when the shape and color of the product dominate.
A birdhouse made of plywood is an excellent opportunity to simultaneously take care of birds and practice carpentry. A homemade bird house can decorate the balcony of a multi-storey building or a garden plot. The work process is simple, you just need to follow the rules and recommendations. We will talk about them in a special article.
A set of children's furniture made of plywood
One of the original ways to decorate furniture made of plywood is the decoupage technique. This method of decoration is relevant for furniture in the style of vintage, Provence, and shabby chic. Using this technology, you can diversify the appearance of furniture with a simple shape.
It is worth noting that the “decoupage” technique is simple to perform and does not require special skills: the base is primed, a pattern is glued on top and varnished.
Decor made using the decoupage technique
Table 8. Decoration of a plywood tabletop
| Illustration | Description |
| Step 1 | The surface of the table top is sanded using sandpaper. |
| Step 2 | Prime the surface using white acrylic paint. The primer must be applied with a brush in two layers. |
| Step 3 | When the soil dries, its top layer is leveled by grinding. |
| The prepared surface is covered with paint of the selected shade. |
| Painting tape is applied around the perimeter of the tabletop to mark borders. |
| Step 6 | The borders are painted in the required color and after the paint has dried, the tape is carefully removed. |
| Step 7 | The tabletop is covered with lace fabric, which is fixed with clothespins. |
| The tabletop is painted with contrasting spray paint through the lace, which is left on the surface of the tabletop until the paint has completely dried. |
| Step 9 | After removing the lace, the tabletop is coated with several layers of transparent varnish. |
Final finishing
For beginners, the subtleties of work sometimes cause difficulties. To avoid repeating common mistakes, you need to follow the recommendations of experienced builders:
- It is better to spray paint wide areas of the structure.
- It is more convenient to handle medium-sized surfaces with a roller.
- Multifaceted, shaped elements and hard-to-reach corners can be painted over with a paint brush.
- To work with paints and varnishes, use a foam roller, this way you can avoid lint residue from fur devices.
- To ensure uniform coloring, work is carried out in the longitudinal direction of the plywood fibers.
- Apply the second coat of paint after the previous one has dried.
Attention! In order to get a rich color as a result of the work done, it is not necessary to apply a thick layer of paint. Two treatments are enough.
An original carved product for the living room or bedroom
If the master wants to achieve a perfectly smooth glossy finish, the partition is opened with high-quality varnish. The final layer is applied with a sprayer, which allows you to evenly cover the surface. If you don't have one, a regular roller will do. Hard-to-reach areas are coated with a brush. After the manipulations have been completed, the wall must be allowed to dry.
More interesting and educational information on this topic is presented in the video: