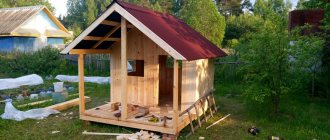
Sometimes it’s nice to do something yourself at the dacha, and a beautiful, roomy gazebo made from pallets with your own hands (photo below) will not be an exception to the rule. Even if you are not very well versed in the selection of materials or the construction process, you can believe that there is nothing complicated about it. Especially if you use available materials, for example, ordinary pallets. The gazebo looks stylish and attractive, and the process of assembling it does not take much time - ideal for novice builders.
Advantages and disadvantages
There are many advantages to using pallets. The following factors are usually mentioned:
- open design of the gazebo (free air circulation in the gazebo has a beneficial effect on health, it is pleasant to be in it even on the hottest days)
- affordability (pallets can be made from boards yourself, you can purchase used options - all this will not cost that much)
- environmentally friendly construction (by the way, when using pallets as construction raw materials, try not to choose pallets marked IPPC, the wood of which is coated with chemicals).
Choosing pallets
Below is a classification of the most common products.
Euro pallet sizes
Pallets: 1 - “Euro size”, 2 - “Euro standard”
The length and width of the wooden container can be different (for a certified Euro pallet these dimensions are 120 and 80 cm, respectively), the standard height is 14.5 cm.
Finnish and American pallets
Dimensions of the Finnish pallet
The length of the final pallet is 120 cm, the width is 100 cm. When building a gazebo from American-style pallets, consider other dimensions: 120 x 120 cm.
American pallet sizes
Whatever choice is made, the advantages of such a building are obvious:
- The environmentally friendly material will not cause harm to health, will organically fit into the countryside exterior and provide comfort.
- The design allows sunlight and fresh air to pass through, creating a feeling of unity with nature.
- You can build a gazebo from pallets with your own hands. Even for a novice master it will take 2-3 days.
New pallets, purchased and used
As mentioned earlier, significant savings can be achieved by using pallets as raw materials for construction. This especially applies to the choice between new pallets and already used ones. The challenge for the most industrious is to make the pallets yourself. Which of the three options can be considered the best? Let's try to figure it out.
Naturally, the cheapest option would be to choose already used pallets. At the same time, you will have to spend quite a lot of effort on them: you will have to partially patch them up - drive in nails where necessary or sand them properly. In addition, used products can emit an unpleasant smell of old wood, which is not so easy to get rid of on your own. And yet, if you have the opportunity to get several pallets for free, then you shouldn’t refuse - you have every chance to make not only a gazebo out of pallets (fences made from pallets, for example, look great on a summer cottage).
If you decide to put together pallets yourself, it will be much cheaper than purchased ones, and in addition, you can be absolutely sure of the quality of your gazebo - it will last a very long time if you choose good wood.
Preliminary activities
Before you start building, you must develop at least an indicative drawing of the future structure. This way it will be possible to correctly calculate the amount of materials and finishing needed.
When creating a drawing, it would be more rational to proceed from the dimensions of the pallets. Since the most common dimensions are 120x80 cm, it is better to lay the gazebo with a base of 240x240 or 360x360 cm. With such dimensions it will be more convenient for you to work without having to cut the pallets to the required size.
When choosing a place for a gazebo, be guided by your preferences and the capabilities of the site. For example, if you want to place a barbecue there, then you will have to build a structure with a larger area, away from the fence, and think through a smoke exhaust system. If you will be building near a pond or on clay soil, then it is recommended to build the building on small piles.
It is advisable to place the entrance to the building in the south or southwest direction.
First you need to make a drawing
DIY gazebo made from pallets - photos and instructions
However, no matter what type of pallets you choose, the result will be positive in any case. The gazebo will not only decorate the site, but will also become a cozy place for friendly gatherings on summer evenings. During the day, you can find shelter from the hot rays of the sun without running into the house - an excellent compromise. And the best part is that you can build a similar gazebo from pallets with your own hands (example photo below) in just a day or two! Now we will tell you how to do it correctly.
In order to build a gazebo from wooden pallets with your own hands, you need to draw up a plan that you should strictly follow.
So, step by step we go from the first point to the last:
- Choosing building material
- Thinking over the appearance of the gazebo
- Making a drawing
- We directly build a gazebo
- We decorate the gazebo
Tools
Initially, you need to make sure that you have the necessary tools:
Bucket
Level
Roulette
Gloves
Hammer Trowel Shovel
Screw keys
Screwdriver
Materials:
timber
Capscrews Nails Gravel
Sand
Pallets
Cement Ruberoid Slate
Choosing a location on the site
The first step is to take care of the place on the site where you want to install the gazebo. To do this, you need to clear the selected area, remove stones and grass. If the ground on the site is uneven, then you need to level it (for this, crushed stone or just earth is used). Leveling the ground is especially important if you want to lay the floor directly on top of the ground. We, however, would not recommend going this route, because the proposed option is not the most durable - it is better to make something similar to a wooden pedestal, a base on which to place the gazebo.
After bringing the area into the desired form, you can apply preliminary markings using pegs and rope.
Project
Having prepared for construction, do not forget to turn to the best assistant - your own imagination. It's time to invent a pallet gazebo project.
Having used such a word, we were not mistaken - creating a gazebo is like a construction set, and therefore it becomes possible to show maximum ingenuity. In particular, this applies to the interior decoration of the gazebo: you can knock down a table and benches from pallets. It is recommended to create furniture immediately before installing the gazebo. Having thoroughly figured out what kind of gazebo you would like to see on your site, proceed to the next stage - the drawing.
Drawing
Don't worry about the fact that you are not very good at drawing - any, even the most basic graphic editors will come to the rescue. Your task is not to accurately document the entire layout of the gazebo, but to visualize it as correctly as possible on the site. It is proposed to create a drawing of a gazebo made of pallets, taking into account the structural sections - this will be clear and useful for you in the further implementation of the project.
Foundation
Let's start working on the site - we build the foundation of the gazebo from pallets with our own hands (photo below). Choosing the type of foundation depends largely on the amount of time you want to spend on construction. If the task is to do everything as quickly as possible, then the best option is to place concrete blocks on the compacted earth. Laying the brick pillars will take a little time. The longest option is pouring concrete columns (it should be noted that this type of foundation is the most reliable)
Please note that soft soils require the installation of a simple strip foundation - which will slow down the work somewhat (you will need to wait for the cement mortar to harden).
It is necessary to lay a base of timber along the perimeter of the foundation, and all this must be secured to the foundation with screws (anchor bolts are also suitable). The base is secured to each other with strapping.
Fastening the first pallet
You need to use only high-quality boards for the base - they bear the most impressive load. If you put a protective film under the base, this will help protect the foundation from moisture.
Walls and floor
Once we have the bottom strong part, we can start installing the corner posts. They are placed in the corners, in the front part on both sides of the entrance, on the rest - above the support posts. They need to be connected at the top with strapping.
Important: the racks must be placed strictly vertically, otherwise the gazebo may sway.
After all the racks are installed and secured, you need to work on the top trim. It is best to strengthen the strapping with corners - this way you will reduce the likelihood of breaks. After this, the floor boards are laid.
Important: the boards that will be used to cover the floor must be pre-treated with an anti-rotting agent - otherwise the gazebo may sag.
If according to the project you have a middle frame, then after laying the floor, proceed to this stage.
The walls of the gazebo made from pallets can be made up of either one row of pallets or several (depending on what design of the gazebo was chosen). Wall panels are fastened using cap screws or anchors. Sometimes nails are also used - this is a less reliable, but completely acceptable option.
Roof
The last thing we do is make the roof of the gazebo from pallets. The choice of material is yours - it can be roofing felt, polycarbonate, tiles. Each of the materials has its own advantages and disadvantages: the tiles look attractive, but laying them will take a lot of time; It is easiest to cover with roofing felt, but the appearance of the roof will be extremely specific; polycarbonate is the middle option. The roofing pallets themselves are not very suitable, but they can be disassembled and the boards used to lay the roof.
Decoration and operation
Having erected a gazebo, you can easily move on to the final and, probably, the most enjoyable stage - decorating and decorating the gazebo from pallets. The purpose of this stage is not only to put the gazebo in order visually, but also to ensure its long-term existence. To do this, cover the floor of the gazebo with a composition for durability, and then you can paint the floor or fill it with varnish.
The walls can either be left in their original wooden beauty, or covered with acrylic paints (here your imagination can play as you like).
If you want to change the color of the gazebo after the fact of its construction, use stain or special wood paint. The stain will help highlight the natural shade of the wood.
In any case, it is recommended to varnish the walls - this will protect them from pests and maintain an attractive appearance for a long time.
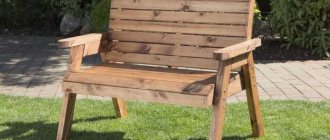
You can decorate the gazebo by hanging decorative curtains or several flowerpots on the windows. Inside the gazebo you can put benches on which it would be nice to throw a few colorful pillows. A small table would be a great addition.
Decoration
If you plan to spend evenings in the gazebo, then it is most logical to install electricity there (do not forget to insulate the wiring so as not to create flammable situations). A beautiful addition to the gazebo will be a wooden or stone path leading to it. To lay such a path, you will need leftover pallets.
Preparation of material
A gazebo cannot be erected without first preparing the main building material. What should be done:
- Check all prepared material for integrity and strength. Broken products need to be repaired or disassembled into separate whole boards, which can be useful during construction.
- Clean the selected pallets from dirt and make the surface of the wood uniformly clean and sanded. To do this, the boards need to be either sanded or treated with a grinder or an appropriate attachment on a drill/grinder.
- Treat with protective agents. The wood must be coated in several layers with special antiseptic and water-repellent impregnations. Then the pallets must be left to dry until completely dry.
- Give pallets a finished look. They can be painted or treated with stain, whichever you prefer.
The last point can be done either at the preparatory stage, or after the gazebo is completely built.
Detailed diagram of creating a coffee table
Assembly requires 1 pallet and a minimum of tools. You will need to buy a special tint for wood, a primer, paint of a suitable color and 4 carved legs, which are also made of wood. For fastening you will need hardware, nails and screws.
- Any pallet must have an upper and lower plane. One is made flat, there should be no gaps between the boards. The final result looks like this - only the top plane with 6 intermediate bars should remain of your pallet. Every 3 bars are fixed with a separate board.
- Before nailing the purchased legs, they need to be coated with a primer and then painted with paint - preferably from a spray can.
- The upper plane and side elements are tinted, after which the legs are installed.
By spending a minimal amount of money, you can build a full-fledged table using the most ordinary pallets. In the future, it can be placed indoors or taken outside.
Foundation
The choice of foundation is also carried out at the design stage and depends on the design features and the type of soil on which the structure is being built. You should not repeat the mistakes of the “reckless builder” from the parable, who built the house on the sand. For clay soils, a pile foundation is suitable.
A steel pipe with blades at the end will easily enter the ground and provide adequate structural strength in adverse weather conditions. Cartilaginous soils will require a simple strip foundation. This option will extend the construction by several days required for excavation and hardening of the cement mortar.
Briefly about the main thing
Pallets have long been successfully used as a building material for the manufacture of lightweight summerhouses. To decorate a garden with such a design, you need to choose a high-quality container, sand it, treat it with an antiseptic and paint it. Ignoring these steps will shorten the life of the building. Construction includes preparation of drawings, construction of the foundation, walls and roof. At the finish line, furniture is made and the gazebo is decorated to taste.
Question
Write in the comments what you think - is it worth additionally priming the surface of the wood before painting?
Construction process
Building a gazebo with your own hands begins with installing a base in the shape of a pedestal, as can be seen in the photo. The future structure will be located on this basis. The best option in this case may be outdated boards that do not need to be thoroughly cleaned. In this case, it is not at all necessary to build a very high base. The pallets placed at the very bottom will be protected from rot by the platform on which the structure stands.
The next stage is installation of the frame, as shown in the video. The future appearance of the gazebo, built with your own hands at the dacha, depends on the design of the frame. There are several types of construction:
- solid;
- from two walls;
- consisting of columns.
In the first case, the space inside the gazebo will receive very little sunlight. You can make several windows, but this will not significantly change the situation. Thanks to the second method, the room will be provided with daylight and protection from rain. If the structure consists of columns, a magnificent view will open in all directions, but in the event of heavy slanting rain, the room will be flooded with water.
To ensure that the building is reliably protected from the wind, it is recommended to install pallets or pallets in two or three layers. The wall and ceiling elements are nailed to the frame, after which they are connected to each other. This option is the most suitable for those who want to build a reliable and durable gazebo structure in their country house.
It is worth noting that in the third case, if the project provides for the presence of columns, the pallets can be placed not only lengthwise relative to each other, but also across. It all depends on how the main elements of the building are located. Pallets must be attached to the supporting parts.
In cases where the gazebos are designed only for the summer season, and will be dismantled with the onset of cold weather, it is possible to install only partial sheathing. Additional protection is provided by fabric or other protective materials that cover the roof surface. As soon as autumn arrives, the roof can be easily removed and the remaining structure disassembled.
Room interior
Furniture, also constructed from pallets, is often placed in the gazebo. The most common designs are tables, coffee tables, etc. The material can be used not only as a table top, but also as legs, to which wheels can then be attached.
The finished table can be painted to match the color of the room or simply varnished. In any case, the wood requires additional processing so that the piece of furniture does not deteriorate in the future. Sometimes the wooden surface is replaced with durable glass, which makes the interior more modern. In this case, the legs can be made not ordinary, rectangular in shape, but also curly. By adjusting the height of the legs, a small coffee table can be turned into a full-fledged table, and thus the gazebo can be used as a small dining room.
https://youtube.com/watch?v=VDUgfyN43u8
Table
A special word needs to be said about the manufacture of the table, because it is, of course, the pride of the entire project.
To build it, bring 4 more pallets and, freeing them from the skis, connect the resulting elements together according to the following diagram.
Make 4 more “2/3” parts and install them on the previously assembled stand, screwing them immediately behind the hundredth board, symmetrically about the central axis.
As a result, you should have a design like this.
Attention! Don’t forget to not only twist the parts together, but also attach them to other elements of the gazebo. To make a table cover, you need to select four more good-quality pallets and move their outer legs 63 mm closer to the center
To make a table cover, you need to select four more good-quality pallets and move their outer legs 63 mm closer to the center.
Then completely dismantle the existing flooring and, adding several boards from broken pallets, assemble in its place a solid board with edges protruding four centimeters.
If you did everything correctly, the lid will fit tightly onto the prepared “leg”. All that remains is to secure it in place with screws and you will get an excellent table for the gazebo.
By the way, at this stage you should get a picture like this.
Preparatory work
First of all, you need to draw up a plan and drawing of what kind of gazebo it will be, what size and shape. Where will the garden furniture be located and what dimensions will it be? Calculate how much and what material will be needed, purchase everything you need.
There are a lot of self-tapping screws, so it’s better to buy them with a reserve, so they won’t be superfluous in the household.
Pallets purchased for construction need to be prepared:
- Inspect for damage, check for strength, then select the best ones. The rest can be disassembled into boards.
- Clean from dirt and wane.
- Pallets and individual planks from disassembly must be processed with a grinding machine.
- Wood needs protection from moisture, fungus and pests. To do this, it must be treated with a special antiseptic solution. If this is not done, the wood will darken and take on a not very beautiful gray color, and will also rot.
- It is better to paint the wood immediately, and not after the gazebo is ready. Waterproof wood paint is suitable, and if you want to leave the natural wood color, you can use stain. After painting, it is advisable to coat it with waterproof varnish.
The better the wood is processed, the longer the structure will retain its beautiful appearance. Prepare the necessary tool. Clear the area where you plan to build the gazebo from debris, bushes and tall grass.
What tools will you need:
- saw;
- hammer;
- axe;
- grinder;
- jigsaw;
- screwdriver;
- drill and drill bits;
- brushes;
- roulette;
- level;
- pencil.
It is better to use a power tool; it will save energy and make the work much easier and faster.
Drawing
After defining the architectural forms, it's time to put the gazebo design on paper. In this case, complete design documentation is not required, but it is highly desirable to make a drawing with structural sections of the structure.
Also, on the plan of the land plot, you can plot the contours of the future building to assess the general concept of landscape design of the territory. In the simplest graphic editors, you can make a 3D visualization of the gazebo and see what the structure will look like on the ground.
Drawing
We correlate the sizes with the number of family members and guests who will certainly come and appreciate our work. Drawing is a very important matter, you need to take everything into account:
- how many rows will there be at the base;
- how many pallets will be in a row;
- how many pillars are needed for the roof;
- will the entrance to the gazebo be determined by the doorway, or will the entire front part of the gazebo itself be an entrance;
- determine the angle of inclination of the roof;
- We decide how many rows there will be in our walls, one or two.
The drawing and calculations will give us enormous savings in materials, and therefore in money.
Design project
This stage opens up endless possibilities for creativity. The material chosen for construction is reminiscent of design elements, and accordingly, many design options are obtained.
This version of the gazebo illustrates that quite decent structures can be made from pallets, if only there was an idea.
Perhaps it will be a simple quadrangular house, “Baba Yaga’s hut” or a multifaceted gazebo consisting of six or more corners. Various modifications are available, limited only by the author's imagination.
Where to choose a location for installation
An important step in building a do-it-yourself flying gazebo is to choose the ideal location on the site. It must be cleared of stones, sticks, and pieces of wood and the tall grass must be mowed. Cover all uneven areas with soil and compact them thoroughly. This is an extremely important point when laying a floor on top of the ground.
Important! Experienced builders do not advise laying the floor on top of the ground, otherwise the building will not last long. It is necessary to lay the foundation for the building.
After cleaning the area, you need to mark the perimeter of the future gazebo with pegs and rope.